You can configure event notifications to track and monitor the status of DLC jobs, flow tasks, and DSW instances, or to automatically trigger downstream operations when the status of a model version changes.
1. Activate EventBridge and grant permissions (first-time configuration)
Before you create a notification rule for the first time, you must activate EventBridge and grant the required permissions.
To go to the configuration page, go to the Workspace Details page. After you enter the specified workspace, click in the upper-right corner.
1.1 Activate EventBridge
On the Event Notification Configuration tab, click Activate for Free to open the EventBridge activation page. For more information, see Activate EventBridge.

After activation, PAI automatically creates a custom event bus for each workspace named pai-system-${Workspace Name}. You can go to the EventBridge console, switch to the destination region, and view and manage the list of custom event buses.
1.2 Grant PAI permissions to access cloud resources
Click Grant Permission. The system automatically creates the service-linked role AliyunServiceRoleForPAIWorkspace to grant PAI permissions to access your cloud resources. For more information about this role, see Appendix: PAI Workspace Service-linked Role.
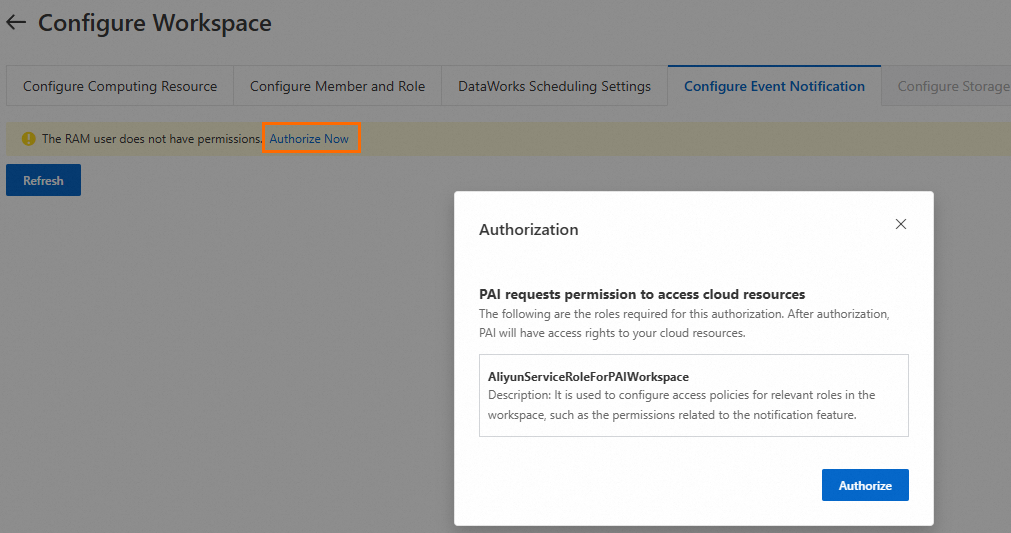
1.3 (Optional) Grant a RAM user permissions to configure event notifications
If you use a Resource Access Management (RAM) user to perform the configuration, you must grant the user permissions to operate EventBridge.
You can create a custom policy and grant permissions to the RAM user. The policy is as follows:
{
  "Statement": [{
    "Effect": "Allow",
    "Action": [
      "eventbridge:CreateEventBus",
      "eventbridge:GetEventBus",
      "eventbridge:DeleteEventBus",
      "eventbridge:ListEventBuses",
      "eventbridge:CreateRule",
      "eventbridge:GetRule",
      "eventbridge:UpdateRule",
      "eventbridge:EnableRule",
      "eventbridge:DisableRule",
      "eventbridge:DeleteRule",
      "eventbridge:ListRules",
      "eventbridge:PutEvents",
      "eventbridge:UpdateTargets",
      "eventbridge:DeleteTargets",
      "eventbridge:ListTargets"
    ],
    "Resource": "acs:eventbridge:*:*:eventbus/*"
  }],
  "Version": "1"
}
2. Create an event rule
After you complete the initial configuration, return to the Workspace Details page. On the page, click Create Event Rule to begin the configuration.
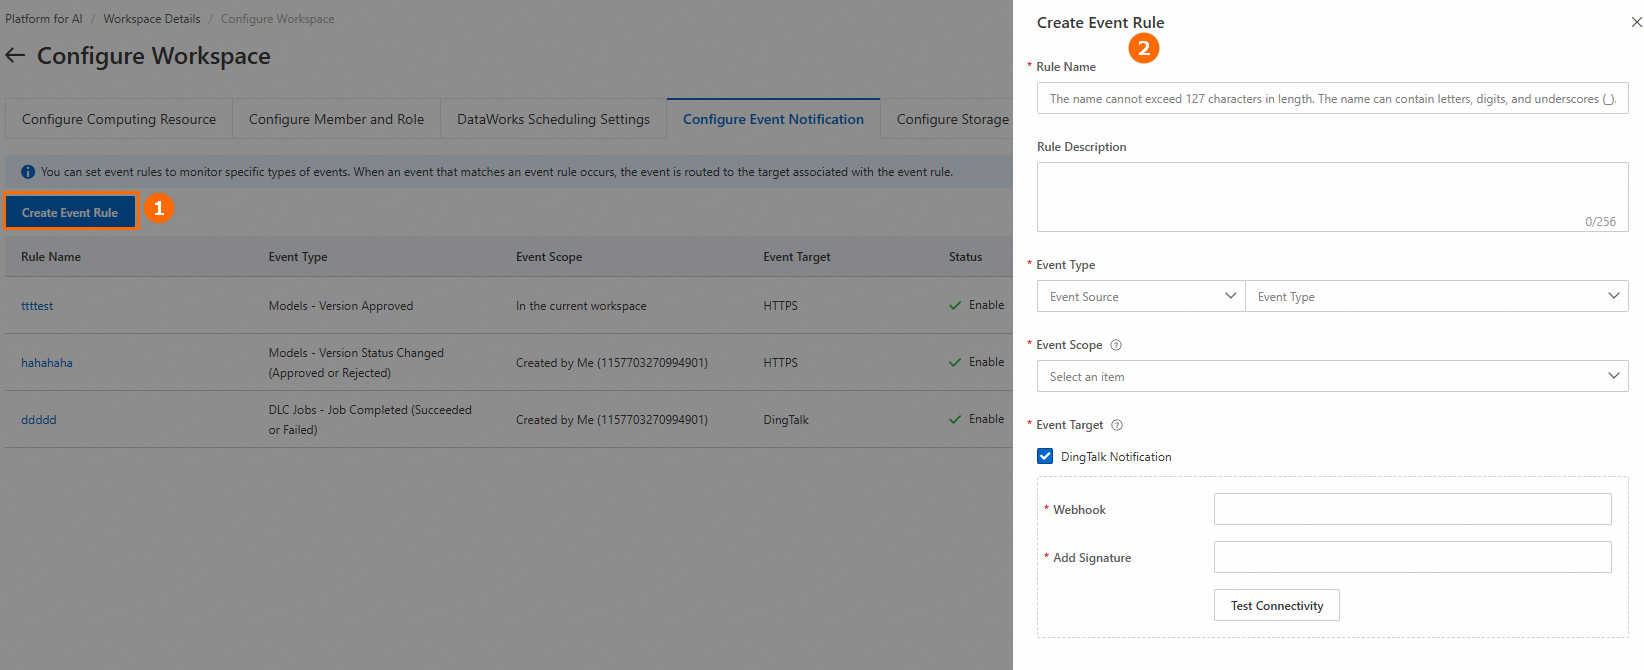
2.1 Configure event types
Select the event source and the specific event types that you want to monitor.
Flow task: Monitors the status of Designer flow tasks. Event types include Task Failed and Task Finished (includes success and failure).
DLC job: Monitors the lifecycle events of DLC jobs. Event types include job progress (such as entering the queue, starting bidding, starting to run, and job failed), automatic fault tolerance, job timeout (requires you to configure a timeout rule in the scheduling settings), and other events (such as job preemption and manual job stop).
Model: Monitors status changes of model versions in AI Asset Management. Event types include Model Version Approved for Publishing (status changes from Pending to Approved) and Model Version Status Changed (includes approved and not approved for publishing).
DSW instance: Monitors status changes of DSW instances and saved images. Event types include regular instance status changes (such as Creating and Instance Failed), image saving (such as Saving Image, Image Saved Successfully, and Image Save Failed), and instance shutdown (such as Instance Stopped and Stopping).
2.2 Configure event targets
You can configure the notification method and recipients for when an event occurs.
DingTalk notification: Configure a webhook and a signing key. For more information, see Appendix: Obtain a webhook and a key. After the configuration is complete, click Test Connectivity to verify the connection.
WeCom notification: Configure the webhook URL for WeCom message push.
Lark notification: Configure the webhook URL for a custom Lark bot.
HTTP/HTTPS: Automatically calls a specified URL when the status of a model version changes. This method applies only to the Model event type. The receiving API must parse the data according to the standard template.
Voice call, text message, and email: Sends notifications to specified contacts by phone call, text message, or email. This method does not apply to the Model event type. If no contacts are available, you must first configure the message receiving settings.
The default number of event targets for a single rule is 5. If this does not meet your needs, you can request a quota increase. Request a quota of no more than 100. Note: When you configure voice calls, text messages, or emails, each contact you add consumes one quota unit. Contacts are not deduplicated and are counted cumulatively. For example, if you add Alice and Tony as contacts for text messages and add Alice and Alan for emails, the total quota consumed is 4.
FAQ
Q: What should I do if I receive a ServiceNotEnable error when I go to the Event Notification Configuration page?
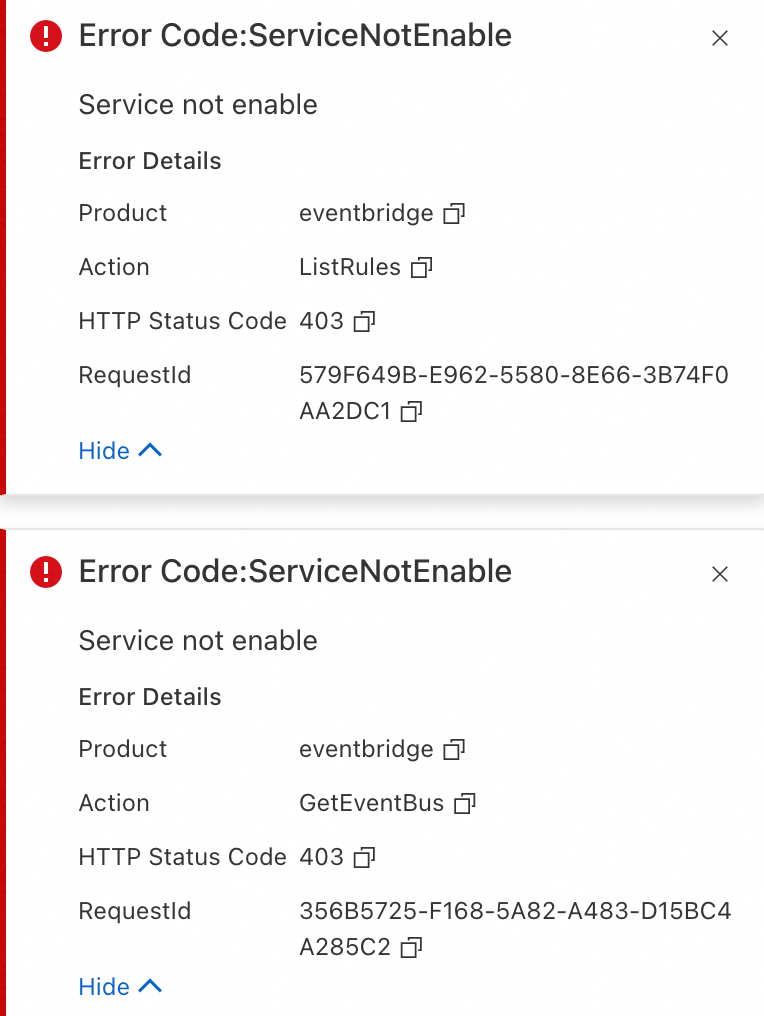
A: This error indicates that the EventBridge service has not been activated. You must first activate EventBridge.
Appendix: Obtain a webhook and a key
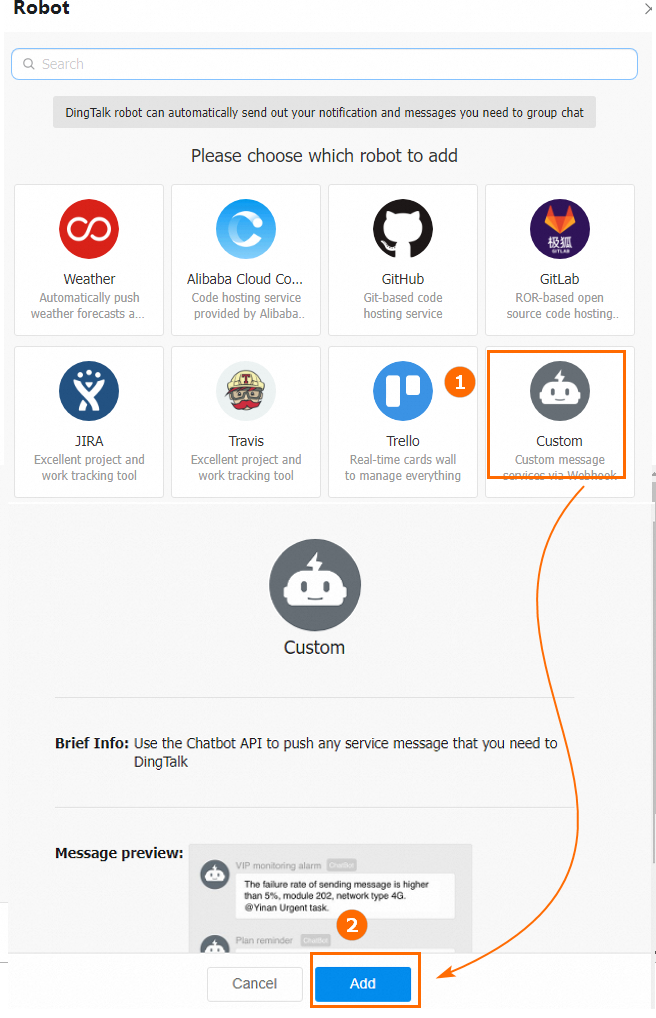
In the DingTalk group where you want to receive notifications, open the group bot dialog box as shown in the following figure.
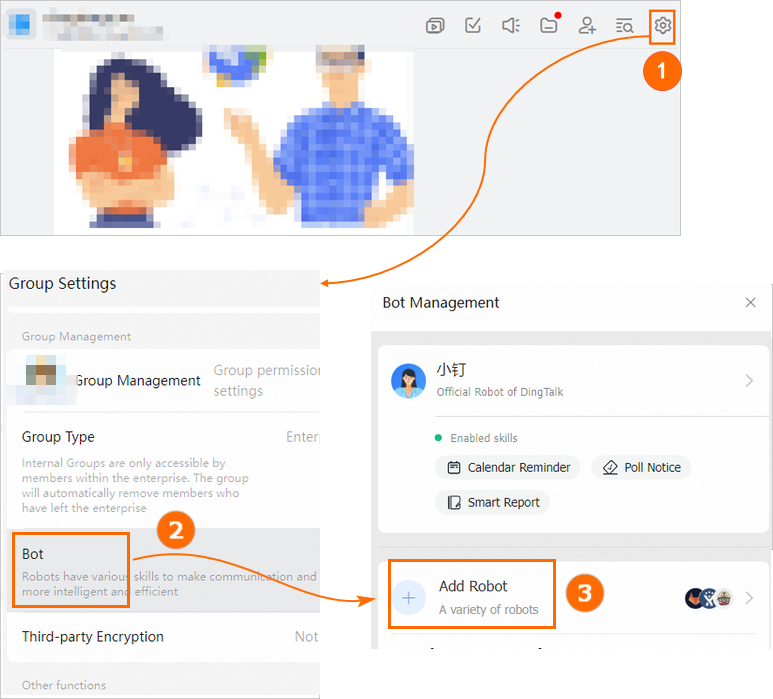
Open the Add Robot dialog box as shown in the following figure.
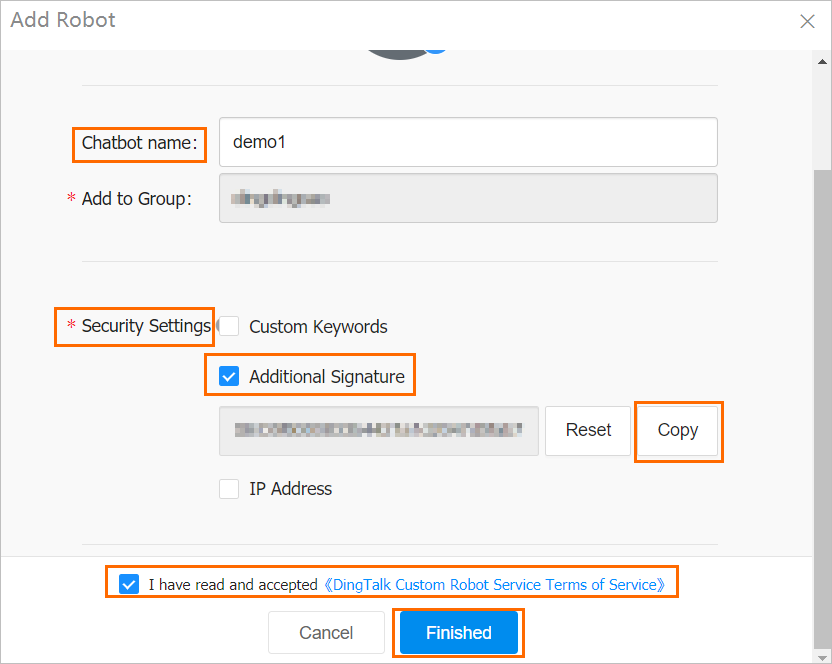
In the Add Robot dialog box, configure the required parameters, copy the key, and then click Finished.
ImportantSave the copied key for later use.
In the Add Robot dialog box, click Copy to copy the webhook and then click Finished.
ImportantSave the webhook for later use.
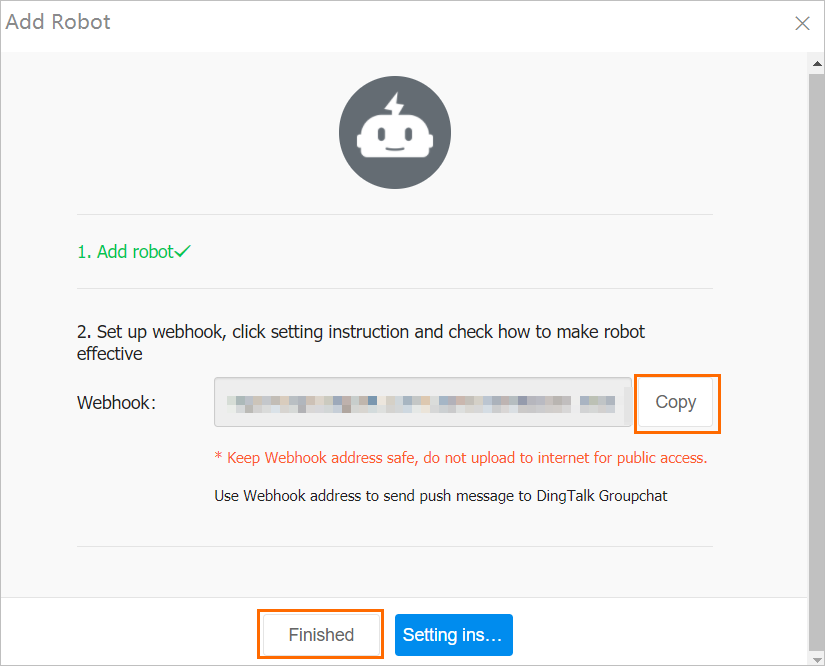
The key and webhook that you obtained in Step 3 and Step 4 are the values required for the Signing Key and Webhook fields when you create an event rule in the Event notification configuration section.