Access DSW instances from PAI console, navigate interface areas, and manage instance lifecycle operations.
Prerequisites
-
PAI workspace with at least one DSW instance.
-
Permissions to access workspace and operate DSW instances.
-
Correct region selected for your workspace.
Access DSW instance
The console provides visual interface to monitor and manage all instances. Console access is simpler than remote connection and does not require complex network or permission configurations.
-
Log on to the PAI console.
-
In the left-side navigation pane, click Workspaces. On the Workspace List page, click the name of the target workspace.
-
In the upper-left corner, select the region where the service is deployed.
-
In the left-side navigation pane, choose Model Training > Data Science Workshop (DSW).
-
Optional: Enter instance name or keyword in the search box.
-
In the Actions column for the target DSW instance, click Open.
-
Perform operations in the DSW interface.
Interface overview
The following figure and table describe interface areas.

|
Area |
Name |
Description |
|
1 |
Top menu bar |
Global controls and settings for the instance. |
|
2 |
Left-side toolbar |
Shortcuts to common tools and operations. |
|
3 |
Notebook tools |
Tools and options for working with notebooks. |
|
4 |
Instance configuration |
Instance configuration including basic information, image, and resources. |
|
5 |
Notebook |
Interactive programming environment to write and run code, read data, develop algorithms, and train and deploy models. |
|
6 |
WebIDE |
Browser-based integrated development environment. Supports all Notebook features and provides additional development tools. Create, edit, and run script files for complex software development without installing a local IDE. |
|
7 |
Terminal |
Command-line interface to install software packages, manage file system, access server resources, and run shell scripts. |
|
8 |
Resource Usage |
Current CPU and memory utilization of the instance. |
Manage instances
The following figure highlights common management operations.

View and modify instance details
Click the DSW instance name in Area 1 to open the instance details page.
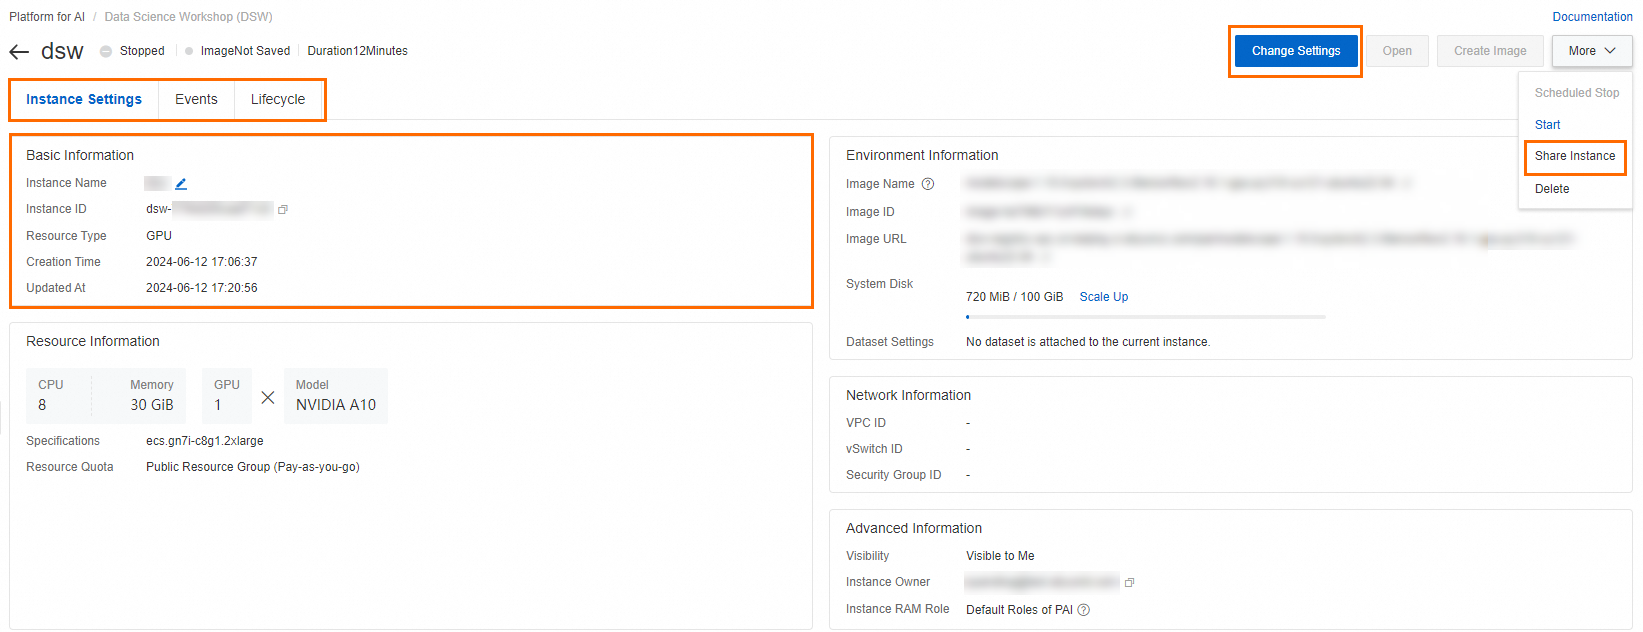
Available operations on the instance details page:
-
In the Basic Information section, modify the instance name.
-
On the Events tab, view events related to the DSW instance.
-
On the Lifecycle tab, view instance lifecycle details.
-
Click Share Instance to make the instance visible to other workspace members.
ImportantOnce public, an instance cannot be made private again.
-
Click Change Settings to modify resource details, environment information, and network configurations.
Copy instance ID
Area 2 displays the instance ID for copying.
View lifecycle and resource type
Hover over Area 3 to view instance lifecycle details and resource type.
Instance operations
Area 4 provides the following operations:
-
Open instance
Click Open to launch the development page.
-
Stop instance
Click Stop to stop a running instance.
Important-
Dedicated resource group without mounted dataset: The instance system disk serves as temporary storage. Stopping or deleting the instance permanently deletes data on this disk. Back up necessary data before stopping.
-
Public resource group: An attached free cloud disk saves the environment when stopped. If not restarted within 15 days, the system releases the cloud disk and its environment.
-
Expanded system disk billing: If you expanded the system disk when creating the instance, it continues to incur charges when stopped. To stop all billing, delete the instance. Back up necessary data before deletion.
-
-
Start instance
Click Start to start a stopped instance. Wait for Status to change from Starting to Running.
-
Click Create Image and follow on-screen instructions to save the current environment to a personal or enterprise Container Registry (ACR). Use this image to create new instances. For more information, see Create a DSW instance image.
-
Change configuration
Click Change Settings to modify resource details, environment information, and network configurations.
-
Configure scheduled stop
Click Scheduled Stop. In the dialog box, turn on Enable Scheduled stop and set a Stop the Instance At time. The instance automatically stops at the specified time.
NoteSet an automatic instance recycling policy in the Scheduling Center of the workspace.
Delete instance
Click ![]() and then Delete to delete the instance (Area 5).
and then Delete to delete the instance (Area 5).
Deleted instances cannot be recovered. Back up necessary data before deletion.