Use the PostObject operation to upload files directly from a browser to Object Storage Service (OSS), bypassing the application server as a relay. The application server generates a signature using temporary access credentials from Security Token Service (STS), and the browser POSTs the file directly to OSS using that signature. This keeps your long-term AccessKey pair on the server and out of the browser.
How it works

The upload flow involves three parties:
The browser requests signature information from your application server.
The application server calls STS to get temporary access credentials, then uses those credentials to compute a V4 signature and an upload policy.
The browser submits the file directly to OSS using the signature information, without routing the file through your application server.
Temporary access credentials from STS are scoped and time-limited. They prevent your AccessKey pair from being exposed in browser code or network traffic.
Prerequisites
Before you begin, ensure that you have:
An Alibaba Cloud account with permissions to create OSS buckets, RAM users, RAM roles, and ECS instances
A development environment for the application server language you plan to use (Java, Python, Node.js, Go, or PHP)
Demo projects
Download a complete working project to run locally or deploy directly:
Step 1: Prepare OSS resources
Create a bucket
Configure a CORS rule
Step 2: Configure the application server
If you already have an application server running, skip the ECS setup and go directly to Configure user permissions.
Set up an ECS instance (optional)
Create an ECS instance
On the Custom Launch tab of the Elastic Compute Service (ECS) console, configure the following:
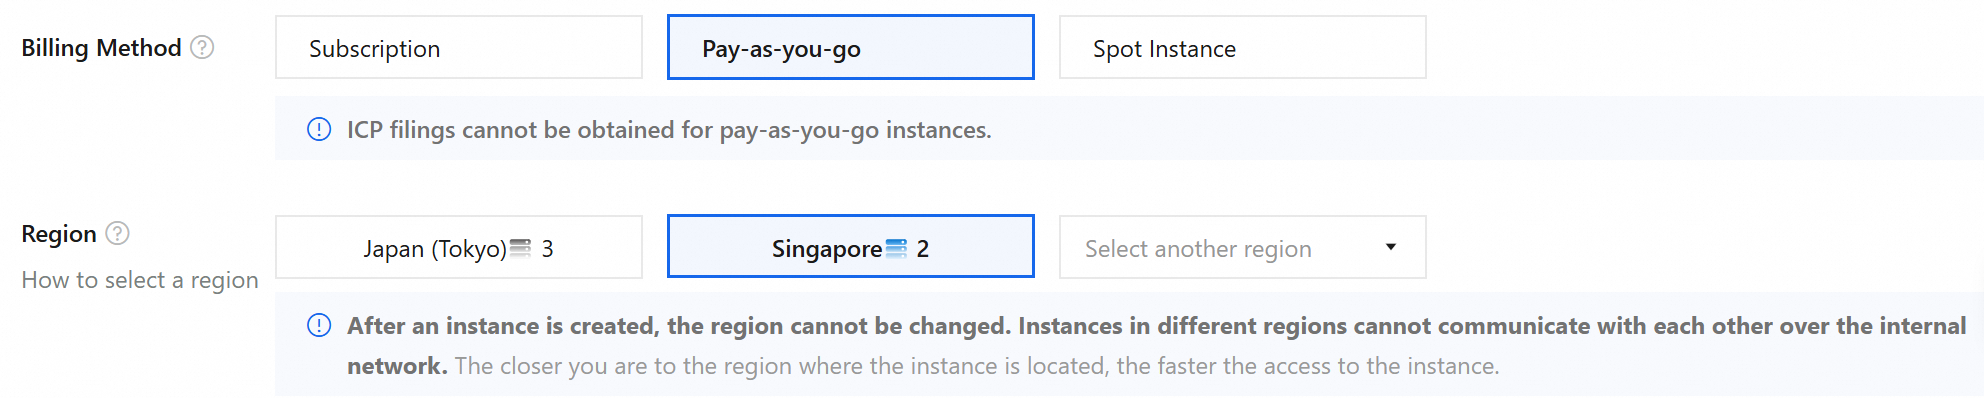
Select a region and billing method Select a billing method based on your requirements. This example uses Pay-as-you-go. Select a region close to your users to minimize latency. This example uses China (Hangzhou).
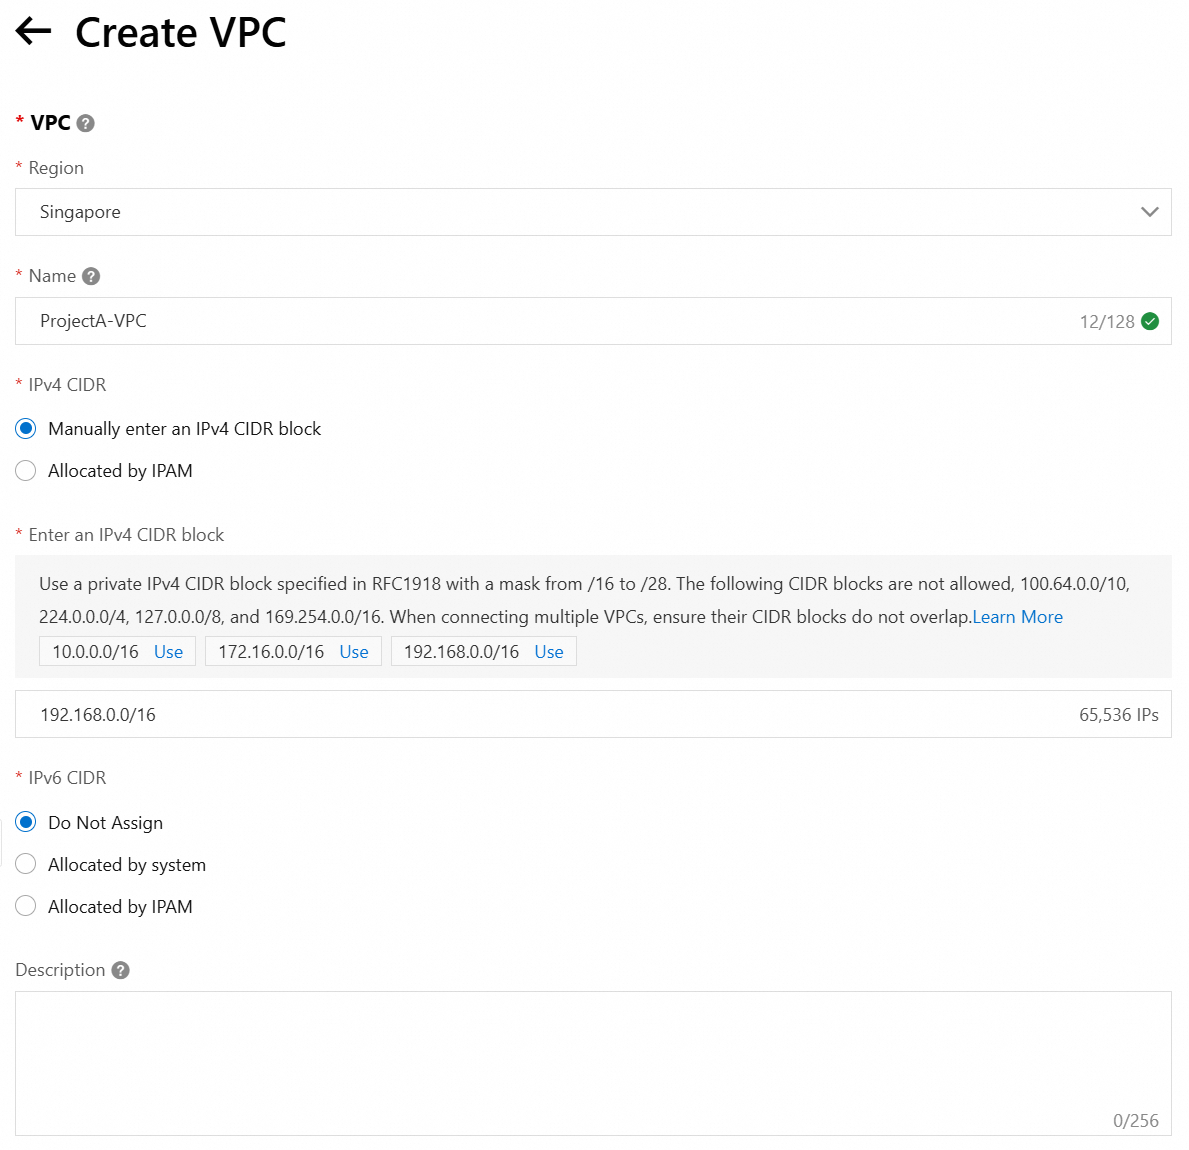
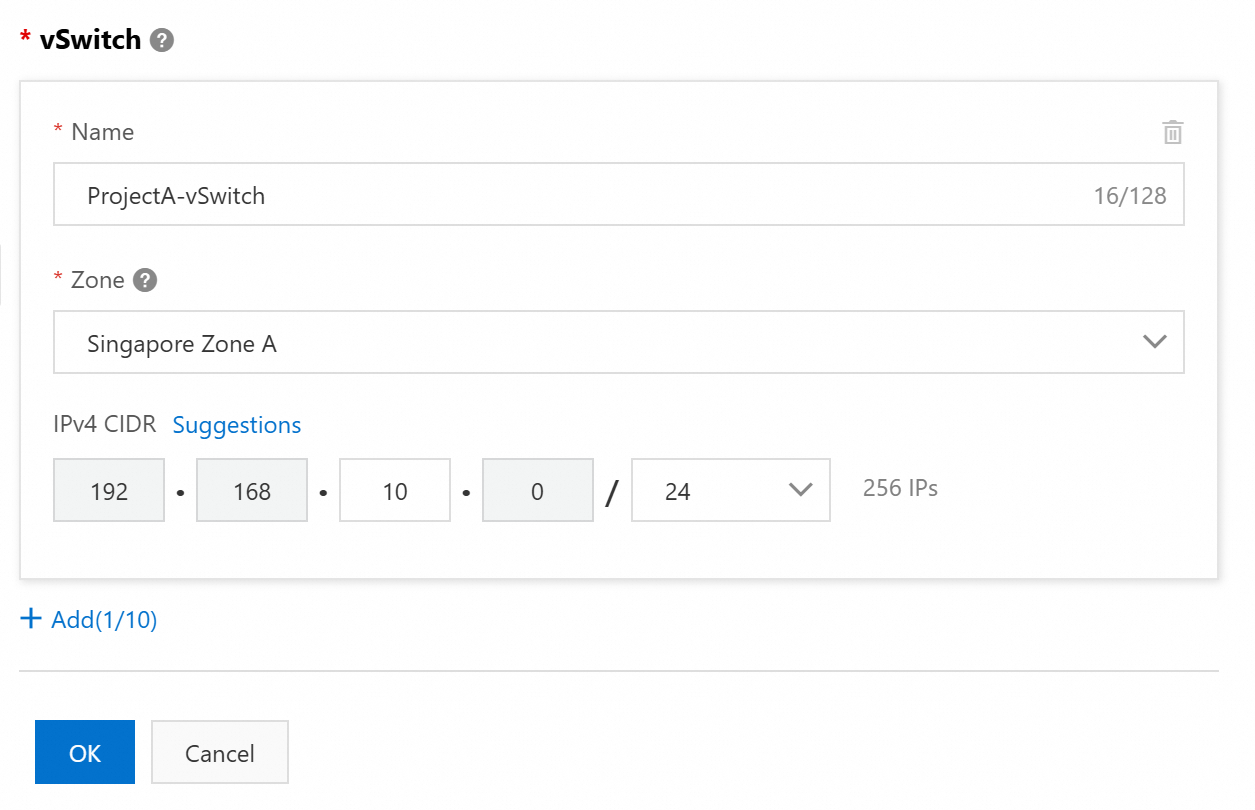
Create a virtual private cloud (VPC) and a vSwitch Create a VPC in the same region as the ECS instance and plan your CIDR blocks. After creating the VPC, return to the Custom Launch tab, refresh the VPC and vSwitch drop-down lists, and select the VPC and vSwitch you created.
You can create a vSwitch during VPC creation.

Select an instance type and image This example uses the
ecs.e-c1m1.largeinstance type and theAlibaba Cloud Linux 3.2104 LTS 64-bitpublic image.
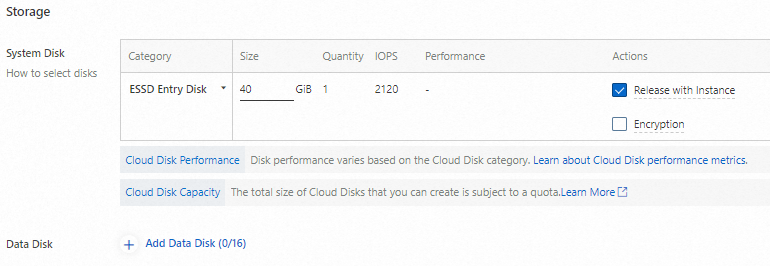
Configure storage For a lightweight web application, a system disk is sufficient. No data disks are needed.
Assign a public IP address Select Assign Public IPv4 Address to enable internet access. Set Bandwidth Billing Method to Pay-by-traffic.
- Without a public IP address or elastic IP address (EIP), you cannot connect to the instance over SSH or Remote Desktop Protocol (RDP), or test the web service from the internet. - For more information about pay-by-traffic billing, see Public bandwidth billing.
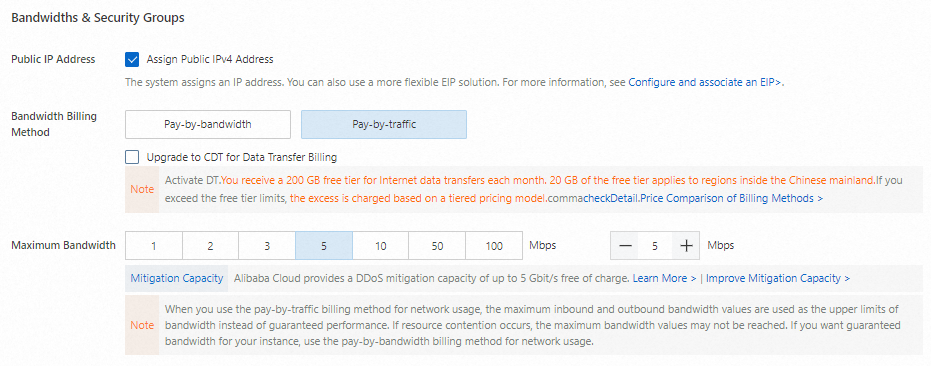
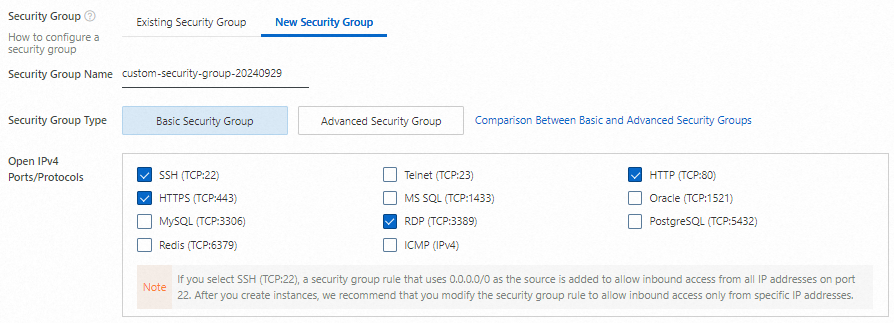
Create a security group Create a security group that opens the following ports: SSH (TCP:22), RDP (TCP:3389), HTTP (TCP:80), and HTTPS (TCP:443).
Selecting SSH (TCP:22) creates a rule that allows traffic from all IP addresses (0.0.0.0/0). After creating the instance, restrict this rule to specific IP addresses. See Modify a security group rule.
Create a key pair Create a key pair and download the private key (
.pemfile) when prompted. After creating the key pair, return to the Custom Launch tab, refresh the Key Pair list, and select the key pair. Selectecs-useras the logon username. Usingrootintroduces unnecessary security risks.The private key is downloaded automatically. Check your browser's download history to find the
.pemfile.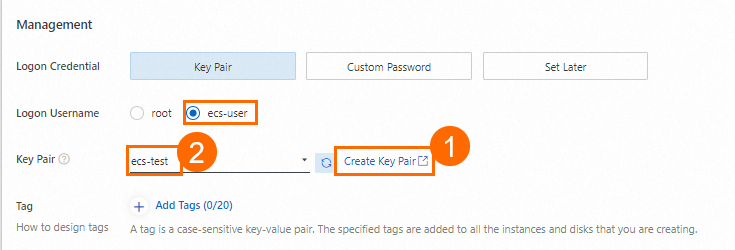
Complete instance creation Click Create Order. In the success message, click Console to view the instance. Note the following for later:
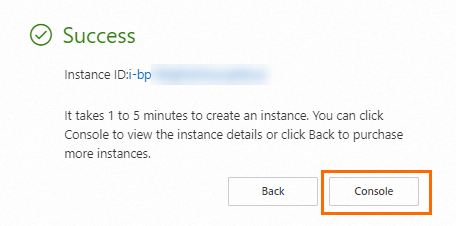
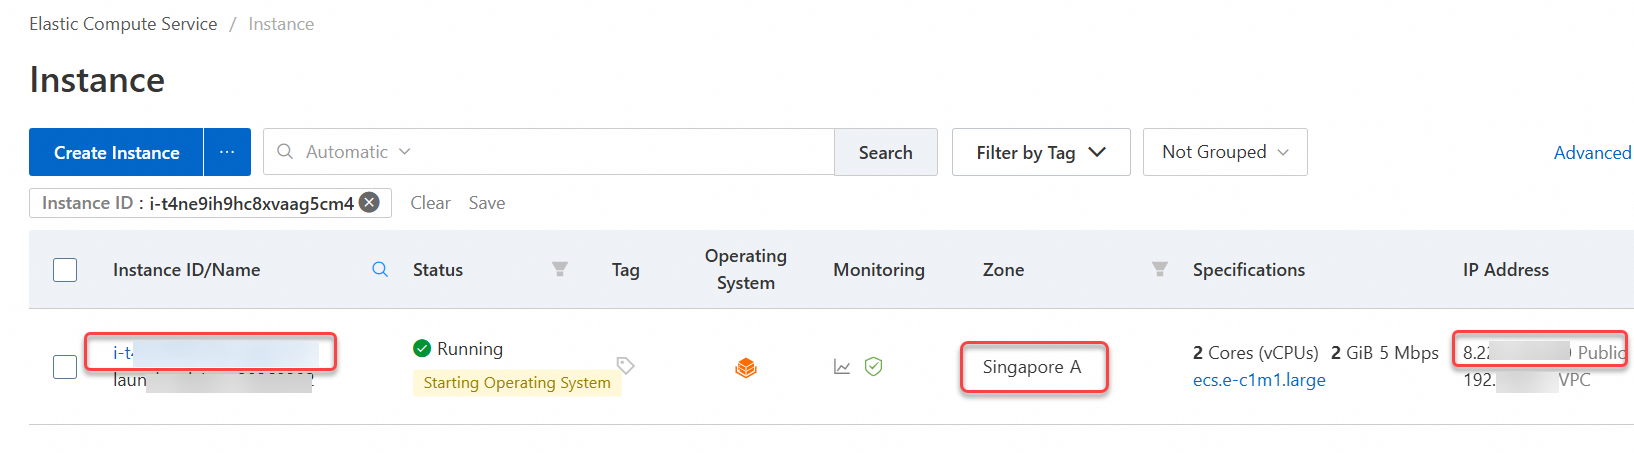
Instance ID
Region and zone
Public IP address
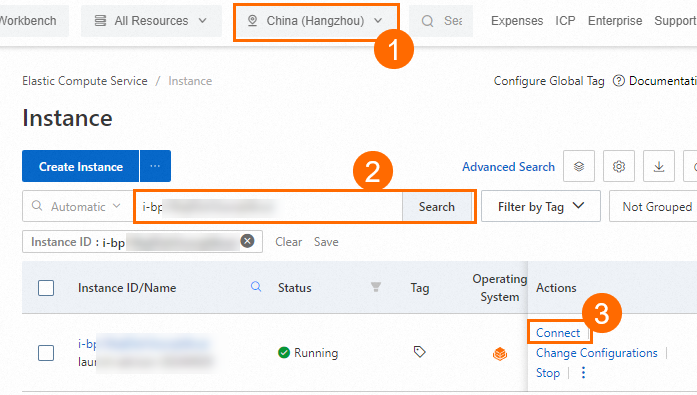
Connect to the ECS instance
On the Instance page in the ECS console, find the instance by region and ID, then click Connect in the Actions column.
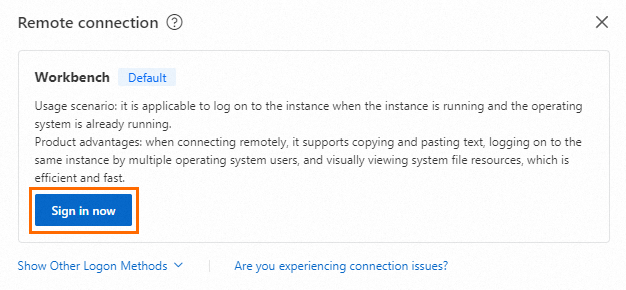
In the Remote connection dialog box, click Sign in now in the Workbench section.
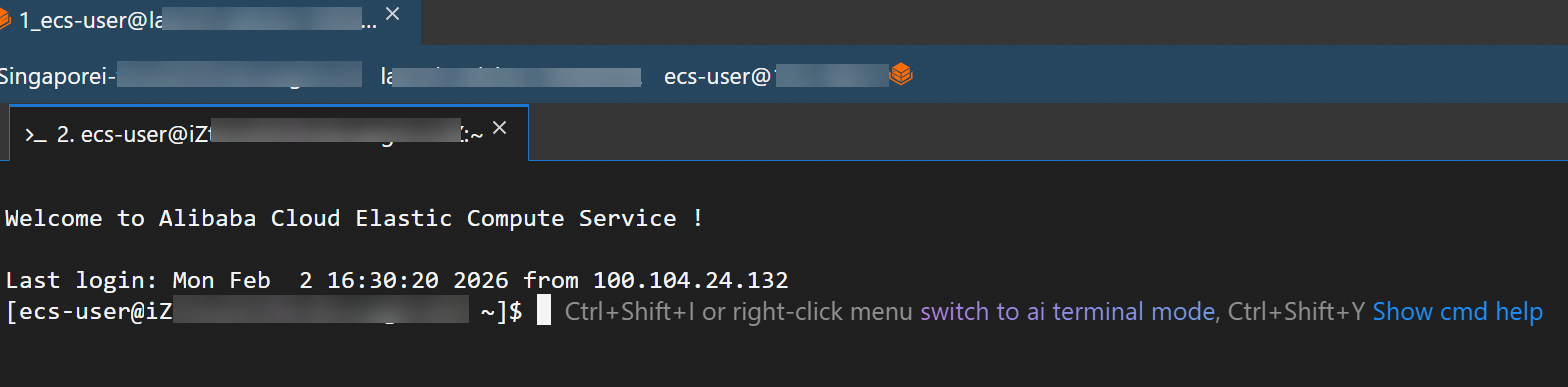
In the Instance Login dialog box, set Connection Method to Terminal Connection and Authentication Method to SSH Key Authentication. Enter or upload the private key you downloaded, and log on as
ecs-user.If a page similar to the following appears, you have successfully connected.
Configure user permissions
Set environment variables
Store sensitive credentials as environment variables rather than hardcoding them in your application.
Linux
echo "export OSS_ACCESS_KEY_ID='your-access-key-id'" >> ~/.bashrc
echo "export OSS_ACCESS_KEY_SECRET='your-access-key-secret'" >> ~/.bashrc
echo "export OSS_STS_ROLE_ARN='your-role-arn'" >> ~/.bashrc
source ~/.bashrc
Verify that the variables are set:
echo $OSS_ACCESS_KEY_ID
echo $OSS_ACCESS_KEY_SECRET
echo $OSS_STS_ROLE_ARN
macOS
First, check your default shell:
echo $SHELLZsh:
echo "export OSS_ACCESS_KEY_ID='your-access-key-id'" >> ~/.zshrc
echo "export OSS_ACCESS_KEY_SECRET='your-access-key-secret'" >> ~/.zshrc
echo "export OSS_STS_ROLE_ARN='your-role-arn'" >> ~/.zshrc
source ~/.zshrc
Bash:
echo "export OSS_ACCESS_KEY_ID='your-access-key-id'" >> ~/.bash_profile
echo "export OSS_ACCESS_KEY_SECRET='your-access-key-secret'" >> ~/.bash_profile
echo "export OSS_STS_ROLE_ARN='your-role-arn'" >> ~/.bash_profile
source ~/.bash_profile
Verify that the variables are set:
echo $OSS_ACCESS_KEY_ID
echo $OSS_ACCESS_KEY_SECRET
echo $OSS_STS_ROLE_ARN
Windows
setx OSS_ACCESS_KEY_ID "your-access-key-id"
setx OSS_ACCESS_KEY_SECRET "your-access-key-secret"
setx OSS_STS_ROLE_ARN "your-role-arn"
Open a new cmd window and verify:
echo %OSS_ACCESS_KEY_ID%
echo %OSS_ACCESS_KEY_SECRET%
echo %OSS_STS_ROLE_ARN%
Implement signature generation on the application server
All examples use OSS Signature Version 4 (OSS4-HMAC-SHA256). The application server calls STS to get temporary credentials, constructs an upload policy, and computes the signature in four steps:
Create the policy JSON.
Base64-encode the policy to produce the string to sign.
Derive the signing key using HMAC-SHA256 chaining:
date → region → "oss" → "aliyun_v4_request".Sign the string to sign with the derived key.
For details on the policy form field, see Signature version 4 (recommended).
Java
Add the following dependencies to your Maven project:
<!-- https://mvnrepository.com/artifact/com.aliyun/credentials-java -->
<dependency>
    <groupId>com.aliyun.oss</groupId>
    <artifactId>aliyun-sdk-oss</artifactId>
    <version>3.17.4</version>
</dependency>
<dependency>
  <groupId>com.aliyun</groupId>
  <artifactId>sts20150401</artifactId>
  <version>1.1.6</version>
</dependency>
package com.aliyun.oss.web;
import com.aliyun.sts20150401.models.AssumeRoleResponse;
import com.aliyun.sts20150401.models.AssumeRoleResponseBody;
import com.aliyun.tea.TeaException;
import com.aliyun.oss.common.utils.BinaryUtil;
import com.fasterxml.jackson.databind.ObjectMapper;
import org.apache.commons.codec.binary.Base64;
import org.springframework.http.ResponseEntity;
import org.springframework.stereotype.Controller;
import org.springframework.web.bind.annotation.GetMapping;
import javax.crypto.Mac;
import javax.crypto.spec.SecretKeySpec;
import java.time.*;
import java.time.format.DateTimeFormatter;
import java.util.*;
@Controller
public class WebController {
// The OSS bucket information. Replace the values with your actual information.
String bucket = "examplebucket";
String region = "cn-hangzhou";
String host = "http://examplebucket.oss-cn-hangzhou.aliyuncs.com";
// Specify the URL of the application server to which the upload callback request is sent. The URL must use the public domain name. This URL is used for communication between the application server and OSS. After you upload an object, OSS uses the URL to send upload information to the application server.
// The prefix of the names of objects uploaded to OSS.
String upload_dir = "dir";
// The validity period of the temporary credentials. Unit: seconds.
Long expire_time = 3600L;
/**
* The expiration time is calculated based on the specified validity period. Unit: seconds.
* @param seconds: the validity period, in seconds.
* @return: the time string in the ISO 8601 standard. Example: 2014-12-01T12:00:00.000Z.
*/
public static String generateExpiration(long seconds) {
// The current timestamp. Unit: seconds.
long now = Instant.now().getEpochSecond();
// The timestamp for the expiration time.
long expirationTime = now + seconds;
// Convert the timestamp into an Instant object and format it in the ISO 8601 format.
Instant instant = Instant.ofEpochSecond(expirationTime);
// Set the time zone to UTC.
ZoneId zone = ZoneOffset.UTC;
// Convert the Instant object into a ZonedDateTime object.
ZonedDateTime zonedDateTime = instant.atZone(zone);
// Define the date and time format. Example: 2023-12-03T13:00:00.000Z.
DateTimeFormatter formatter = DateTimeFormatter.ofPattern("yyyy-MM-dd'T'HH:mm:ss.SSS'Z'");
// Format the date and time.
String formattedDate = zonedDateTime.format(formatter);
// Return the result.
return formattedDate;
}
// Initialize an StsClient instance.
public static com.aliyun.sts20150401.Client createStsClient() throws Exception {
// If the project code is leaked, the AccessKey pair may be leaked and the security of all resources within your account may be compromised. The following lines are provided only for reference.
// We recommend that you use STS tokens, which provide higher security.
com.aliyun.teaopenapi.models.Config config = new com.aliyun.teaopenapi.models.Config()
// Make sure that the OSS_ACCESS_KEY_ID environment variable is configured.
.setAccessKeyId(System.getenv("OSS_ACCESS_KEY_ID"))
// Make sure that the OSS_ACCESS_KEY_SECRET environment variable is configured.
.setAccessKeySecret(System.getenv("OSS_ACCESS_KEY_SECRET"));
// Specify the endpoint of the region in which the bucket is located. For more information, visit https://api.alibabacloud.com/product/Sts.
config.endpoint = "sts.cn-hangzhou.aliyuncs.com";
return new com.aliyun.sts20150401.Client(config);
}
/**
* Obtain an STS token.
* @return AssumeRoleResponseBodyCredentials object.
*/
public static AssumeRoleResponseBody.AssumeRoleResponseBodyCredentials getCredential() throws Exception {
com.aliyun.sts20150401.Client client = WebController.createStsClient();
com.aliyun.sts20150401.models.AssumeRoleRequest assumeRoleRequest = new com.aliyun.sts20150401.models.AssumeRoleRequest()
// Make sure that the OSS_STS_ROLE_ARN environment variable is configured.
.setRoleArn(System.getenv("OSS_STS_ROLE_ARN"))
.setRoleSessionName("yourRoleSessionName");// Specify a custom session name.
com.aliyun.teautil.models.RuntimeOptions runtime = new com.aliyun.teautil.models.RuntimeOptions();
try {
// Write your own code to display the response of the API operation if necessary.
AssumeRoleResponse response = client.assumeRoleWithOptions(assumeRoleRequest, runtime);
// The AccessKey ID, AccessKey secret, and STS token that are required for subsequent operations are included in credentials.
return response.body.credentials;
} catch (TeaException error) {
// Handle exceptions with caution in actual business scenarios, and do not ignore exceptions in your project. In this example, exceptions are printed for demonstration.
// Display the error message.
System.out.println(error.getMessage());
// Display the URL for troubleshooting.
System.out.println(error.getData().get("Recommend"));
com.aliyun.teautil.Common.assertAsString(error.message);
}
// Return a default error response object instead of null.
AssumeRoleResponseBody.AssumeRoleResponseBodyCredentials defaultCredentials = new AssumeRoleResponseBody.AssumeRoleResponseBodyCredentials();
defaultCredentials.accessKeyId = "ERROR_ACCESS_KEY_ID";
defaultCredentials.accessKeySecret = "ERROR_ACCESS_KEY_SECRET";
defaultCredentials.securityToken = "ERROR_SECURITY_TOKEN";
return defaultCredentials;
}
@GetMapping("/get_post_signature_for_oss_upload")
public ResponseEntity<Map<String, String>> getPostSignatureForOssUpload() throws Exception {
AssumeRoleResponseBody.AssumeRoleResponseBodyCredentials sts_data = getCredential();
String accesskeyid = sts_data.accessKeyId;
String accesskeysecret = sts_data.accessKeySecret;
String securitytoken = sts_data.securityToken;
// Obtain the current date in the x-oss-credential header. The value is in the yyyyMMdd format.
ZonedDateTime today = ZonedDateTime.now().withZoneSameInstant(java.time.ZoneOffset.UTC);
DateTimeFormatter formatter = DateTimeFormatter.ofPattern("yyyyMMdd");
String date = today.format(formatter);
// Obtain the x-oss-date header.
ZonedDateTime now = ZonedDateTime.now().withZoneSameInstant(java.time.ZoneOffset.UTC);
DateTimeFormatter formatter2 = DateTimeFormatter.ofPattern("yyyyMMdd'T'HHmmss'Z'");
String x_oss_date = now.format(formatter2);
// Step 1: Create a policy.
String x_oss_credential = accesskeyid + "/" + date + "/" + region + "/oss/aliyun_v4_request";
ObjectMapper mapper = new ObjectMapper();
Map<String, Object> policy = new HashMap<>();
policy.put("expiration", generateExpiration(expire_time));
List<Object> conditions = new ArrayList<>();
Map<String, String> bucketCondition = new HashMap<>();
bucketCondition.put("bucket", bucket);
conditions.add(bucketCondition);
Map<String, String> securityTokenCondition = new HashMap<>();
securityTokenCondition.put("x-oss-security-token", securitytoken);
conditions.add(securityTokenCondition);
Map<String, String> signatureVersionCondition = new HashMap<>();
signatureVersionCondition.put("x-oss-signature-version", "OSS4-HMAC-SHA256");
conditions.add(signatureVersionCondition);
Map<String, String> credentialCondition = new HashMap<>();
credentialCondition.put("x-oss-credential", x_oss_credential); // Replace the value with your AccessKey ID.
conditions.add(credentialCondition);
Map<String, String> dateCondition = new HashMap<>();
dateCondition.put("x-oss-date", x_oss_date);
conditions.add(dateCondition);
conditions.add(Arrays.asList("content-length-range", 1, 10240000));
conditions.add(Arrays.asList("eq", "$success_action_status", "200"));
conditions.add(Arrays.asList("starts-with", "$key", upload_dir));
policy.put("conditions", conditions);
String jsonPolicy = mapper.writeValueAsString(policy);
// Step 2: Create a string to sign.
String stringToSign = new String(Base64.encodeBase64(jsonPolicy.getBytes()));
// System.out.println("stringToSign: " + stringToSign);
// Step 3: Calculate the signing key.
byte[] dateKey = hmacsha256(("aliyun_v4" + accesskeysecret).getBytes(), date);
byte[] dateRegionKey = hmacsha256(dateKey, region);
byte[] dateRegionServiceKey = hmacsha256(dateRegionKey, "oss");
byte[] signingKey = hmacsha256(dateRegionServiceKey, "aliyun_v4_request");
// System.out.println("signingKey: " + BinaryUtil.toBase64String(signingKey));
// Step 4: Calculate the signature.
byte[] result = hmacsha256(signingKey, stringToSign);
String signature = BinaryUtil.toHex(result);
// System.out.println("signature:" + signature);
Map<String, String> response = new HashMap<>();
// Add data to the Map object.
response.put("version", "OSS4-HMAC-SHA256");
response.put("policy", stringToSign);
response.put("x_oss_credential", x_oss_credential);
response.put("x_oss_date", x_oss_date);
response.put("signature", signature);
response.put("security_token", securitytoken);
response.put("dir", upload_dir);
response.put("host", host);
// Return the ResponseEntity object that includes the 200 OK status code to the web client. Then, the client can perform the PostObject operation.
return ResponseEntity.ok(response);
}
public static byte[] hmacsha256(byte[] key, String data) {
try {
// Initialize SecretKeySpec, set the algorithm to HMAC-SHA256, and use the provided key.
SecretKeySpec secretKeySpec = new SecretKeySpec(key, "HmacSHA256");
// Obtain a Mac instance and use the getInstance method to set the algorithm to HMAC-SHA256.
Mac mac = Mac.getInstance("HmacSHA256");
// Use the key to initialize the Mac instance.
mac.init(secretKeySpec);
// Calculate the HMAC value. Use the doFinal method to receive the data to be calculated and return the calculation result as an array.
byte[] hmacBytes = mac.doFinal(data.getBytes());
return hmacBytes;
} catch (Exception e) {
throw new RuntimeException("Failed to calculate HMAC-SHA256", e);
}
}
}Python
Install dependencies:
pip install flask
pip install alibabacloud_tea_openapi alibabacloud_sts20150401 alibabacloud_credentials
from flask import Flask, render_template, jsonify
from alibabacloud_tea_openapi.models import Config
from alibabacloud_sts20150401.client import Client as Sts20150401Client
from alibabacloud_sts20150401 import models as sts_20150401_models
from alibabacloud_credentials.client import Client as CredentialClient
import os
import json
import base64
import hmac
import datetime
import time
import hashlib
app = Flask(__name__)
# Configure the OSS_ACCESS_KEY_ID, OSS_ACCESS_KEY_SECRET, and OSS_STS_ROLE_ARN environment variables.
access_key_id = os.environ.get('OSS_ACCESS_KEY_ID')
access_key_secret = os.environ.get('OSS_ACCESS_KEY_SECRET')
role_arn_for_oss_upload = os.environ.get('OSS_STS_ROLE_ARN')
# Specify a session name.
role_session_name = 'yourRoleSessionName'
# Replace the values with your actual information.
bucket = 'examplebucket'
region_id = 'cn-hangzhou'
host = 'http://examplebucket.oss-cn-hangzhou.aliyuncs.com'
# The validity period of the temporary access credentials. Unit: seconds.
expire_time = 3600
# Specify the prefix in the name of the object that you want to upload to OSS.
upload_dir = 'dir'
def hmacsha256(key, data):
"""
The function calculates an HMAC-SHA256 value.
:param key: The key used to calculate the hash value. The key is of the byte type.
:param data: The data whose hash value you want to calculate. The data is of the string type.
:return: The calculated HMAC-SHA256 value. The value is of the byte type.
"""
try:
mac = hmac.new(key, data.encode(), hashlib.sha256)
hmacBytes = mac.digest()
return hmacBytes
except Exception as e:
raise RuntimeError(f"Failed to calculate HMAC-SHA256 due to {e}")
@app.route("/")
def hello_world():
return render_template('index.html')
@app.route('/get_post_signature_for_oss_upload', methods=['GET'])
def generate_upload_params():
# Initialize the configuration.
config = Config(
region_id=region_id,
access_key_id=access_key_id,
access_key_secret=access_key_secret
)
# Create an STS client and obtain temporary access credentials.
sts_client = Sts20150401Client(config=config)
assume_role_request = sts_20150401_models.AssumeRoleRequest(
role_arn=role_arn_for_oss_upload,
role_session_name=role_session_name
)
response = sts_client.assume_role(assume_role_request)
token_data = response.body.credentials.to_map()
# Use the temporary access credentials returned by STS.
temp_access_key_id = token_data['AccessKeyId']
temp_access_key_secret = token_data['AccessKeySecret']
security_token = token_data['SecurityToken']
now = int(time.time())
# Convert the timestamp to a datetime object.
dt_obj = datetime.datetime.utcfromtimestamp(now)
# Set the expiration time to 3 hours later than the current time.
dt_obj_plus_3h = dt_obj + datetime.timedelta(hours=3)
# The request time.
dt_obj_1 = dt_obj.strftime('%Y%m%dT%H%M%S') + 'Z'
# The request date.
dt_obj_2 = dt_obj.strftime('%Y%m%d')
# The expiration time of the request.
expiration_time = dt_obj_plus_3h.strftime('%Y-%m-%dT%H:%M:%S.000Z')
# Create a policy and generate a signature.
policy = {
"expiration": expiration_time,
"conditions": [
["eq", "$success_action_status", "200"],
{"x-oss-signature-version": "OSS4-HMAC-SHA256"},
{"x-oss-credential": f"{temp_access_key_id}/{dt_obj_2}/cn-hangzhou/oss/aliyun_v4_request"},
{"x-oss-security-token": security_token},
{"x-oss-date": dt_obj_1},
]
}
print(dt_obj_1)
policy_str = json.dumps(policy).strip()
# Step 2: Create a string to sign.
stringToSign = base64.b64encode(policy_str.encode()).decode()
# Step 3: Calculate the signing key.
dateKey = hmacsha256(("aliyun_v4" + temp_access_key_secret).encode(), dt_obj_2)
dateRegionKey = hmacsha256(dateKey, "cn-hangzhou")
dateRegionServiceKey = hmacsha256(dateRegionKey, "oss")
signingKey = hmacsha256(dateRegionServiceKey, "aliyun_v4_request")
# Step 4: Calculate the signature.
result = hmacsha256(signingKey, stringToSign)
signature = result.hex()
# Specify the response data.
response_data = {
'policy': stringToSign, # The form field.
'x_oss_signature_version': "OSS4-HMAC-SHA256", # The signature version and the algorithm used to calculate the signature. Set the value to OSS4-HMAC-SHA256.
'x_oss_credential': f"{temp_access_key_id}/{dt_obj_2}/cn-hangzhou/oss/aliyun_v4_request", # The parameters used to specify information about the derived key.
'x_oss_date': dt_obj_1, # The request time.
'signature': signature, # The signature description.
'host': host,
'dir': upload_dir,
'security_token': security_token # The STS token.
}
return jsonify(response_data)
if __name__ == "__main__":
app.run(host="127.0.0.1", port=8000) # Listening on public addresses such as 0.0.0.0 requires the implementation of corresponding authentication mechanisms on the server side.Node.js
Install dependencies:
npm install ali-oss
npm install @alicloud/credentials
npm install express
const express = require('express');
const OSS = require('ali-oss');
const { STS } = require('ali-oss');
const { getCredential } = require('ali-oss/lib/common/signUtils');
const { getStandardRegion } = require('ali-oss/lib/common/utils/getStandardRegion');
const { policy2Str } = require('ali-oss/lib/common/utils/policy2Str');
const app = express();
const PORT = process.env.PORT || 8000; // Specify the port number.
// Specify the directory in which static files are stored.
app.use(express.static('templates'));
const GenerateSignature = async () => {
// Initialize the STS client.
let sts = new STS({
accessKeyId: process.env.OSS_ACCESS_KEY_ID, //Obtain the AccessKey ID of the RAM user from the environment variable.
accessKeySecret: process.env.OSS_ACCESS_KEY_SECRET // Obtain the AccessKey secret of the RAM user from the environment variable.
});
// Call the assumeRole operation to obtain temporary access credentials from STS.
const result = await sts.assumeRole(process.env.OSS_STS_ROLE_ARN, '', '3600', 'yourRoleSessionName'); // Obtain the ARN of the RAM role from the environment variable, set the validity period of the temporary access credentials to 3600 seconds, and set the role session name to yourRoleSessionName.
// Get the values of AccessKeyId, AccessKeySecret, and SecurityToken.
const accessKeyId = result.credentials.AccessKeyId;
const accessKeySecret = result.credentials.AccessKeySecret;
const securityToken = result.credentials.SecurityToken;
// Initialize the OSS client instance.
const client = new OSS({
bucket: 'examplebucket', // Replace examplebucket with the actual bucket name.
region: 'cn-hangzhou', // Replace cn-hangzhou with the ID of the region in which the bucket is located.
accessKeyId,
accessKeySecret,
stsToken: securityToken,
refreshSTSTokenInterval: 0,
refreshSTSToken: async () => {
const { accessKeyId, accessKeySecret, securityToken } = await client.getCredential();
return { accessKeyId, accessKeySecret, stsToken: securityToken };
},
});
// Create a Map to store form fields.
const formData = new Map();
// Set the signature expiration time to 10 minutes later than the current time.
const date = new Date();
const expirationDate = new Date(date);
expirationDate.setMinutes(date.getMinutes() + 10);
// Format the date as a UTC time string that conforms to the ISO 8601 standard.
function padTo2Digits(num) {
return num.toString().padStart(2, '0');
}
function formatDateToUTC(date) {
return (
date.getUTCFullYear() +
padTo2Digits(date.getUTCMonth() + 1) +
padTo2Digits(date.getUTCDate()) +
'T' +
padTo2Digits(date.getUTCHours()) +
padTo2Digits(date.getUTCMinutes()) +
padTo2Digits(date.getUTCSeconds()) +
'Z'
);
}
const formattedDate = formatDateToUTC(expirationDate);
// Create x-oss-credential and specify the form data.
const credential = getCredential(formattedDate.split('T')[0], getStandardRegion(client.options.region), client.options.accessKeyId);
formData.set('x_oss_date', formattedDate);
formData.set('x_oss_credential', credential);
formData.set('x_oss_signature_version', 'OSS4-HMAC-SHA256');
// Create a policy.
// The following example policy contains only required fields.
const policy = {
expiration: expirationDate.toISOString(),
conditions: [
{ 'bucket': 'examplebucket'},
{ 'x-oss-credential': credential },
{ 'x-oss-signature-version': 'OSS4-HMAC-SHA256' },
{ 'x-oss-date': formattedDate },
],
};
// If an STS token exists, add it to the policy and form data.
if (client.options.stsToken) {
policy.conditions.push({ 'x-oss-security-token': client.options.stsToken });
formData.set('security_token', client.options.stsToken);
}
// Generate a signature and specify the form data.
const signature = client.signPostObjectPolicyV4(policy, date);
formData.set('policy', Buffer.from(policy2Str(policy), 'utf8').toString('base64'));
formData.set('signature', signature);
// Return the form data.
return {
host: `http://${client.options.bucket}.oss-${client.options.region}.aliyuncs.com`,
policy: Buffer.from(policy2Str(policy), 'utf8').toString('base64'),
x_oss_signature_version: 'OSS4-HMAC-SHA256',
x_oss_credential: credential,
x_oss_date: formattedDate,
signature: signature,
dir: 'user-dir', // Specify the prefix in the name of the object that you want to upload to OSS.
security_token: client.options.stsToken
};
};
app.get('/get_post_signature_for_oss_upload', async (req, res) => {
try {
const result = await GenerateSignature();
res.json(result); // Return the generated signature data.
} catch (error) {
console.error('Error generating signature:', error);
res.status(500).send('Error generating signature');
}
});
app.listen(PORT, () => {
console.log(`Server is running on http://127.0.0.1:${PORT}`); // Listening on public addresses such as 0.0.0.0 requires the implementation of corresponding authentication mechanisms on the server side.
});Go
Install the dependency:
go get -u github.com/aliyun/credentials-go
go mod tidy
package main
import (
"crypto/hmac"
"crypto/sha256"
"encoding/base64"
"encoding/hex"
"encoding/json"
"fmt"
"io"
"hash"
"log"
"net/http"
"os"
"time"
"github.com/aliyun/credentials-go/credentials"
)
// Define the global variables.
var (
region string
bucketName string
product = "oss"
)
// Use the PolicyToken structure to store the generated form data.
type PolicyToken struct {
Policy string `json:"policy"`
SecurityToken string `json:"security_token"`
SignatureVersion string `json:"x_oss_signature_version"`
Credential string `json:"x_oss_credential"`
Date string `json:"x_oss_date"`
Signature string `json:"signature"`
Host string `json:"host"`
Dir string `json:"dir"`
}
func main() {
// Specify the default IP and port strings.
strIPPort := ":8000"
if len(os.Args) == 3 {
strIPPort = fmt.Sprintf("%s:%s", os.Args[1], os.Args[2])
} else if len(os.Args) != 1 {
fmt.Println("Usage : go run test1.go ")
fmt.Println("Usage : go run test1.go ip port ")
fmt.Println("")
os.Exit(0)
}
// Display the IP address and port of the server.
fmt.Printf("server is running on %s \n", strIPPort)
// Register the function that processes the root path requests.
http.HandleFunc("/", handlerRequest)
// Register the function that processes the requests initiated to obtain the signature.
http.HandleFunc("/get_post_signature_for_oss_upload", handleGetPostSignature)
// Start the HTTP server.
err := http.ListenAndServe(strIPPort, nil)
if err != nil {
strError := fmt.Sprintf("http.ListenAndServe failed : %s \n", err.Error())
panic(strError)
}
}
// Use the handlerRequest function to process requests to the root path.
func handlerRequest(w http.ResponseWriter, r *http.Request) {
if r.Method == "GET" {
http.ServeFile(w, r, "templates/index.html")
return
}
http.NotFound(w, r)
}
// Use the handleGetPostSignature function to process the requests initiated to obtain the signature.
func handleGetPostSignature(w http.ResponseWriter, r *http.Request) {
if r.Method == "GET" {
response := getPolicyToken()
w.Header().Set("Content-Type", "application/json")
w.Header().Set("Access-Control-Allow-Origin", "*") // Allow cross-origin requests.
w.Write([]byte(response))
return
}
http.NotFound(w, r)
}
// Use the getPolicyToken function to generate the signature and access credentials required to upload an object.
func getPolicyToken() string {
// Specify the region in which the bucket is located.
region = "cn-hangzhou"
// Specify the bucket.
bucketName = "examplebucket"
// Specify the URL to which the data is uploaded.
host := fmt.Sprintf("https://%s.oss-%s.aliyuncs.com", bucketName, region)
// Specify the directory to which you want to upload the object.
dir := "user-dir"
config := new(credentials.Config).
SetType("ram_role_arn").
SetAccessKeyId(os.Getenv("OSS_ACCESS_KEY_ID")).
SetAccessKeySecret(os.Getenv("OSS_ACCESS_KEY_SECRET")).
SetRoleArn("OSS_STS_ROLE_ARN").
SetRoleSessionName("Role_Session_Name").
SetPolicy("").
SetRoleSessionExpiration(3600)
// Create a credential provider based on the configurations.
provider, err := credentials.NewCredential(config)
if err != nil {
log.Fatalf("NewCredential fail, err:%v", err)
}
// Obtain access credentials from the credential provider.
cred, err := provider.GetCredential()
if err != nil {
log.Fatalf("GetCredential fail, err:%v", err)
}
// Create a policy.
utcTime := time.Now().UTC()
date := utcTime.Format("20060102")
expiration := utcTime.Add(1 * time.Hour)
policyMap := map[string]any{
"expiration": expiration.Format("2006-01-02T15:04:05.000Z"),
"conditions": []any{
map[string]string{"bucket": bucketName},
map[string]string{"x-oss-signature-version": "OSS4-HMAC-SHA256"},
map[string]string{"x-oss-credential": fmt.Sprintf("%v/%v/%v/%v/aliyun_v4_request", *cred.AccessKeyId, date, region, product)},
map[string]string{"x-oss-date": utcTime.Format("20060102T150405Z")},
map[string]string{"x-oss-security-token": *cred.SecurityToken},
},
}
// Convert the format of the policy to JSON.
policy, err := json.Marshal(policyMap)
if err != nil {
log.Fatalf("json.Marshal fail, err:%v", err)
}
// Create a string to sign.
stringToSign := base64.StdEncoding.EncodeToString([]byte(policy))
hmacHash := func() hash.Hash { return sha256.New() }
// Create a signing key.
signingKey := "aliyun_v4" + *cred.AccessKeySecret
h1 := hmac.New(hmacHash, []byte(signingKey))
io.WriteString(h1, date)
h1Key := h1.Sum(nil)
h2 := hmac.New(hmacHash, h1Key)
io.WriteString(h2, region)
h2Key := h2.Sum(nil)
h3 := hmac.New(hmacHash, h2Key)
io.WriteString(h3, product)
h3Key := h3.Sum(nil)
h4 := hmac.New(hmacHash, h3Key)
io.WriteString(h4, "aliyun_v4_request")
h4Key := h4.Sum(nil)
// Generate a signature.
h := hmac.New(hmacHash, h4Key)
io.WriteString(h, stringToSign)
signature := hex.EncodeToString(h.Sum(nil))
// Create content that will be returned to the frontend form.
policyToken := PolicyToken{
Policy: stringToSign,
SecurityToken: *cred.SecurityToken,
SignatureVersion: "OSS4-HMAC-SHA256",
Credential: fmt.Sprintf("%v/%v/%v/%v/aliyun_v4_request", *cred.AccessKeyId, date, region, product),
Date: utcTime.UTC().Format("20060102T150405Z"),
Signature: signature,
Host: host, // The URL to which the data is uploaded.
Dir: dir, // The directory to which the data is uploaded.
}
response, err := json.Marshal(policyToken)
if err != nil {
fmt.Println("json err:", err)
}
return string(response)
}PHP
Install dependencies:
composer install<?php
// Use Alibaba Cloud SDKs.
require_once __DIR__ . '/vendor/autoload.php';
use AlibabaCloud\Client\AlibabaCloud;
use AlibabaCloud\Client\Exception\ClientException;
use AlibabaCloud\Client\Exception\ServerException;
use AlibabaCloud\Sts\Sts;
// Disable error displaying.
ini_set('display_errors', '0');
$bucket = 'examplebucket'; // Replace the value with your actual bucket name.
$region_id = 'cn-hangzhou'; // Replace the value with the ID of the region in which the bucket is located.
$host = 'http://examplebucket.oss-cn-hangzhou.aliyuncs.com'; // Replace the value with the URL of the bucket.
$expire_time = 3600; // Specify the validity period in seconds.
$upload_dir = 'user-dir'; // Specify the prefix in the object name.
// Calculate the HMAC-SHA256 value.
function hmacsha256($key, $data) {
return hash_hmac('sha256', $data, $key, true);
}
// Process the requests initiated to obtain signatures.
if ($_SERVER['REQUEST_METHOD'] === 'GET' && $_SERVER['REQUEST_URI'] === '/get_post_signature_for_oss_upload') {
AlibabaCloud::accessKeyClient(getenv('OSS_ACCESS_KEY_ID'), getenv('OSS_ACCESS_KEY_SECRET'))
->regionId('cn-hangzhou')
->asDefaultClient();
// Create a request to obtain temporary access credentials from STS.
$request = Sts::v20150401()->assumeRole();
// Initiate the STS request and obtain the result.
// Replace <YOUR_ROLE_SESSION_NAME> with a custom session name, such as oss-role-session.
// Replace <YOUR_ROLE_ARN> with the ARN of the RAM role that has the permissions to upload objects to the specified bucket.
$result = $request
->withRoleSessionName('oss-role-session')
->withDurationSeconds(3600)
->withRoleArn(getenv('OSS_STS_ROLE_ARN'))
->request();
// Obtain the credential information in the STS request result.
$tokenData = $result->get('Credentials');
// Construct JSON data from the returned result.
$tempAccessKeyId = $tokenData['AccessKeyId'];
$tempAccessKeySecret = $tokenData['AccessKeySecret'];
$securityToken = $tokenData['SecurityToken'];
$now = time();
$dtObj = gmdate('Ymd\THis\Z', $now);
$dtObj1 = gmdate('Ymd', $now);
$dtObjPlus3h = gmdate('Y-m-d\TH:i:s.u\Z', strtotime('+3 hours', $now));
// Create a policy.
$policy = [
"expiration" => $dtObjPlus3h,
"conditions" => [
["x-oss-signature-version" => "OSS4-HMAC-SHA256"],
["x-oss-credential" => "{$tempAccessKeyId}/{$dtObj1}/cn-hangzhou/oss/aliyun_v4_request"],
["x-oss-security-token" => $securityToken],
["x-oss-date" => $dtObj],
]
];
$policyStr = json_encode($policy);
// Create a string to sign.
$stringToSign = base64_encode($policyStr);
// Calculate the signing key.
$dateKey = hmacsha256(('aliyun_v4' . $tempAccessKeySecret), $dtObj1);
$dateRegionKey = hmacsha256($dateKey, 'cn-hangzhou');
$dateRegionServiceKey = hmacsha256($dateRegionKey, 'oss');
$signingKey = hmacsha256($dateRegionServiceKey, 'aliyun_v4_request');
// Calculate the signature.
$result = hmacsha256($signingKey, $stringToSign);
$signature = bin2hex($result);
// Return the signature data.
$responseData = [
'policy' => $stringToSign,
'x_oss_signature_version' => "OSS4-HMAC-SHA256",
'x_oss_credential' => "{$tempAccessKeyId}/{$dtObj1}/cn-hangzhou/oss/aliyun_v4_request",
'x_oss_date' => $dtObj,
'signature' => $signature,
'host' => $host,
'dir' => $upload_dir,
'security_token' => $securityToken
];
header('Content-Type: application/json');
echo json_encode($responseData);
exit;
}
// Specify the homepage route.
if ($_SERVER['REQUEST_METHOD'] === 'GET' && $_SERVER['REQUEST_URI'] === '/') {
echo file_get_contents(__DIR__ . '/public/index.html');
exit;
}
// Specify other routes.
http_response_code(404);
echo json_encode(['message' => 'Not Found']);
exit;
?>Step 3: Configure the web client
After the web client gets the signature information from the application server, construct an HTML form upload request and POST the file directly to OSS.
Signature response from the application server
HTML form example
<!DOCTYPE html>
<html lang="zh-CN">
<head>
    <meta charset="UTF-8" />
    <meta name="viewport" content="width=device-width, initial-scale=1.0" />
    <title>Upload Directly to OSS with Signatures from Application Server</title>
</head>
<body>
<div class="container">
    <form>
        <div class="mb-3">
            <label for="file" class="form-label">Select File:</label>
            <input type="file" class="form-control" id="file" name="file" required />
        </div>
        <button type="submit" class="btn btn-primary">Upload</button>
    </form>
</div>

<script type="text/javascript">
document.addEventListener('DOMContentLoaded', function () {
    const form = document.querySelector("form");
    const fileInput = document.querySelector("#file");

    form.addEventListener("submit", (event) => {
        event.preventDefault();

        const file = fileInput.files[0];

        if (!file) {
            alert('Select a file to upload. ');
            return;
        }

        const filename = file.name;

        fetch("/get_post_signature_for_oss_upload", { method: "GET" })
            .then((response) => {
                if (!response.ok) {
                    throw new Error("Failed to obtain the signature.");
                }
                return response.json();
            })
            .then((data) => {
                let formData = new FormData();
                formData.append("success_action_status", "200");
                formData.append("policy", data.policy);
                formData.append("x-oss-signature", data.signature);
                formData.append("x-oss-signature-version", "OSS4-HMAC-SHA256");
                formData.append("x-oss-credential", data.x_oss_credential);
                formData.append("x-oss-date", data.x_oss_date);
                formData.append("key", data.dir + file.name); // The file name.
                formData.append("x-oss-security-token", data.security_token);
                formData.append("file", file); // The form field "file" must be the last one.

                return fetch(data.host, {
                    method: "POST",
                    body: formData
                });
            })
            .then((response) => {
                if (response.ok) {
                    console.log("Uploaded.");
                    alert("File uploaded.");
                } else {
                    console.log("Upload failed with the following response:", response);
                    alert("Failed to upload the file. Try again later.");
                }
            })
            .catch((error) => {
                console.error("An error occurred:", error);
            });
    });
});
</script>
</body>
</html>
The form includes a file input and a Submit button. When the form is submitted:
JavaScript intercepts the default form submission.
An AJAX request fetches the signature information from the application server.
A
FormDataobject is built with all required fields.A POST request sends the file directly to the OSS bucket URL.
A success alert appears if the file uploads. An error alert appears if the upload fails.
Verify the result
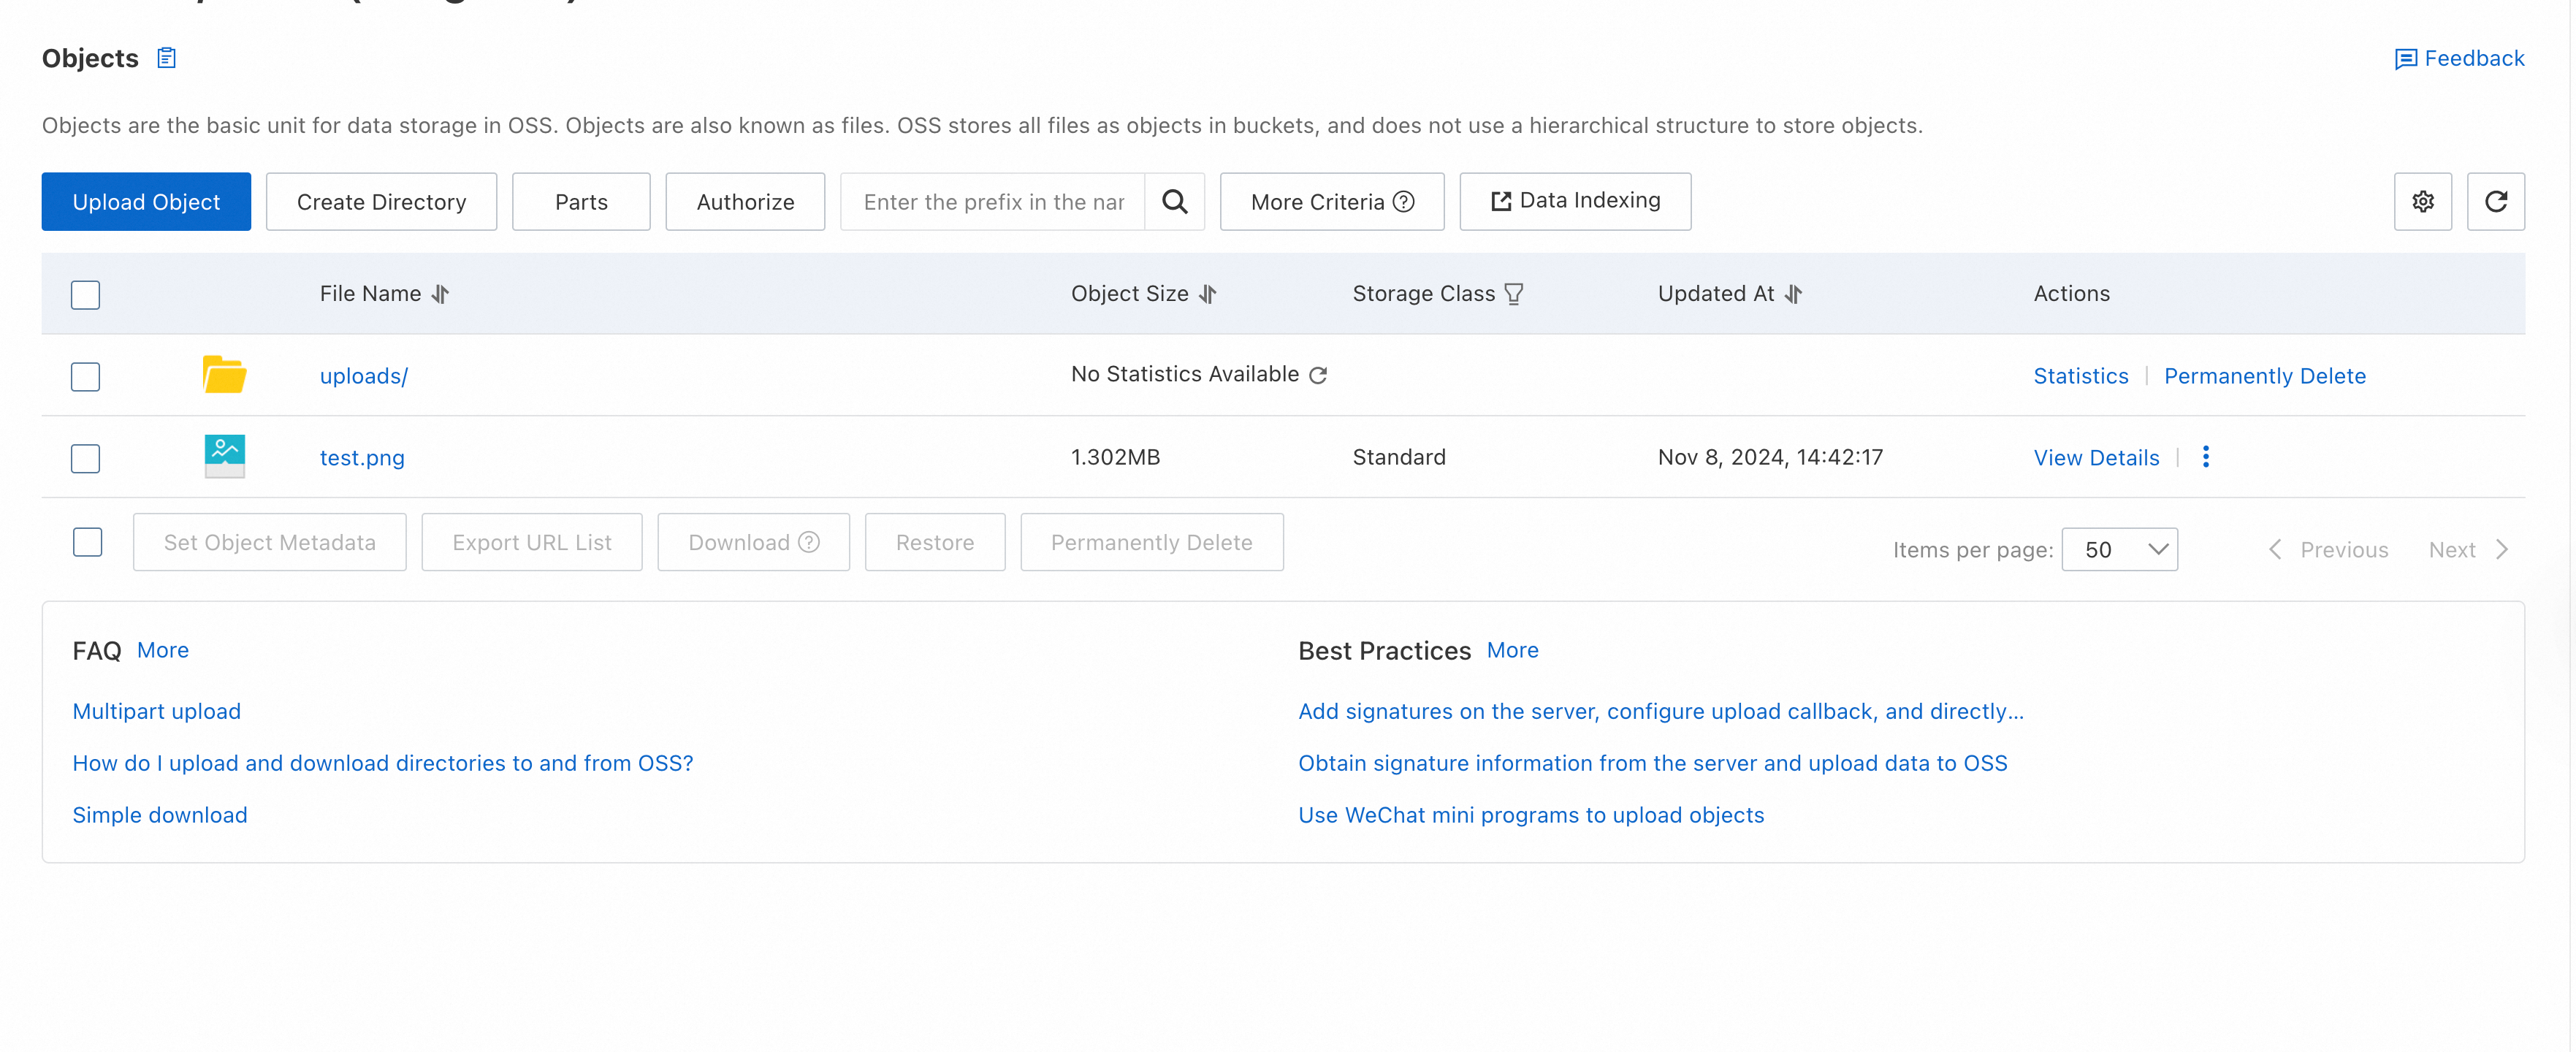
Access your application server in a browser, select a file, and upload it.
On the Buckets page, click the name of the bucket you created. Verify that the uploaded object appears in the bucket.
Suggested configurations
Configure an upload callback
Resource cleanup
The following resources were created in this guide. Release them after verification to avoid ongoing charges and security exposure:
ECS instance
OSS bucket
RAM user
RAM role
Release the ECS instance
After the instance is released, billing stops and all instance data is permanently deleted.
Go to the Instance page in the ECS console, find the instance by region and ID, and click the
 icon in the Actions column.
Choose Instance Status > Release.
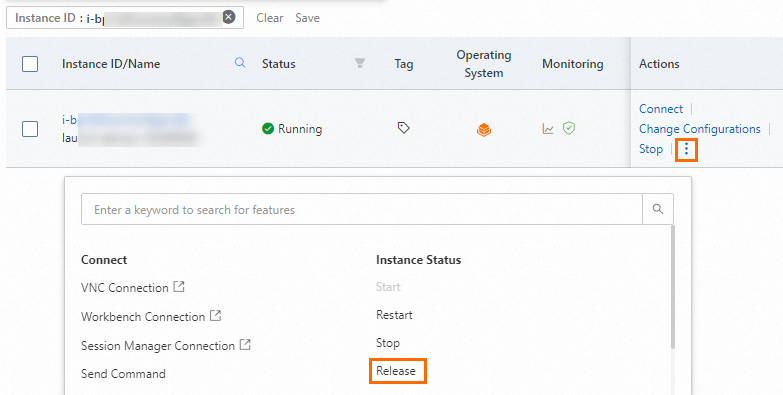
In the Release dialog box, select Release Now and click Next.
Review the associated resources, read the data loss warnings, select the acknowledgment check box, and click OK.
Releasing the instance also releases its system disk and public IP address (if assigned).
The associated security group, vSwitch, and VPC are not released automatically. You are not charged for them. Release them separately if no longer needed.
If an EIP is associated with the instance, it is retained after the instance is released and continues to incur charges. Release it separately if no longer needed.
Delete the bucket
Delete the RAM user
Delete the RAM role
FAQ
What's next
Resumable upload — for large files or unreliable connections
Multipart upload — for files that need to be split into parts
Add signatures on the server, configure upload callbacks, and directly transfer data — to receive upload notifications with object metadata
Signature version 4 (recommended) — full reference for V4 signature calculation and policy fields