Directory quotas for General-purpose NAS file systems limit the storage space and file count within a directory. You can set quotas at the directory level, or per user and group within the same path.
Prerequisites
-
A General-purpose NAS file system is created. For more information, see Create a file system.
-
A mount target is added. Add a mount target.
-
A permission group and rules are created. For more information, see Procedure.
-
The file system is mounted and a directory exists for your scenario. Mounting scenarios.
Quota types
|
Category |
Quota type |
|
Quota scope |
Note
Only General-purpose NAS file systems that use the NFS protocol support user (group) quotas. |
|
Quota restriction level |
|
Usage notes
-
File system instances
-
NFS-based General-purpose NAS file systems support directory quotas and user (group) quotas.
-
SMB-based General-purpose NAS file systems support directory quotas only.
-
Extreme NAS file systems do not support directory quotas.
-
-
Quotas
-
A file system supports quotas on up to 500 directories with a maximum depth of 8 levels. For example, / is depth 0, /workspace is depth 1, and /workspace/dir1 is depth 2.
-
A directory supports quotas for up to 500 unique UIDs and GIDs. Exceeding this limit may cause configuration failures or read errors.
Important-
After you set a restrictive quota, write operations fail when usage exceeds the limit—including increasing file length, creating files/directories, and moving files in. The application layer receives an IOError. Why is the "Disk quota exceeded" error message returned when writing data to a file system?
-
Restrictive quotas can block critical writes. Test thoroughly in a non-production environment before applying to business-critical paths.
-
After you create a directory quota, it enters an initialization process and its status is Initializing. This process can take several hours or longer, depending on the number of files and directories in the file system. After initialization is complete, the status changes to Running. You can query the directory quota status in the NAS console or by calling the DescribeDirQuotas API operation.
-
Quota settings are applied asynchronously. A restrictive quota typically takes 5 to 15 minutes to take effect or be disabled.
-
-
Regions
-
NFS-based General-purpose NAS: All regions.
-
SMB-based General-purpose NAS: All regions except China (Shenzhen) Finance.
-
Create a directory quota
-
Log on to the NAS console.
-
In the left-side navigation pane, choose .
-
In the top navigation bar, select the resource group and region where your file system resides.

-
Find the file system and click its ID or click Manage. On the Quota Management page, click Create Directory Quota.
-
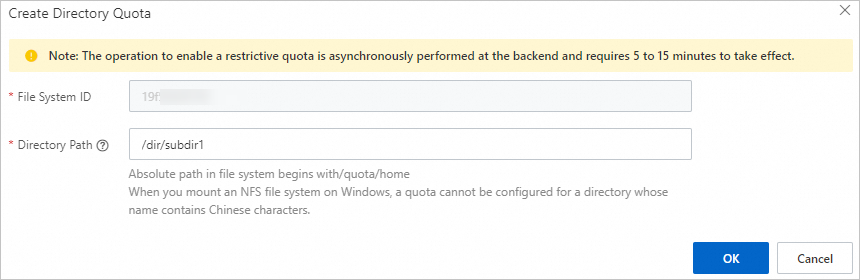
In the Create Directory Quota dialog box, set the Directory Path.
Important-
Quotas apply only to existing directories. The path must be absolute from the NAS file system root (such as
/mydir), not the local mount path on your client (such as/mnt/mydir). -
Directory paths cannot contain Chinese characters.
For example, if a General-purpose NAS file system is mounted to
/mnt, with root directory/, a level-1 subdirectory/dir0, and a level-2 subdirectory/dir/subdir1, the quota directory paths are:-
Root directory:
/ -
Level-1 subdirectory:
/dir0 -
Level-2 subdirectory:
/dir/subdir1
-
-
Check the directory quota status.
After creation, the quota status is Initializing. Initialization can take several hours or longer depending on the number of files and directories in the file system. Once complete, the status changes to Running. A default user quota entry (user type: All Users, quota type: Statistical) is created automatically. The quota type is editable, but the user type is not.
Add a user quota
A statistical quota tracks usage. A restrictive quota enforces storage and file count limits for a specific user or group in the directory.
-
Only General-purpose NAS file systems that use the NFS protocol support user (group) quotas.
-
Only one quota type can be configured for each user type.
Procedure
In the Quota Management area, find the target directory path and click Manage Quotas. In the panel, click Assign Quota to User and configure the parameters. 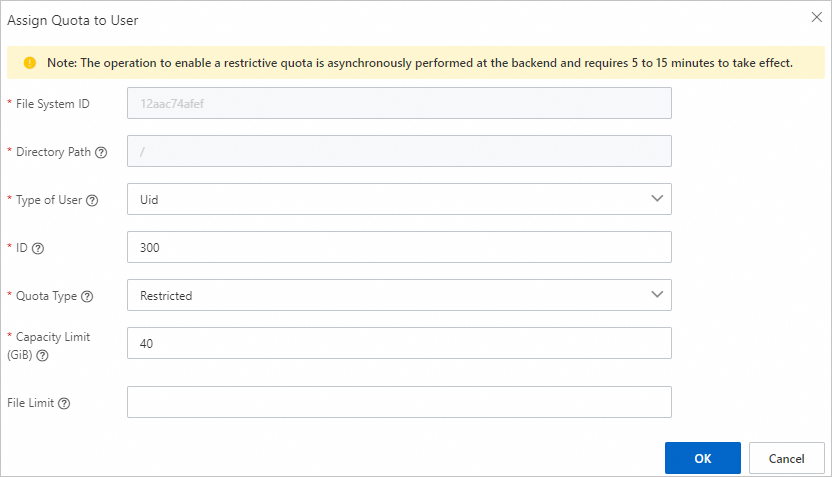
|
Parameter |
Required |
Description |
|
User Type |
Yes |
The user ID type. Valid values: Uid (user), Gid (user group), All Users. You can set different quotas for multiple users in the same path. |
|
ID |
No |
Required when User Type is set to Uid or Gid. Specifies the target user or group. For example:
|
|
Quota Type |
Yes |
|
|
Capacity Limit (GiB) |
No |
Required when Quota Type is set to Restrictive. Specifies the maximum storage capacity for files and directories in the quota path. Note
|
|
File Limit |
No |
Required when Quota Type is set to Restrictive. Specifies the maximum number of files and subdirectories a user can create in the directory. Note
|
Delete a user quota
In the user quota list, find the target quota entry and click Delete.
Deleting a directory with a quota also removes its directory quota and user quota entries.
Edit a user quota
In the user quota list, find the target quota entry and click Edit. The quota type, capacity limit, and file count limit are editable.
Capacity limit and file count limit are editable only for restrictive quotas. At least one must be changed.
API
Available API operations:
FAQ
Why is the Disk quota exceeded error message returned when writing data to a file system?
-
Cause
The user or group exceeded the storage or file count limit set by a restrictive quota on the target directory. Blocked operations include increasing file length, creating files/directories, and moving files in. An error message such as
Disk quota exceededis returned. -
Solution
-
Free up space by deleting data or increase the capacity limit of the directory. For more information, see Edit a user quota.
-
After freeing space, perform a small write (such as
touch testfile) to trigger a quota statistics refresh. Once the write succeeds, restart your application.
-