This topic describes how to back up data from a Windows Elastic Compute Service (ECS) instance to File Storage NAS (NAS). You can use a Windows built-in tool named Windows Server Backup to back up data from disks to NAS.
Prerequisites
A Server Message Block (SMB) file system is created and mounted on a Windows ECS instance. For more information, see Mount an SMB file system.
Only Windows Server 2008 and later are supported.
Background information
You can use Windows Server Backup to perform a full backup or run scheduled tasks to back up data at regular intervals. You can restore data from these backups based on your business requirements.
NAS helps you implement computing-storage separation. You can store temporary data for computing tasks and dynamic memory on ECS instances and store permanent data on NAS. If no response is returned from an ECS instance, you can switch to another ECS instance to seamlessly access data stored on NAS. NAS allows multiple ECS instances to access a file system.
You can manually synchronize data stored on an ECS instance to NAS or schedule synchronization plans on a regular basis. This helps you preserve data and restore data in the event of disasters, such as data loss caused by accidental deletion of ECS instances or disks. Each disk snapshot is a copy of an entire disk. Compared with the disk snapshot, NAS is more flexible for data storage. For example, you can back up one or several directories at a time instead of an entire disk.
Windows Server Backup is a Windows built-in tool for data backup and restoration. You can use the tool to back up or restore a file, a directory, or an entire disk. For more information, see Overview of Windows Server Backup. You can use Windows Server Backup to back up an entire server (all volumes), selected volumes, the system state, and specific files and folders to other devices. These devices include disks, tape libraries, and remote shared folders. You can also restore data from these devices based on your business requirements.
Install Windows Server Backup
Perform the following steps to install and start Windows Server Backup on a Windows ECS instance.
Open the Server Manager.
Choose , and click Add Features.
Select Windows Server Backup Features and click Next.
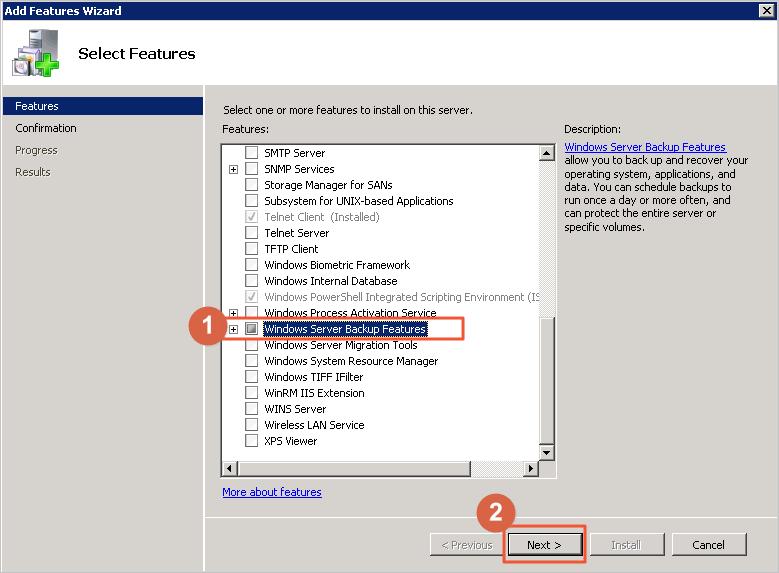
Click Install to install Windows Server Backup.
After the installation is complete, choose and click Windows Server Backup to start the service.
Manually back up data
In Windows Server Backup, you can select the Backup Once option to back up the required data to NAS. The data includes the copy of an entire disk or specific folders.
In the Windows Server Backup window, click Backup Once to open the Backup Once Wizard dialog box.
In the Backup Options step, configure the required settings and click Next.
In the Select Backup Configuration step, select items to back up and click Next.
You can select Full Server to back up the entire server. You can also select Custom to back up specific folders.
In the Select Items for Backup step, click Add Items to configure the required settings.
If you select Custom in Step 3, you need to configure the required settings in the Select Items for Backup step.
Click Add Items, select folders to back up, and click OK.
Click Advanced Settings to configure settings, such as the backup type and files to skip during backup. Then, click OK.
In the Specify Destination Type step, select Remote shared folder, and click Next.
In the Specify Remote Folder step, specify the location of a remote folder, and click Next.
In the Location field, you must specify a directory that resides in a NAS file system, for example, \\file-system-id.region.nas.aliyuncs.com\myshare\backup.
Click Backup to start a backup task.
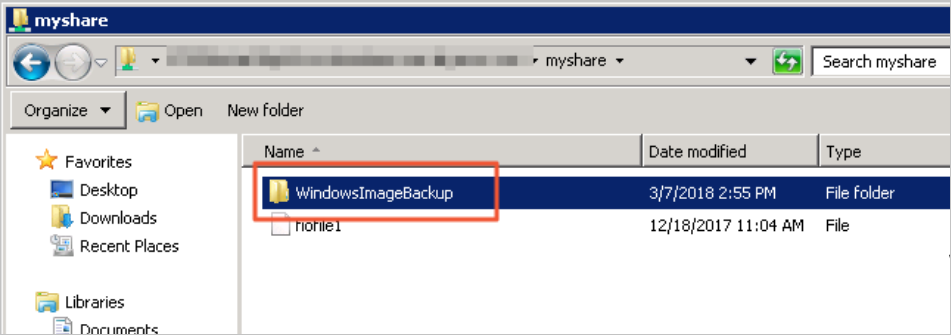
After the backup task is complete, you can view the backup data in the backup directory of the NAS file system.
Automatically back up data
You can create scheduled backup tasks to automatically back up data.
In the Windows Server Backup window, click Backup Schedule to open the Backup Schedule Wizard dialog box.
In the Getting Started step, click Next.
In the Select Backup Configuration step, select items to back up and click Next.
You can select Full Server to back up the entire server. You can also select Custom to back up specific folders.
In the Select Items for Backup step, click Add Items to configure the required settings.
If you select Custom in Step 3, you need to configure the required settings in the Select Items for Backup step.
Click Add Items, select folders to back up, and click OK.
Click Advanced Settings to configure settings, such as the backup type and files to skip during backup, and click OK.
In the Specify Backup Time step, configure the backup frequency and backup time, and click Next.
In the Specify Destination Type step, select Back up to a shared network folder, and click Next.
NoteWhen you store the scheduled backups in a remote folder, the latest backup will overwrite all of the previous backups.
In the Specify Remote Shared Folder step, specify the location of a remote folder and click Next.
In the Location field, you must specify a directory that resides in a NAS file system, for example, \\file-system-id.region.nas.aliyuncs.com\myshare\backup.
Click Finish to start a scheduled backup task.
The scheduled backup task automatically runs at the specified time. After the backup task is complete, you can view the backup data in the backup directory of the NAS file system.
Restore data
If your file is deleted or overwritten accidentally, you can restore data from a backup that is stored in a NAS file system.
In the Windows Server Backup window, click Recover to open the Recovery Wizard dialog box.
In the Getting Started step, select A backup stored in another location and click Next.
In the Specify Location Type step, select Remote shared folder and click Next.
In the Specify Remote Folder step, specify the location of a remote folder and click Next.
In the Location field, you must specify a directory where a backup is stored in a NAS file system, for example, \\file-system-id.region.nas.aliyuncs.com\myshare\backup.
In the Select Backup Date step, select the date of a backup to be restored and click Next.
In the Select Recovery Type step, select Files and folders and click Next.
In the Select Items to Recover step, select items to restore, such as files and folders, and click Next.
In the Specify Recovery Options step, specify the location of a directory to which you want to restore data and click Next.
Click Recover to restore data.