On-premises container mode runs microservice applications inside a local Docker container that mirrors your production environment. The Alibaba Cloud Toolkit plug-in for IntelliJ IDEA manages the container lifecycle -- from image setup and port mapping to environment variable injection -- so you can develop and debug locally before deploying to the cloud.
When to use on-premises container mode
Use on-premises container mode when:
Your local OS differs from production. For example, if you develop on Windows but deploy to Linux, on-premises container mode runs a Linux container locally so your application behaves the same way it does in production.
Your application is not Java-based. The default local run mode supports only Java applications. On-premises container mode supports any language through a custom container image.
If your application is a Java microservice and your local OS matches production, running the application directly in IntelliJ IDEA without a container is simpler.
How it works
The Alibaba Cloud Toolkit plug-in performs the following steps:
Builds or locates the application artifact -- either by running a Maven build or by using a local file you specify.
Starts a Docker container on your local machine using either a default image (for Java, Tomcat, or HSF applications) or a custom image you provide.
Injects microservice environment variables into the container, including service discovery endpoints, namespace credentials, and debugging configuration.
Maps ports between the container and your host machine, exposing debugging ports and service ports automatically.
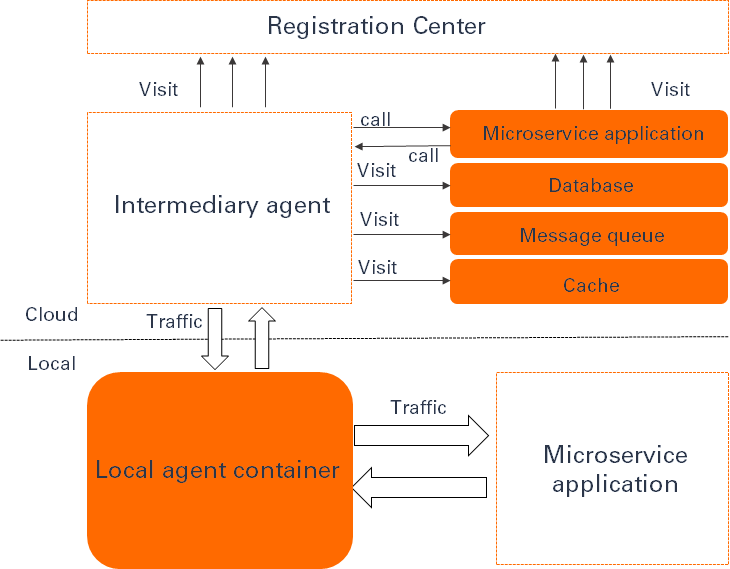
The following diagram illustrates the architecture.
Prerequisites
Before you begin, ensure that you have:
IntelliJ IDEA installed
Docker installed and running on your local machine
The Alibaba Cloud Toolkit plug-in installed in IntelliJ IDEA
Step 1: Configure the on-premises container
Open IntelliJ IDEA.
In the menu bar, choose Run > Edit Configurations....
In the Run/Debug Configurations dialog box, click the plus sign (+) in the upper-left corner.
Expand Alibaba Microservice Container and click the name of your on-premises container.
Configure the parameters described in Configuration parameters.

Click OK.
Configuration parameters
| Parameter | Description |
|---|---|
| Name | A name for the on-premises container configuration. |
| Server | The Docker daemon to use. Only the local Docker daemon is supported. This value is fixed to Local Docker Server. |
| Application type | The type of application to run. This determines which container image the plug-in uses. See Application types for details. |
| Artifact | The source of the application package. Applies only when Application type is not set to Image. See Artifact options for details. |
| Image ID or name | The ID or name of a custom container image. Applies only when Application type is set to Image. |
| Entrypoint | A custom entrypoint that overrides the default entrypoint of the container image. Applies only when Application type is set to Image. |
| Command | A custom command that overrides the default command of the container image. Applies only when Application type is set to Image. |
| Bind ports | Port mappings between the host and the container, in <Host port number>:<Container port number> format. Separate multiple port mappings with spaces. The plug-in automatically exposes Spring Cloud service ports and debugging ports, so this parameter is optional in most cases. See Port mappings for defaults. |
| Bind mounts | Directory mappings between the host and the container, in <Host file directory>:<Container file directory> format. Separate multiple directory mappings with spaces. Mapped directories are shared between the host and the container for read and write access. |
| Environment variables | Environment variables to pass to the container, in <Key>=<Value> format. Separate multiple variables with semicolons (;). The plug-in automatically injects microservice-related variables. See Microservice environment variables for the full list. |
Application types
| Type | Use case |
|---|---|
| Java | Java applications built on Spring Cloud or Dubbo. Package format: JAR. |
| Tomcat | Java applications built on Spring Cloud or Dubbo. Package format: WAR. |
| HSF-Container | Java applications built on High-speed Service Framework (HSF). Package format: JAR or WAR. |
| Image | Any application. Uses a custom container image that you provide. |
When you select Image, the plug-in runs your custom container image as-is. For all other types, the plug-in uses a default container image with a built-in startup script.
Artifact options
This parameter applies only when Application type is not set to Image.
| Option | Description |
|---|---|
| Maven Build | Builds the project with Maven and runs the resulting package. You must add a Maven build step to the configuration. See Set up a Maven build. |
| Use File | Uses a local file as the application package. |
Step 2: Run the container
Run the configuration. On the first run, the plug-in pulls the default container image and downloads required tools. This initial setup takes several minutes.
After the container starts, the startup log appears in the IntelliJ IDEA console.

Step 3 (optional): Debug Java applications
The plug-in automatically enables Java debugging by setting the JAVA_TOOL_OPTIONS environment variable with JDWP configuration. The default debugging port is 5005. If port 5005 is occupied, the plug-in uses the next consecutive port.
Connect to the debugging port with a remote debugging tool, or use the debugger attaching feature in IntelliJ IDEA.

Port mappings
The plug-in automatically maps the following ports from the container to the host.
| Port type | Default port | Fallback behavior |
|---|---|---|
| Debugging port | 5005 | If occupied, the plug-in uses the next consecutive port. |
| Spring Cloud service port | 8080 | If occupied, the plug-in uses the next consecutive port. This port can be overridden by the on-premises Spring Cloud service port configured for interconnection between on-premises and cloud applications. |
For default container images (Java, Tomcat, HSF-Container): The built-in startup script reads the JAVA_TOOL_OPTIONS variable and configures debugging automatically.
For custom container images (Image type): Add the JAVA_TOOL_OPTIONS variable to your startup script to enable debugging. Set the variable value to:
-agentlib:jdwp=transport=dt_socket,server=y,suspend=n,address=<debugging-port>Microservice environment variables
The plug-in injects the following environment variables into the container at startup, grouped by purpose.
Debugging
| Variable | Value | Description |
|---|---|---|
JAVA_TOOL_OPTIONS | -agentlib:jdwp=transport=dt_socket,server=y,suspend=n,address=<debugging-port> | Enables JDWP debugging. The default port is 5005. |
Service discovery
| Variable | Value | Description |
|---|---|---|
ADDRESS_SERVER_HOST | Auto-configured | Host address of the Address Server. |
ADDRESS_SERVER_PORT | Auto-configured | Port number of the Address Server. |
PRODUCT | EDAS, SAE, or MSE | The Alibaba Cloud product type for the current runtime. |
Authentication
| Variable | Value | Description |
|---|---|---|
ACCESS_KEY | Auto-configured | The AccessKey ID for the namespace. |
SECRET_KEY | Auto-configured | The AccessKey secret for the namespace. |
TENANT_ID | Auto-configured | The ID of the namespace. |
Application configuration
| Variable | Value | Description |
|---|---|---|
PROJECT_NAME | Auto-configured | The ID of the application that the on-premises microservice belongs to. |
SUB_ONLY | true or not set | Set to true when subscribeOnly is enabled in the interconnection configuration between on-premises and cloud applications. |
REMOTE_IP | Auto-configured | Internal IP address of the remote proxy. Defaults to the IP address of eth0. |
For default container images: The startup script reads these variables automatically and configures the application.
For custom container images: Use these variables in your own startup script as needed.
Set up a Maven build
If you select Maven Build for Artifact, add a Maven build step to the container configuration.
In the on-premises container configuration, scroll to the Before launch section.
Click the plus sign (+) and select Run Maven Goal.
In the Select Maven Goal dialog box, specify the module and the Maven command.

Multi-module Maven projects
For projects with multiple modules, add two Maven build steps in the following order:
Root project: Enter
clean installin the Command line field. This builds all modules.Target module: Enter
clean packagein the Command line field. The plug-in uses the package produced by this module to run the container.