Key-based flashback lets you recover individual documents in a specific collection from a point in time before an accidental UPDATE or DELETE — without restoring the entire instance. Recovered data is written to a temporary collection first, so you can review it before committing the restore.
Key-based flashback has been in public preview since February 26, 2024. The feature is free of charge during public preview, and the Service-Level Agreement (SLA) is not guaranteed.
Prerequisites
Before you begin, make sure that:
The instance is a replica set or sharded cluster instance
The instance uses cloud disks for storage
The instance runs MongoDB 5.0 or later
Key-based flashback is activated on your instance — to request activation, submit a ticket
How it works
Enable flashback backup on a specific collection. The configuration takes 10 minutes to take effect.
After data is accidentally modified or deleted, initiate a flashback task. Specify the point in time and the document keys to restore.
The system writes the recovered data to a temporary collection. Review the data there.
Restore from the temporary collection to the original collection.
Limitations
Supported operations
Flashback supports restoring data from UPDATE and DELETE operations only:
INSERT operations cannot be rolled back.
Data Definition Language (DDL) operations are not tracked.
Documents with no recorded changes cannot be flashed back.
Keys and indexes
| Limit | Value |
|---|---|
| Supported index types | Default primary key _id; user-defined general indexes |
| Supported data types for index fields | String, Double, ObjectId, Boolean, Date, 32-bit integer, 64-bit integer, Decimal128 |
| Index field naming | Letters, digits, and underscores (_) only; must start with a letter or underscore |
| Max length per index field | 128 characters |
| Max number of index fields | 10 |
| Max index value size for queries | 16 KB — queries that exceed this limit may return no results |
Flashback scope
| Limit | Value |
|---|---|
| Retention period | 1–7 days |
| Recovery window | From the moment flashback backup takes effect to the current time, within the retention period |
| Max documents per flashback task | 1,000 — content beyond this limit is truncated |
| Restore index key preview max size | Less than 48 KB |
| Combined database + collection name length | Less than 254 characters (e.g., test.table = 10 characters) |
| Supported size of a single document in query results | Unlimited |
Performance impact
Enabling key-based flashback may reduce the instance's transactions per second (TPS) by up to 3%. The actual impact varies by workload.
Billing
Key-based flashback is free of charge during the public preview period.
Enable flashback backup
Go to the ApsaraDB for MongoDB Replica Set Instances or Sharded Cluster Instances page. In the top navigation bar, select a resource group and region, then click the instance ID.
In the left navigation pane of the instance details page, click Backup and Restoration.
Click the Flashback by key tab.
Click Flashback Backup Settings.
If an Insufficient Permissions message appears, enter an account and password with read and write permissions for the target database. For details, see Create a database account and grant permissions.
In the Flashback Backup Settings panel, configure the following parameters and click OK.
Parameter Description Retention period The number of days to retain flashback backup files. Valid values: 1–7. The retention timer starts when the backup file is generated and the file is automatically deleted after the specified period. Select collection to back up The collection to enable flashback backup for. Preview and set indexes in the collection to back up The index fields to track for flashback. The default value is _id. Separate multiple fields with commas (,). You can specify up to 10 fields. These are the document fields available as restore keys — they are not related to the indexes returned bygetIndexes().In the Modify Flashback Backup Settings dialog box, click OK.
The configuration takes 10 minutes to take effect. Only data written after this point can be restored using flashback.
Initiate a flashback task
On the Backup and Restoration page, click the Flashback by key tab. In the Actions column of the target backup task, click Point-in-time Flashback.
In the Point-in-time Flashback panel, configure the following parameters and click OK.
Parameter Description Select collection to restore Pre-filled — no change needed. Create temporary collection The name of the temporary collection where recovered data is written. Select point in time for restoration The point in time to restore data to. The flashback configuration must have been active for at least 10 minutes before a point in time becomes selectable. Enter key to restore The document keys to restore. See Key syntax below. In the Flashback Data Preview dialog box, select the documents to restore and click OK. The system displays what will be recovered:
Keys separated by semicolons (
;) return an OR match — the system shows all documents matching any of the keys.Keys separated by commas (
,) return an AND match — if_idis present, the system matches on_idonly and ignores other fields in the same set; if no_idis present, the system matches all fields in the set.
After the task completes, the recovered data is available in the temporary collection until the retention period expires.
Key syntax
Use semicolons (;) to separate independent key sets — each set is an OR condition. Use commas (,) within a set to specify AND conditions, using the column=value format. If a key value contains a comma or semicolon, escape it with a backslash (\).
| Goal | Input | Preview |
|---|---|---|
Restore two documents by _id | key1;key2 | [ { "_id": "key1" }, { "_id": "key2" } ] |
Restore by _id AND another field | key1;test1=v1,key2 | [ { "_id": "key1" }, { "test1": "v1", "_id": "key2" } ] |
| Restore a key that contains a comma | a\,b | (escape with backslash; e.g., if the primary key is a,b, enter a\,b) |
The keys you specify must be included in the index fields you configured when enabling flashback backup. If the input is very long, the system automatically splits the task into multiple flashback tasks — this does not affect the flashback results.
Restore to the original collection
On the Backup and Restoration page, click the Flashback by key tab.
To restore the latest flashback task, click Restore To Original Table. To select a different task, click Flashback Records, find the task, and click restore.
In the Restore To Original Table dialog box, click OK.
This operation overwrites the matching documents in the original collection with data from the temporary collection. The overwrite takes 1–2 minutes. Do not write to the same keys during this time, or the restored data may not be as expected.
To track the restore job, check Restoration Task Records.
Disable flashback backup
Disable a specific backup task: On the Backup and Restoration page, click the Flashback by key tab. In the Actions column of the target task, click Close.
Disable all backup tasks: On the Backup and Restoration page, click the Flashback by key tab, then click Disable Flashback Backup in the upper-left corner.
After disabling flashback backup, all previously generated flashback backup data becomes unavailable.
Example
This example walks through recovering two documents in the test1.test001 collection that were accidentally modified and deleted.
Step 1: Enable flashback backup
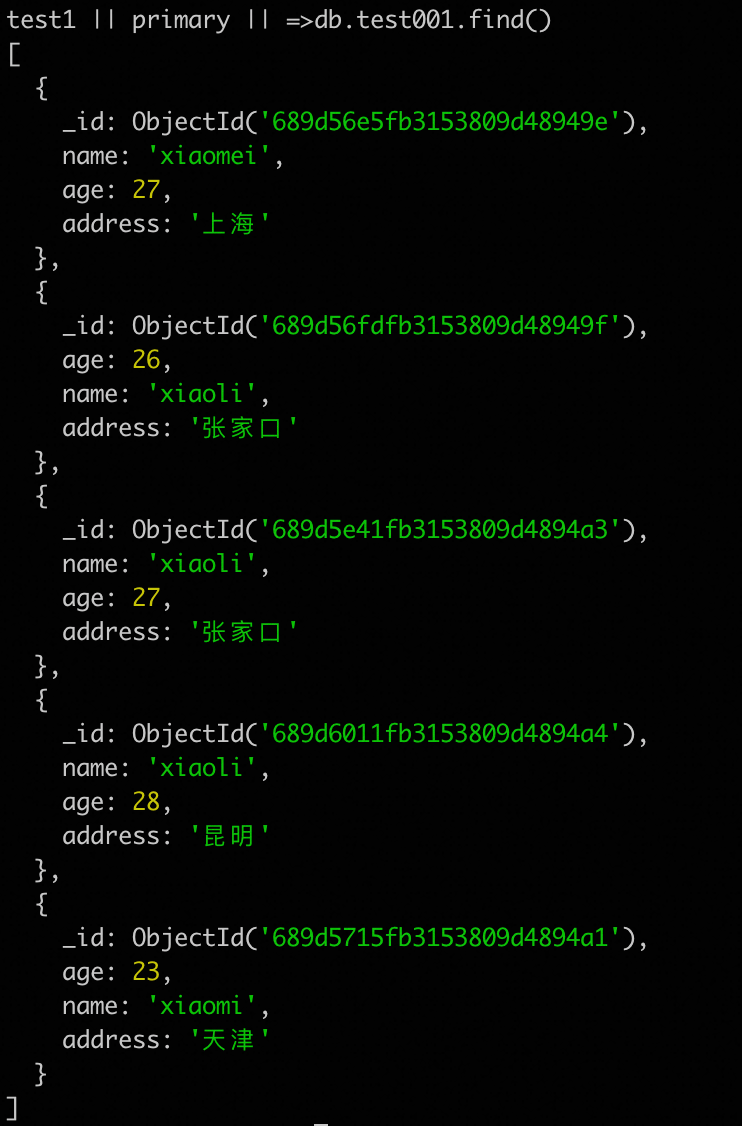
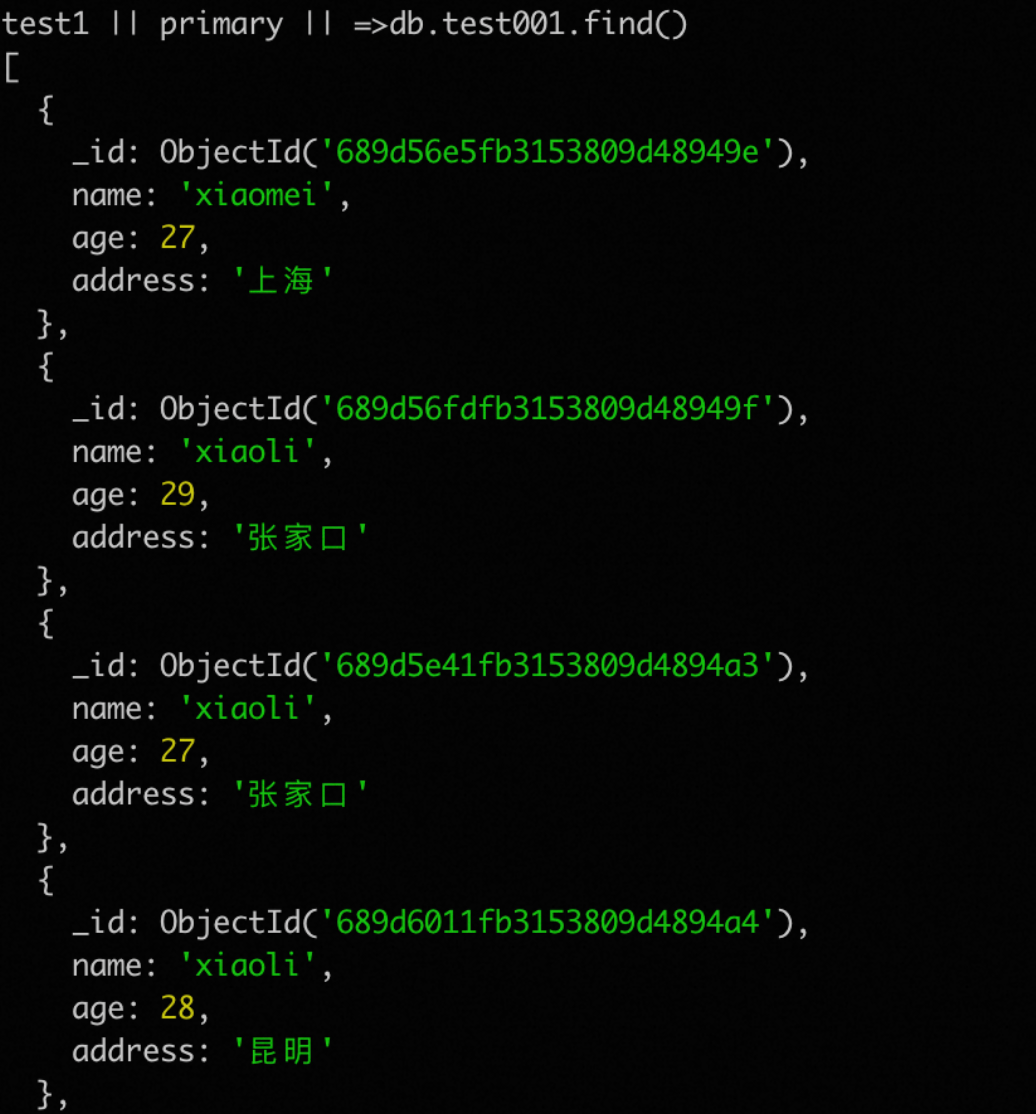
View the current data in the
test1.test001collection.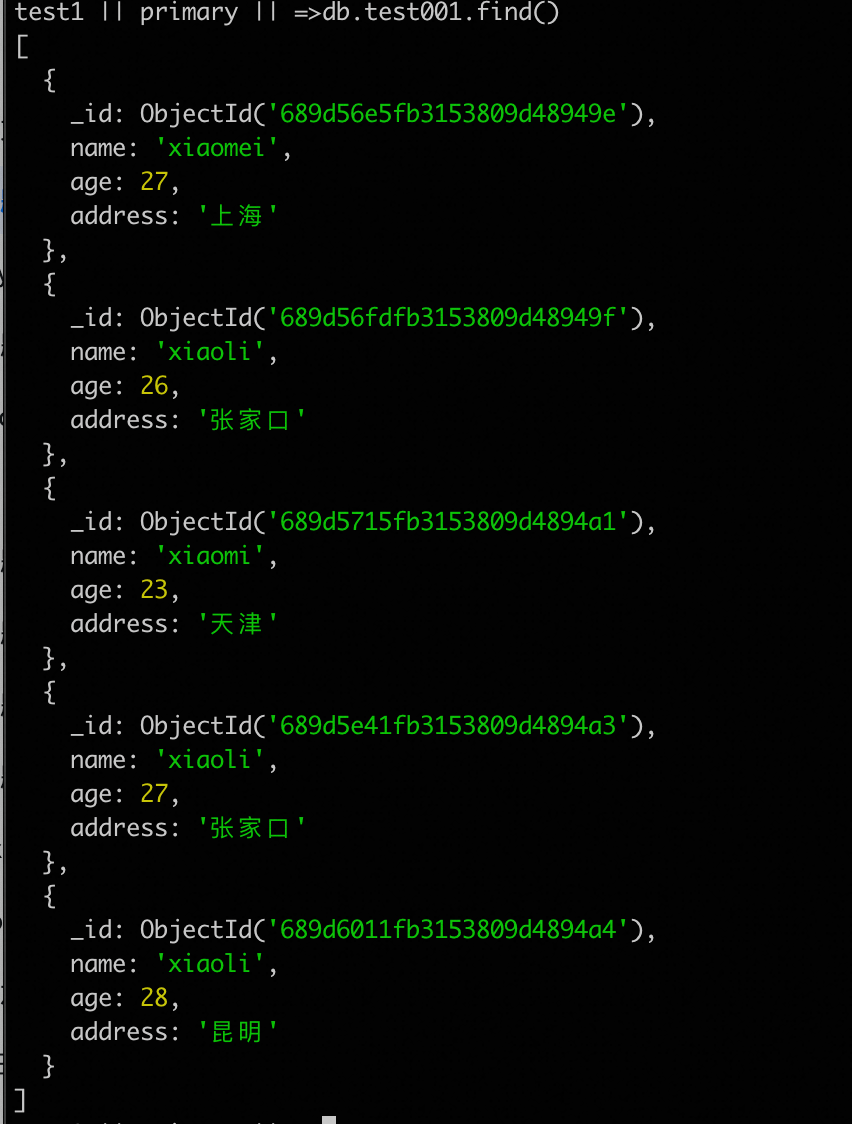
In Flashback Backup Settings, set the retention period to 1 day, select
test001as the collection to back up, and set_id,nameas the index fields.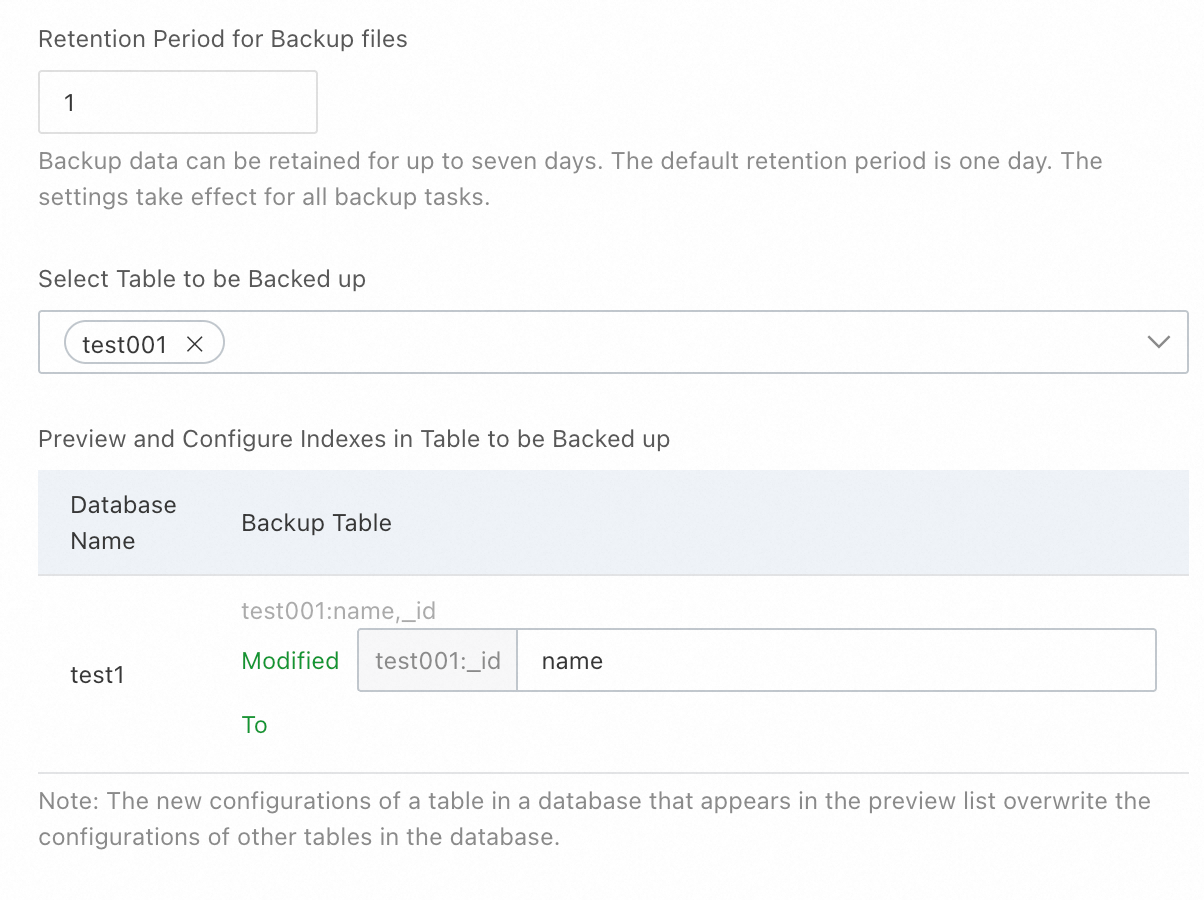
Wait 10 minutes for the configuration to take effect.
Step 2: Initiate a flashback task
At
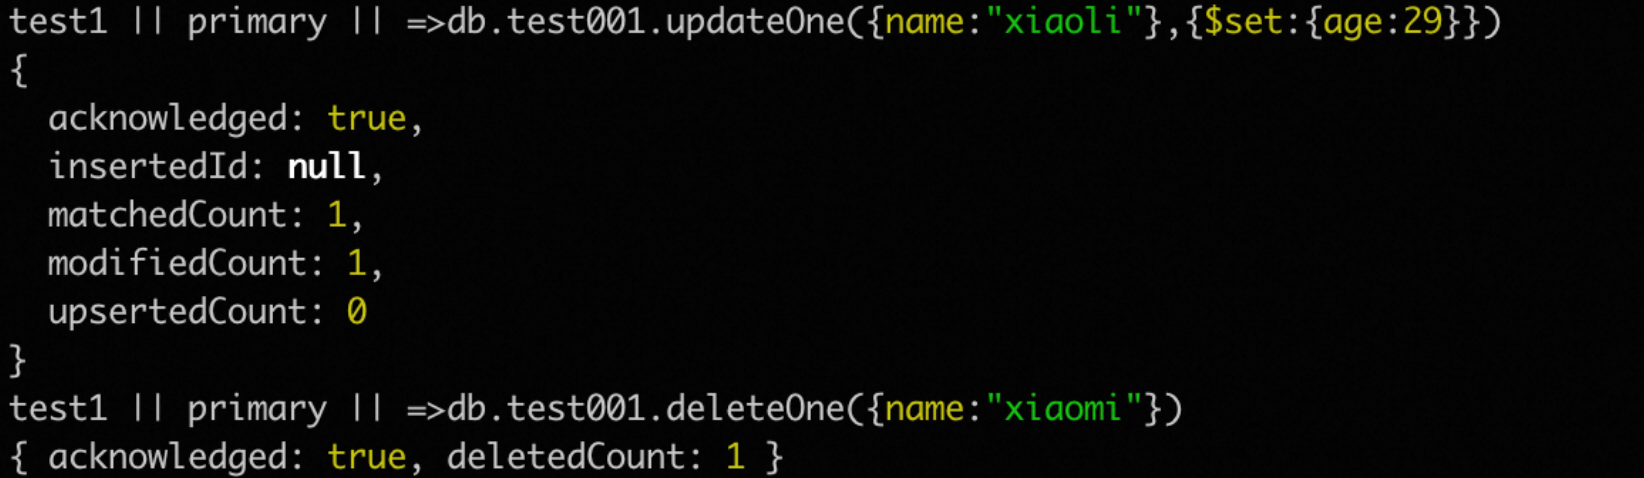
2025-08-14T19:27 (UTC+8), two changes are made totest1.test001:The document where
name=xiaoliis updated:ageis set to29.The document where
name=xiaomiis deleted.
Confirm the changes are now reflected in the collection.
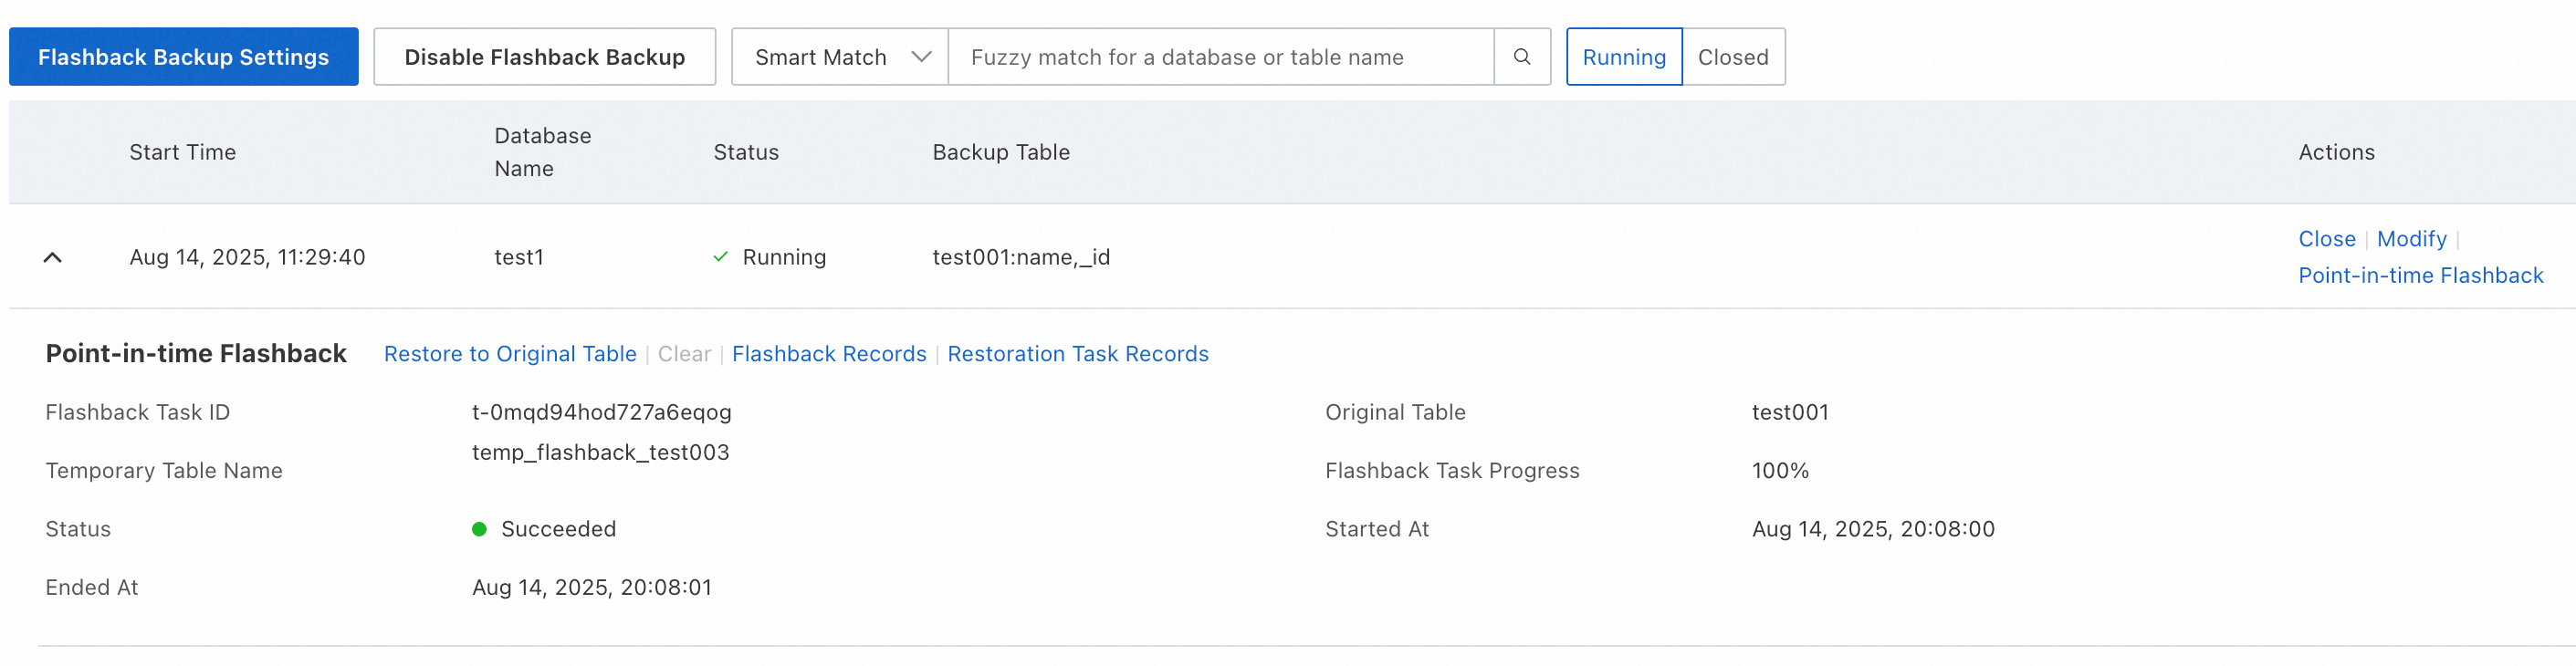
Initiate a flashback task in the console:
Set the collection to restore to
test001.Set the temporary collection name to
temp_flashback_test003.Select a point in time before the changes:
2025-08-14T19:16 (UTC+8).Enter
689d5715fb3153809d4894a1;name=xiaolias the restore keys.
The restore index preview shows:
[{"_id":"689d5715fb3153809d4894a1"},{"name":"xiaoli"}].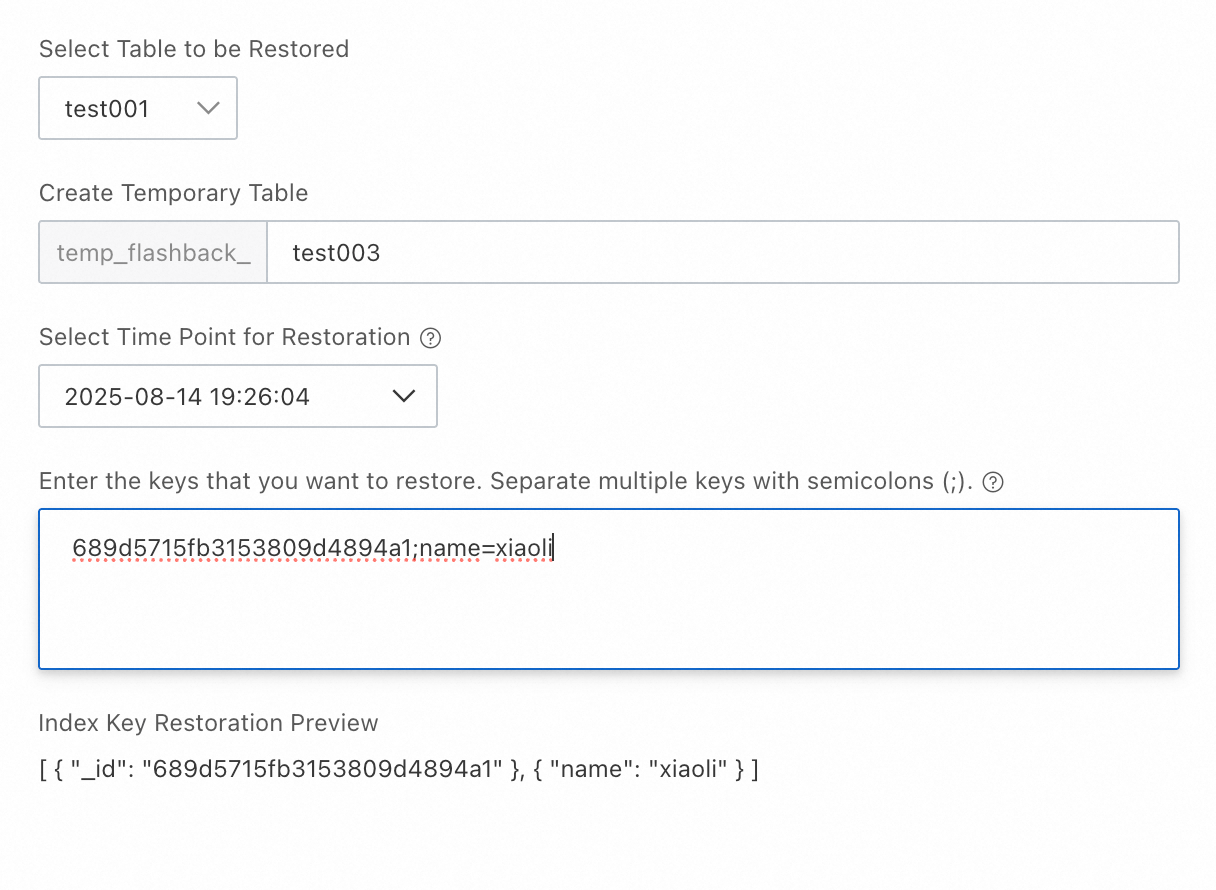
Click OK to preview the flashback data. The preview shows the modification and deletion records from
2025-08-14T19:27 (UTC+8)and the corresponding flashback operations (update and insert).
Select the documents to restore and click OK to start the flashback task.
View the data in the temporary collection. The recovered documents for
[{"_id":"689d5715fb3153809d4894a1"},{"name":"xiaoli"}]appear as follows.
Step 3: Restore to the original collection
Click Restore To Original Collection to restore the latest flashback task. Alternatively, click Flashback History and select a specific flashback task to restore from.
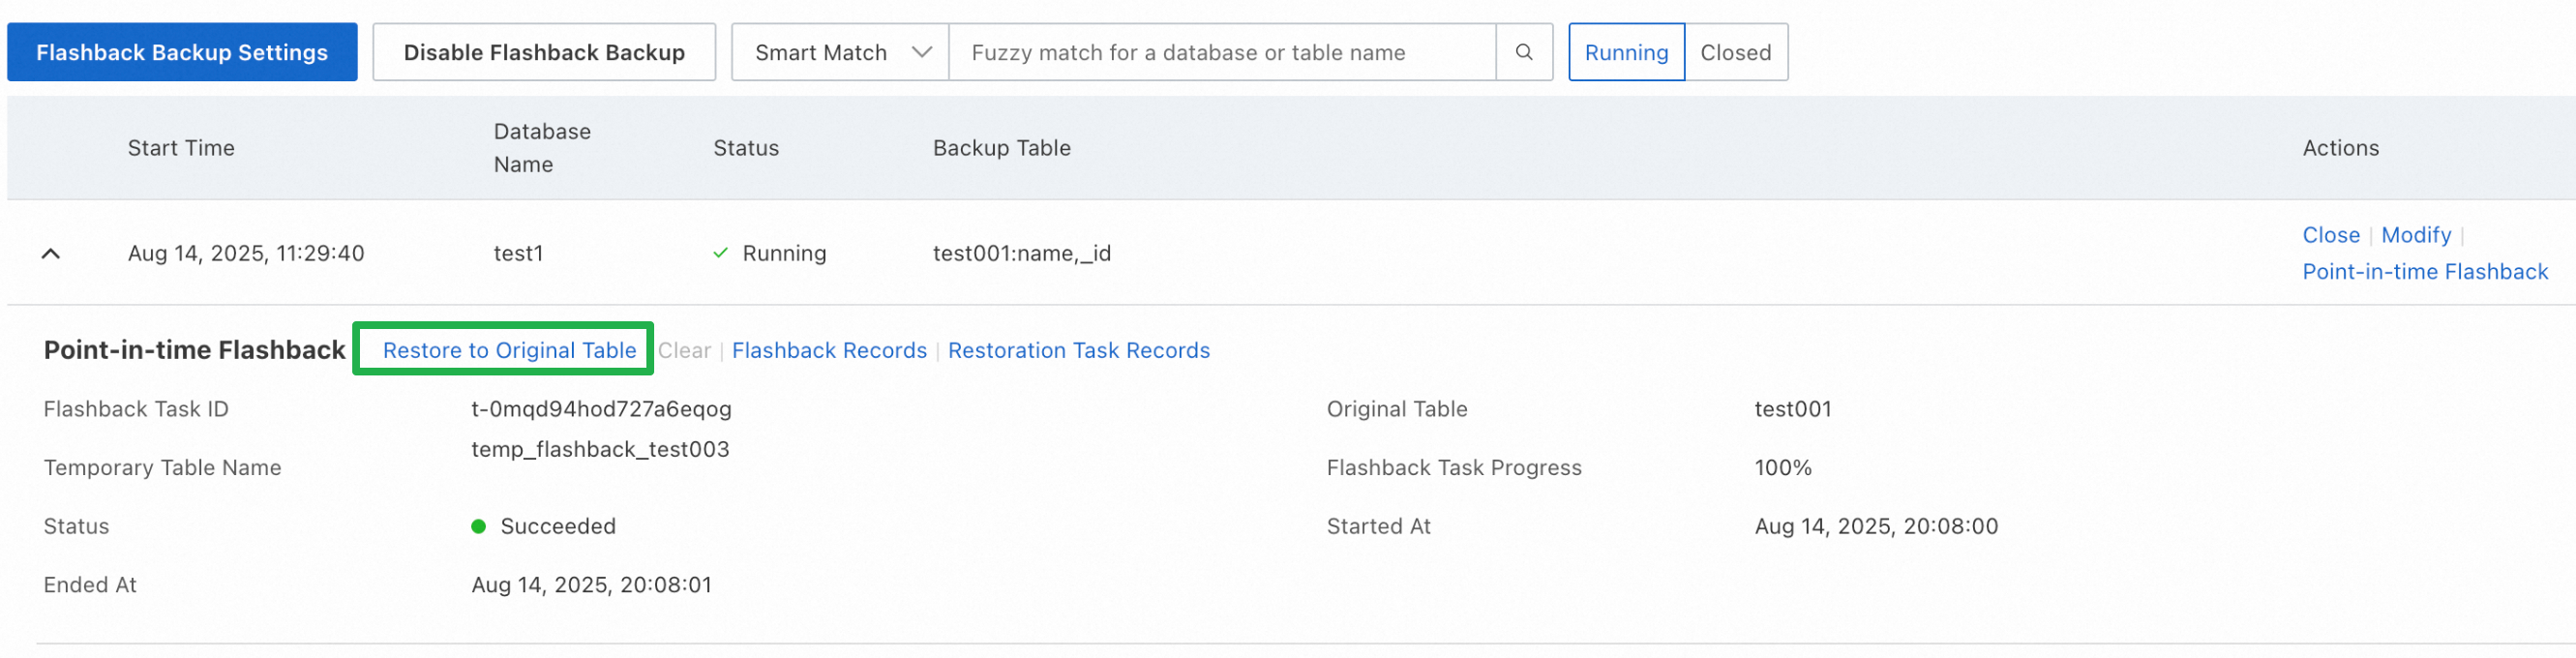

Select the latest flashback task and start the restoration.
Click Restore Job History to monitor progress.

Confirm the data in
test1.test001has been restored to its state before the changes at2025-08-14T19:27 (UTC+8).