This tutorial shows you how to bridge a Hologres real-time data warehouse and a MaxCompute enterprise data warehouse by setting up metadata mappings (external schemas and external tables) and configuring periodic data synchronization tasks.
Background
In a traditional data warehouse architecture, upstream real-time or batch data is written to a data warehouse and analyzed using an online analytical processing (OLAP) engine. However, two scenarios require you to read Hologres data from MaxCompute:
-
Real-time data distribution and archiving: Data is distributed quickly from real-time sources to business applications. After real-time warehousing requirements are met, the data is archived to the corresponding layers and subject areas of the enterprise data warehouse.
-
Business-first with data archiving: Business requirements are met first, without going through the enterprise data warehouse. After the data mart stabilizes, the data is archived back to the DWD (Detail Data Warehouse) and DWS (Summary Data Warehouse) layers of the enterprise data warehouse.
The data access patterns for these scenarios include:
-
Browsing real-time data warehouse data during data warehouse model iteration and refinement.
-
Periodically archiving data from the real-time data warehouse or data mart to the enterprise data warehouse.
-
Writing data processed by the enterprise data warehouse to the Hologres ADS (Application Data Store) layer for business consumption.
What you can do
This tutorial builds a metadata mapping and synchronization pipeline from MaxCompute to Hologres with three capabilities:
-
Schema-level metadata mapping: Use RAM role authentication to read Hologres metadata and data in real time through external schemas, with no DDL table creation required in MaxCompute.
-
Table-level metadata mapping: Select tables in the Hologres data catalog and auto-create MaxCompute external tables that map to those Hologres tables with a single click.
-
Data synchronization: Configure tables for recurring synchronization tasks with a single click, enabling periodic archiving to the enterprise data warehouse.
Data type mappings differ between MaxCompute and Hologres. Some Hologres data types cannot be synchronized to MaxCompute. For more information, see Data type mapping between MaxCompute and Hologres.
Before you begin: choose your Hologres integration pattern
Before starting setup, decide how to add Hologres to the DataWorks Data Catalog. This choice determines which operations are available downstream — in particular, whether you can create data synchronization tasks (Step 10).
| Pattern | Best for | Supports sync tasks? |
|---|---|---|
| DataWorks Data Source pattern (recommended for this tutorial) | Data Integration scenarios — for example, periodic sync from a Hologres table to MaxCompute | Yes |
| Hologres - Instance pattern | Browsing data across multiple databases | No |
If you need recurring data synchronization tasks (Step 10), add Hologres using the DataWorks Data Source pattern. The Hologres - Instance pattern cannot create synchronization tasks.
Limitations
Before you begin, be aware of the following limitations:
-
External table metadata is not refreshed automatically. Creating an external table is a one-time action. To reflect Hologres source table structure changes in MaxCompute, delete the current external table and re-create the metadata mapping.
-
Hologres - Instance pattern does not support data synchronization tasks. If you need to create recurring sync tasks, add Hologres as a DataWorks Data Source, not as a Hologres - Instance.
-
Source table structure changes require a DML event. If the source table structure changes, the change only becomes visible in the destination table after a subsequent data change (insert, update, or delete) occurs in the source table.
-
Developer permission grant requires SPM mode. Granting the RAM role Developer permission on a Hologres instance is only supported in Simple Permission Model (SPM) mode.
How it works
This tutorial extends a real-time data warehouse built using Flink and Hologres. In the DWD layer of the Hologres real-time data warehouse, it adds a process to map MaxCompute to Hologres schemas and tables, and to synchronize data from the DWD layer tables. The following figure shows the full workflow.
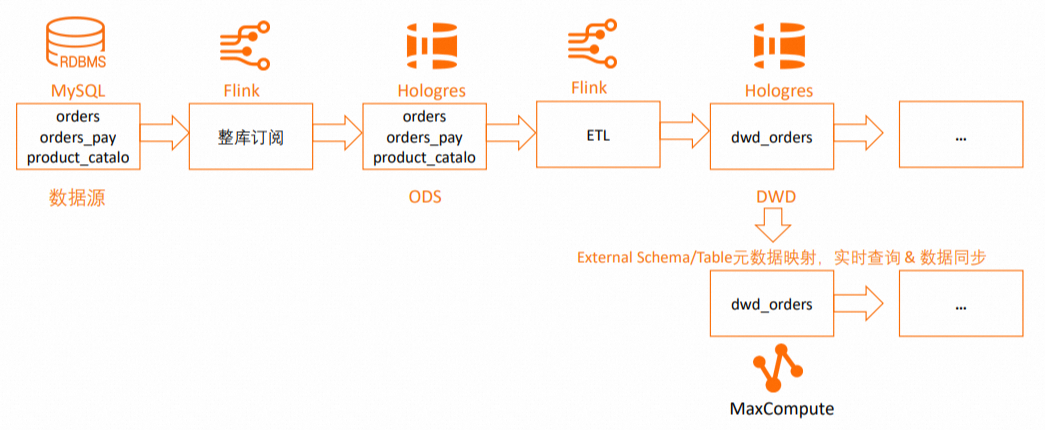
The workflow supports:
-
Mapping to Hologres schemas using external schemas.
-
Mapping to Hologres tables using external tables.
-
Specifying Hologres tables for one-time or recurring data synchronization.
Prerequisites
Account and product activation:
-
Create a MaxCompute project and enable schema-level hierarchy
-
Activate ApsaraDB RDS
-
Activate Hologres
-
Activate Realtime Compute for Apache Flink
Permissions:
-
Create a RAM role and configure a trust policy
-
Grant the
AliyunODPSDefaultRolerole theSuperUserpermission on the Hologres instance (required for external schema mapping) -
Grant the RAM role the Developer permission on the Hologres instance (SPM mode only; required for external table RAM role authentication)
Network requirements:
-
The ApsaraDB RDS for MySQL instance, Hologres instance, and Flink instance must be in the same region, same zone, and use the same VPC (Virtual Private Cloud).
-
Use the network probing feature in the Realtime Compute console to verify connectivity between your Flink workspace and the RDS for MySQL and Hologres instances. For more information, see How to perform network probing.
Steps overview
Step 1: Create an ApsaraDB RDS for MySQL instance and prepare a data source
-
Log on to the RDS console. In the left navigation pane, click Instances and select a region in the upper-left corner.
-
On the Instances page, click Create Instance. In this tutorial, Billing Method is set to pay-as-you-go and Database Engine is set to MySQL 8.0.
-
On the Instances page, click the target instance's Instance ID/Name to open its details page.
-
In the left navigation pane, click Accounts. Create a database logon account.
-
In the left navigation pane, click Databases and then click Create Database. Configure the following parameters:
Parameter Required Description Example Database Name Required 2–64 characters. Must start with a letter and end with a letter or digit. Can contain only lowercase letters, digits, underscores ( _), or hyphens (-). Must be unique within the instance.hologres_testAuthorized by Optional Only standard accounts appear here. A privileged account has full permissions on all databases and does not require authorization. Select the logon account you just created. -
Click Log On to Database. In the left navigation pane, select Database Instances and double-click the database you created. On the SQLConsole page, run the following SQL to create test tables and insert test data.
CREATE TABLE `orders` (
  order_id bigint not null primary key,
  user_id varchar(50) not null,
  shop_id bigint not null,
  product_id bigint not null,
  buy_fee numeric(20,2) not null,
  create_time timestamp not null,
  update_time timestamp not null default now(),
  state int not null
);

CREATE TABLE `orders_pay` (
  pay_id bigint not null primary key,
  order_id bigint not null,
  pay_platform int not null,
  create_time timestamp not null
);

CREATE TABLE `product_catalog` (
  product_id bigint not null primary key,
  catalog_name varchar(50) not null
);

-- Prepare data.
INSERT INTO product_catalog VALUES(1, 'phone_aaa'),(2, 'phone_bbb'),(3, 'phone_ccc'),(4, 'phone_ddd'),(5, 'phone_eee');

INSERT INTO orders VALUES
(100001, 'user_001', 12345, 1, 5000.05, '2023-02-15 16:40:56', '2023-02-15 18:42:56', 1),
(100002, 'user_002', 12346, 2, 4000.04, '2023-02-15 15:40:56', '2023-02-15 18:42:56', 1),
(100003, 'user_003', 12347, 3, 3000.03, '2023-02-15 14:40:56', '2023-02-15 18:42:56', 1),
(100004, 'user_001', 12347, 4, 2000.02, '2023-02-15 13:40:56', '2023-02-15 18:42:56', 1),
(100005, 'user_002', 12348, 5, 1000.01, '2023-02-15 12:40:56', '2023-02-15 18:42:56', 1),
(100006, 'user_001', 12348, 1, 1000.01, '2023-02-15 11:40:56', '2023-02-15 18:42:56', 1),
(100007, 'user_003', 12347, 4, 2000.02, '2023-02-15 10:40:56', '2023-02-15 18:42:56', 1);

INSERT INTO orders_pay VALUES
(2001, 100001, 1, '2023-02-15 17:40:56'),
(2002, 100002, 1, '2023-02-15 17:40:56'),
(2003, 100003, 0, '2023-02-15 17:40:56'),
(2004, 100004, 0, '2023-02-15 17:40:56'),
(2005, 100005, 0, '2023-02-15 18:40:56'),
(2006, 100006, 0, '2023-02-15 18:40:56'),
(2007, 100007, 0, '2023-02-15 18:40:56');
Step 2: Create a Hologres instance and a database
-
Log on to the Hologres Management Console and select a region in the upper-left corner. If you don't have an instance, purchase a Hologres instance first. In this tutorial, use the following settings:
-
Product Type: Exclusive Instance (pay-as-you-go)
-
Specifications: Compute Group Type
-
Reserved Computing Resources of Virtual Warehouse: 64 CUs
-
-
On the Instances page, click the target instance name.
-
On the instance details page, click Connect to Instance, then click the Metadata Management tab.
-
Click Create Database. Enter a Database Name and keep the other settings at their defaults. In this tutorial, the database is named
holodb. -
Click the Security Center tab, then click User Management in the left navigation pane. Grant the following permissions:
-
Grant the
SuperUserpermission to theAliyunODPSDefaultRolerole so it can perform table operations in Hologres. For more information, see User Management. -
Grant the RAM role the Developer permission for the instance. This is only supported in SPM mode. For more information, see DB Management.
-
Step 3: Create a whole-database sync task for RDS for MySQL in Flink (ODS layer)
This step synchronizes all tables from RDS for MySQL to the public schema of the holodb Hologres database using Flink Change Data Capture (CDC). The default init_warehouse compute group in Hologres is then used to query the Operational Data Store (ODS) data.
Enable binary logging for MySQL before creating the sync task. Run the following command in the RDS for MySQL database to check: show variables like "log_bin";. For setup details, see MySQL Server Configuration Requirements.
-
Create a session cluster.
-
Log on to the Flink console and select a region in the upper-left corner.Flink console
-
Click the target workspace name. In the left navigation pane, select O&M > Session Clusters.
-
Click Create Session Cluster.
-
-
Create a Hologres catalog.
-
Click the target workspace name. In the left navigation pane, select Catalogs.
-
On the Catalog List page, click Create Catalog. In the Create Catalog dialog box, select Hologres, click Next, and configure the following parameters:
Parameter Required Description catalog name Required A custom name for the Hologres catalog. endpoint Required The VPC endpoint from the Network Information section on the Hologres instance details page. For example: hg****cn-cn-2****f-cn-shenzhen-vpc-st.hologres.aliyuncs.com:80.dbname Required The name of the Hologres database. username Required Your AccessKey ID. password Required Your AccessKey secret.
-
-
Create a MySQL catalog. On the Catalog List page, click Create Catalog. In the Create Catalog dialog box, select MySQL, click Next, and configure the following parameters:
Parameter Required Description catalog name Required A custom name for the MySQL catalog. hostname Required The IP address or hostname of the MySQL database. Find it in the RDS MySQL console under Database Connection on the instance details page. For cross-VPC or internet access, configure network connectivity first. See Network Connectivity. port Default The server port. Default: 3306.default database Required The name of the default database. username Required The MySQL database username. Find it in the RDS MySQL console under Accounts on the instance details page. password Required The MySQL database password. Find it in the RDS MySQL console under Accounts on the instance details page. -
Synchronize data from RDS for MySQL to Hologres.
-
Click the target workspace name. In the left navigation pane, select Development > ETL.
-
On the Drafts tab, click
 to create a new folder.
 -
Right-click the folder and select New Blank Stream Draft. In the New Draft dialog box, enter a Name and select an Engine Version, then enter the following SQL:
CREATE DATABASE IF NOT EXISTS <your-hologres-catalog>.<hologres-database-name>
-- The table_property.binlog.level parameter was set when the catalog was created,
-- so binary logging is enabled for all tables created by CDAS.
AS DATABASE <your-mysql-catalog>.<mysql-database-name> INCLUDING ALL TABLES
-- Select which tables from the upstream database to ingest.
/*+ OPTIONS('server-id'='8001-8004') */ ;
-- Specify the server-id range for the MySQL CDC instance.
Click Deploy in the upper-right corner.
-
On the Deployments page, click the target job name to open its Configuration page.
-
Click Start in the upper-right corner, select Initial Mode, then click Start.
By default, this example synchronizes data to the
publicschema of the Hologres database. To synchronize to a different schema, see Use as a destination catalog for CDAS. After specifying a schema, the table name format changes when using the catalog. For more information, see Use a Hologres catalog. -
Step 4: Load data to Hologres
Table groups store data in Hologres. Before querying data from a table group in the holodb database using the init_warehouse compute group, you must load that table group into the compute group.
-
Log on to the Hologres Management Console and select a region in the upper-left corner.Hologres Management ConsoleHologres Management Console
-
In the left navigation pane, click Instances, then click the target instance name.
-
On the instance details page, click Connect to Instance.
-
Click the SQL Editor tab. Confirm the instance and database names, then run the following commands:
-- View the table groups in the current database.
SELECT tablegroup_name FROM hologres.hg_table_group_properties GROUP BY tablegroup_name;

-- Load a table group to the compute group.
CALL hg_table_group_load_to_warehouse ('<hologres-database-name>.<table-group-name>', '<virtual-warehouse-name>', 1);

-- Verify the table group is loaded.
SELECT * FROM hologres.hg_warehouse_table_groups;
For more information, see Create a new virtual warehouse instance.
-
Verify the three tables were synchronized from MySQL to Hologres:
SELECT * FROM orders;
SELECT * FROM orders_pay;
SELECT * FROM product_catalog;
Step 5: Create a DWD layer table in Flink
This step uses the Flink Catalog feature to create a wide table dwd_orders in the DWD layer of Hologres. The Hologres connector's column-level partial update capability lets you use INSERT statements for efficient partial updates. Hologres' hybrid row-columnar storage and strong resource isolation ensure that write, read, and analytics workloads don't interfere with each other.
-
Log on to the Flink console and select a region in the upper-left corner.Flink console
-
Click the target workspace name. In the left navigation pane, select Development > Scripts.
-
Click
 to create a new query script. Run the following SQL:
-- Wide table fields must be nullable because different streams write to the same result table. CREATE TABLE <hologres-catalog>.<hologres-database>.dwd_orders ( order_id bigint not null, order_user_id string, order_shop_id bigint, order_product_id bigint, order_product_catalog_name string, order_fee numeric(20,2), order_create_time timestamp, order_update_time timestamp, order_state int, pay_id bigint, pay_platform int comment 'platform 0: phone, 1: pc', pay_create_time timestamp, PRIMARY KEY(order_id) NOT ENFORCED ); -- Set binlog TTL to one week. ALTER TABLE <hologres-catalog>.<hologres-database>.dwd_orders SET ( 'table_property.binlog.ttl' = '604800' ); -
Create an SQL stream job to consume binlogs from the ODS
ordersandorders_paytables in real time.-
In the left navigation pane, select Development > ETL.
-
Create a new SQL stream job named
DWD. Copy the following SQL into the editor, then deploy and start the job. Theorderstable is joined with theproduct_catalogdimension table, and results are written todwd_ordersfor real-time data enrichment.BEGIN STATEMENT SET; INSERT INTO <your-hologres-catalog>.<your-hologres-database>.dwd_orders ( order_id, order_user_id, order_shop_id, order_product_id, order_fee, order_create_time, order_update_time, order_state, order_product_catalog_name ) SELECT o.*, dim.catalog_name FROM <your-hologres-catalog>.<your-hologres-database>.orders as o LEFT JOIN <your-hologres-catalog>.<your-hologres-database>.product_catalog FOR SYSTEM_TIME AS OF proctime() AS dim ON o.product_id = dim.product_id; INSERT INTO <your-hologres-catalog>.<your-hologres-database>.dwd_orders (pay_id, order_id, pay_platform, pay_create_time) SELECT * FROM <your-hologres-catalog>.<your-hologres-database>.orders_pay; END; -
Verify the wide table data. Connect to the Hologres instance through HoloWeb and run:
SELECT * FROM dwd_orders;The expected result looks like this:
+------------+---------------+---------------+------------------+----------------------------+------------+-------------------+-------------------+-------------+------------+--------------+-----------------+
| order_id   | order_user_id | order_shop_id | order_product_id | order_product_catalog_name | order_fee  | order_create_time | order_update_time | order_state | pay_id     | pay_platform | pay_create_time |
+------------+---------------+---------------+------------------+----------------------------+------------+-------------------+-------------------+-------------+------------+--------------+-----------------+
| 100002     | user_002      | 12346         | 2                | phone_bbb                  | 4000.04    | 2023-02-15 15:40:56 | 2023-02-15 18:42:56 | 1           | NULL       | NULL         | NULL            |
| 100004     | user_001      | 12347         | 4                | phone_ddd                  | 2000.02    | 2023-02-15 13:40:56 | 2023-02-15 18:42:56 | 1           | NULL       | NULL         | NULL            |
| 11111      | user_test     | 12346         | 2                | phone_bbb                  | 4000.04    | 2025-12-15 00:00:00 | 2025-12-15 00:00:00 | 1           | NULL       | NULL         | NULL            |
| 100001     | user_001      | 12345         | 1                | phone_aaa                  | 5000.05    | 2023-02-15 16:40:56 | 2023-02-15 18:42:56 | 1           | NULL       | NULL         | NULL            |
| 100007     | user_003      | 12347         | 4                | phone_ddd                  | 2000.02    | 2023-02-15 10:40:56 | 2023-02-15 18:42:56 | 1           | NULL       | NULL         | NULL            |
| 100006     | user_001      | 12348         | 1                | phone_aaa                  | 1000.01    | 2023-02-15 11:40:56 | 2023-02-15 18:42:56 | 1           | NULL       | NULL         | NULL            |
| 100005     | user_002      | 12348         | 5                | phone_eee                  | 1000.01    | 2023-02-15 12:40:56 | 2023-02-15 18:42:56 | 1           | NULL       | NULL         | NULL            |
| 100003     | user_003      | 12347         | 3                | phone_ccc                  | 3000.03    | 2023-02-15 14:40:56 | 2023-02-15 18:42:56 | 1           | NULL       | NULL         | NULL            |
+------------+---------------+---------------+------------------+----------------------------+------------+-------------------+-------------------+-------------+------------+--------------+-----------------+
-
Step 6: Bind MaxCompute and Hologres computing resources in DataWorks
-
Log on to the DataWorks console and select a region in the upper-left corner.
-
Create a DataWorks workspace. In this tutorial, the workspace is named
Hologres_DW_TEST. -
On the Workspaces page, click the target workspace name.
-
On the Workspace Details page, click Computing Resource in the left navigation pane. On the Computing Resource page, click Associate Compute Resource and select both MaxCompute and Hologres. Fill in the required details. For more information, see Bind compute resources.
-
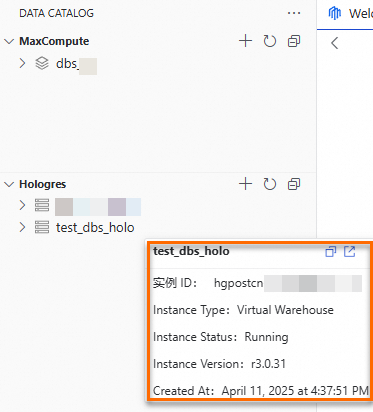
In the left navigation pane, choose Data Development and O&M > Data Development. In the Select Workspace section, click Go To DataStudio. Add and view the MaxCompute projects and Hologres instances. Hover over a MaxCompute project name or Hologres instance name to see the data source or instance details. Data source mode: Hologres - Instance mode:
-
When you add a Hologres catalog in Data Catalog, the method you use determines the resulting behavior. The following table describes the behavior associated with each method:
Method to add a Hologres catalog
Applicable scenario
Description
Add using the DataWorks Data Source pattern
Suitable for Data Integration scenarios.
For example, you can periodically synchronize data from a specific table in Hologres to MaxCompute.
-
A specific database is specified as a DataWorks data source, which carries the identity of the executor. You cannot query other databases without permission.
-
If you bind a Hologres computing resource after you create a DataWorks workspace, a Hologres catalog is added to Data Catalog in DataWorks Data Source mode by default.
Add using the Hologres - Instance pattern
Suitable for scenarios that require browsing data across databases.
-
You can use the identity carried by the computing resource to view databases for which you have permissions. This method facilitates browsing data across databases.
-
You can create metadata mapping tasks, but cannot create synchronization tasks.
-
-
Hover over the MaxCompute project name or Hologres instance name to view details about the data source or instance.
Data source mode
Hologres - Instance mode
Step 7: Create a MaxCompute external data source for Hologres
-
Log on to the MaxCompute console and select a region in the upper-left corner.MaxCompute console
-
In the left navigation pane, choose Manage Configurations > External Data Source.
-
On the External Data Source page, click Create External Data Source.
-
Configure the following parameters:
Parameter Required Description External Data Source Type Required Select Hologres. External Data Source Name Required A custom name. Must start with a letter and contain only lowercase letters, underscores ( _), and digits. Maximum 128 characters. For example:holo_external_source.Description Optional Enter as needed. Connection Method Required Default: classic network access (internal network). InstanceID Required Select the Hologres instance in the current region. Host Required Auto-generated by the system. Port Required Auto-generated by the system. DBNAME Required The name of the Hologres database to connect to. Authentication And Authorization Required Select RAM Role. For Hologres external projects, use Task executor mode. RoleARN Required The ARN of the RAM role. Find it in the RAM console under Identities > Roles > Basic Information. Example: acs:ram::124****:role/aliyunodpsdefaultrole.Service-linked Role Required If you select Task executor, the service-linked role is acs:ram::124****:role/aliyunserviceroleformaxcomputeidentitymgmt.Foreign Server Supplemental Properties Optional Additional attributes for the external data source.
Step 8: Map a Hologres schema to MaxCompute
Schema-level mapping creates a MaxCompute external schema that mirrors an entire Hologres schema. No DDL table definitions are needed in MaxCompute — schema structure changes and data changes in Hologres are visible in MaxCompute in real time.
-
Log on to the DataWorks console and select a region in the upper-left corner.
-
In the left navigation pane, choose Data Development and O&M > Data Development.
-
In the Select Workspace section, click Go To DataStudio.
-
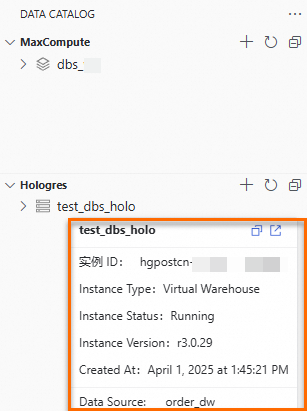
On the DataStudio page, click the
 icon to open Data CATALOG.
 -
Expand the Hologres data catalog, right-click the
publicschema of the target instance, and select Metadata Mapping to MaxCompute. -
On the Metadata Mapping to MaxCompute page, configure the following key parameters (keep the defaults for all others):
Parameter Value in this tutorial Project Search Method From DataWorks Data Source Data Source The name of the MaxCompute computing resource bound to DataWorks External Schema Name publicExternal Data Source holo_external_source -
Click Run in the upper-left corner. A MaxCompute external schema named
publicis created after the task completes. -
Browse Hologres tables and query data in MaxCompute:
SET odps.namespace.schema=true;
SELECT * FROM public.dwd_orders;
If the schema-level mapping succeeds but the mapped table name doesn't appear in the MaxCompute folder in Data Catalog, or queries fail, check that RAM role permissions are configured correctly. For more information, see Hologres foreign tables.
Unlike external schemas, external tables require you to explicitly create Hologres tables as external tables in MaxCompute. External tables support two authentication methods: RAM role and dual-signature.
RAM role: Supports cross-account role assumption. On the Hologres side, add the RAM role as a user and grant it the Developer permission (SPM mode only). For more information, see Manage users and Manage databases.
Dual-signature: Uses the current task executor's identity for authentication. The current user accesses Hologres through MaxCompute external tables using the same identity that has permissions for the Hologres tables. For more information, see Hologres external tables.
Step 9: Map a Hologres table to a MaxCompute external table
Table-level mapping lets you select specific tables and create MaxCompute external tables for them. You can map some or all fields. For mapping rules, see the tblproperties parameter section in Hologres foreign tables.
-
Log on to the DataWorks console and select a region in the upper-left corner.
-
In the left navigation pane, choose Data Development and O&M > Data Development.
-
In the Select Workspace section, click Go To DataStudio.
-
On the DataStudio page, click the
icon to open Data CATALOG. -
Expand the Hologres data catalog, right-click the
dwd_orderstable in thepublicschema, and select Metadata Mapping to MaxCompute. -
On the Metadata Mapping to MaxCompute page, configure the following key parameters (keep the defaults for all others). For a full parameter reference, see Table-level metadata mapping.
Parameter Value in this tutorial Instance Search Method From DataWorks Data Source Data Source The name of the MaxCompute data source bound to DataWorks Schema defaultExternal Table The name of the external table to create in MaxCompute (defaults to the Hologres table name). Note: this is a one-time action — metadata is not refreshed automatically. Permissions to Access MaxCompute External Table Dual-signature (recommended). If using RAM role, add users and grant database permissions on the Hologres side. Lifecycle Set as needed. -
Click Run in the upper-left corner. The new external table appears under the MaxCompute schema in the left navigation pane.
-
Query the external table in MaxCompute:
SET odps.namespace.schema=true;
SELECT * FROM dwd_orders;
Step 10: Create a recurring sync task for a Hologres table
To periodically archive DWD table data from the Hologres real-time data warehouse to a MaxCompute internal table, create a data synchronization task with a recurring schedule.
This step requires that Hologres was added to DataWorks using the DataWorks Data Source pattern (not the Hologres - Instance pattern). If you used the Hologres - Instance pattern, sync tasks are not supported.
-
Log on to the DataWorks console and select a region in the upper-left corner.
-
In the left navigation pane, choose Data Development and O&M > Data Development.
-
In the Select Workspace section, click Go To DataStudio.
-
On the DataStudio page, click the
 icon to open DATA STUDIO. Create a new project folder.
 -
Click the
icon to open Data CATALOG. -
Expand the Hologres data catalog, right-click the
dwd_orderstable in thepublicschema, and select Data Synchronization to MaxCompute. -
In the Create Node dialog box, name the destination table
dwd_holo_ordersand click OK. -
On the synchronization configuration page, configure the following key parameters (keep the defaults for all others). For a full parameter reference, see Configure a synchronization node.
Parameter Description Data Source The Hologres data source bound to DataWorks. Schema The schema where you want to store the data. Table The MaxCompute internal table name. In this tutorial: dwd_holo_orders.Lifecycle Set as needed. Import Method Overwrite: deletes existing data and writes new data. Append: preserves existing data and adds new data. Permissions to Access Hologres Dual-signature: verifies permissions using your current identity. Make sure the current identity has read permissions on the MaxCompute table and permissions on the mapped Hologres source table. RAMRole: authenticates via a specified RAM role. Grant the AliyunSTSAssumeRoleAccesspolicy to the RAM user. See RAM role authorization pattern, then configure the RAM role in the RamRole field. -
Click Scheduling in the right-side panel. On the Properties page, configure the workflow and scheduling cycle. For more information, see Node Scheduling Configuration.
-
Click Run in the upper-left corner. After the task completes, the new internal table appears under MaxCompute in the left navigation pane. Query the table:
 SET odps.namespace.schema=true;
 SELECT * FROM default.dwd_holo_orders;