Get started with Real-Time Streaming (RTS)
Real-Time Streaming (RTS) reduces end-to-end latency from 3–6 seconds to the millisecond level with stronger packet-loss resistance. RTS is ideal for e-commerce live streaming, online education, live sports, and live entertainment. This topic walks you through the complete RTS setup.
Prerequisites
-
An ingest domain, a streaming domain, and a valid ICP filing. .
Note-
If your live center is located in a region outside the Chinese mainland and your acceleration region is set to Outside Chinese Mainland, your domains do not require an ICP filing.
-
If the ingest and streaming domains are two subdomains under the same apex domain, you only need to obtain an ICP filing for the apex domain.
-
Basic RTS workflow
Step 1: Activate ApsaraVideo Live
Video tutorial: Activate the live streaming service.
-
Log on to the ApsaraVideo Live console.
-
Click Enable Now. On the activation page, select a billing method (pay-by-traffic ) and then select the ApsaraVideo Live Service Agreement checkbox.
-
Click Enable Now.
Step 2: Add ingest and streaming domains
Before you can use the RTS service, you must add an ingest domain and a streaming domain.
Video tutorial: Add a domain name.
-
Prepare your domain names.
-
If you do not have a domain name, you can register one on the Alibaba Cloud Domains platform. For more information, see Register a domain name on Alibaba Cloud.
-
After registering a domain name, you may need to apply for an ICP filing depending on your usage. For more information, see ICP filing procedure.
Note-
To quickly test the basic features of ApsaraVideo Live, you can select a live center outside the Chinese mainland and set the acceleration region to Outside Chinese Mainland. In this case, an ICP filing is not required for your domain name.
-
If the ingest domain and streaming domain are two subdomains of the same root domain, you only need to obtain an ICP filing for the root domain.
-
-
-
Log on to the ApsaraVideo Live console.
In the left navigation pane, click Domain Names. The Domain Management page appears.
-
Click Add Domain.
NoteTo add a subdomain, add a prefix to your registered domain name. A subdomain does not need to be registered separately. Make sure to distinguish between the ingest domain and the streaming domain.
-
Configure the required domain name parameters.
ImportantWhen you add a domain name to ApsaraVideo Live for the first time, you must verify its ownership. For more information, see Verify domain ownership.
-
Record the generated CNAME record value for the next step.
After you add the domain, a configuration table appears. This table includes the streaming domain, record type (CNAME), hostname, and CNAME record value. You must add this CNAME record value at your DNS provider to enable CDN acceleration. You can also click CNAME Configuration Guide to complete the configuration.
Step 3: Configure a CNAME record
Point your domain to the CNAME address assigned by Alibaba Cloud. The following steps use Alibaba Cloud DNS.
-
Alibaba Cloud CDN verification servers are deployed in the Chinese mainland. If you configure geo-based DNS resolution with a CNAME record only for regions outside the Chinese mainland, the verification servers cannot resolve the CNAME address. The CNAME status appears as Pending Configuration. This does not affect the CDN acceleration service.
-
CNAME domains for Alibaba Cloud CDN, Dynamic Route for CDN (DCDN), ApsaraVideo Live, and ApsaraVideo VOD can only be used for scheduling and resolution by Alibaba Cloud CDN. Alibaba Cloud reserves the right to suspend any domains and accounts that misuse CNAME domains.
-
Log on to the Alibaba Cloud DNS-Authoritative Domains console.
-
In the left-side navigation pane, choose Authoritative DNS Resolution.
-
Find the domain that you want to configure and click Settings in the Actions column.
-
Click Add Record and configure the settings as shown in the following figure:
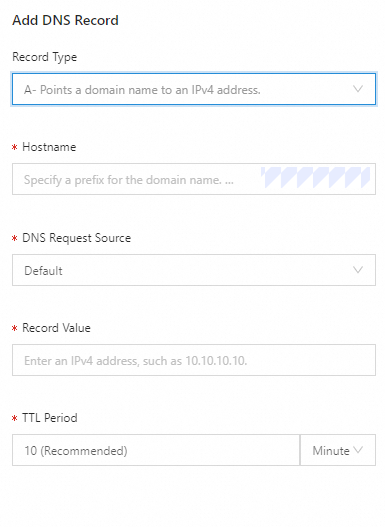
Parameter
Description
Record type
Select CNAME Record to point one domain name to another.
Host
Enter the prefix for the domain name. The table below lists common prefixes and example domains.
Resolution line
Select the default value.
Record value
Enter the CNAME value of the record.
TTL
Select the default value.
Prefix
Example domain
Description
demo
demo.aliyundoc.com
Resolves a subdomain.
@
aliyundoc.com
Resolves the apex domain.
*
*.aliyundoc.com
Wildcard resolution.
-
Click OK to complete the CNAME configuration.
Verify CNAME propagation
-
Method 1: On the Add CNAME Record page, click CNAME Configuration Guide. In the CNAME validation section, click Verify to check whether the CNAME configuration has taken effect.
-
Method 2: Run the nslookup -type=cname yourdomain.com command. If the returned resolution result matches the CNAME value for the domain in the ApsaraVideo Live console, the CNAME record is active.
C:\Users\xxx>nslookup -type=cname xxx
Server:  xxx
Address:  xxx

Non-authoritative answer:
xxx       canonical name = cxxx.cdngslb.com

C:\Users\xxx>
Configure an SSL certificate (optional)
To play live streams in a browser, configure an SSL certificate for your ingest and streaming domains. Enable secure streaming over HTTPS.
Step 4: Associate ingest and streaming domains
You must associate an ingest domain with a streaming domain to use RTS.
Video tutorial: Associate an ingest domain with a streaming domain.
-
In the left-side navigation pane, click Domain Names. Find your streaming domain and click Domain Settings in the Actions column to go to the page.
-
Click the Stream Ingest Information tab.
-
Click Add Stream Ingest Information or the edit icon next to Ingest Domain to select the ingest domain that you want to associate. In the Ingest Domain dialog box that appears, select an existing ingest domain from the Ingest Domain drop-down list and click OK. If you need to add a new ingest domain, you must first add it on the Domain Management page.
Step 5: Enable Real-Time Streaming (RTS)
-
Log on to the ApsaraVideo Live console.
-
In the left-side navigation pane, choose Live + > RTS.
-
Select the streaming domain for which you want to enable RTS.
-
Turn on the RTS switch and select Sub-second (End-to-End Latency: 400-800 ms) or Half-second (End-to-End Latency: 200-400 ms).
Click Quickly Generate Live Streaming URLs to generate ARTC protocol ingest and playback URLs. Ensure that you have configured an SSL certificate and correctly set the
Access-Control-Allow-Originresponse header.
Sub-second latency
-
Features: 400–800 ms end-to-end latency. Compatible with standard live streaming and other ingest and playback protocols.
-
Supported protocols: ARTC (WebRTC-based) for ingest and playback. Forward-compatible with standard live streaming: supports RTMP ingest, origin pull, and RTMP/FLV/HLS playback.
-
Ingest and playback tools: Compatible with most common tools. Recommended: Alibaba Cloud Live Ingest SDK and Alibaba Cloud Live Player SDK.
-
Other notes: If the stream contains B-frames or non-Opus audio, the system automatically removes B-frames and transcodes audio to Opus for H5 playback, incurring live transcoding fees.
Alibaba Cloud Web SDK playback: Native WebRTC does not support B-frames and uses Opus audio. The system auto-triggers transcoding based on the ingest content:
-
If the stream contains B-frames and AAC-encoded audio, video transcoding removes B-frames and audio transcoding converts AAC to Opus. You are charged standard video transcoding fees based on the source resolution.
-
If the stream does not contain B-frames but uses AAC audio, audio transcoding converts AAC to Opus. You are charged for audio-only transcoding.
-
If you also configure a live transcoding template, B-frame removal and Opus transcoding apply in addition to the template. You are charged for the combined transcoding operations.
Alibaba Cloud Native SDK playback: The SDK natively supports B-frames and AAC, so no automatic transcoding is triggered and no additional fees apply.
-
Half-second latency
-
Features: 200–400 ms end-to-end latency. Best for scenarios that demand the lowest possible latency.
-
Supported protocols: ARTC (WebRTC-based) only. Not compatible with standard live streaming: does not support RTMP ingest, origin pull, or RTMP/FLV/HLS playback.
-
Ingest and playback tools: For ingest, you can use OBS with the WHIP protocol or the Alibaba Cloud Live Ingest SDK. For playback, you must use the Alibaba Cloud Player SDK.
-
Other notes: The streaming domain cannot use cloud features like transcoding or recording. Use a restreaming configuration to push the stream to another streaming domain for these features.
-
Click Configure Stream Relay and select an ingest domain to receive the restreamed RTMP stream. The domain must be associated with a streaming domain and have the ultra-low latency half-second mode and dual-stream disaster recovery features disabled. For example, if
push.example.comis associated withpull.example.com, you can pull the stream frompull.example.comusing standard protocols and use transcoding and recording.
-
-
RTS configuration can take several minutes to propagate across the network. Please wait before you start testing.
-
To associate one ingest domain with multiple streaming domains, Associate primary and sub-streaming domains.
-
RTS and standard live streaming can share a streaming domain, but RTS uses UDP while standard streaming uses TCP. A separate streaming domain for RTS is recommended.
Step 6: Generate ingest and streaming URLs
Method 1: Generate URLs in the console
After you enable RTS, click Generate URLs in the ingest and playback experience tool. Enter an AppName and StreamName to generate RTS ingest and streaming URLs over the ARTC protocol.
Select a streaming domain, confirm the associated ingest domain, enable Real-Time Streaming (RTS), and choose a latency mode: sub-second latency (400–800 ms, supports RTMP/ARTC ingest and HLS/FLV/RTMP/ARTC playback) or half-second latency (200–400 ms, ARTC only). Configure an SSL certificate and the Access-Control-Allow-Origin response header before use.
Method 2: Assemble URLs manually
To manually assemble URLs, gather the following: ingest domain, streaming domain, AppName, StreamName, transcoding template ID (if applicable), and authentication string (if applicable).
|
URL type |
URL format |
Assembly rule |
|
Ingest URL |
Supports RTMP, RTS, and SRT. We recommend using RTMP for ingest. Example: RTMP: Note
RTS supports pulling streams using URLs in RTS format. |
Ingest domain + AppName + StreamName + Authentication string |
|
Streaming URL |
Supports RTMP, FLV, M3U8, and RTS. We recommend that you use RTS for playback. Example: RTS: |
Streaming domain + AppName + StreamName + Authentication string |
|
Transcoded stream URL Note
If you use a transcoding template, you must assemble the streaming URL using this format. |
Supports RTMP, FLV, M3U8, and RTS. We recommend that you use RTS for playback. Example: RTS: |
Streaming domain + AppName + StreamName_Transcoding template ID + Authentication string |
-
For associated ingest and streaming domains, you can ingest and play streams as long as the AppName and StreamName are the same for both.
-
A transcoded stream URL requires a transcoding template. Find the template ID in the console. Live stream transcoding.
-
The authentication string (auth_key) is generated by an MD5 authentication algorithm. URL authentication must be enabled. Components of an authenticated URL.
-
Replace {transcoding_template_ID} or {authentication_string} with the actual data, and omit the curly braces {} from the final URL.
Step 7: Ingest and play RTS streams
Use the Try RTS tool in the console to test ingest and playback. Choose to ingest from your camera or share your screen, then click the corresponding button to start.
The console experience tool uses a proxy signaling domain. If you integrate the Web SDK directly, configure an SSL certificate and the Access-Control-Allow-Origin response header for your domains.
Alibaba Cloud RTS also provides mobile and web demos.
You can also integrate the following SDKs:
|
SDK type |
References |
|
Mobile |
|
|
Web |
For playback errors, run diagnostics with the Self-service troubleshooting tool.
Configure an SSL certificate (optional)
Configure an SSL certificate for your ingest and streaming domains to enable RTS playback in browsers. Enable secure streaming over HTTPS.
An SSL certificate is optional when using the RTS SDKs or demos.
Configure custom URL authentication (optional)
URL authentication protects your content from unauthorized access and is enabled by default for new domains.
The default configuration requires no further setup. To customize, configure the Primary Key, Secondary Key, and Validity Period.
Video tutorial: Configure URL authentication.
-
In the left-side navigation pane, choose Domain Names. Select the streaming domain for which you have enabled RTS and click Domain Settings in the Actions column.
-
Choose to go to the Access Control page.
-
Click the URL Signing tab and then click Modify.
NoteIf URL authentication is already enabled, click Modify to configure the authentication settings. If it was previously disabled, turn on the URL Signing switch to configure the settings.
-
Configure the URL authentication information. The following table describes the parameters.
Parameter
Description
Authentication Type
ApsaraVideo Live streaming domains support only Type A authentication to effectively protect origin resources.
Note
A URL authentication failure returns a 403 error. If this happens, recalculate the URL.
-
MD5 calculation error
For example:
X-Tengine-Error:denied by req auth: invalid md5hash=de7bfdc915ced05e17380a149bd760be -
Timestamp error
For example:
X-Tengine-Error:denied by req auth: expired timestamp=1439469547
Primary Key
The console generates a primary key when you add a domain. View it at Domains, selecting your domain, clicking Domain Settings, and then choosing . You can also set a custom primary key.
Secondary Key
Enter a custom secondary key for your authentication method.
Validity Period
The validity period controls how long an authenticated URL can initiate sessions. Active sessions continue after expiry, but new requests with an expired URL fail.
Default: 1,440 minutes (1 day). Minimum: 1 minute.
-
Other operations: Verify RTS latency
Add a time synchronizer URL to your stream to compare stream time with a standard time source and verify RTS. The following example uses the OBS streaming tool.
In OBS, add the time synchronizer URL as a browser source in Sources, then click Start Streaming.