Lindorm-cqlsh is a command-line shell tool provided by the Lindorm team. It is based on Cassandra cqlsh and supports Windows and Unix operating systems. Install Lindorm-cqlsh on your local machine or an ECS instance to connect to and access LindormTable.
Prerequisites
-
The client's IP address has been added to the Lindorm whitelist.
-
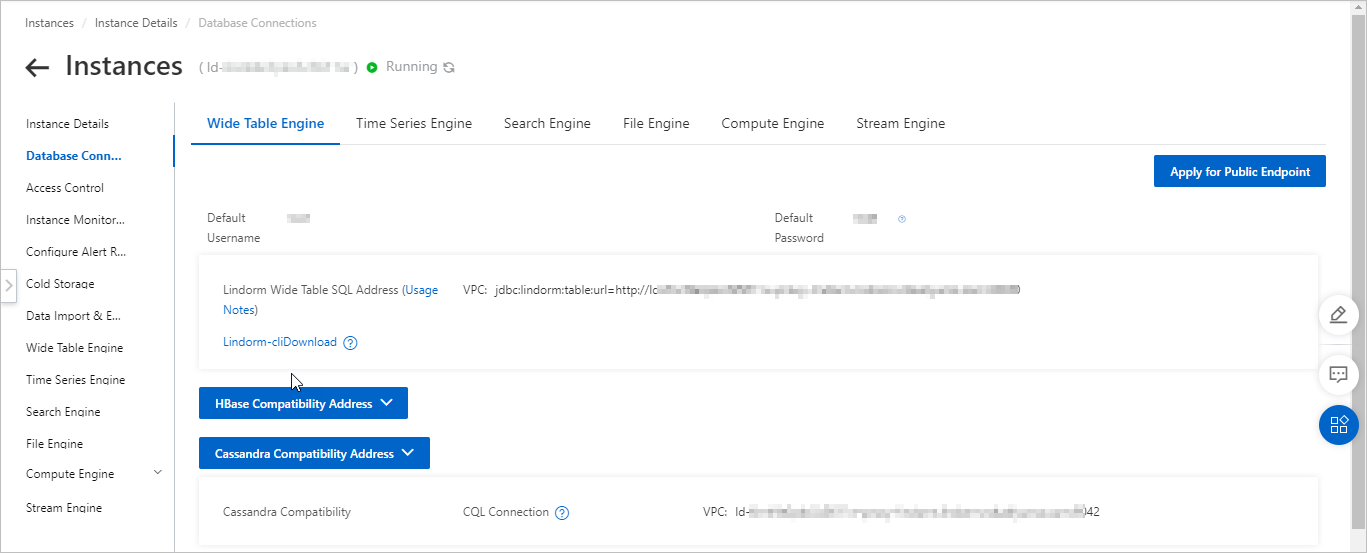
Obtain the LindormTable endpoint displayed next to CQL Connection on the Wide Table Engine tab of the Lindorm console. For more information, see View endpoints.
-
Download and extract Lindorm-cqlsh.
If your application runs on an ECS instance, ensure that the Lindorm instance and the ECS instance meet the following requirements for network connectivity. For more information about how to view ECS instance details, see View instance information.
The Lindorm instance and the ECS instance are deployed in the same region. We recommend that you deploy the two instances in the same zone to reduce network latency.
The network types are identical.
Common commands
After you use Lindorm-cqlsh to connect to LindormTable, you can run the following commands:
Documented shell commands:===========================
CAPTURE  COPY  DESCRIBE  LOGIN   DESC  EXIT  HELP PAGING  SHOW
CQL help topics:================
CREATE_KEYSPACE        TEXT                ALTER_KEYSPACE           TIME       CREATE_ROLE
DROP_USER              TIMESTAMP           ALTER_TABLE              CREATE_TABLE
GRANT                  ALTER_USER          INSERT                   UPDATE
CREATE_USER            INSERT_JSON         USE                      ASCII
DATE                   INT                 UUID                     BATCH
DELETE                 JSON                BEGIN                    KEYWORDS
BLOB                   DROP_COLUMNFAMILY   LIST_PERMISSIONSBOOLEAN  LIST_ROLES
COUNTER                DROP_INDEX          LIST_USERS               DROP_KEYSPACE
PERMISSIONS            CREATE_COLUMNFAMILY REVOKE                   DROP_ROLE
SELECT                 CREATE_INDEX        DROP_TABLE                SELECT_JSON
Procedure
-
Run the following command to connect Lindorm-cqlsh to Lindorm.
bin/cqlsh <host> <port> -u <username> -p <password>NoteWe recommend that you set the Python version of the path in which bin/cqlsh is located to 2.7.x.
-
<host>: The LindormTable CQL Connection endpoint from the Lindorm console. Example:
ld-bp17j28j2y7pm****-proxy-lindorm.lindorm.rds.aliyuncs.com. -
<port>: The port number of the CQL Connection endpoint for the Lindorm wide-table engine. The default value is 9042.
<username>: the username that you want to use to connect to LindormTable. Default value: root.
-
<password>: The password for the username. If you forget your password, reset it in the cluster management system. For more information, see Reset password.
-
Lindorm supports multiple Lindorm-cqlsh access commands. For more information, run
bin/cqlsh -help.
-
Use Lindorm-cqlsh to create a keyspace. The concept of a keyspace in Lindorm is similar to the concept of a database in a relational database system. A keyspace can contain one or more tables or column families.
CREATE KEYSPACE test_keyspace WITH replication = {'class': 'SimpleStrategy', 'replication_factor': 1};After the keyspace is created, run the following command to query the keyspace:
DESCRIBE KEYSPACE test_keyspace; -
Run the USE command to switch to the keyspace.
USE test_keyspace;The following information is returned:
cqlsh:test_keyspace> -
The following code example shows how to access Lindorm wide tables using Lindorm-cqlsh:
-
Use Lindorm-cqlsh to create a table named test_user. The table contains two columns of the TEXT data type: first_name and last_name. The first_name field is the primary key of the table.
CREATE TABLE test_user(first_name text, last_name text, PRIMARY KEY (first_name));NoteIf you have not run
USE test_keyspace;, create the table using the following statement:CREATE TABLE test_keyspace.test_user(first_name text, last_name text, PRIMARY KEY (first_name)); -
Query the information about the test_user table.
DESCRIBE TABLE test_user;The following information is returned:
CREATE TABLE test_keyspace.test_user ( first_name text PRIMARY KEY, last_name text ) WITH bloom_filter_fp_chance = 0.01 AND caching = {'keys': 'ALL', 'rows_per_partition': 'NONE'} AND comment = '' AND compaction = {'class': 'org.apache.cassandra.db.compaction.SizeTieredCompactionStrategy', 'max_threshold': '32', 'min_threshold': '4'} AND compression = {'chunk_length_in_kb': '64', 'class': 'org.apache.cassandra.io.compress.LZ4Compressor'} AND crc_check_chance = 1.0 AND dclocal_read_repair_chance = 0.1 AND default_time_to_live = 0 AND gc_grace_seconds = 864000 AND max_index_interval = 2048 AND memtable_flush_period_in_ms = 0 AND min_index_interval = 128 AND read_repair_chance = 0.0 AND speculative_retry = '99PERCENTILE';NoteYou can execute the DESCRIBE TABLE statement to query the statement that you execute to create the table. The returned information shows the custom settings and default settings in a formatted manner. Lindorm is not fully compatible with the table attributes that are supported by Cassandra. If a table attribute is not supported by Lindorm, the system still returns the attribute. The returned value is the default attribute value in Cassandra.
-
Lindorm ignores the following table attributes:
crc_check_chance, gc_grace_seconds, read_repair_chance, speculative_retry, dclocal_read_repair_chance, crc_check_chance. -
Lindorm fully supports the following attributes:
compression, default_time_to_live.
-
-
Insert data into the test_user table.
INSERT INTO test_user (first_name, last_name) VALUES ('test', 'LINDORM'); INSERT INTO test_user (first_name, last_name) VALUES ('Zhang', 'San'); INSERT INTO test_user (first_name) VALUES ('Wu'); -
Check whether the data is inserted as expected. We recommend that you do not run the following command in scenarios in which a large volume of data is inserted:
SELECT COUNT(*) FROM test_user;The following information is returned:
  count
-------
    3

(1 rows)
You can run the following command to query the details of the inserted data:
SELECT * FROM test_user;The following information is returned:
first_name | last_name ------------+----------- test | LINDORM Wu | null Zhang | San (3 rows) -
Delete the value in the last_name column for a specified row in the test_user table, and then query the table to verify the deletion.
DELETE last_name FROM test_user WHERE first_name='test';
SELECT * FROM test_user WHERE first_name='test';
The following information is returned:
first_name | last_name ------------+----------- test | null -
You can delete the specified rows from the test_user table and then query the table to verify the deletion.
DELETE FROM test_user WHERE first_name='test';
SELECT * FROM test_user WHERE first_name='test';
The following information is returned:
first_name | last_name ------------+----------- (0 rows) -
Truncate or delete a table. Only superusers can run
TRUNCATE, DROP TABLE, DROP KEYSPACE.TRUNCATE test_user; DROP TABLE test_user; -
Use a search index in Lindorm.
Run Lindorm Cassandra Query Language (CQL) commands to create a search index for a wide table in LindormTable. Before you create a search index for a wide table, make sure that the attributes of the table meet the corresponding requirements. For more information about the requirements, submit a ticket to contact technical support.
CREATE TABLE test_keyspace.tb (cn1 text PRIMARY KEY, cn2 text, cn3 text) WITH extensions = {'CONSISTENCY_TYPE':'strong', 'MUTABILITY':'MUTABLE_LATEST'}; CREATE SEARCH INDEX tbidx ON test_keyspace.tb WITH COLUMNS (cn2, cn3); REBUILD SEARCH INDEX ON test_keyspace.tb ; INSERT INTO test_keyspace.tb (cn1, cn2, cn3) VALUES ('v11', 'v12', 'v13'); SELECT * FROM test_keyspace.tb WHERE cn2 like '%v1';NoteThis example creates an index table named
tbcalledtbidx, inserts data, and performs a fuzzy query. -
Use a secondary index in Lindorm.
Run Lindorm CQL commands to create a secondary index for a wide table in LindormTable. Before you create a secondary index for a wide table, make sure that the attributes of the table meet the corresponding requirements. For information about the requirements, see Secondary index.
CREATE TABLE test_keyspace.tb (cn1 text PRIMARY KEY, cn2 text, cn3 text) WITH extensions = {'CONSISTENCY_TYPE':'strong', 'MUTABILITY':'MUTABLE_LATEST'};
CREATE INDEX tbidx ON test_keyspace.tb (cn2);
INSERT INTO test_keyspace.tb (cn1, cn2, cn3) VALUES ('v11', 'v12', 'v13');
SELECT * FROM test_keyspace.tb WHERE cn2 = 'v12';
-