Quick start with Flink SQL JOIN
Flink SQL supports five join types for streaming data pipelines: regular joins, interval joins, temporal joins, lookup joins, and lateral joins. Before choosing a join type, understand a key difference from batch SQL: in streaming queries, joins accumulate state over time. Choosing the wrong join type can cause unbounded state growth and degrade pipeline performance.
Two constraints apply to all join types:
-
Cartesian products are not supported. Queries that would produce one fail.
-
JOIN order is not optimized by default. In the
FROMclause, list the table with the lowest update frequency first and the table with the highest update frequency last.
Joins overview
| Join type | When to use | Key constraint |
|---|---|---|
| Regular join | General-purpose joins where input tables support INSERT, UPDATE, and DELETE | Both sides are kept in state indefinitely; configure a time-to-live (TTL) to bound state growth |
| Interval join | Joins where matching rows must fall within a time range | Requires at least one equivalent join condition and one time-based condition |
| Temporal join | Joining a stream with versioned table data at a specific point in time | Both tables must use the same time semantics (event time or processing time) |
| Lookup join | Enriching a stream with static or slowly-changing data from an external system | One table must have a processing-time attribute; the other must use a lookup source connector |
| Lateral join | Joining a table with the output of a table-valued function (TVF) | The ON clause must always be ON TRUE |
Prerequisites
Before you begin, ensure that you have:
-
Access to the Realtime Compute for Apache Flink console
-
A workspace with a session cluster. If you don't have a session cluster, see Create a session cluster.
Regular joins
Regular joins are the most commonly used join type. New records and updates to both tables immediately affect the join result. Regular joins support INSERT, UPDATE, and DELETE operations on input tables.
Regular joins keep both sides of the join in state indefinitely. State can grow without bound depending on the number of distinct input rows. To limit state growth, configure a TTL — but be aware that TTL may affect result accuracy.
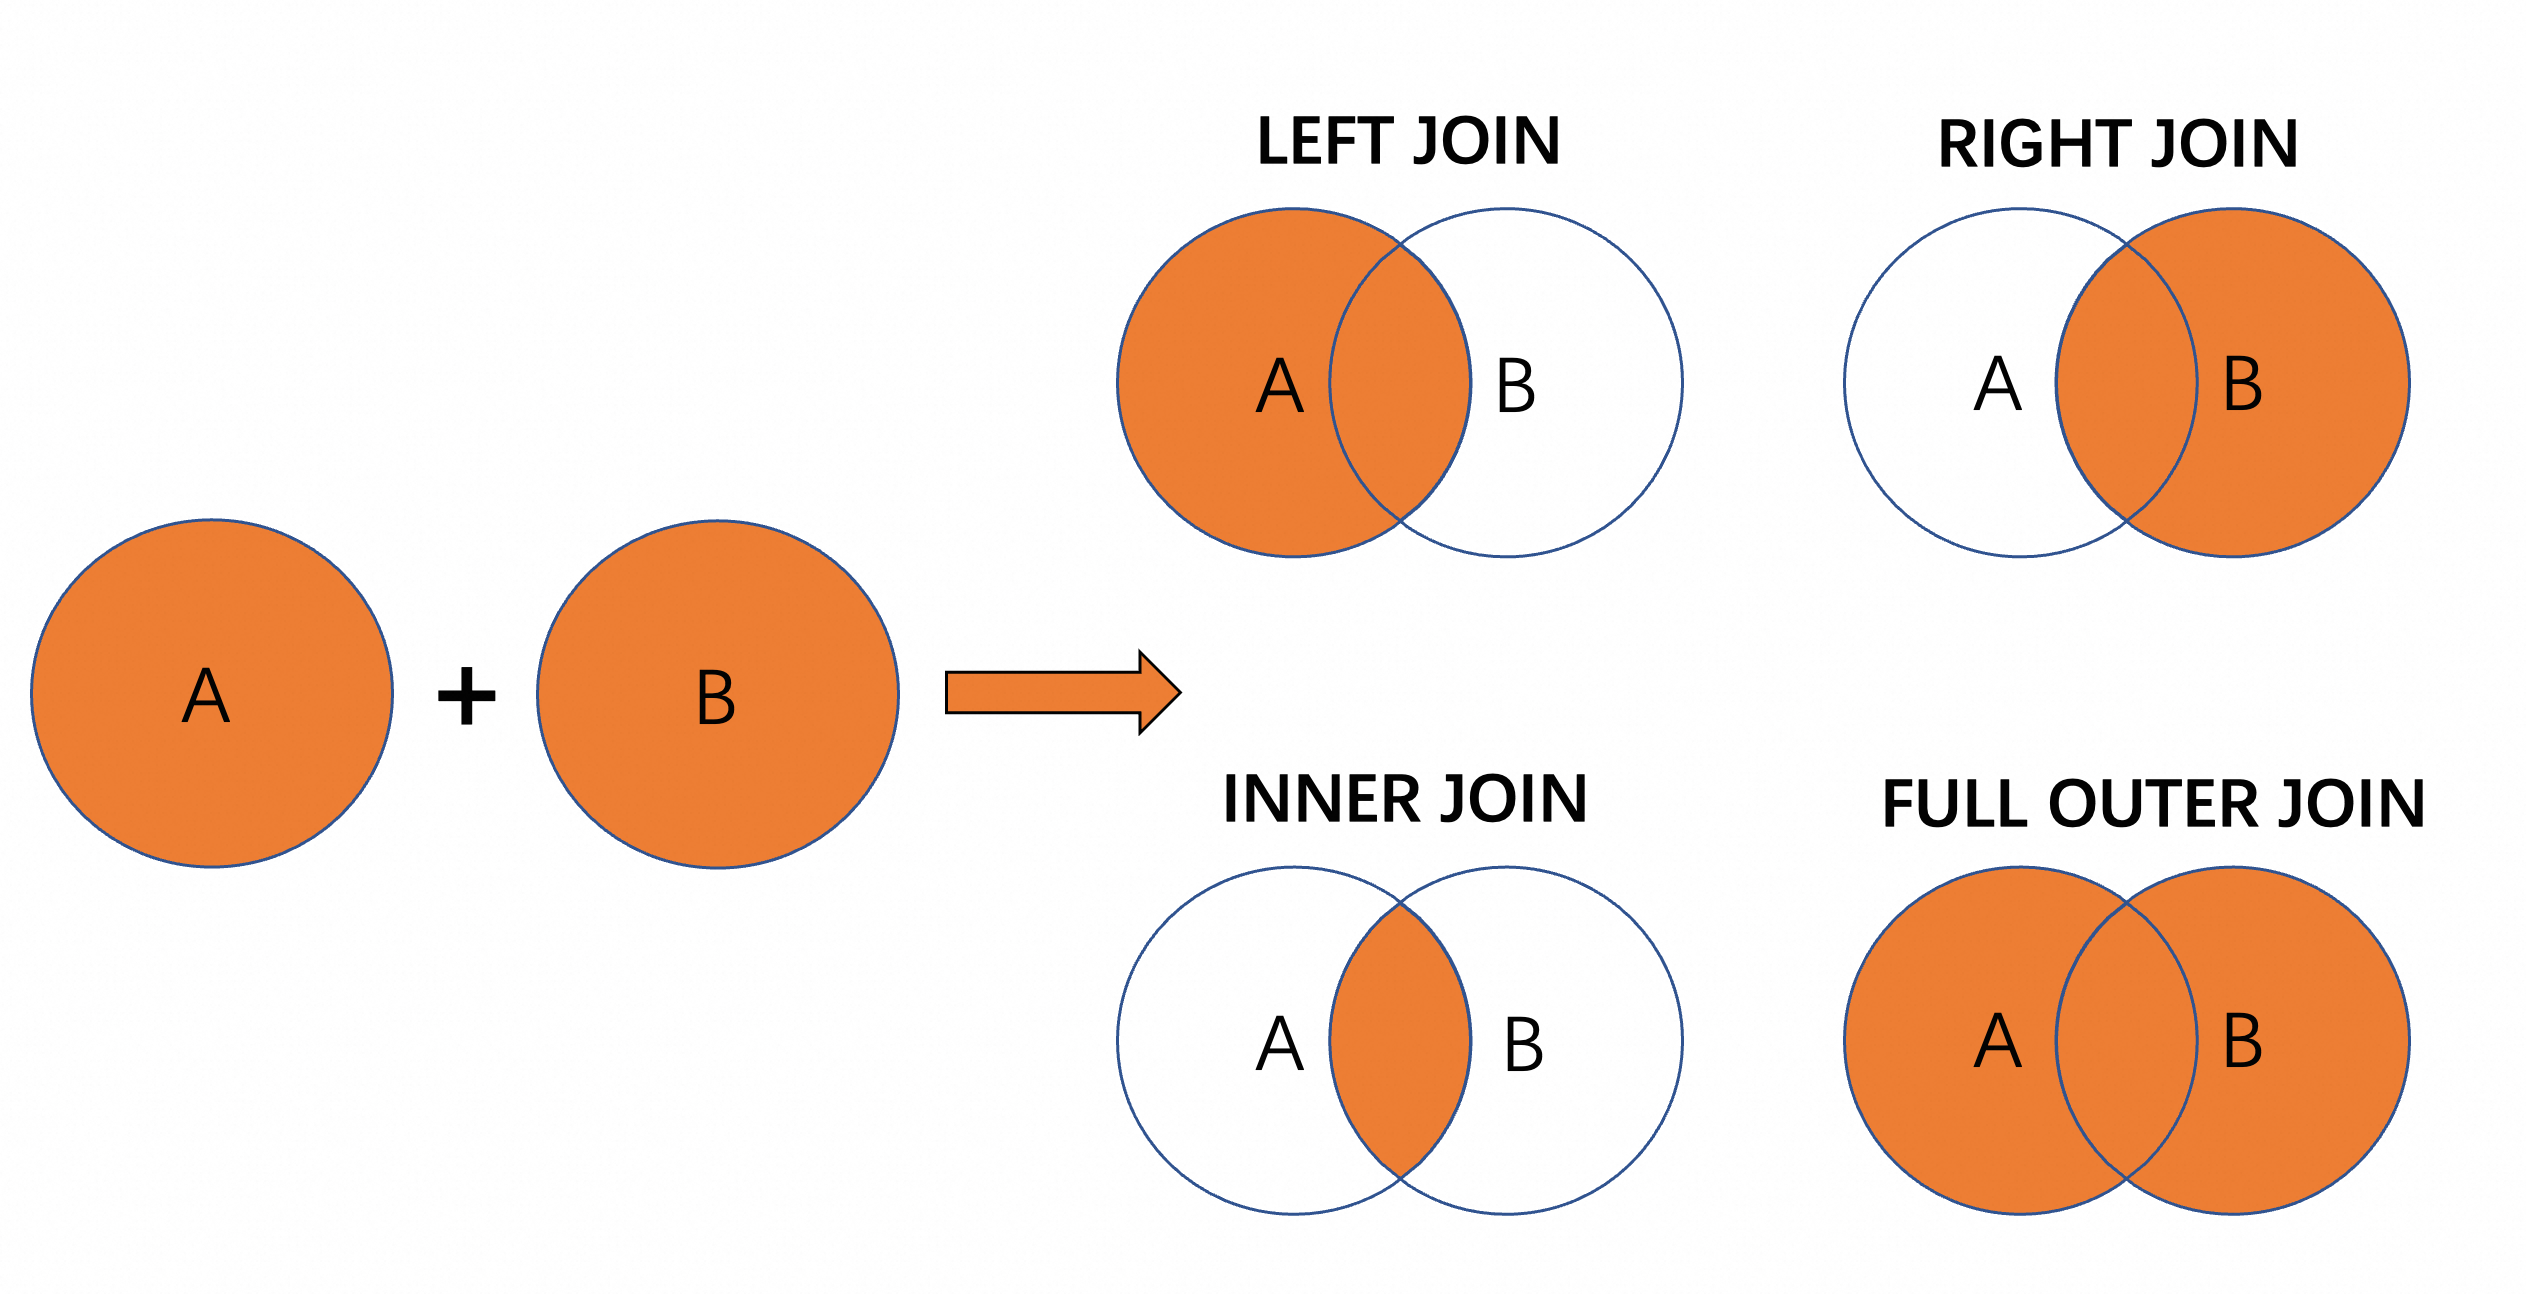
The four standard SQL join operations are supported:
| Operation | Returns |
|---|---|
| INNER JOIN | Only rows where the join condition is met in both tables |
| LEFT JOIN | All rows from the left table; NULLs for non-matching rows in the right table |
| RIGHT JOIN | All rows from the right table; NULLs for non-matching rows in the left table |
| FULL OUTER JOIN | All rows from both tables; NULLs where there is no match |
Regular joins diagram
Example: join superhero codenames with real names
This example uses the Faker connector to generate two tables and joins them on agent_id.
-
Log on to the Realtime Compute for Apache Flink console.
-
Find your workspace and click Console in the Actions column.
-
In the left-side navigation pane, choose Development > ETL.
-
Click the + icon, select New Blank Stream Draft, enter a name and engine version in the New Draft dialog, and then click Create.
-
Paste the following SQL into the editor:
CREATE TEMPORARY TABLE NOC ( agent_id STRING, codename STRING ) WITH ( 'connector' = 'faker', 'fields.agent_id.expression' = '#{regexify ''(1|2|3|4|5){1}''}', -- Generates a number from 1 to 5 'fields.codename.expression' = '#{superhero.name}', -- Generates a superhero name 'number-of-rows' = '10' ); CREATE TEMPORARY TABLE RealNames ( agent_id STRING, name STRING ) WITH ( 'connector' = 'faker', 'fields.agent_id.expression' = '#{regexify ''(1|2|3|4|5){1}''}', 'fields.name.expression' = '#{Name.full_name}', -- Generates a random full name 'number-of-rows' = '10' ); SELECT name, codename FROM NOC INNER JOIN RealNames ON NOC.agent_id = RealNames.agent_id; -- Matches rows where agent_id is the same in both tables (values 1-5) -
Click Debug in the upper-right corner, select your cluster, and click OK.

For the full regular join syntax reference, see Regular join statements.
Interval joins
An interval join matches rows from two streams where their timestamps fall within a defined time range. Each row in one stream is matched with rows in the other stream whose timestamp is within the specified interval. This is commonly used to correlate events that must occur within a bounded time window of each other.
An interval join requires:
-
At least one equivalent join condition
-
At least one time-based condition specifying the interval, using
<,<=,>=,>,BETWEEN, or an equality check on time attributes of the same type
Interval joins diagram

Example: filter orders shipped within 3 hours
This example joins an orders table with a shipments table and returns only rows where the shipment occurred within 3 hours of the order.
Create a draft on the ETL page as described in Regular joins, then paste the following SQL:
CREATE TEMPORARY TABLE orders (
  id INT,
  order_time AS TIMESTAMPADD(HOUR, CAST(FLOOR(RAND()*(1-5+1)+5)*(-1) AS INT), CURRENT_TIMESTAMP)
  -- Generates a random timestamp 2-4 hours before the current time
)
WITH (
  'connector' = 'datagen',
  'rows-per-second' = '10',
  'fields.id.kind' = 'sequence',
  'fields.id.start' = '1',
  'fields.id.end' = '100'
);

CREATE TEMPORARY TABLE shipments (
  order_id INT,
  shipment_time AS TIMESTAMPADD(HOUR, CAST(FLOOR(RAND()*(1-5+1))+1 AS INT), CURRENT_TIMESTAMP)
  -- Generates a random timestamp 0-2 hours before the current time
)
WITH (
  'connector' = 'datagen',
  'rows-per-second' = '5',
  'fields.order_id.kind' = 'sequence',
  'fields.order_id.start' = '1',
  'fields.order_id.end' = '100'
);

SELECT
  o.id AS order_id,
  o.order_time,
  s.shipment_time,
  TIMESTAMPDIFF(HOUR, o.order_time, s.shipment_time) AS hour_diff
FROM orders o
JOIN shipments s ON o.id = s.order_id
WHERE
    o.order_time BETWEEN s.shipment_time - INTERVAL '3' HOUR AND s.shipment_time;
-- Returns only orders where the time between placement and shipment is within 3 hours
Click Debug in the upper-right corner and click OK. The following figure shows the debugging results.

For the full interval join syntax reference, see Interval join.
Temporal joins
A temporal join joins a stream with a versioned table at a specific point in time. Instead of always using the latest version of the dimension data, a temporal join looks up the version that was current at the moment each stream event arrived. This is useful when the lookup data changes over time — for example, currency exchange rates or product prices — and you need historically accurate calculations.
The syntax uses FOR SYSTEM_TIME AS OF:
FROM stream_table
JOIN versioned_table FOR SYSTEM_TIME AS OF stream_table.event_time AS v
ON stream_table.key = v.key
Temporal joins diagram

Example: convert transaction amounts using the exchange rate at transaction time
This example joins a transactions stream with a currency_rates versioned table. Each transaction is converted using the exchange rate that was in effect when the transaction occurred, not the current rate.
Step 1: generate simulated data (optional)
Create a draft on the ETL page as described in Regular joins, then paste the following SQL to write simulated data to Apache Kafka:
CREATE TEMPORARY TABLE currency_rates (
  `currency_code` STRING,
  `eur_rate` DECIMAL(6,4),
  `rate_time` TIMESTAMP(3),
  WATERMARK FOR `rate_time` AS rate_time - INTERVAL '15' SECOND,
  PRIMARY KEY (currency_code) NOT ENFORCED
) WITH (
  'connector' = 'upsert-kafka',
  'topic' = 'currency_rates',
  'properties.bootstrap.servers' = '${secret_values.kafkahost}',
  'key.format' = 'raw',
  'value.format' = 'json'
);

CREATE TEMPORARY TABLE transactions (
  `id` STRING,
  `currency_code` STRING,
  `total` DECIMAL(10,2),
  `transaction_time` TIMESTAMP(3),
  WATERMARK FOR `transaction_time` AS transaction_time - INTERVAL '30' SECOND
) WITH (
  'connector' = 'kafka',
  'topic' = 'transactions',
  'properties.bootstrap.servers' = '${secret_values.kafkahost}',
  'key.format' = 'raw',
  'key.fields' = 'id',
  'value.format' = 'json'
);

CREATE TEMPORARY TABLE currency_rates_faker (
  `currency_code` STRING,
  `eur_rate` DECIMAL(6,4),
  `rate_time` TIMESTAMP(3)
)
WITH (
  'connector' = 'faker',
  'fields.currency_code.expression' = '#{Currency.code}',
  'fields.eur_rate.expression' = '#{Number.randomDouble ''4'',''0'',''10''}',
  'fields.rate_time.expression' = '#{date.past ''15'',''SECONDS''}',
  'rows-per-second' = '2'
);

CREATE TEMPORARY TABLE transactions_faker (
  `id` STRING,
  `currency_code` STRING,
  `total` DECIMAL(10,2),
  `transaction_time` TIMESTAMP(3)
)
WITH (
  'connector' = 'faker',
  'fields.id.expression' = '#{Internet.UUID}',
  'fields.currency_code.expression' = '#{Currency.code}',
  'fields.total.expression' = '#{Number.randomDouble ''2'',''10'',''1000''}',
  'fields.transaction_time.expression' = '#{date.past ''30'',''SECONDS''}',
  'rows-per-second' = '2'
);

BEGIN STATEMENT SET;

INSERT INTO currency_rates
SELECT * FROM currency_rates_faker;

INSERT INTO transactions
SELECT * FROM transactions_faker;

END;
Click Deploy in the upper-right corner. In the left-side navigation pane, choose O&M > Deployments, find your deployment, and click Start in the Actions column. In the Start Job panel, select Initial Mode and click Start.
Step 2: run the temporal join
Create another draft on the ETL page and paste the following SQL to read the simulated data and run the temporal join:
CREATE TEMPORARY TABLE currency_rates (
  `currency_code` STRING,
  `eur_rate` DECIMAL(6,4),
  `rate_time` TIMESTAMP(3),
  WATERMARK FOR `rate_time` AS rate_time - INTERVAL '15' SECOND,
  PRIMARY KEY (currency_code) NOT ENFORCED
) WITH (
  'connector' = 'upsert-kafka',
  'topic' = 'currency_rates',
  'properties.bootstrap.servers' = '${secret_values.kafkahost}',
  'properties.auto.offset.reset' = 'earliest',
  'properties.group.id' = 'currency_rates',
  'key.format' = 'raw',
  'value.format' = 'json'
);

CREATE TEMPORARY TABLE transactions (
  `id` STRING,
  `currency_code` STRING,
  `total` DECIMAL(10,2),
  `transaction_time` TIMESTAMP(3),
  WATERMARK FOR `transaction_time` AS transaction_time - INTERVAL '30' SECOND
) WITH (
  'connector' = 'kafka',
  'topic' = 'transactions',
  'properties.bootstrap.servers' = '${secret_values.kafkahost}',
  'properties.auto.offset.reset' = 'earliest',
  'properties.group.id' = 'transactions',
  'key.format' = 'raw',
  'key.fields' = 'id',
  'value.format' = 'json'
);

SELECT
  t.id,
  t.total * c.eur_rate AS total_eur,
  c.eur_rate,
  t.total,
  c.currency_code,
  c.rate_time,
  t.transaction_time
FROM transactions t
JOIN currency_rates FOR SYSTEM_TIME AS OF t.transaction_time AS c
ON t.currency_code = c.currency_code;
Click Debug in the upper-right corner and click OK.
The result shows point-in-time rate lookups: the exchange rate changed at 20:16:11 and 20:35:22. A transaction that arrived at 20:35:14 uses the rate from 20:16:11 because the rate had not yet changed at that moment.

If you only need to join based on when events are processed rather than when they occurred, use processing-time temporal joins instead. See Processing-time temporal join statements.
Lookup joins
A lookup join enriches a data stream with static or slowly-changing data stored in an external system. Each row from the stream is matched against the current snapshot of the external table at processing time. This is useful when reference data — such as product names or user profiles — lives in a relational database and needs to be combined with real-time events.
Requirements:
-
One table must have a processing-time attribute.
-
The other table must be connected through a lookup source connector (for example, the MySQL connector).
-
Append
FOR SYSTEM_TIME AS OF PROCTIME()to the dimension table. This ensures each stream row is matched against the dimension table snapshot at the time the row is processed. If the dimension table is updated after the join runs, earlier join results are unaffected. -
The
ONcondition must include an equivalent condition on a field that supports random lookup in the dimension table.
Lookup joins diagram

Example: enrich orders with product names from MySQL
This example joins a streaming orders table (using the Faker connector) with a static products table (using the MySQL connector) to add product names and flag high-value orders.
Create a draft on the ETL page as described in Regular joins, then paste the following SQL:
CREATE TEMPORARY TABLE orders (
    order_id STRING,
    product_id INT,
    order_total INT
) WITH (
  'connector' = 'faker',
  'fields.order_id.expression' = '#{Internet.uuid}',                              -- Generates a random UUID
  'fields.product_id.expression' = '#{number.numberBetween ''1'',''5''}',        -- Generates a number from 1 to 5
  'fields.order_total.expression' = '#{number.numberBetween ''1000'',''5000''}', -- Generates a number from 1000 to 5000
  'number-of-rows' = '10'
);

-- Join with static product data from MySQL
CREATE TEMPORARY TABLE products (
 product_id INT,
 product_name STRING
)
WITH(
  'connector' = 'mysql',
  'hostname' = '${secret_values.mysqlhost}',
  'port' = '3306',
  'username' = '${secret_values.username}',
  'password' = '${secret_values.password}',
  'database-name' = 'db2024',
  'table-name' = 'products'
);

SELECT
    o.order_id,
    p.product_name,
    o.order_total,
  CASE
    WHEN o.order_total > 3000 THEN 1
    ELSE 0
  END AS is_importance
  -- is_importance = 1 indicates a high-value order (order_total exceeds 3000)
FROM orders o
JOIN products FOR SYSTEM_TIME AS OF PROCTIME() AS p
-- FOR SYSTEM_TIME AS OF PROCTIME() joins each order row against the products snapshot at processing time
ON o.product_id = p.product_id;
The following figure shows an example of product data retrieved via the MySQL connector.

Click Debug in the upper-right corner and click OK. The following figure shows the debugging results.

For the full lookup join syntax reference, see JOIN statements for dimension tables.
Lateral joins
A lateral join evaluates a subquery for each row in the outer table and joins the outer row with the subquery result. This allows correlated subqueries in the FROM clause, which is useful for aggregating or filtering related records per row without multiple table scans.
Lateral joins may cause performance degradation if the inner subquery is complex or processes large amounts of data.
The ON clause must always be ON TRUE. Example: JOIN LATERAL TABLE(table_func(order_id)) t(res) ON TRUE.
Lateral joins diagram

Example: find the top 3 products by total sales
This example aggregates sales records per product and returns the three products with the highest total sales.
Create a draft on the ETL page as described in Regular joins, then paste the following SQL:
CREATE TEMPORARY TABLE sale (
  sale_id STRING,
  product_id INT,
  sale_num INT
)
WITH (
  'connector' = 'faker',
  'fields.sale_id.expression' = '#{Internet.uuid}',                         -- Generates a random UUID
  'fields.product_id.expression' = '#{regexify ''(1|2|3|4|5){1}''}',        -- Selects a number from 1 to 5
  'fields.sale_num.expression' = '#{number.numberBetween ''1'',''10''}',     -- Generates a random integer from 1 to 10
  'number-of-rows' = '50'
);

CREATE TEMPORARY TABLE products (
 product_id INT,
 product_name STRING,
 PRIMARY KEY(product_id) NOT ENFORCED
)
WITH(
  'connector' = 'mysql',
  'hostname' = '${secret_values.mysqlhost}',
  'port' = '3306',
  'username' = '${secret_values.username}',
  'password' = '${secret_values.password}',
  'database-name' = 'db2024',
  'table-name' = 'products'
);

SELECT
    p.product_name,
    s.total_sales
FROM products p
LEFT JOIN LATERAL
    (SELECT SUM(sale_num) AS total_sales FROM sale WHERE sale.product_id = p.product_id) s ON TRUE
ORDER BY total_sales DESC
LIMIT 3;
Click Debug in the upper-right corner and click OK. The following figure shows the debugging results.

What's next
-
Regular join statements — full syntax and options for regular joins
-
Interval join — full syntax and options for interval joins
-
JOIN statements for dimension tables — full syntax and options for lookup joins
-
Processing-time temporal join statements — temporal joins based on processing time rather than event time