Spark Thrift Server is an Apache Spark service that supports SQL query execution over JDBC or ODBC connections, making it straightforward to integrate EMR Serverless Spark with Business Intelligence (BI) tools, data visualization tools, and custom applications. This topic describes how to create a Spark Thrift Server session, generate an access token, and connect from Python, Java, Beeline, Apache Superset, Hue, DataGrip, and Redash.
Prerequisites
Before you begin, ensure that you have:
A workspace. For more information, see Manage workspaces
Create a Spark Thrift Server session
After you create a Spark Thrift Server session, you can select it when creating a Spark SQL task.
Log on to the EMR console.
In the left-side navigation pane, choose EMR Serverless > Spark.
On the Spark page, click the workspace name.
In the left-side navigation pane of the EMR Serverless Spark page, choose Operation Center > Sessions.
On the Session Manager page, click the Spark Thrift Server Sessions tab.
Click Create Spark Thrift Server Session.
Configure the parameters and click Create.
Parameter Description Name Session name. Must be 1–64 characters and can contain letters, digits, hyphens (-), underscores (_), and spaces. Deployment Queue The queue used to deploy the session. Select a development queue or a queue shared by development and production environments. For more information, see Resource Queue Management. Engine version The Spark engine version for this session. For more information, see Engine version introduction. Use Fusion Acceleration Enables the Fusion engine to accelerate Spark workloads and reduce task costs. For billing details, see Billing and Fusion engine. Auto Stop Enabled by default. The session stops automatically after 45 minutes of inactivity. Network Connectivity The network connection used to access data sources or external services in a virtual private cloud (VPC). For setup instructions, see Configure network connectivity between EMR Serverless Spark and a data source across VPCs. Spark Thrift Server Port Port 443 for public endpoint access; port 80 for internal same-region endpoint access. Access Credential Only the Token method is supported. spark.driver.cores Number of CPU cores for the driver process. Default: 1. spark.driver.memory Memory available to the driver process. Default: 3.5 GB. spark.executor.cores Number of CPU cores per executor. Default: 1. spark.executor.memory Memory available to each executor. Default: 3.5 GB. spark.executor.instances Number of executors. Default: 2. Dynamic Resource Allocation Disabled by default. When enabled, configure: Minimum Number of Executors (default: 2) and Maximum Number of Executors (default: 10 if spark.executor.instancesis not set).More Memory Configurations Additional memory settings: spark.driver.memoryOverhead — non-heap memory per driver; if blank, Spark uses max(384 MB, 10% x spark.driver.memory). spark.executor.memoryOverhead — non-heap memory per executor; if blank, Spark usesmax(384 MB, 10% x spark.executor.memory). spark.memory.offHeap.size — off-heap memory for the application (default: 1 GB); effective only whenspark.memory.offHeap.enabledistrue. When using the Fusion engine, both parameters default to enabled and 1 GB respectively.Spark Configuration Additional Spark configuration key-value pairs, separated by spaces. For example: spark.sql.catalog.paimon.metastore dlf.On the Spark Thrift Server Sessions tab, click the session name, then open the Overview tab and copy the endpoint. Choose the endpoint that matches your network environment:
Public Endpoint — use when connecting from a local machine, external network, or cross-cloud environment. Internet traffic charges may apply. Apply appropriate security measures.
Internal Same-region Endpoint — use when connecting from an Alibaba Cloud ECS instance in the same region. Internal access is free and more secure, but is limited to the same-region Alibaba Cloud network.
Create a token
On the Spark Thrift Server Sessions tab, click the session name.
Click the Token Management tab.
Click Create Token.
Configure the parameters and click OK.
Parameter Description Name A name for the token. Expiration Time Number of days until the token expires. Must be 1 or more. Enabled by default; tokens expire after 365 days. Copy the token immediately after creation.
ImportantToken information cannot be retrieved after you leave this page. If a token expires or is lost, create a new one or reset the existing token.
Connect to Spark Thrift Server
All connection methods use the same four values. Retrieve these from the console before connecting:
| Placeholder | Where to find it |
|---|---|
<endpoint> | Overview tab of the session — Endpoint(Public) or Endpoint(Internal) |
<port> | 443 for public endpoint; 80 for internal same-region endpoint |
<username> | The token name from the Token Management tab |
<token> | The token value copied from the Token Management tab |
Internal same-region endpoint access is limited to resources within the same VPC.
Connect using Python
Install the required packages:
pip install pyhive thriftConnect to Spark Thrift Server and run a query. All examples call
hive.connect()with the endpoint, port, scheme, and token credentials. Usescheme='https'and port443for public access, orscheme='http'and port80for internal access.Connect by using a public endpoint
from pyhive import hive

if __name__ == '__main__':
    # Replace <endpoint>, <username>, and <token> with your actual values.
    cursor = hive.connect(
        '<endpoint>',
        port=443,
        scheme='https',
        username='<username>',
        password='<token>'
    ).cursor()
    cursor.execute('show databases')
    print(cursor.fetchall())
    cursor.close()
Connect by using an internal same-region endpoint
from pyhive import hive

if __name__ == '__main__':
    # Replace <endpoint>, <username>, and <token> with your actual values.
    cursor = hive.connect(
        '<endpoint>',
        port=80,
        scheme='http',
        username='<username>',
        password='<token>'
    ).cursor()
    cursor.execute('show databases')
    print(cursor.fetchall())
    cursor.close()
Connect using Java
Add the following dependencies to your
pom.xmlfile:The built-in Hive version in EMR Serverless Spark is 2.x. Use hive-jdbc 2.x to ensure compatibility.
<dependencies>
    <dependency>
        <groupId>org.apache.hadoop</groupId>
        <artifactId>hadoop-common</artifactId>
        <version>3.0.0</version>
    </dependency>
    <dependency>
        <groupId>org.apache.hive</groupId>
        <artifactId>hive-jdbc</artifactId>
        <version>2.1.0</version>
    </dependency>
</dependencies>
Connect and run a query. Both examples use the Hive JDBC URL format with
transportMode=httpand the token embedded in the HTTP path. The only difference is the port and SSL setting.Connect by using a public endpoint
import java.sql.Connection;
import java.sql.DriverManager;
import java.sql.ResultSet;
import java.sql.ResultSetMetaData;
import org.apache.hive.jdbc.HiveStatement;

public class Main {
    public static void main(String[] args) throws Exception {
        String url = "jdbc:hive2://<endpoint>:443/;transportMode=http;httpPath=cliservice/token/<token>";
        Class.forName("org.apache.hive.jdbc.HiveDriver");
        Connection conn = DriverManager.getConnection(url);
        HiveStatement stmt = (HiveStatement) conn.createStatement();

        String sql = "show databases";
        System.out.println("Running " + sql);
        ResultSet res = stmt.executeQuery(sql);

        ResultSetMetaData md = res.getMetaData();
        String[] columns = new String[md.getColumnCount()];
        for (int i = 0; i < columns.length; i++) {
            columns[i] = md.getColumnName(i + 1);
        }
        while (res.next()) {
            System.out.print("Row " + res.getRow() + "=[");
            for (int i = 0; i < columns.length; i++) {
                if (i != 0) {
                    System.out.print(", ");
                }
                System.out.print(columns[i] + "='" + res.getObject(i + 1) + "'");
            }
            System.out.println(")]");
        }

        conn.close();
    }
}
Connect by using an internal same-region endpoint
import java.sql.Connection;
import java.sql.DriverManager;
import java.sql.ResultSet;
import java.sql.ResultSetMetaData;
import org.apache.hive.jdbc.HiveStatement;

public class Main {
    public static void main(String[] args) throws Exception {
        String url = "jdbc:hive2://<endpoint>:80/;transportMode=http;httpPath=cliservice/token/<token>";
        Class.forName("org.apache.hive.jdbc.HiveDriver");
        Connection conn = DriverManager.getConnection(url);
        HiveStatement stmt = (HiveStatement) conn.createStatement();

        String sql = "show databases";
        System.out.println("Running " + sql);
        ResultSet res = stmt.executeQuery(sql);

        ResultSetMetaData md = res.getMetaData();
        String[] columns = new String[md.getColumnCount()];
        for (int i = 0; i < columns.length; i++) {
            columns[i] = md.getColumnName(i + 1);
        }
        while (res.next()) {
            System.out.print("Row " + res.getRow() + "=[");
            for (int i = 0; i < columns.length; i++) {
                if (i != 0) {
                    System.out.print(", ");
                }
                System.out.print(columns[i] + "='" + res.getObject(i + 1) + "'");
            }
            System.out.println(")]");
        }

        conn.close();
    }
}
Connect using Spark Beeline
Navigate to the Spark
bindirectory first, then connect. The path below is an example from an EMR on ECS cluster — adjust it to your actual Spark installation path. To find the path, runenv | grep SPARK_HOME.Connect by using a public endpoint
cd /opt/apps/SPARK3/spark-3.4.2-hadoop3.2-1.0.3/bin/

./beeline -u "jdbc:hive2://<endpoint>:443/;transportMode=http;httpPath=cliservice/token/<token>"
Connect by using an internal same-region endpoint
cd /opt/apps/SPARK3/spark-3.4.2-hadoop3.2-1.0.3/bin/ ./beeline -u "jdbc:hive2://<endpoint>:80/;transportMode=http;httpPath=cliservice/token/<token>"NoteThe code uses
/opt/apps/SPARK3/spark-3.4.2-hadoop3.2-1.0.3as an example of the Spark installation path in an EMR on ECS cluster. You need to adjust the path based on the actual Spark installation path on your client. If you are not sure about the Spark installation path, you can use theenv | grep SPARK_HOMEcommand to find it.The
spark-beelineclient is available directly on EMR on ECS clusters:Connect by using a public endpoint
spark-beeline -u "jdbc:hive2://<endpoint>:443/;transportMode=http;httpPath=cliservice/token/<token>"Connect by using an internal same-region endpoint
spark-beeline -u "jdbc:hive2://<endpoint>:80/;transportMode=http;httpPath=cliservice/token/<token>"
If Hive Beeline returns the following error, the Hive Beeline version is incompatible with Spark Thrift Server. Use Hive Beeline 2.x.
24/08/22 15:09:11 [main]: ERROR jdbc.HiveConnection: Error opening session
org.apache.thrift.transport.TTransportException: HTTP Response code: 404
Connect using Apache Superset
Apache Superset is a data exploration and visualization platform that supports a wide range of chart types. For setup instructions, see the Superset documentation.
Install the required package:
pip install thrift==0.20.0Start Superset and open the Superset interface.
Click DATABASE in the upper-right corner to open the Connect a database page.
Select Apache Spark SQL.
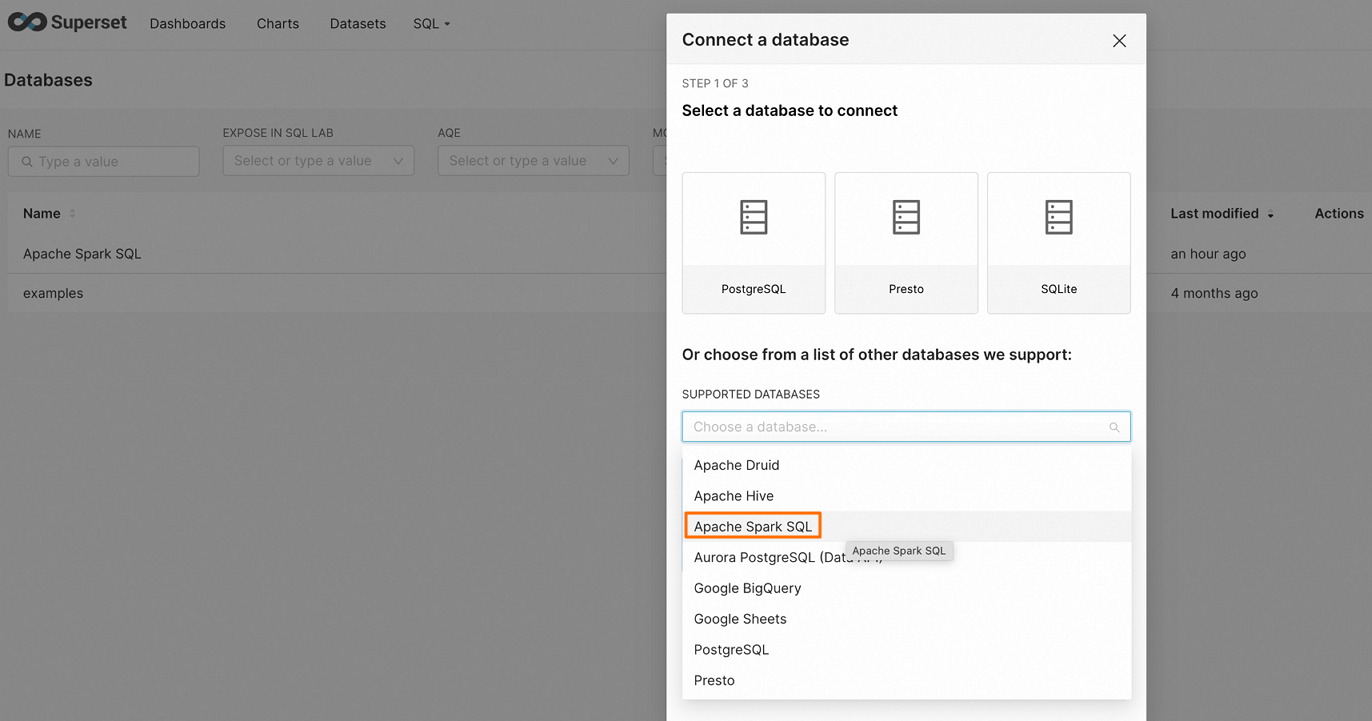
Enter the connection string for your network environment:
Connect by using a public endpoint
hive+https://<username>:<token>@<endpoint>:443/<db_name>Connect by using an internal same-region endpoint
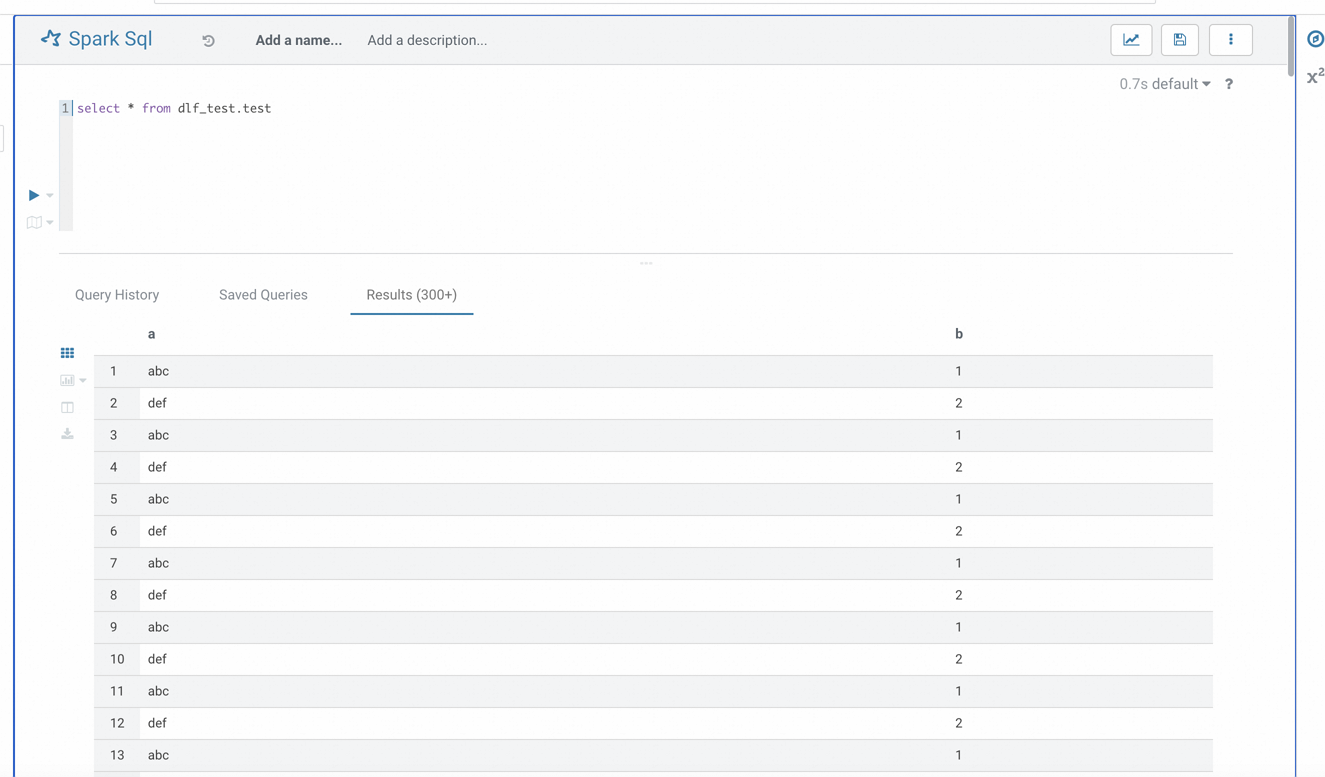
hive+http://<username>:<token>@<endpoint>:80/<db_name>Click FINISH to confirm the connection.
Connect using Hue
Hue is an open-source web interface for the Hadoop ecosystem.
Install the required package:
pip install thrift==0.20.0Add a Spark SQL connection to the Hue configuration file (typically
/etc/hue/hue.conf):Connect by using a public endpoint
[[[sparksql]]]
     name = Spark Sql
     interface=sqlalchemy
     options='{"url": "hive+https://<username>:<token>@<endpoint>:443/"}'
Connect by using an internal same-region endpoint
[[[sparksql]]]
     name = Spark Sql
     interface=sqlalchemy
     options='{"url": "hive+http://<username>:<token>@<endpoint>:80/"}'
Restart Hue to apply the changes:
sudo service hue restartOpen the Hue interface and select the Spark SQL option. A successful configuration lets you connect to Spark Thrift Server and run SQL queries.
Connect using DataGrip
DataGrip is a database IDE for querying, creating, and managing databases. The steps below use DataGrip 2025.1.2.
Open DataGrip.
Create a project.
Click
 and select File > New > Project.
Enter a project name (for example,
Spark) and click OK.
In the Database Explorer menu bar, click the icon
 and select Data Source > Other > Apache Spark.
In the Data Sources and Drivers dialog, configure the following:
Tab Parameter Description General Name A custom connection name, for example, spark_thrift_server.Authentication Authentication method Select No auth for development. In production, select User & Password to restrict SQL task submission to authorized users. Driver Driver version Click Apache Spark, then click Go to Driver and confirm the driver version is ver. 1.2.2. This version is required for compatibility with the Spark 3.x engine.URL Connection URL Enter the JDBC URL for your network environment. Public endpoint: jdbc:hive2://<endpoint>:443/;transportMode=http;httpPath=cliservice/token/<token>. Internal same-region endpoint:jdbc:hive2://<endpoint>:80/;transportMode=http;httpPath=cliservice/token/<token>.Options Run keep-alive query (Optional) Prevents automatic disconnection due to inactivity. 
Click Test Connection to confirm that the data source is configured successfully.

Click OK to complete the setup.
After connecting, right-click a table in the Database Explorer, select New > Query Console, and write SQL in the editor to query table data. For more information, see DataGrip Help.

Connect using Redash
Redash is an open-source BI tool with web-based query and data visualization capabilities. For installation instructions, see Setting up a Redash Instance.
Install the required package:
pip install thrift==0.20.0Log on to Redash.
In the left navigation pane, click Settings. On the Data Sources tab, click +New Data Source.
Configure the following parameters and click Create.
Parameter Description Type Selection Select Hive (HTTP). Name A custom name for the data source. Host The Spark Thrift Server endpoint from the Overview tab (public or internal). Port 443for public endpoint access;80for internal same-region endpoint access.HTTP Path /cliserviceUsername Any username, for example, root.Password The token value. HTTP Scheme httpsfor public endpoint access;httpfor internal same-region endpoint access.
Click Create > New Query to open the query editor and write SQL statements.

View jobs by session
On the Sessions page, click the session name, then open the Execution Records tab.
The tab shows each job's run ID, start time, and a link to the Spark UI.
