Alibaba Cloud DataWorks lets you create, schedule, and govern Hive, Spark SQL, and Spark jobs on E-MapReduce (EMR) clusters — all from a single workspace. This topic walks through the end-to-end process: registering an EMR cluster, setting up a resource group, and submitting each job type.
How it works
The overall flow has two phases:
Prepare the environment — Create a DataWorks workspace, provision a serverless resource group, and register your EMR cluster.
Submit jobs — Create a node for each job type (Hive, Spark SQL, or Spark), develop and test the task, configure scheduling, and deploy.
Once deployed, the task runs automatically according to its schedule and appears in Operation Center for monitoring.
Supported cluster types
DataWorks supports registering the following EMR cluster types:
DataLake cluster (new data lake)
Custom cluster
Hadoop cluster (old data lake)
Hadoop clusters (old data lake) are no longer recommended. Migrate to DataLake clusters as soon as possible. For details, see Migrate Hadoop clusters to DataLake clusters.
Supported Hadoop versions: EMR-3.26.3, EMR-3.27.2, EMR-3.29.0, EMR-3.32.0, EMR-3.35.0, EMR-3.38.2, EMR-3.38.3, EMR-4.3.0, EMR-4.4.1, EMR-4.5.0, EMR-4.5.1, EMR-4.6.0, EMR-4.8.0, EMR-4.9.0, EMR-5.2.1, EMR-5.4.3, EMR-5.6.0
Limits
| Limit | Details |
|---|---|
| EMR Flink tasks | Cannot run in the DataWorks console. |
| Task running | You can use a serverless resource group (recommended) or an old-version exclusive resource group for scheduling to run an EMR task. |
| SQL statement size | Cannot exceed 130 KB for Hive and Spark SQL tasks. |
| Query results | Capped at 10,000 rows and 10 MB total for EMR Hive, Spark SQL, and Spark nodes. |
| Spark on YARN deploy mode | Cluster mode only (--deploy-mode cluster). Client mode is not supported for scheduled jobs. In cluster mode, the driver runs on the cluster and logs appear in YARN container logs; in client mode, the driver runs on the submitting machine, which is not supported. |
| JAR package size | Packages under 200 MB can be uploaded directly to DataWorks; packages 200 MB or larger must be stored in Hadoop Distributed File System (HDFS). |
| Cluster registration scope | An EMR cluster can be registered to multiple workspaces within the same Alibaba Cloud account, but not across accounts. |
| EMR Serverless Spark regions | Available in: China (Hangzhou), China (Shanghai), China (Beijing), China (Zhangjiakou), China (Shenzhen), Singapore, Germany (Frankfurt), and US (Silicon Valley). |
Prerequisites
Before you begin, make sure that you have:
The required permissions. Only the following identities can register EMR clusters: For details on granting permissions, see Grant permissions to RAM users.
An Alibaba Cloud account
A RAM user or RAM role with both the DataWorks workspace administrator role and the AliyunEMRFullAccess policy
A RAM user or RAM role with both the AliyunDataWorksFullAccess and AliyunEMRFullAccess policies
A purchased EMR cluster. This topic uses a cluster in the China (Shanghai) region.
Usage notes
Standard mode workspaces: to isolate development and production EMR data, register separate EMR clusters for each environment. Store metadata using one of these methods:
Data Lake Formation (DLF) (recommended): store metadata in two different catalogs in DLF. See Use DLF for unified metadata storage.
ApsaraDB RDS: store metadata in two different ApsaraDB RDS databases. See Configure a self-managed ApsaraDB RDS for MySQL database.
Data lineage: Only SQL tasks on EMR Hive, EMR Spark, and EMR Spark SQL nodes can generate data lineages. Table-level and field-level lineages are available for clusters at v3.43.1, v5.9.1, or later minor versions.
For Spark-based nodes, table-level and field-level lineages require cluster version v5.8.0, v3.42.0, or a later minor version. Clusters on earlier versions support table-level lineage only for Spark 2.x.
Metadata management: for DataLake or custom clusters, configure EMR-HOOK before using DataWorks metadata features. Without EMR-HOOK, real-time metadata display, audit logs, and data lineages will not be available, and EMR governance tasks cannot run. EMR-HOOK is supported for EMR Hive and EMR Spark SQL services. See Use the Hive extension feature to record data lineage and historical access information and Use the Spark SQL extension feature to record data lineage and historical access information.
Kerberos-enabled clusters: add UDP inbound rules to the cluster's security group for the CIDR block of the vSwitch associated with your resource group. Set the port range per your
/etc/krb5.conffile. To add the rule: open the EMR console, go to the Basic Information tab of your cluster, click the icon next to Cluster Security Group, then on the Inbound tab click Add Rule, setting Protocol Type to Custom UDP and Authorization Object to the vSwitch CIDR.
Network connectivity: if the DataWorks resource group and EMR cluster share the same virtual private cloud (VPC) and vSwitch but cannot connect, add the vSwitch CIDR block and inbound rules for commonly used ports of open source components to the cluster's security group. See Manage security groups.
Prepare a DataWorks environment
Step 1: Create a workspace
If a workspace already exists in China (Shanghai), skip this step.
Log on to the DataWorks console and select China (Shanghai) in the top navigation bar.
In the left-side navigation pane, click Workspace. On the Workspaces page, click Create Workspace and create a workspace in standard mode. See Create a workspace.
Step 2: Create a serverless resource group
A serverless resource group handles data synchronization and task scheduling.
Purchase a serverless resource group.
Log on to the DataWorks console and select China (Shanghai). In the left-side navigation pane, click Resource Group.
On the Resource Groups page, click Create Resource Group. Set Region and Zone to China (Shanghai), specify a resource group name, and complete the purchase. For billing details, see Billing of serverless resource groups.
If no VPC or vSwitch exists in the region, use the provided link to create one in the VPC console. See What is VPC?
Associate the resource group with your workspace. On the Resource Groups page, find the resource group you purchased, click Associate Workspace in the Actions column, then click Associate next to your workspace.
Enable Internet access for the resource group. By default, serverless resource groups cannot access the Internet. To reach test data over the Internet, configure an Internet NAT gateway and an elastic IP address (EIP) for the associated VPC. For more details, see Use serverless resource groups.
Go to the Internet NAT Gateway page and select China (Shanghai).
Click Create Internet NAT Gateway and configure the key parameters:
Parameter
Setting
Region
China (Shanghai)
VPC
The VPC associated with your resource group
Associate vSwitch
The vSwitch associated with your resource group
Access Mode
SNAT-enabled Mode
EIP
Purchase EIP
Service-linked Role
Click Create Service-linked Role (required on first NAT gateway creation)
To find the VPC and vSwitch associated with your resource group: go to Resource Groups, click Network Settings for the resource group, and check the Data Scheduling & Data Integration section on the VPC Binding tab.
Click Buy Now, accept the terms, and click Activate Now.
Step 3: Register the EMR cluster and initialize the resource group
Go to the Register EMR Cluster page.
In the DataWorks console, select China (Shanghai). In the left-side navigation pane, choose More > Management Center, select your workspace, and click Go to Management Center.
In the left-side navigation pane of Management Center, click Cluster Management. On the Cluster Management page, click Register Cluster, then select E-MapReduce in the dialog box.
Configure cluster information. On the Register EMR Cluster page, set the following parameters:
Parameter Setting Alibaba Cloud Account to Which Cluster Belongs Current Alibaba Cloud Account Cluster Type Data Lake Default Access Identity Cluster Account: hadoop Pass Proxy User Information Pass Initialize the resource group.
On the Cluster Management page, find the registered EMR cluster and click Initialize Resource Group.
In the dialog box, find the resource group and click Initialize.
After initialization completes, click OK.
ImportantMake sure initialization succeeds. Tasks using an uninitialized resource group will fail. If initialization fails, check the failure cause and run a network connectivity diagnosis as prompted.
For more details, see DataStudio (old version): Associate an EMR computing resource.
Submit EMR jobs
Submit EMR Hive jobs
Step 1: Create an EMR Hive node
Log on to the DataWorks console. In the left-side navigation pane, choose Data Development and O&M > Data Development, select your workspace, and click Go to Data Development.
In DataStudio, find your workflow, right-click it, and choose Create Node > EMR > EMR Hive.
Alternatively, move the pointer over the Create icon and choose Create Node > EMR > EMR Hive.
In the Create Node dialog box, configure Name, Engine Instance, Node Type, and Path, then click Confirm.
Node names can contain only letters, digits, underscores (_), and periods (.).
Step 2: Develop the Hive task
In the SQL editor on the node configuration tab, write your Hive SQL. Define dynamic variables using the ${Variable} format and assign scheduling parameters to them in the Scheduling Parameter section of the Properties tab. The values are substituted automatically at runtime. For scheduling parameter formats, see Supported formats of scheduling parameters.
Sample code:
show tables;
select '${var}'; -- Assign a scheduling parameter to the var variable.
select * from userinfo;
SQL statements cannot exceed 130 KB.
If multiple EMR computing resources are associated with your workspace, select one from the data source list.
To override the scheduling parameter value before running, click Run with Parameters in the toolbar.
Run the task:
In the toolbar, click the
 icon. In the Parameters dialog box, select your resource group and click Run.
- Use the resource group connected to your EMR cluster. See Network connectivity solutions. - Query results are capped at 10,000 rows and 10 MB.
Click the
 icon to save the SQL statements.
(Optional) Run smoke testing when you commit the node or after committing. See Perform smoke testing.
To change the YARN queue for job submission, see Configure advanced parameters.
Step 3: Configure scheduling properties
To run the task on a schedule, click Properties in the right-side navigation pane and configure scheduling settings. See Overview.
Configure Rerun and Parent Nodes before committing the task.
Step 4: Deploy the task
Click the
 icon to save the task.
Click the
 icon to commit. In the Submit dialog box, add a Change description.
- Configure Rerun and Parent Nodes before committing. - If code review is enabled, the task can only be deployed after the code passes review. See Code review.
For standard mode workspaces, click Deploy in the upper-right corner to deploy to the production environment. See Deploy nodes.
Submit EMR Spark SQL jobs
Step 1: Create an EMR Spark SQL node
Log on to the DataWorks console. In the left-side navigation pane, choose Data Development and O&M > Data Development, select your workspace, and click Go to Data Development.
In DataStudio, find your workflow, right-click it, and choose Create Node > EMR > EMR Spark SQL.
Alternatively, move the pointer over the Create icon and choose Create Node > EMR > EMR Spark SQL.
In the Create Node dialog box, configure Name, Engine Instance, Node Type, and Path, then click Confirm.
Node names can contain letters, digits, underscores (_), and periods (.).
Step 2: Develop the Spark SQL task
In the SQL editor, write Spark SQL code. Use the ${Variable} format for dynamic variables and assign scheduling parameters in Properties > Scheduling Parameter. For scheduling parameter formats, see Supported formats of scheduling parameters.
Sample code:
SHOW TABLES;
-- The ${var} variable is replaced at runtime with the assigned scheduling parameter value.
CREATE TABLE IF NOT EXISTS userinfo_new_${var} (
  ip  STRING COMMENT 'IP address',
  uid STRING COMMENT 'User ID'
)
PARTITIONED BY (dt STRING);
SQL statements cannot exceed 130 KB.
If multiple EMR data sources are associated with your workspace, select the appropriate one.
Run the task:
Click the
icon. In the Parameters dialog box, select a resource group and click Run.- Use the resource group connected to your data source. See Network connectivity solutions. - Query results are capped at 10,000 rows and 10 MB.
Click the
icon to save SQL statements.(Optional) Run smoke testing. See Perform smoke testing.
To change the YARN queue for job submission, see Configure advanced parameters.
Step 3: Configure scheduling properties
Click Properties in the right-side navigation pane and configure scheduling settings. See Overview.
Configure Rerun and Parent Nodes before committing the task.
Step 4: Deploy the task
Click the
icon to save the task.Click the
icon to commit. In the Submit dialog box, add a Change description.- Configure Rerun and Parent Nodes before committing. - See Code review if code review is enabled.
For standard mode workspaces, click Deploy in the upper-right corner to deploy to the production environment. See Deploy nodes.
Submit EMR Spark jobs
EMR Spark nodes submit jobs using spark-submit. Three methods are available for providing the JAR file.
Do not add comments to EMR Spark node code. Comments cause execution errors.
Step 1: Create an EMR Spark node
Log on to the DataWorks console. In the left-side navigation pane, choose Data Development and O&M > Data Development, select your workspace, and click Go to Data Development.
In DataStudio, find your workflow, right-click it, and choose Create Node > EMR > EMR Spark.
Alternatively, move the pointer over the Create icon and choose Create Node > EMR > EMR Spark.
In the Create Node dialog box, configure Name, Engine Instance, Node Type, and Path, then click Confirm.
Node names can contain letters, digits, underscores (_), and periods (.).
Step 2: Develop the Spark task
Choose one of the following methods based on your JAR package size:
Method 1 (recommended): Upload a JAR resource and reference it
Use this method when the JAR package is less than 200 MB.
Upload the JAR package to DataWorks as an EMR JAR resource, then reference it in the node code.
1. Create an EMR JAR resource.
Upload the JAR package from your machine to the DataWorks console. After creating the resource, commit it. See Create and use an EMR resource.
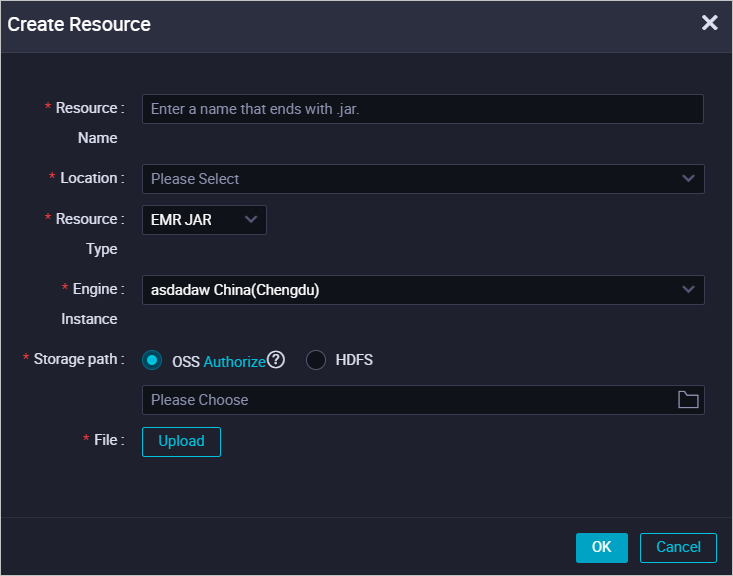
On the first upload, authorize DataWorks to store the JAR package in OSS as prompted.
2. Reference the JAR resource in the node.
Open the EMR Spark node configuration tab.
Under Resource in the EMR folder, right-click the JAR resource and select Insert Resource Path. DataWorks automatically adds a resource reference line to the editor:
##@resource_reference{"spark-examples_2.12-1.0.0-SNAPSHOT-shaded.jar"}
spark-examples_2.12-1.0.0-SNAPSHOT-shaded.jar
Add the
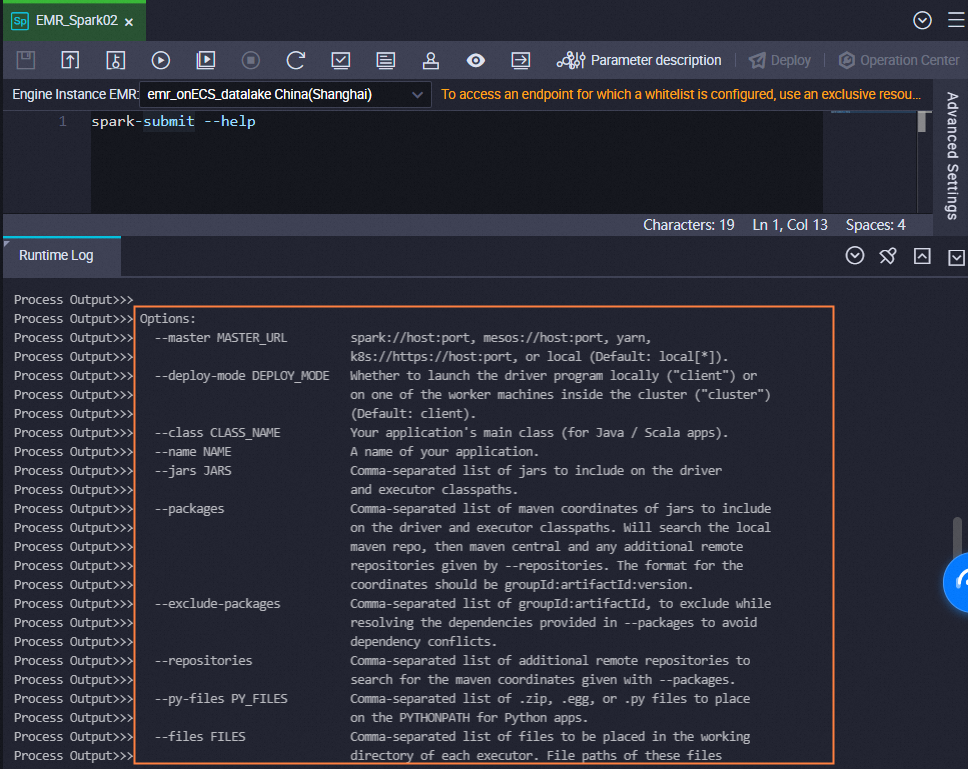
spark-submitcommand below the reference line. Example:org.apache.spark.examples.SparkPi: the main class in the JAR package.spark-examples_2.11-2.4.0.jar: the name of the uploaded JAR package.
- Spark nodes on YARN only support cluster mode. Set
--deploy-mode cluster(notclient): in cluster mode, the driver runs on the cluster and its logs appear in the YARN container logs; in client mode, the driver runs on the submitting machine, which is not supported for scheduled YARN jobs. - To addspark-submitoptions like--executor-memory 2G, include them directly in the node code. - Runspark-submit --helpto view all available options.##@resource_reference{"spark-examples_2.11-2.4.0.jar"} spark-submit --class org.apache.spark.examples.SparkPi --master yarn spark-examples_2.11-2.4.0.jar 100Key components:
Method 2: Reference a JAR file stored in HDFS
Use this method when the JAR package is 200 MB or larger. Store the JAR in HDFS and reference it by path in the spark-submit command.
Upload the JAR to HDFS on your EMR cluster and record the storage path.
Open the EMR Spark node configuration tab and write the
spark-submitcommand with the HDFS path. Example:hdfs:///tmp/jars/spark-examples_2.11-2.4.8.jar: the HDFS path of the JAR package.org.apache.spark.examples.JavaSparkPi: the main class in the JAR package.Other parameters are set based on your cluster configuration.
Important- Spark nodes on YARN only support cluster mode (
--deploy-mode cluster). - To addspark-submitoptions like--executor-memory 2G, include them directly in the node code.spark-submit --master yarn --deploy-mode cluster --name SparkPi --driver-memory 4G --driver-cores 1 --num-executors 5 --executor-memory 4G --executor-cores 1 --class org.apache.spark.examples.JavaSparkPi hdfs:///tmp/jars/spark-examples_2.11-2.4.8.jar 100Key parameters:
Method 3: Reference a JAR file stored in OSS (OSS REF)
Use the OSS REF method to reference a JAR file stored in OSS. When the task runs, DataWorks automatically downloads the OSS resource. This method works for JAR dependencies and scripts.
1. Build the JAR package.
Check the required code dependencies in /usr/lib/emr/spark-current/jars/ on the EMR cluster's master node. The following example uses Spark 3.4.2.
Add POM dependencies to your IntelliJ IDEA project:
<dependencies>
    <dependency>
        <groupId>org.apache.spark</groupId>
        <artifactId>spark-core_2.12</artifactId>
        <version>3.4.2</version>
    </dependency>
    <dependency>
        <groupId>org.apache.spark</groupId>
        <artifactId>spark-sql_2.12</artifactId>
        <version>3.4.2</version>
    </dependency>
</dependencies>
Add build plugins:
<build>
    <sourceDirectory>src/main/scala</sourceDirectory>
    <testSourceDirectory>src/test/scala</testSourceDirectory>
    <plugins>
        <plugin>
            <groupId>org.apache.maven.plugins</groupId>
            <artifactId>maven-compiler-plugin</artifactId>
            <version>3.7.0</version>
            <configuration>
                <source>1.8</source>
                <target>1.8</target>
            </configuration>
        </plugin>
        <plugin>
            <artifactId>maven-assembly-plugin</artifactId>
            <configuration>
                <descriptorRefs>
                    <descriptorRef>jar-with-dependencies</descriptorRef>
                </descriptorRefs>
            </configuration>
            <executions>
                <execution>
                    <id>make-assembly</id>
                    <phase>package</phase>
                    <goals>
                        <goal>single</goal>
                    </goals>
                </execution>
            </executions>
        </plugin>
        <plugin>
            <groupId>net.alchim31.maven</groupId>
            <artifactId>scala-maven-plugin</artifactId>
            <version>3.2.2</version>
            <configuration>
                <recompileMode>incremental</recompileMode>
            </configuration>
            <executions>
                <execution>
                    <goals>
                        <goal>compile</goal>
                        <goal>testCompile</goal>
                    </goals>
                    <configuration>
                        <args>
                            <arg>-dependencyfile</arg>
                            <arg>${project.build.directory}/.scala_dependencies</arg>
                        </args>
                    </configuration>
                </execution>
            </executions>
        </plugin>
    </plugins>
</build>
Sample Scala code:
package com.aliyun.emr.example.spark

import org.apache.spark.sql.SparkSession

object SparkMaxComputeDemo {
  def main(args: Array[String]): Unit = {
    // Create a Spark session.
    val spark = SparkSession.builder()
      .appName("HelloDataWorks")
      .getOrCreate()

    // Print the Spark version.
    println(s"Spark version: ${spark.version}")
  }
}
Package the code. This example produces SparkWorkOSS-1.0-SNAPSHOT-jar-with-dependencies.jar.
2. Upload the JAR to OSS.
Log on to the OSS console and click Buckets in the left-side navigation pane.
Click your bucket (for example,
onaliyun-bucket-2) to open the Objects page.Click Create Directory, set Directory Name to
emr/jars, and click OK.Go to the new directory, click Upload Object, select
SparkWorkOSS-1.0-SNAPSHOT-jar-with-dependencies.jar, and click Upload Object.
3. Reference the JAR in the node.
On the EMR Spark node configuration tab, write the spark-submit command using the ossref:// protocol:
spark-submit --class com.aliyun.emr.example.spark.SparkMaxComputeDemo --master yarn ossref://onaliyun-bucket-2/emr/jars/SparkWorkOSS-1.0-SNAPSHOT-jar-with-dependencies.jarKey parameters:
| Parameter | Description |
|---|---|
class | Full name of the main class |
master | Running mode of the Spark application |
ossref file path | Format: ossref://{endpoint}/{bucket}/{object}. Leave endpoint blank to reference a bucket in the same region as the EMR cluster. |
4. Run the task and view results.
Click the
 icon and select a serverless resource group to run the task. After it completes, note the application ID displayed in the console (for example,
 application_1730367929285_xxxx).Create an EMR Shell node and run the following command to view logs:
yarn logs -applicationId application_1730367929285_xxxx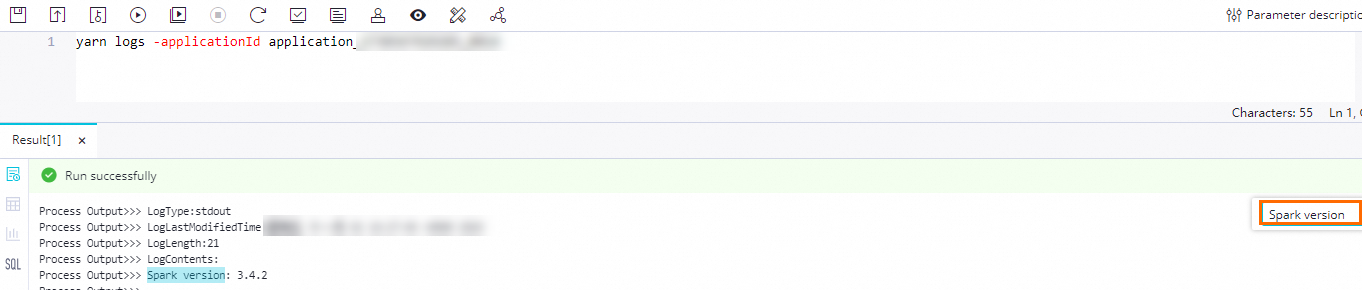
(Optional) Configure advanced parameters
On the Advanced Settings tab, set Spark-specific parameters. For the full parameter list, see Spark Configuration. Available parameters vary by cluster type.
DataLake cluster or custom cluster (EMR on ECS):
| Parameter | Description |
|---|---|
| queue | Scheduling queue for job submission. Default: default. If a workspace-level YARN queue is configured, selecting Yes for Global Settings Task Precedence uses the workspace-level queue; otherwise, the node-level queue applies. See YARN schedulers and Configure a global YARN queue. |
| priority | Task priority. Default: 1. |
| FLOW_SKIP_SQL_ANALYZE | SQL execution mode. true: run all SQL statements in one batch. false (default): run one statement at a time. Available only in the DataWorks development environment. |
| Others | Add any custom Spark parameter in key: value format on the Advanced Settings tab. DataWorks converts it to --conf key=value at commit time. To enable Ranger permission control, add spark.hadoop.fs.oss.authorization.method=ranger when configuring global Spark parameters. |
Hadoop cluster (EMR on ECS):
| Parameter | Description |
|---|---|
| queue | Scheduling queue. Default: default. Same YARN queue precedence rules as above. |
| priority | Task priority. Default: 1. |
| FLOW_SKIP_SQL_ANALYZE | SQL execution mode. true: batch execution. false: single-statement execution. Available only in the development environment. |
| USE_GATEWAY | Whether to use a gateway cluster for job submission. true: submit via gateway cluster. false: submit to the master node directly. If no gateway cluster is associated but this is set to true, submission will fail. |
| Others | Custom Spark parameters and global Spark parameters. See the DataLake cluster section above. |
Spark cluster (EMR on ACK):
| Parameter | Description |
|---|---|
| queue | Not supported. |
| priority | Not supported. |
| FLOW_SKIP_SQL_ANALYZE | SQL execution mode. true: batch execution. false: single-statement execution. Available only in the development environment. |
| Others | Custom and global Spark parameters. See Configure global Spark parameters. |
EMR Serverless Spark cluster:
| Parameter | Description |
|---|---|
| queue | Scheduling queue. Default: dev_queue. |
| priority | Task priority. Default: 1. |
| FLOW_SKIP_SQL_ANALYZE | SQL execution mode. true: batch execution. false: single-statement execution. Available only in the development environment. |
| SERVERLESS_RELEASE_VERSION | Spark engine version. Uses the Default Engine Version set on the Register EMR Cluster page unless overridden here. |
| SERVERLESS_QUEUE_NAME | Resource queue. Uses the Default Resource Queue set on the Register EMR Cluster page unless overridden. See Manage resource queues. |
| Others | Custom and global Spark parameters. See Configure global Spark parameters. |
For Serverless Spark parameter details, see the Submit a Spark task section of the spark-submit CLI topic.
Step 3: Configure scheduling properties
Click Properties in the right-side navigation pane and configure scheduling settings. See Overview.
Configure Rerun and Parent Nodes before committing the task.
Step 4: Deploy the task
Click the
icon to save the task.Click the
icon to commit. In the Submit dialog box, add a Change description.- Configure Rerun and Parent Nodes before committing. - See Code review if code review is enabled.
For standard mode workspaces, click Deploy in the upper-right corner to deploy to the production environment. See Deploy nodes.
Monitor deployed tasks
After deploying a task, it is automatically registered in Operation Center. From there, you can:
View run history: check execution logs, output, and run status for each scheduled instance.
Manually trigger a run: re-run a task outside its schedule for testing or recovery.
See Operation Center for details.
For periodic scheduling, define the scheduling cycle, dependencies, and parameters. See Node scheduling configuration.
To handle complex string processing or math in your tasks, create user-defined functions. See Create an EMR function.
Troubleshooting
`java.net.ConnectException: Connection timed out` when submitting an EMR Hive job
This error means the DataWorks resource group cannot reach the EMR cluster. Check two things:
Confirm that the resource group and the EMR cluster are in the same VPC and vSwitch.
Check the cluster's security group rules and make sure port
10000on the ECS instance is open. For other job types, open the corresponding ports listed in Commonly used ports of open source components. See Manage security groups.