This topic describes how to enable HBase in Ranger and how to configure the related permissions.
Prerequisites
A cluster is created and the HBase and Ranger services are selected when you create the cluster. For more information, see Create a cluster.
Procedure
- Go to the Services tab.
- Log on to the EMR on ECS console.
- In the top navigation bar, select the region in which your cluster resides and select a resource group.
- On the EMR on ECS page, find the desired cluster and click Services in the Actions column.
- Enable HBase in Ranger.
- On the Services tab of the page that appears, click Status in the Ranger-plugin section.
- In the Service Overview section of the Status tab, turn on enableHBase.
- In the message that appears, click OK.
- View the HBase service on the web UI of Ranger.
- Modify the parameters based on your business requirements. The following figure shows the information about the HBase service.
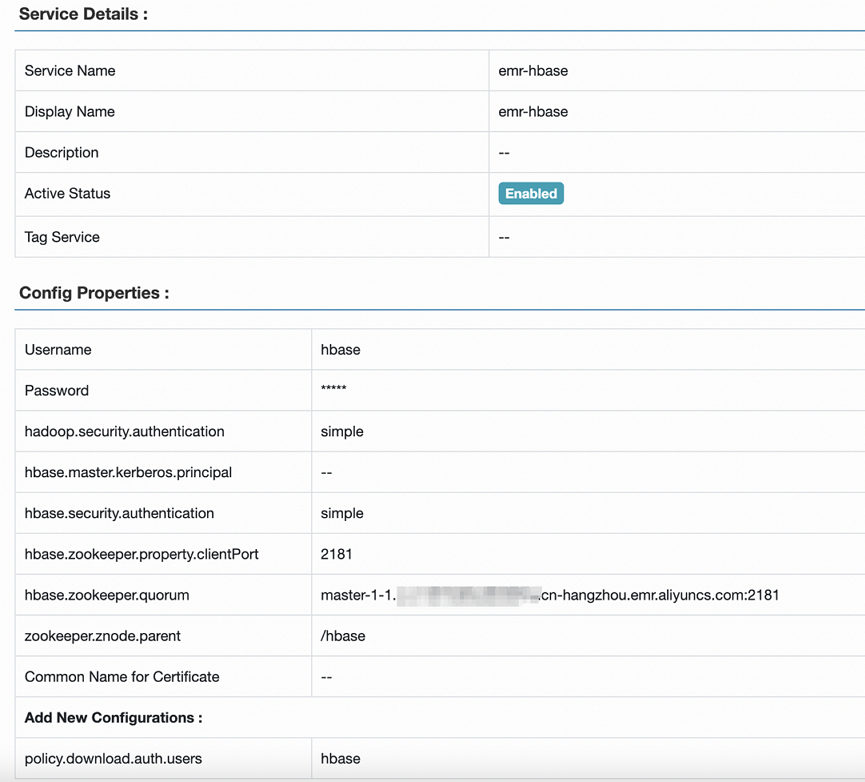
The following table describes the parameters of the HBase service.
Parameter Description Service Name The name of the service. Set the value to emr-hbase. Username The username that is used to access the HBase service. In this example, hbase is used. Password The password that is used to access the HBase service. You can specify a custom password. hadoop.security.authentication - Select simple for a standard cluster (a non-high-security cluster).
- Select Kerberos for a high-security cluster.
hbase.master.kerberos.principal This parameter is required only for a high-security cluster. Set the value to hbase/_HOST@EMR.${CLUSTER_ID}.COM. Note To obtain the value of${CLUSTER_ID}, you need to log on to the host and run thehostnamecommand to obtain the hostname first. Then, convert the string that follows a period (.) and starts with c- into uppercase to obtain a string that starts with C-. The obtained string is the value of${CLUSTER_ID}.hbase.security.authentication - Select simple for a standard cluster (a non-high-security cluster).
- Select Kerberos for a high-security cluster.
hbase.zookeeper.property.clientPort Set the value to 2181. hbase.zookeeper.quorum Set the value to master-1-1. zookeeper.znode.parent Set the value to /hbase.Add New Configurations - Name: Set the value to policy.download.auth.users.
- Value: Set the value to hbase.
- Modify the parameters based on your business requirements.
- Restart HBase.
- On the Services tab, click the
 icon and select HBase.
 - In the upper-right corner, choose .
- In the dialog box that appears, configure the Execution Reason parameter and click OK.
- In the Confirm message, click OK.
- On the Services tab, click the
Configure administrator accounts
- Access the web UI of Ranger. For more information, see Access the web UI of Ranger.
- Click emr-hbase.
- Grant users the Admin permission to run management commands. The Admin permission allows users to run management commands, such as balance, compaction, flush, and split. Click the
 icon in the Action column for the existing permission policy, and then add administrator accounts. You can also modify the permissions. For example, you can retain only the Admin permission. You must set hbase as an administrator account.
 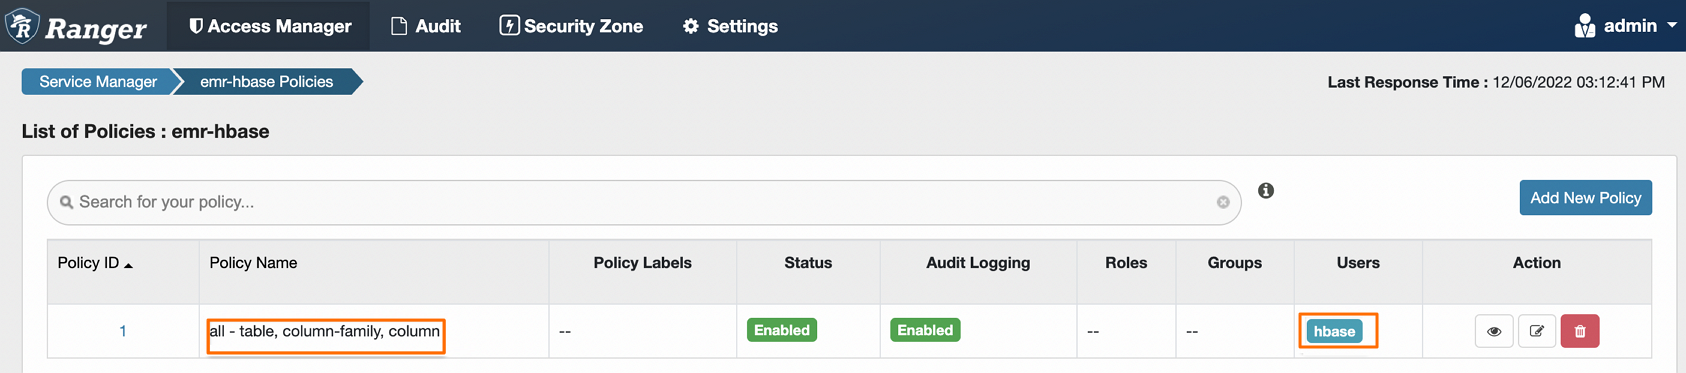 If you want to use Phoenix, you must add an additional policy in Ranger. The following table describes the parameters for the policy.
Parameter Example HBase Table SYSTEM.* HBase Column-family Asterisk (*) HBase Column Asterisk (*) Select Group public Permissions Read, Write, Create, and Admin
Configure permissions
For example, you can perform the following steps to grant the test user the Create, Write, and Read permissions on the foo_ns:test table:
- Access the web UI of Ranger. For more information, see Access the web UI of Ranger.
- Click emr-hbase.
- Click Add New Policy in the upper-right corner.
- Configure the parameters based on your business requirements. The following table describes the parameters.
Parameter Description Policy Name The name of the policy. You can specify a custom name. HBase Table The table on which permissions are configured. The value must be in the format of ${namespace}:${tablename}. You can specify multiple tables. Press Enter each time you enter a table name. In this example, the foo_ns:test table is used.If ${namespace} is set to default, the value of this parameter is specified in the ${tablename} format. You do not need to add default in the parameter value. The value of this parameter can contain asterisks (*). For example, foo_ns:* indicates all tables in foo_ns.Notedefault:*is not supported.HBase Column-family The column family. For example, set this parameter to *.HBase Column The name of the column. For example, set this parameter to *.Select Group The user group to which you want to attach the policy. Select User The user to whom you want to attach the policy. Example: test. Permissions The permissions that you want to grant. Example: Read, Write, Create, and Admin. - Click Add. After the policy is added, the test user is granted the specified permissions. The test user can access the foo_ns:test table.Note After you add, remove, or modify a policy, it takes about one minute for the configuration to take effect.