Alibaba Cloud Elasticsearch allows you to upload and install a custom or open source plug-in. This topic describes the procedure in detail.
This feature is available only for clusters that are deployed in the new control architecture (V3). You can view the control architecture (V2 or V3) of your cluster on the Basic Information page of the cluster.
Prerequisites
The plug-in that you want to upload is prepared. Make sure that the plug-in is usable and secure.
The name of the plug-in file that you want to upload must be 8 to 128 characters in length and can contain only letters, digits, hyphens (-), and periods (.). The file name extension must be .zip.
ImportantBefore you upload the plug-in, we recommend that you perform a test on a self-managed Elasticsearch cluster of the same version as your Alibaba Cloud Elasticsearch cluster. If the test is successful, upload the plug-in. For more information, see Installing Plugins.
If you want to upload a custom SQL plug-in, you must make sure that the xpack.sql.enabled parameter in the YML configuration file of your Elasticsearch cluster is set to false.
For more information, see Configure the YML file.
Limits
You are not allowed to upload plug-ins whose security policies define operation permissions, such as elasticsearch-analysis-hanlp.
Precautions
If issues such as console-reported errors, cluster update suspension, and verification failures occur when you upload and install a custom plug-in, you can follow the instructions provided in Installation errors of a custom plug-in to locate and resolve the issue.
When an Elasticsearch cluster is upgraded, plug-ins installed for the cluster are not automatically updated. To update a plug-in, you must manually upload a new version of the plug-in.
By default, custom plug-ins cannot access the Internet. If your cluster is deployed in the new network architecture, you can use the PrivateLink service to establish a private connection for the cluster and enable the custom plug-ins that are installed for the cluster to access the Internet. For more information, see Configure a private connection for an Elasticsearch cluster. If your cluster is deployed in the original network architecture, the custom plug-ins can access only the virtual private cloud (VPC) where the cluster resides.
A custom plug-in may affect the stability of your Elasticsearch cluster. You must make sure that the custom plug-in you want to upload is usable and secure.
Procedure
The upload of a custom plug-in triggers a restart of the Elasticsearch cluster, and the plug-in may affect the stability of the cluster. Make sure that the custom plug-in is usable and secure. We recommend that you upload a custom plug-in during off-peak hours.
Log on to the Alibaba Cloud Elasticsearch console.
In the left-side navigation pane, click Elasticsearch Clusters.
Navigate to the desired cluster.
In the top navigation bar, select the resource group to which the cluster belongs and the region where the cluster resides.
On the Elasticsearch Clusters page, find the cluster and click its ID.
In the left-side navigation pane of the page that appears, choose .
On the Plug-ins page, click the Custom Plug-ins tab. Then, click Upload.
Upload and install a custom plug-in.
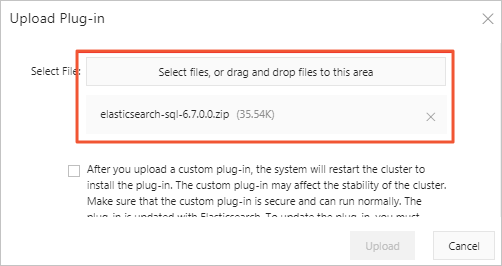
In the Upload Plug-in panel, click Select files, or drag and drop files to this area. Then, select the custom plug-in file that you want to upload and click Open.
You can also drag a custom plug-in file to this area and upload the file. The following figure shows that the plug-in file elasticsearch-sql-6.7.0.0.zip is added.
The custom plug-in file that you upload must meet the following conditions. If the file does not meet the conditions, verification on the file may fail.
File name:
The file name must be 8 to 128 characters in length and can contain only letters, digits, hyphens (-), and periods (.). The file name extension must be .zip.
ImportantA custom plug-in that has the following characteristics cannot be uploaded or installed: The name of the custom plug-in is the same as a built-in plug-in provided by Alibaba Cloud Elasticsearch, the name and version of the custom plug-in are the same as the name and version of a custom plug-in that is already uploaded, the version of the Elasticsearch cluster for which you want to install the custom plug-in is incorrect, and the version of the custom plug-in is incompatible with the version of the Elasticsearch cluster for which you want to install the plug-in.
File size: The file size cannot exceed 100 MB.
Total number of files that are uploaded: A maximum of 50 files can be uploaded for a single Elasticsearch cluster.
Read the precautions, select the check box, and then click OK.
The system then restarts the cluster. We recommend that you upload a plug-in during off-peak hours. After the cluster is restarted, you can check the plug-in on the Custom Plug-ins tab. If the state of the plug-in is Installed, the plug-in is successfully uploaded and installed.

If you no longer require the plug-in, find it on the Custom Plug-ins tab and click Remove in the Actions column. For more information, see Install and remove a built-in plug-in. In addition, make sure that the plug-in to be removed is not referenced by indexes. Otherwise, the cluster restart may be stuck.