If your Alibaba Cloud Elasticsearch instance uses the new cloud-native control architecture (v3), you can migrate data from a self-managed Elasticsearch cluster that is hosted on an Elastic Computing Service (ECS) instance. This topic describes how to use the reindex method to migrate data over a private connection. The process includes creating an index and migrating the data.
Prerequisites
The self-managed Elasticsearch cluster must meet the following requirements:
The ECS instance that hosts the cluster must be in a virtual private cloud (VPC). ClassicLink is not supported. The ECS instance and the Alibaba Cloud Elasticsearch instance must be in the same VPC.
The security group of the ECS instance must allow access from all node IP addresses of the Alibaba Cloud Elasticsearch instance. You can find the node IP addresses in the Kibana console. Port 9200 must also be open.
A connection is established with the Alibaba Cloud Elasticsearch instance. You can run the
curl -XGET http://<host>:9200command from the machine where you run the script to verify the connection.NoteYou can run the scripts in this topic from any machine. The machine must be able to access port 9200 of both the self-managed Elasticsearch cluster and the Alibaba Cloud Elasticsearch cluster.
Prepare the index data in the self-managed Elasticsearch cluster. This topic uses the `source` index that is shown in the following figure as an example.

The Alibaba Cloud Elasticsearch instance must meet the following requirements:
Enable the automatic index creation feature in advance. Alternatively, you can create the index
mappingsandsettingson the Alibaba Cloud Elasticsearch instance.No whitelist restrictions are configured.
Limitations
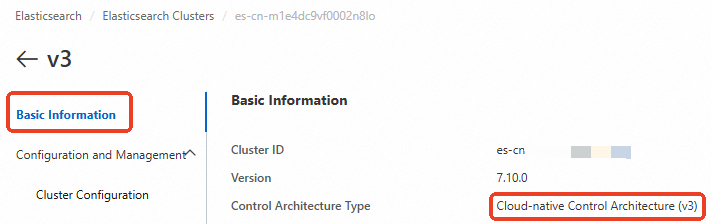
Alibaba Cloud ES provides two deployment modes: basic control (v2) architecture and cloud-native new control (v3) architecture. You can check the deployment mode in the Basic Information section of the instance.
For clusters that use the cloud-native new control (v3) architecture, you must use PrivateLink to establish a private connection to the Alibaba Cloud ES cluster for cross-cluster reindex operations. Select a solution from the following table based on your business scenario.
Scenario | ES cluster network architecture | Solution |
Data migration between Alibaba Cloud ES clusters | Both ES clusters use the basic control (v2) architecture. | reindex method: Cross-cluster reindex between Alibaba Cloud ES clusters. |
One of the ES clusters uses the cloud-native new control (v3) architecture. Note The other ES cluster can use either the cloud-native new control (v3) architecture or the basic control (v2) architecture. | ||
Migrate data from a self-managed ES cluster on an ECS instance to an Alibaba Cloud ES cluster | The Alibaba Cloud ES cluster uses the basic control (v2) architecture. | reindex method: Migrate data from a self-managed Elasticsearch cluster to Alibaba Cloud Elasticsearch using reindex. |
The Alibaba Cloud ES cluster uses the cloud-native new control (v3) architecture. | reindex method: Migrate data from a self-managed Elasticsearch cluster to Alibaba Cloud by establishing a private connection to the instance. |
Procedure
Step 1: Configure an SLB instance that supports PrivateLink
Currently, only Server Load Balancer (SLB) instances that support PrivateLink can be used as service resources for an endpoint service. Before you use PrivateLink to privately access a service between VPCs, you must create an SLB instance that supports PrivateLink and configure its listener.
Step 2: Create an endpoint service
An endpoint service allows other VPCs to establish private connections by creating endpoints. After you configure the SLB instance, you must create an endpoint service.
Step 3: Configure private network peering for Alibaba Cloud Elasticsearch
In the Elasticsearch console, you can associate the Alibaba Cloud Elasticsearch instance with the endpoint service that you created in Step 2.
Step 4: Obtain the endpoint domain name
After the target instance is associated with the endpoint service, you must obtain the endpoint domain name. You will use this domain name to configure the reindex whitelist.
Step 5: Configure the reindex whitelist
In the Elasticsearch console, add the domain name that you obtained in Step 4 to the reindex whitelist of the target instance for authorization.
After you complete these steps, a private connection is established between the source and target instances. You can now migrate the data.
Step 1: Configure an SLB instance that supports PrivateLink
Create an SLB instance.
Make sure that the SLB instance is in the same region as the backend Elastic Computing Service (ECS) instances. For more information, see Create an SLB instance that supports PrivateLink.
Configure the Protocol & Listener by setting the load balancing protocol to TCP and the port to 9200.

For more information, see Configure protocol and listener.
Click Next. Configure the backend server group by adding the ECS instance that hosts your self-managed ES cluster and setting the port to 9200.
For more information, see Configure backend servers.
Click Next. In the Configure the Health Check section, configure the settings as needed. This topic uses the default settings.
Click Next. Review the configuration and click Submit. Click OK. Return to the Instance Management page and check the health check status of the backend ECS instance.
If the health check status of the backend ECS instance is Normal, the instance can process requests that are forwarded by the SLB instance.
Step 2: Create an endpoint service
In the top menu bar, select the region where you want to create the endpoint service.
The example in this topic uses the China (Hangzhou) region.
Click Create Endpoint Service. On the Create Endpoint Service page, configure the endpoint service according to your requirements.
For specific operations and detailed instructions, see Create and manage an endpoint service. The following table describes the configurations that are used in this topic. For parameters that are not mentioned, you can configure them as needed or keep the default values.
Parameter
Description
Select Service Resource
Select the zone to carry the traffic. Then, select the SLB instance to associate with the endpoint service.
The SLB instance acts as the service resource and is associated with the endpoint service. The associated SLB instance accepts network access from your service users. The zone of the endpoint service is the same as the primary zone of the service resource.
An SLB instance can be used as a service resource only if it meets two conditions:
The network type is VPC.
The feature is Supports PrivateLink.
Automatically Accept Endpoint Connections
Select whether to automatically accept connection requests from endpoints. We recommend that you select Yes. The values are described as follows:
Yes: The endpoint service automatically accepts connection requests from endpoints. The service can be accessed through the endpoints.
No: The endpoint connection will be in the Disconnected state, waiting for the service administrator to process it:
If the service administrator accepts the endpoint connection, the service can be accessed through the endpoint.
If the service administrator rejects the endpoint connection, the service cannot be accessed through the endpoint.
Enable Zone Affinity
Select whether to enable zone affinity. We recommend that you select Yes.
Click OK.
Step 3: Configure private network peering for Alibaba Cloud Elasticsearch
Log on to the Alibaba Cloud Elasticsearch console.
In the left-side navigation pane, click Elasticsearch Clusters.
Navigate to the desired cluster.
In the top navigation bar, select the resource group to which the cluster belongs and the region where the cluster resides.
On the Elasticsearch Clusters page, find the cluster and click its ID.
In the left-side navigation pane of the page that appears, choose .
In the Network Settings section, click Edit on the right side of Configure Private Connection.
In the Configure Private Connection panel, click Add Private Connection. Select the endpoint service created in Step 2 and the target access zone. Then, select the checkbox for the system prompt.
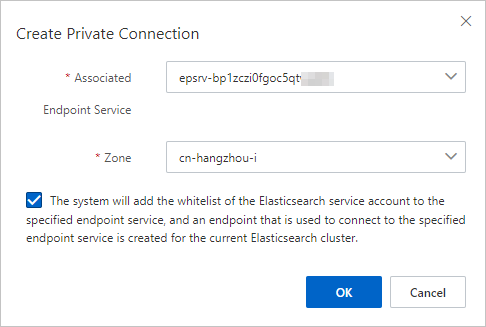
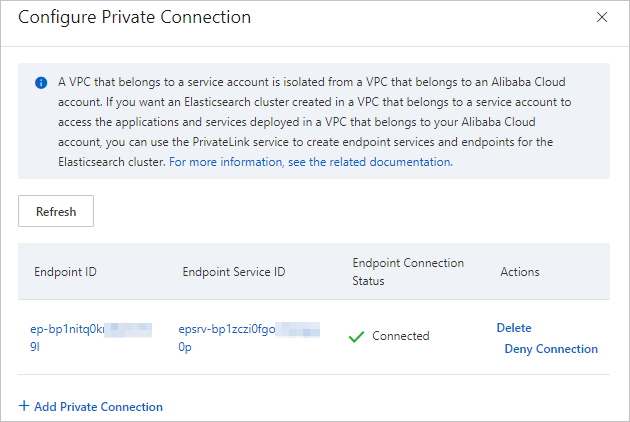
Click OK. The endpoint service then connects to the endpoint. Once the connection is established, the status changes to Connected.
Step 4: Obtain the endpoint domain name
After you complete the preceding steps, you must obtain the endpoint domain name to configure the reindex whitelist.
In the Configure Private Connection panel, click the desired Endpoint ID.
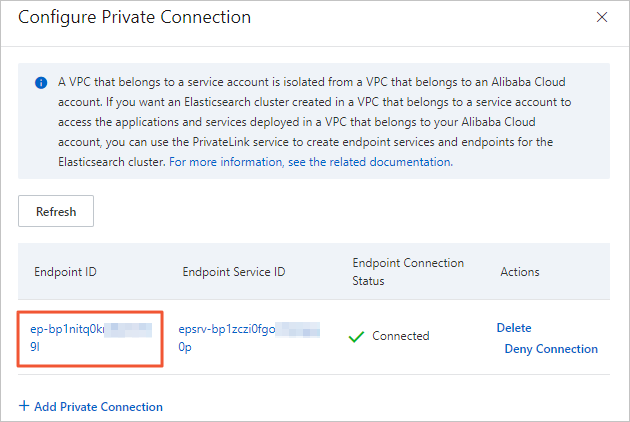
On the Endpoint Connections tab, click the
 icon next to the target endpoint ID to view the corresponding domain name.
Step 5: Configure the reindex whitelist
This operation restarts the cluster. We recommend that you perform this operation during off-peak hours.
Log on to the Alibaba Cloud Elasticsearch console.
In the left-side navigation pane, click Elasticsearch Clusters.
Navigate to the desired cluster.
In the top navigation bar, select the resource group to which the cluster belongs and the region where the cluster resides.
On the Elasticsearch Clusters page, find the cluster and click its ID.
In the navigation pane on the left, choose .
In the YML File Configuration section, click Modify Configuration on the right.
In the YML File Configuration panel, click Modify Configuration and add the domain name that you obtained in Step 4.
Sample code:
reindex.remote.whitelist: 'ep-bp1nitq0krp8yhcf****-cn-hangzhou-i.epsrv-bp1zczi0fgoc5qtv****.cn-hangzhou.privatelink.aliyuncs.com:9200'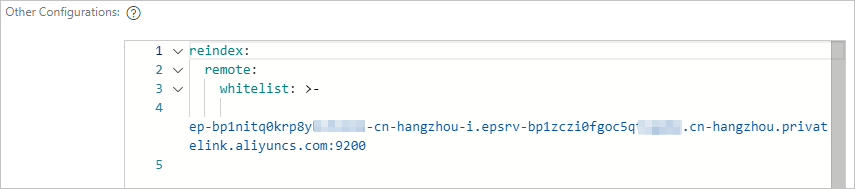
Click OK.
Step 6: Migrate data
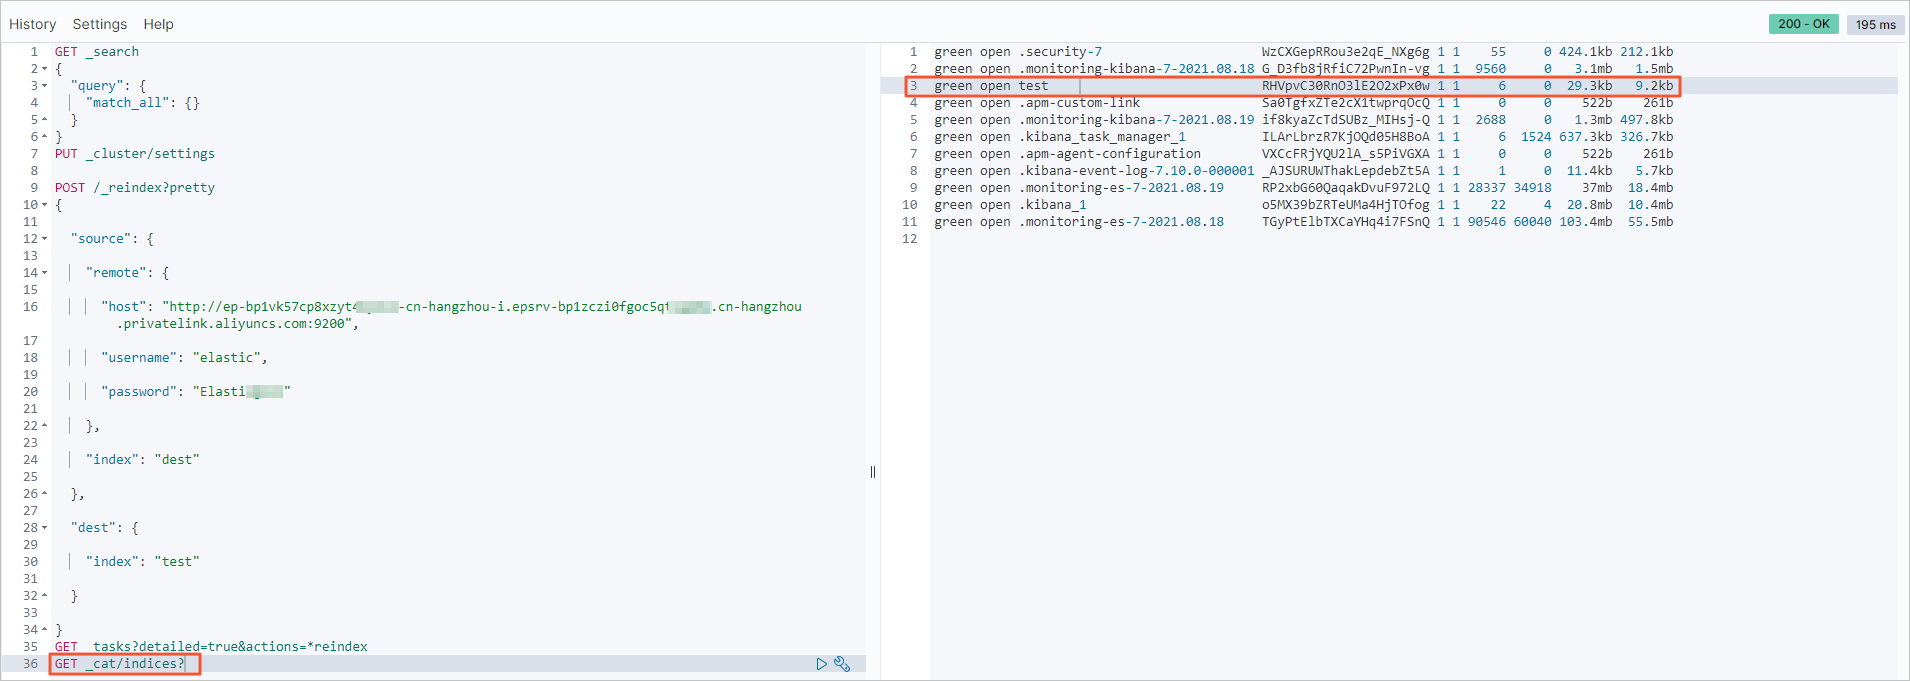
In Dev Tools on the Kibana console, run the following command to migrate data.
NoteFor more information about how to log on to the Kibana console, see Log on to the Kibana console.
POST /_reindex?pretty
{

  "source": {

    "remote": {

      "host": "http://ep-bp1nitq0krp8yhcf****-cn-hangzhou-i.epsrv-bp1zczi0fgoc5qtv****.cn-hangzhou.privatelink.aliyuncs.com:9200",

      "username": "elastic",

      "password": "Elastic@123***"

    },

    "index": "source",
    "size": 5000

  },

  "dest": {

    "index": "dest"

  }

}
For more information, see the reindex API.
Optional: During data migration, you can run the following command to obtain the status of all running reindex requests.
GET _tasks?detailed=true&actions=*reindexView the data migration result.
After the data migration is complete, you can run the following command to view the result.
GET _cat/indices?If the health status of the target index `dest` is normal and the data size is as expected, the data migration is successful.
FAQ
Question: What do I do if a single index has a large volume of data and the data synchronization is slow?
Solution:
The reindex feature is implemented using the scroll method. You can increase the scroll size or configure scroll slices to improve efficiency through parallel processing. For more information, see the reindex API.
If the source data volume is large, we recommend that you use the Object Storage Service (OSS) snapshot method. For more information, see Advanced: Migrate a self-managed ES cluster to Alibaba Cloud ES using OSS.
If a single index has a large volume of data, you can set the number of replicas for the target index to 0 and the refresh interval to -1 before migration. This can speed up data synchronization. After the data migration is complete, you must change these settings back to their original values.
// Before migrating index data, set the number of replicas to 0 and disable refresh to speed up migration.
curl -u user:password -XPUT 'http://<host:port>/indexName/_settings' -d' {
        "number_of_replicas" : 0,
        "refresh_interval" : "-1"
}'
// After migrating index data, reset the number of replicas to 1 and the refresh interval to 1s (the default value).
curl -u user:password -XPUT 'http://<host:port>/indexName/_settings' -d' {
        "number_of_replicas" : 1,
        "refresh_interval" : "1s"
}'