You can use Beats to collect the data of an Elastic Compute Service (ECS) instance. The data includes logs, network data, and metrics. Beats then sends the collected data to Alibaba Cloud Elasticsearch or Logstash for further processing, such as monitoring and analysis. This topic describes how to use a Filebeat shipper to collect the logs of an ECS instance.
Prerequisites
The following operations are performed:
Create an Alibaba Cloud Elasticsearch or Logstash cluster. In this example, a V6.7.0 cluster is used.
For more information, see Create an Alibaba Cloud Elasticsearch cluster or Create an Alibaba Cloud Logstash cluster.
Enable the Auto Indexing feature for the Elasticsearch cluster.
For security purposes, Alibaba Cloud Elasticsearch disables the Auto Indexing feature by default. However, Beats depends on this feature when it collects the logs of ECS instances. If you want to select Elasticsearch for Output, you must enable the Auto Indexing feature for the Elasticsearch cluster. For information about how to enable the feature, see Configure the YML file.
Create an ECS instance in the same virtual private cloud (VPC) as the Elasticsearch or Logstash cluster.
When you create the ECS instance, select one of the following types of operating systems: Alibaba Cloud Linux (Alinux), Red Hat Enterprise Linux (RHEL), and CentOS. Beats supports only the three types of operating systems. For more information, see Create an instance on the Custom Launch tab.
ImportantThe default installation directory of Beats is /opt/aliyunbeats/. After you install Beats, the conf, logs, and data directories are generated on the ECS instance. The conf directory contains the configuration file, the logs directory contains the Beats log file, and the data directory contains the Beats data file. We recommend that you do not delete or modify these files. Otherwise, errors may occur, or data may be incorrect. If an error occurs, you can view the Beats logs in the logs directory to locate the error.
Install Cloud Assistant and Docker on the ECS instance.
For more information, see Install Cloud Assistant Agent and Deploy and use Docker on ECS instances.
ImportantYou must use Docker Community Edition (Docker-CE). If you use Docker other than Docker-CE, such as podman-docker, Beats will fail to be deployed.
Procedure
Log on to the Alibaba Cloud Elasticsearch console.
Navigate to the Beats Data Shippers page.
In the top navigation bar, select a region.
In the left-side navigation pane, click Beats Data Shippers.
Optional: If this is the first time you go to the Beats Data Shippers page, view the information displayed in the message that appears and click OK to authorize the system to create a service-linked role for your account.
NoteWhen Beats collects data from various data sources, Beats depends on the service-linked role and the rules specified for the role. Do not delete the service-linked role. Otherwise, the use of Beats is affected. For more information, see Elasticsearch service-linked roles.
Configure and enable a shipper to collect the logs of the ECS instance.
NoteIn this example, a Filebeat shipper is used.
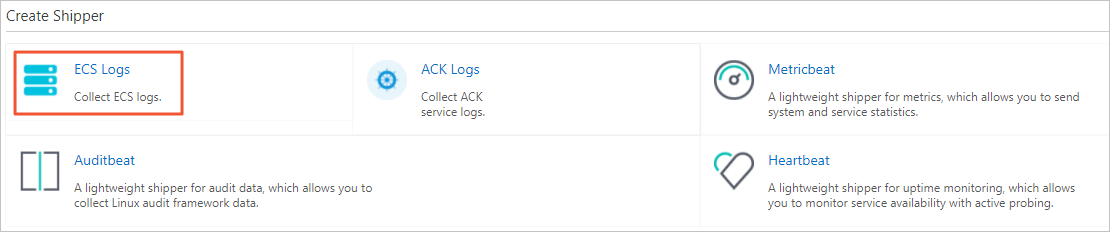
In the Create Shipper section, move the pointer over Filebeat and click ECS Logs.
 Note
NoteFor other types of shippers, you can directly click the shipper type. For example, to create a Metricbeat shipper, click Metricbeat.
In the Configure Shipper step, configure the parameters.
Parameter
Description
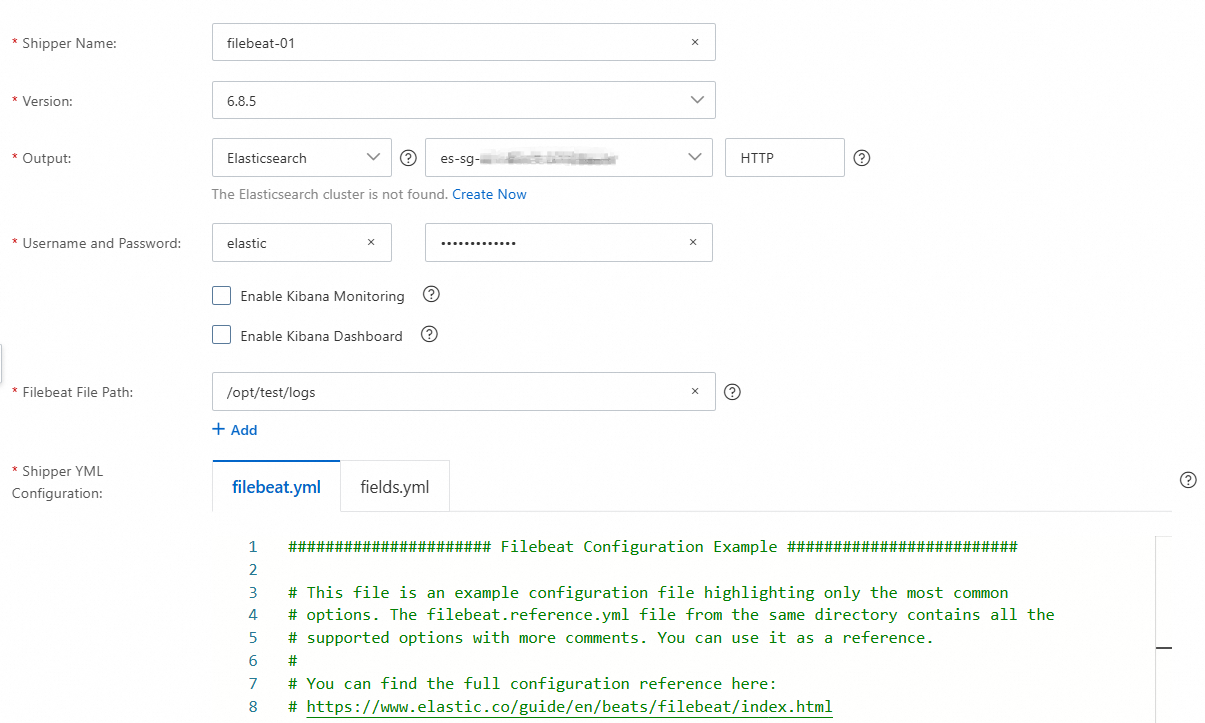
Shipper Name
The name of the shipper. The name must be 1 to 30 characters in length and can contain letters, digits, underscores (_), and hyphens (-). The name must start with a letter.
Version
Set this parameter to 6.8.5, which is the only version supported by Filebeat.
Output
The destination for the data collected by the shipper. The system provides existing Elasticsearch and Logstash clusters for you to select. The protocol must be the same as that of the selected Elasticsearch cluster.
ImportantElasticsearch V8.X clusters are not supported.
Username and Password
If you select Elasticsearch for Output, enter the username and password used to access the destination Elasticsearch cluster. This way, the shipper can write data to the cluster. The default username is elastic. The password is specified when you create the Elasticsearch cluster. If you forget the password, you can reset it. For more information about the procedure and precautions for resetting the password, see Reset the access password for an Elasticsearch cluster.
Enable Kibana Monitoring
Specifies whether to monitor the metrics of the shipper. If you select Elasticsearch for Output, the Kibana monitor uses the same Elasticsearch cluster as Output. If you select Logstash for Output, you must configure a monitor in the configuration file of the destination Logstash cluster.
Enable Kibana Dashboard
Specifies whether to enable the default Kibana dashboard. Alibaba Cloud Kibana is deployed in a VPC. You must enable the Private Network Access feature for Kibana on the Kibana Configuration page. For more information, see Configure a public or private IP address whitelist for Kibana.
Filebeat File Path
This parameter is specific to Filebeat shippers. Alibaba Cloud deploys Beats with Docker. You must map the directory from which logs are collected to Docker. The directory that you specify must be consistent with the value of
input.pathinfilebeat.yml. If you want to collect logs from a multi-level directory, you need to only specify one level in the directory. If the name of a level in the directory contains an asterisk (*), you do not need to enter the name of this level when you configure Filebeat File Path. For example, if you want to collect logs from the /var/log/*/*.log directory and you specifyinput.path: /var/log/*/*.login filebeat.yml, you need to only enter/var/or/var/log/when you configure Filebeat File Path.ImportantYou can specify a directory or full path. You can also specify a value for a fuzzy match of a specific type of files in a path.
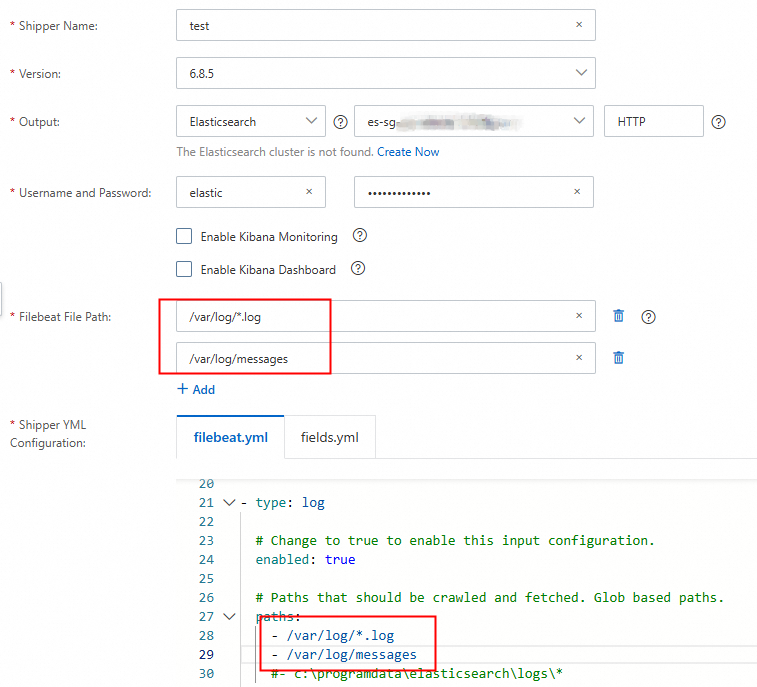
If you want to collect logs from multiple directories, click Add, enter the directory from which you want to collect logs, and then add the directory to the value of the paths parameter in Shipper YML Configuration.
Shipper YML Configuration
The YML configuration file of the shipper. You must make sure that log collection is enabled and that the value of paths is the same as the value of Filebeat File Path. The following code provides an example:
filebeat.inputs:
- type: log
  enabled: true
  paths:
    - /var/log/*.log
You can configure other parameters based on your business requirements. For more information, see Prepare a YML configuration file for a shipper.
ImportantIf you already configure Output, you do not need to specify the destination again in Shipper YML Configuration. Otherwise, the system reports a shipper installation error.
Alibaba Cloud Filebeat does not allow you to customize index names. By default, the system creates indexes whose names are in the filebeat-%{[agent.version]}-%{+yyyy.MM.dd} format, such as filebeat-6.8.5-2021.12.11.
Click Next.
Optional: If this is the first time you go to the Install Shipper step, click Authorize Now. On the Cloud Resource Access Authorization page, click Agree to Authorization to authorize the selected Elasticsearch cluster to access ECS instances.

The authorization service is provided by the Resource Access Management (RAM) service. After you confirm the authorization, the system automatically creates the system roles AliyunElasticsearchAccessingOOSRole and AliyunOOSAccessingECS4ESRole. The default system policy for AliyunElasticsearchAccessingOOSRole is AliyunElasticsearchAccessingOOSRolePolicy, and that for AliyunOOSAccessingECS4ESRole is AliyunOOSAccessingECS4ESRolePolicy. Do not delete the system roles and policies during the use of Beats.
If the system roles or policies are deleted, you can go to the Cloud Resource Access Authorization page to perform authorization again. You can attach the following custom policy to the RAM user that you use. Otherwise, the system displays an error message indicating that you do not have the required permissions. For information about how to create a custom policy, see Create a custom policy.
{
    "Version": "1",
    "Statement": [
        {
            "Effect": "Allow",
            "Action": [
                "ram:CreateRole",
                "ram:AttachPolicyToRole",
                "ram:GetRole"
            ],
            "Resource": "acs:ram:*:*:role/*",
            "Condition": {
                "ForAllValues:StringEquals": {
                    "ram:TrustedPrincipalTypes": "Service",
                    "ram:ServiceNames": [
                        "elasticsearch.aliyuncs.com",
                        "oos.aliyuncs.com"
                    ]
                }
            }
        },
        {
            "Effect": "Allow",
            "Action": "ram:AttachPolicyToRole",
            "Resource": "acs:ram:*:*:policy/*"
        },
        {
            "Action": "ram:PassRole",
            "Resource": "*",
            "Effect": "Allow",
            "Condition": {
                "StringEquals": {
                    "acs:Service": "elasticsearch.aliyuncs.com"
                }
            }
        }
    ]
}
In the Install Shipper step, select the ECS instance on which you want to install the shipper.
NoteAll the ECS instances within your account that reside in the same VPC as the Elasticsearch or Logstash cluster selected for Output are displayed. A shipper can be installed only on an ECS instance on which Cloud Assistant and Docker are installed.
Click Start.
In the Start Shipper dialog box, click Back to Beats Shippers. In the Manage Shippers section of the Beats Data Shippers page, view the newly created shipper.
After the value of Status for the shipper changes to Enabled, the shipper is created. The two numbers that follow Enabled indicate the number of ECS instances on which the shipper is installed and the total number of ECS instances on which you want to install the shipper. If the shipper is installed on all ECS instances, the two numbers are the same.
View the running ECS instance.
After the shipper is created, you can view the running ECS instance to check whether shipper installation on the ECS instance succeeds and handle exceptions as prompted.
In the Manage Shippers section, find the newly created shipper and click View Instances in the Actions column.
In the View Instances panel, check whether the shipper installation on the ECS instance succeeds.
The Installed Shippers column provides the value Normal Heartbeat, No Heartbeat, or Installation Failed to indicate whether the shipper installation on an ECS instance succeeds. If the value of Installed Shippers is No Heartbeat or Installation Failed, you can remove the instance or retry the installation on the instance. If the retry fails, you can troubleshoot the issue based on the instructions provided in Installation failures of Beats shippers.
Optional: View monitoring information and dashboards.
If you select Enable Kibana Monitoring or Enable Kibana Dashboard in the Configure Shipper step, you can view the monitoring information or dashboards in the Kibana console of the destination Elasticsearch cluster after the shipper is started.
In the Manage Shippers section, find the newly created shipper, move the pointer over
 in the Actions column, and then select .
 On the logon page of the Kibana console, enter the username and password, and click Log in.
In the left-side navigation pane, click Dashboard and click a metric whose dashboard you want to view. Then, you can view the dashboard of the metric.
In the left-side navigation pane, click Monitoring and select a monitoring item whose information you want to view. Then, you can view the information of the monitoring item.
References
API operation for creating a shipper: CreateCollector
FAQ
How do I use a Filebeat shipper to collect logs from multiple directories?
When you configure the Filebeat File Path parameter for your Filebeat shipper, click Add, enter the directory from which you want to collect logs, and then add the directory to the value of the paths parameter in Shipper YML Configuration.
What do I do if I fail to install a Beats shipper on an ECS instance?
Troubleshoot the issue by following the instructions provided in Installation failures of Beats shippers.