Elastic Desktop Service (EDS) Enterprise has an exclusive account system that supports two types of accounts: convenience accounts and enterprise Active Directory (AD) accounts. Convenience users are end users who log on to Alibaba Cloud Workspace terminals and connect to cloud computers by using convenience accounts. This topic describes how to create convenience accounts.
EDS Enterprise has a centralized control plane in Singapore, which is used to manage the user account information that you create and maintain in the EDS Enterprise console. The account information you create is stored and processed in Singapore.
Background information
Convenience accounts are dedicated EDS user accounts that are suitable for scenarios in which you do not need to connect to enterprise AD systems. For more information about the account systems of EDS Enterprise, see Account systems.
Convenience accounts can be categorized by their activators as follows:
User-activated accounts: Administrators create user accounts by specifying usernames and email addresses. End users receive initial logon credentials (such as passwords) via email and use them to access Alibaba Cloud Workspace terminals. Upon first logon, end users must change their initial passwords to ensure security.
Administrator-activated accounts: Administrators create user accounts by specifying usernames and passwords. These accounts are activated immediately upon creation. The administrators then provide the credentials to end users, who can log on directly to Alibaba Cloud Workspace terminals. A user administrator (assigned from user-activated accounts) receives notifications for administrator-activated accounts, including logon credentials and password reset alerts, via email.
Prerequisites
If you want to add a convenience account to an organization, make sure the organization is created. For more information, see Create an organization.
Create a convenience account
Log on to the Elastic Desktop Service Enterprise console.
In the left-side navigation pane, choose .
On the Users & Organizations page, click the User tab, and then click Create User. Use one of the following methods to create a convenience account:
Manual creation
Click the Manual Entry tab, configure the following parameters as needed, and then click Create User.
Parameter
Required
Description
User Type
Yes
The type of the convenience account. Valid values: User-activated and Administrator-activated.
Username
Yes
The username of the convenience account. It must contain 3 to 25 characters in length and must start with a letter or digit. It can contain lowercase letters, digits, hyphens (-), and underscores (_). The username must not consist solely of digits or match the built-in username reserved in the operating system. For more information, see Naming conventions of convenience users.
Display Name
No
The display name of the convenience account, which is used for identification purposes and is not visible to end users.
Contact Info (Email Address)
Yes
The email addresses designated to receive notifications, including cloud computer assignments, logon information, initial passwords, and password reset alerts. Make sure that the email addresses you specify are valid.
Parent Organization
No
Reflecting real-world business relationships (such as a company's organizational structure), each user can belong to only one organization. Organizations are arranged in a hierarchical, tree-like structure.
A user can be assigned to an organization upon creation, or assigned one later as needed.
User Group
No
You can use user groups to quickly perform bulk authorization for shared cloud computers, cloud browsers, and cloud applications. By applying different logon policies and file approval permissions to different user groups, you can achieve fine-grained management of user privileges.
Password
Yes
This parameter is required if you set the User Type parameter to Administrator-activated. The password must be at least 10 characters in length and include at least three of the following character types: uppercase letters, lowercase letters, digits, and special characters (excluding spaces).
Password Validity
No
The validity period of the password. By default, the password is permanently valid. You can also enter a validity period that ranges from 7 to 365 days. When the password expires, you must change the password before you can proceed to log on.
Lock On
This parameter is required if you set the User Type parameter to Administrator-activated. After the account is locked, end users cannot use the account to log on to Alibaba Cloud Workspace terminals.
Grant Admin Permission
No
Remarks
No
The supplementary information about the convenience account.
Batch creation
Click the Batch Entry tab, configure the following parameters as needed, and then click Close.
Parameter
Required
Description
Account Ownership
Yes
The type of the convenience account. Valid values: User-activated and Administrator-activated.
Password Validity
No
The validity period of the password. By default, the password is permanently valid. You can also enter a validity period that ranges from 7 to 365 days. When the password expires, you must change the password before you can proceed to log on.
Lock On
No
This parameter is required if you set the User Type parameter to Administrator-activated. After the account is locked, end users cannot use the account to log on to Alibaba Cloud Workspace terminals.
Grant Admin Permission
No
Specifies whether to grant local admin permissions to the convenience account. By default, the Grant Admin Permission parameter is set to Yes. If you do not want to grant local admin permissions to the convenience account, select No.
NoteA convenience account with the local admin permissions can be used to install software and modify system settings in cloud computers.
Changes to local admin permissions take effect following a cloud computer restart.
Upload File
Yes
Click Download Template to download a template for importing user information. Open the template, enter user information in the format provided by the template, and then save the template.
If you want to import user-activated user accounts, specify the first column
Usernameand the second columnEmailin the template.If you want to import administrator-activated user accounts, specify the first column
Usernameand the fourth columnPasswordin the template.If you want to specify an organization for each convenience account that you want to import, enter the organization ID in the
OrgIdcolumn of the template. To obtain the value ofOrgId, hover the cursor over the organizational structure as shown in the following figure.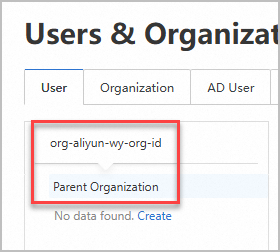
Click Upload Local File and select the template containing the account information. The system will automatically import the data.
After the template is imported to the EDS Enterprise console, a message confirming the creation of convenience accounts will appear in the Create User panel. Click View Account to verify the imported data items. Verify whether the account information in the template is in a valid format if the import fails.
Click Close.
After you create the convenience account, you can view the account information on the User tab. The convenience account is in the Normal state.
NoteThe system does not send notifications when convenience accounts are created. The system sends notifications to specified email addresses when you assign cloud computers or many-to-many shares to the convenience accounts.
Specify a user administrator
For administrator-activated convenience accounts, you must forward usernames and passwords to end users offline. To help users get new passwords quickly, set a user-activated convenience account as the user administrator. This account will replace the administrator-activated convenience account for receiving password notifications.
On the User tab of the Users & Organizations page, find the user-activated convenience account that you want to specify as the user administrator.
Click Grant Administrator Permission in the Actions column.
NoteIf Grant Administrator Permission is grayed out, the current user-activated convenience account already has admin permissions. To assign admin permissions to a different convenience account, first revoke them from the existing one.
Click OK.