After you resize disks of Linux instances by extending the disk capacity in the Elastic Compute Service (ECS) console, you must extend partitions and file systems on the disks in the instance operating systems for the new disk capacity to take effect. In specific early versions of Linux operating systems, you cannot extend partitions or file systems on disks online by using tools such as growpart. In this case, you must extend the partitions and file systems in the instance operating systems offline. A disk is online when it is in the Mount state, and is offline when it is in the Umount state. This topic describes how to extend partitions and file systems on a data disk of a Linux instance offline.
Prerequisites
Snapshots are created for a data disk of a Linux instance to back up data.
To prevent data loss that is caused by accidental operations, we recommend that you create snapshots to back up your data. For more information, see Create a snapshot manually.
The data disk of the Linux instance is initialized and extended in the ECS console.
For more information, see Initialize a data disk (Linux) and Step 1: Increase the disk capacity.
Connect to an ECS instance.
For information about the connection methods, see Connection method overview.
Background information
In the examples of this topic, an instance that has the following configurations is used:
Operating system: Alibaba Cloud Linux 2.1903 LTS 64-bit public image
Data disk: ultra disk
Device name of the data disk: /dev/vdb
Modify the commands or parameter settings based on the actual operating system and device name of your data disk.
When you run the mount command to mount file systems, configure parameters based your business requirements to ensure the data security and performance of the file systems. For more information, see Mount Ext4 file systems with mount command options.
Check the partition format and the file system types of the data disk
Run the following command to check the partition format of the data disk:
sudo fdisk -lu /dev/vdbIn this example, the data disk has a partition named /dev/vdb1.
If the value of the
Systemparameter isLinux, the data disk uses the master boot record (MBR) partition table format.If the value of the
Systemparameter isGPT, the data disk uses the GUID Partition Table (GPT) partition table format.
[testuser@ecshost ~]# sudo fdisk -lu /dev/vdb Disk /dev/vdb: 42.9 GB, 42949672960 bytes, 83886080 sectors Units = sectors of 1 * 512 = 512 bytes Sector size (logical/physical): 512 bytes / 512 bytes I/O size (minimum/optimal): 512 bytes / 512 bytes Disk label type: dos Disk identifier: 0x9277b47b Device Boot Start End Blocks Id System /dev/vdb1 2048 41943039 20970496 83 LinuxNoteIf the data disk is not partitioned, the command output does not include partition information.
Run the following command to check the file system type of the existing partition on the data disk:
blkid /dev/vdb1In this example, the /dev/vdb1 partition is used, and the file system type of the partition is Ext4.
[testuser@ecshost ~]# blkid /dev/vdb1 /dev/vdb1: UUID="e97bf1e2-fc84-4c11-9652-73********24" TYPE="ext4"NoteIf the data disk does not have partitions or file systems or if the data disk has partitions but does not have file systems, no information is returned.
Check the status of the file system.
To check the status of an Ext file system, run the following command:
sudo e2fsck -n /dev/vdb1To check the status of an XFS file system, run the following command:
sudo xfs_repair -n /dev/vdb1To check the status of a BTRFS file system, run the following command:
sudo btrfsck /dev/vdb1
Different command outputs are returned for different types of file systems.
The following code provides a sample command output for an Ext or XFS file system. If the file system works as expected, clean is displayed in the command output. If clean is not displayed, troubleshoot the issue.
[testuser@ecshost ~]# sudo e2fsck -n /dev/vdb1
Warning! /dev/vdb1 is mounted.
Warning: skipping journal recovery because doing a read-only filesystem check.
/dev/vdb1: clean, 11/1310720 files, 126322/5242624 blocks
The following code provides a sample command output for a BTRFS file system. found 114688 bytes used err is 0 indicates that the file system works as expected. If an error is reported in the command output, troubleshoot the issue.
[testuser@ecshost ~]# sudo btrfsck /dev/vdb1
Checking filesystem on /dev/vdb1
UUID: 1234b7a7-68ff-4f48-a88c-8943f27f1234
checking extents
checking free space cache
checking fs roots
checking csums
checking root refs
found 114688 bytes used err is 0
total csum bytes: 0
total tree bytes: 114688
total fs tree bytes: 32768
total extent tree bytes: 16384
btree space waste bytes: 109471
file data blocks allocated: 0
referenced 0
Choose a method to extend partitions or file systems
Choose an extend method based on the partition format and the file system type.
Scenario | Extend method |
The data disk has partitions and file systems. |
|
The data disk is a new disk that does not have partitions or file systems. | After you resize the data disk by extending its capacity in the ECS console, perform the operations that are described in Initialize a data disk (Linux). |
The data disk is an unpartitioned raw disk that has a file system. | After you resize the data disk by extending its capacity in the ECS console, perform the operations that are described in Method 5: Extend the file system of a raw disk. |
The data disk is not attached to instances. | After you attach the data disk to an instance, perform the operation that are described in this topic to extend partitions and file systems on the data disk. |
If a data disk has an MBR partition, you cannot resize the disk to 2 TiB or larger. To prevent data loss, we recommend that you create a disk that is larger than 2 TiB in size, create and format a GPT partition on the disk, and then copy the data from the MBR partition to the GPT partition of the new disk.
If you cannot resize data disks due to issues that occur on the resize or formatting tool, you can upgrade the tool to a later version or re-install the tool.
Method 1: Extend existing MBR partitions
To prevent data loss, we recommend that you do not extend the partitions and file systems that are mounted to instances. If you want to extend a partition that is mounted to an instance, run the umount command to unmount the partition, extend the partition, wait until the partition works as expected, and then run the mount command to remount the partition. Perform operations based on the kernel version of the Linux instance.
If the instance kernel version is earlier than 3.6, unmount the partition, modify the partition table, and then extend the file system.
If the instance kernel version is 3.6 or later, modify the partition table, notify the kernel to update the partition table, and then extend the file system.
To extend existing MBR partitions to consume the additional disk capacity, perform the following operations:
Change the partition table.
Run the following command to view partition information and record the start sectors (value of the Start parameter) and end sectors (value of the End parameter) of the existing partitions:
sudo fdisk -lu /dev/vdbIn this example, the /dev/vdb1 partition is used. The value of Start for the partition is 2048 and the value of End is 41943039.
[testuser@ecshost ~]# sudo fdisk -lu /dev/vdb
Disk /dev/vdb: 42.9 GB, 42949672960 bytes, 83886080 sectors
Units = sectors of 1 * 512 = 512 bytes
Sector size (logical/physical): 512 bytes / 512 bytes
I/O size (minimum/optimal): 512 bytes / 512 bytes
Disk label type: dos
Disk identifier: 0x9277b47b

Device Boot Start End Blocks Id System
/dev/vdb1 2048 41943039 20970496 83 Linux
View the mount path of the data disk, unmount the partition based on the path, and then check that the partition is unmounted.
Run the following command to view mount information:
mount | grep "/dev/vdb"Run the following command to unmount the partition:
sudo umount /dev/vdb1Run the following command to check whether the partition is unmounted:
mount | grep "/dev/vdb"A command output similar to the following one is returned:
[testuser@ecshost ~]# mount | grep "/dev/vdb"
/dev/vdb1 on /mnt type ext4 (rw,relatime,data=ordered)
[testuser@ecshost ~]# sudo umount /dev/vdb1
[testuser@ecshost ~]# mount | grep "/dev/vdb"
Use the fdisk tool to delete the partition.
WarningIf an error occurs when you delete a partition, the data that is stored on the partition may be deleted. To prevent data loss, back up important data such as user data in a database before you delete a partition.
Run the
sudo fdisk -u /dev/vdbcommand to open the partition table for the data disk in sector mode.Enter p to list the partitions on the data disk.
Enter d to delete the partitions.
Enter p to check whether the partitions are deleted.
Enter w to save the changes and exit.
The following sample code provides an example on how to delete a partition:
[testuser@ecshost ~]# sudo fdisk -u /dev/vdb
Welcome to fdisk (util-linux 2.23.2).
Changes will remain in memory only, until you decide to write them.
Be careful before using the write command.
Command (m for help): p
Disk /dev/vdb: 42.9 GB, 42949672960 bytes, 83886080 sectors
Units = sectors of 1 * 512 = 512 bytes
Sector size (logical/physical): 512 bytes / 512 bytes
I/O size (minimum/optimal): 512 bytes / 512 bytes
Disk label type: dos
Disk identifier: 0x9277b47b
Device Boot Start End Blocks Id System
/dev/vdb1 2048 41943039 20970496 83 Linux
Command (m for help): d
Selected partition 1
Partition 1 is deleted
Command (m for help): p
Disk /dev/vdb: 42.9 GB, 42949672960 bytes, 83886080 sectors
Units = sectors of 1 * 512 = 512 bytes
Sector size (logical/physical): 512 bytes / 512 bytes
I/O size (minimum/optimal): 512 bytes / 512 bytes
Disk label type: dos
Disk identifier: 0x9277b47b
Device Boot Start End Blocks Id System
Command (m for help): w
The partition table has been altered!
Calling ioctl() to re-read partition table.
Syncing disks.
Run the fdisk command to re-create the deleted partition on the data disk to extend the partition.
Run the
sudo fdisk -u /dev/vdbcommand to open the partition table for the data disk in sector mode.Enter p to list the partitions on the data disk.
Enter n to create a partition.
Enter p to select the primary partition type.
Enter <Partition number> to select a partition number. In this example, 1 is selected as the partition number.
Specify the start and end sectors for the new partition.
WarningThe new partition must have the same start sector as the deleted partition and a greater end sector. Otherwise, the extend operation fails.
Enter w to save the changes and exit.
Refer to the following example on how to create a partition to extend the original partition. In this example, the /dev/vdb1 partition is extended from 20 GiB to 40 GiB.
[testuser@ecshost ~]# sudo fdisk -u /dev/vdb
Welcome to fdisk (util-linux 2.23.2).
Changes will remain in memory only, until you decide to write them.
Be careful before using the write command.
Command (m for help): p
Disk /dev/vdb: 42.9 GB, 42949672960 bytes, 83886080 sectors
Units = sectors of 1 * 512 = 512 bytes
Sector size (logical/physical): 512 bytes / 512 bytes
I/O size (minimum/optimal): 512 bytes / 512 bytes
Disk label type: dos
Disk identifier: 0x9277b47b
Device Boot Start End Blocks Id System
Command (m for help): n
Partition type:
p primary (0 primary, 0 extended, 4 free)
e extended
Select (default p): p
Partition number (1-4, default 1): 1
First sector (2048-83886079, default 2048):
Using default value 2048
Last sector, +sectors or +size{K,M,G} (2048-83886079, default 83886079):
Partition 1 of type Linux and of size 40 GiB is set
Command (m for help): w
The partition table has been altered!
Calling ioctl() to re-read partition table.
Syncing disks.
Run one of the following commands to update the kernel on the partition table changes:
sudo partprobe /dev/vdbNoteIf your instance runs CentOS 6 and the
-bash: partprobe: command not founderror message appears, change the URL of the YUM repository. For more information, see How do I change CentOS 6 repository addresses? Run thesudo yum install -y partedcommand to install the Parted tool. Then, rerun the partprobe /dev/vdb command.sudo partx -u /dev/vdb1Run the following command to check whether the partition table is changed as expected:
sudo lsblk /dev/vdbRun the following command to check the file system on the extended partition and verify that the file system is in the clean state:
sudo e2fsck -f /dev/vdb1NoteIf the command output does not indicate that the file system is in the clean state, you can run the
sudo e2fsck -n /dev/vdb1command to check the file system.
Extend the file system.
For an Ext file system, such as an Ext3 or Ext4 file system, run the following commands in sequence to extend the file system and remount the partition.
Run the following command to extend the file system:
sudo resize2fs /dev/vdb1Run the following command to mount the partition to /mnt:
sudo mount /dev/vdb1 /mntFor an XFS file system, run the following commands in sequence to remount the partition and then extend the file system.
Run the following command to mount the partition to /mnt:
sudo mount /dev/vdb1 /mntRun the following command to extend the file system:
sudo xfs_growfs /mntNoteThe new version of xfs_growfs requires a mount point as an argument. Example:
xfs_growfs /mnt. To extend a file system, run the xfs_growfs command with the mount point of the file system specified. You can run thexfs_growfs --helpcommand to check how to use xfs_growfs of different versions.For a BTRFS file system, run the following commands in sequence to remount the partition and then extend the file system.
Run the following command to mount the partition to /mnt:
sudo mount /dev/vdb1 /mntRun the following command to extend the BTRFS file system:
sudo btrfs filesystem resize max /mnt
Method 2: Create and format MBR partitions
To create an MBR partition to consume the additional disk capacity, perform the following operations:
Run the following command to create a partition:
sudo fdisk -u /dev/vdbThe following sample code provides an example on how to create a partition. In this example, a 20 GiB partition named /dev/vdb2 is created.
[testuser@ecshost ~]# sudo fdisk -u /dev/vdb
Welcome to fdisk (util-linux 2.23.2).

Changes will remain in memory only, until you decide to write them.
Be careful before using the write commad.

Command (m for help): p

Disk /dev/vdb: 42.9 GB, 42949672960 bytes, 83886080 sectors
Units = sectors of 1 * 512 = 512 bytes
Sector size (logical/physical): 512 bytes / 512 bytes
I/O size (minimum/optimal): 512 bytes / 512 bytes
Disk label type: dos
Disk identifier: 0x2b31a2a3

   Device Boot      Start         End      Blocks   Id  System
/dev/vdb1            2048    41943039    20970496   83  Linux

Command (m for help): n
Partition type:
   p   primary (1 primary, 0 extended, 3 free)
   e   extended
Select (default p): p
Partition number (2-4, default 2): 2
First sector (41943040-83886079, default 41943040):
Using default value 41943040
Last sector, +sectors or +size{K,M,G} (41943040-83886079, default 83886079):
Using default value 83886079
Partition 2 of type Linux and of size 20 GiB is set

Command (m for help): w
The partition table has been altered!

Calling ioctl() to re-read partition table.
Syncing disks.
Run the following command to view the partition:
lsblk /dev/vdbA command output similar to the following one is returned:
[testuser@ecshost ~]# lsblk /dev/vdb
NAME   MAJ:MIN RM SIZE RO TYPE MOUNTPOINT
vdb    253:16   0  40G  0 disk
├─vdb1 253:17   0  20G  0 part
└─vd└─vdb2 253:18   0  20G  0 part
Create a file system.
To create an Ext4 file system, run the following command:
sudo mkfs.ext4 /dev/vdb2To create an XFS file system, run the following command:
sudo mkfs.xfs -f /dev/vdb2To create a BTRFS file system, run the following command:
sudo mkfs.btrfs /dev/vdb2
Run the following command to view the information about the file system:
blkid /dev/vdb2A command output similar to the following one is returned:
[testuser@ecshost ~]# blkid /dev/vdb2
/dev/vdb2: UUID="e3f336dc-d534-4fdd-****-b6ff1a55bdbb" TYPE="ext4"
Run the following command to mount the partition:
sudo mount /dev/vdb2 /mntRun the following command to view the space and usage of the data disk:
df -hA command output similar to the following one is returned. In the command output, the information about the new file system is displayed, which indicates that the partition is mounted:
[testuser@ecshost ~]# df -h
Filesystem Size Used Avail Use% Mounted on
/dev/vda1 40G 1.6G 36G 5% /
devtmpfs 3.9G 0 3.9G 0% /dev
tmpfs 3.9G 0 3.9G 0% /dev/shm
tmpfs 3.9G 460K 3.9G 1% /run
tmpfs 3.9G 0 3.9G 0% /sys/fs/cgroup
/dev/vdb2 9.8G 37M 9.2G 1% /mnt
tmpfs 783M 0 783M 0% /run/user/0
Method 3: Extend existing GPT partitions
To extend existing GPT partitions to consume the additional disk capacity, perform the following operations:
View the mount path of the data disk, unmount the existing partitions based on the path, and then check that the partitions are unmounted. In this example, the /dev/vdb1 partition is used.
Run the following command to view mount information:
mount | grep "/dev/vdb"Run the following command to unmount the partition:
sudo umount /dev/vdb1Run the following command to check whether the partition is unmounted:
mount | grep "/dev/vdb"A command output similar to the following one is returned:
[testuser@ecshost ~]# mount | grep "/dev/vdb"
/dev/vdb1 on /mnt type ext4 (rw,relatime,data=ordered)
[testuser@ecshost ~]# sudo umount /dev/vdb1
[testuser@ecshost ~]# mount | grep "/dev/vdb"
Use the Parted tool to allocate disk capacity for the GPT partition.
Run the following command to start the Parted tool:
sudo parted /dev/vdbTo view the instructions on using the Parted tool, run the help command.
Run the following command to view partition information. Then, record the partition number and start sector of the partition.
printIf the
Fix/Ignore/Cancel?orFix/Ignore?message appears, enter Fix.In this example, the size of the partition is 1 TiB, the partition number (value of
Number) is1, and the start sector (value ofStart) is1049kB.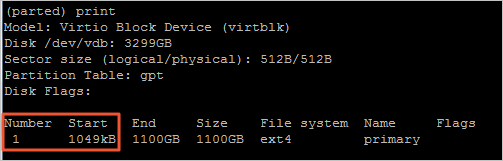
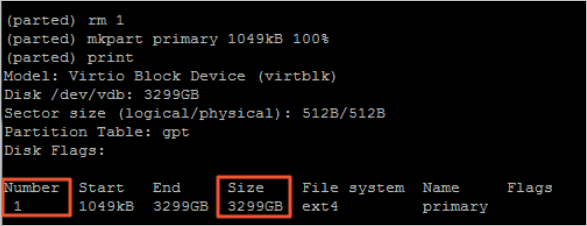
Run the following command to delete the partition:
rm <Partition number>In this example, the partition number is
1. Run the following command to delete the partition:rm 1Run the following command to re-create the primary partition:
mkpart primary <Start sector of the original partition> <Percentage of capacity to be allocated>In this example, the Start value of the original partition is
1049kBand the partition is extended to consume all 3 TiB of the disk capacity. Run the following command to create the primary partition:mkpart primary 1049kB 100%Run the following command to check whether the new partition is created:
printA command output similar to the following one is returned. In the command output, the partition number of the new GPT partition is 1 and the capacity of the partition is increased to 3 TiB.
Run the following command to exit the Parted tool:
quit
The following sample code provides an example on how to perform the preceding steps:
[testuser@ecshost ~]# sudo parted /dev/vdb
GNU Parted 3.1
Using /dev/vdb
Welcome to GNU Parted! Type 'help' to view a list of commands.
(parted) print
Error: The backup GPT table is not at the end of the disk, as it should be.
This might mean that another operating system believes the disk is smaller.
Fix, by moving the backup to the end (and removing the old backup)?
Fix/Ignore/Cancel? Fix
Warning: Not all of the space available to /dev/vdb appears to be used, you can
fix the GPT to use all of the space (an extra 4294967296 blocks) or continue
with the current setting?
Fix/Ignore? Fix
Model: Virtio Block Device (virtblk)
Disk /dev/vdb: 3299GB
Sector size (logical/physical): 512B/512B
Partition Table: gpt
Disk Flags:

Number  Start   End     Size    File system  Name     Flags
 1      1049kB  1100GB  1100GB  ext4         primary

(parted) rm 1
(parted) mkpart primary 1049kB 100%
(parted) print
Model: Virtio Block Device (virtblk)
Disk /dev/vdb: 3299GB
Sector size (logical/physical): 512B/512B
Partition Table: gpt
Disk Flags:

Number  Start   End     Size    File system  Name     Flags
 1      1049kB  3299GB  3299GB  ext4         primary

(parted) quit
Information: You may need to update /etc/fstab.
Run the following command to check the file system on the partition for consistency:
sudo fsck -f /dev/vdb1A command output similar to the following one is returned:
[testuser@ecshost ~]# sudo fsck -f /dev/vdb1
fsck from util-linux 2.23.2
e2fsck 1.43.5 (04-Aug-2017)
Pass 1: Checking inodes, blocks, and sizes
Pass 2: Checking directory structure
Pass 3: Checking directory connectivity
Pass 4: Checking reference counts
Pass 5: Checking group summary information
/dev/vdb1: 11/67108864 files (0.0% non-contiguous), 4265369/268434944 blocks
Extend the file system on the new partition and mount the partition.
Ext file system such as Ext3 or Ext4 file system:
Run the following command to extend the file system:
sudo resize2fs /dev/vdb1Run the following command to mount the partition:
sudo mount /dev/vdb1 /mntXFS file system:
Run the following command to mount the partition:
sudo mount /dev/vdb1 /mntRun the following command to extend the file system:
sudo xfs_growfs /mntNoteThe new version of xfs_growfs requires a mount point as an argument. Example:
xfs_growfs /mnt. To extend a file system, run the xfs_growfs command with the mount point of the file system specified. You can run thexfs_growfs --helpcommand to check how to use xfs_growfs of different versions.BTRFS file system
Run the following command to mount the partition:
sudo mount /dev/vdb1 /mntRun the following command to extend the file system:
sudo btrfs filesystem resize max /mnt
Method 4: Create and format GPT partitions
To create a GPT partition to consume the additional disk capacity, perform the following operations. In this example, a 32 TiB data disk is used. The disk has a 4.8 TiB /dev/vdb1 partition, and a new /dev/vdb2 partition is to be created.
Run the following command to view the information about partitions on the data disk:
sudo fdisk -lA command output similar to the following one is returned:
[testuser@ecshost ~]# sudo fdisk -l
Disk /dev/vda: 42.9 GB, 42949672960 bytes, 83886080 sectors
Units = sectors of 1 * 512 = 512 bytes
Sector size (logical/physical): 512 bytes / 512 bytes
I/O size (minimum/optimal): 512 bytes / 512 bytes
Disk label type: dos
Disk identifier: 0x000b1b45

   Device Boot      Start         End      Blocks   Id  System
/dev/vda1   *        2048    83875364    41936658+  83  Linux
WARNING: fdisk GPT support is currently new, and therefore in an experimental phase. Use at your own discretion.

Disk /dev/vdb: 35184.4 GB, 35184372088832 bytes, 68719476736 sectors
Units = sectors of 1 * 512 = 512 bytes
Sector size (logical/physical): 512 bytes / 512 bytes
I/O size (minimum/optimal): 512 bytes / 512 bytes
Disk label type: gpt
Disk identifier: BCE92401-F427-45CC-8B0D-B30EDF279C2F

#         Start          End    Size  Type            Name
 1         2048  10307921919    4.8T  Microsoft basic mnt
Use the Parted tool to create a partition and allocate disk capacity for the partition.
Run the following command to start the Parted tool:
sudo parted /dev/vdbRun the following command to view the disk capacity that can be allocated. Record the start sector (value of Start), end sector (value of End), and capacity (value of Size) of the existing partition.
print freeIn this example, the Start value of /dev/vdb1 is 1049KB, the End value is 5278GB, and the Size value is 5278GB.
(parted) print free
Model: Virtio Block Device (virtblk)
Disk /dev/vdb: 35.2TB
Sector size (logical/physical): 512B/512B
Partition Table: gpt
Disk Flags:

Number  Start   End     Size    File system  Name  Flags
        17.4kB  1049kB  1031kB  Free Space
 1      1049kB  5278GB  5278GB  ext4         mnt
        5278GB  35.2TB  29.9TB  Free Space
Run the following command to create a partition and specify the start sector and capacity for the partition:
mkpart <Partition name> <Start sector> <Percentage of capacity to be allocated>In this example, the /dev/vdb2 partition that is named test is created. The start sector of the new partition is the end sector of the existing partition. All additional disk capacity on the data disk is allocated to the new partition.
mkpart test 5278GB 100%Run the following command to check whether the capacity (Size) of the partition is changed:
printA command output similar to the following one is returned:
(parted) print
Model: Virtio Block Device (virtblk)
Disk /dev/vdb: 35.2TB
Sector size (logical/physical): 512B/512B
Partition Table: gpt
Disk Flags:

Number  Start   End     Size    File system  Name  Flags
 1      1049kB  5278GB  5278GB  ext4         mnt
 2      5278GB  35.2TB  29.9TB               test
Run the following command to exit the Parted tool:
quit
Create a file system for the new partition.
To create an Ext4 file system, run the following command:
sudo mkfs.ext4 /dev/vdb2To create an Ext3 file system, run the following command:
sudo mkfs.ext3 /dev/vdb2To create an XFS file system, run the following command:
sudo mkfs.xfs -f /dev/vdb2To create a BTRFS file system, run the following command:
sudo mkfs.btrfs /dev/vdb2
A command output similar to the following one is returned. In this example, an XFS file system is created.
[testuser@ecshost ~]# sudo mkfs -t xfs /dev/vdb2
meta-data=/dev/vdb2              isize=512    agcount=28, agsize=268435455 blks
         =                       sectsz=512   attr=2, projid32bit=1
         =                       crc=1        finobt=0, sparse=0
data     =                       bsize=4096   blocks=7301444096, imaxpct=5
         =                       sunit=0      swidth=0 blks
naming   =version 2              bsize=4096   ascii-ci=0 ftype=1
log      =internal log           bsize=4096   blocks=521728, version=2
         =                       sectsz=512   sunit=0 blks, lazy-count=1
realtime =none                   extsz=4096   blocks=0, rtextents=0
Run the following command to view the changes of the partition capacity:
sudo fdisk -lA command output similar to the following one is returned:
[testuser@ecshost ~]# sudo fdisk -l
Disk /dev/vda: 42.9 GB, 42949672960 bytes, 83886080 sectors
Units = sectors of 1 * 512 = 512 bytes
Sector size (logical/physical): 512 bytes / 512 bytes
I/O size (minimum/optimal): 512 bytes / 512 bytes
Disk label type: dos
Disk identifier: 0x000b1b45

   Device Boot      Start         End      Blocks   Id  System
/dev/vda1   *        2048    83875364    41936658+  83  Linux
WARNING: fdisk GPT support is currently new, and therefore in an experimental phase. Use at your own discretion.

Disk /dev/vdb: 35184.4 GB, 35184372088832 bytes, 68719476736 sectors
Units = sectors of 1 * 512 = 512 bytes
Sector size (logical/physical): 512 bytes / 512 bytes
I/O size (minimum/optimal): 512 bytes / 512 bytes
Disk label type: gpt
Disk identifier: BCE92401-F427-45CC-8B0D-B30EDF279C2F

#         Start          End    Size  Type            Name
 1         2048  10307921919    4.8T  Microsoft basic mnt
 2  10307921920  68719474687   27.2T  Microsoft basic test
Run the following command to view the types of file systems on partitions:
blkidA command output similar to the following one is returned:
[testuser@ecshost ~]# blkid
/dev/vda1: UUID="ed95c595-4813-480e-****-85b1347842e8" TYPE="ext4"
/dev/vdb1: UUID="21e91bbc-7bca-4c08-****-88d5b3a2303d" TYPE="ext4" PARTLABEL="mnt" PARTUUID="576235e0-5e04-4b76-****-741cbc7e98cb"
/dev/vdb2: UUID="a7dcde59-8f0f-4193-****-362a27192fb1" TYPE="xfs" PARTLABEL="test" PARTUUID="464a9fa9-3933-4365-****-c42de62d2864"
Run the following command to mount the new partition:
sudo mount /dev/vdb2 /mnt
Method 5: Extend the file system of a raw disk
If the data disk is a raw disk that has a file system but no partitions, perform the following operations to extend the file system:
Run the following command to view the type of the file system:
df -ThA command output similar to the following one is returned. In this example, the file system type of /dev/vdb is XFS.
[testuser@ecshost ~]# df -Th
Filesystem     Type      Size  Used Avail Use% Mounted on
devtmpfs       devtmpfs  434M     0  434M   0% /dev
tmpfs          tmpfs     446M     0  446M   0% /dev/shm
tmpfs          tmpfs     446M  524K  446M   1% /run
tmpfs          tmpfs     446M     0  446M   0% /sys/fs/cgroup
/dev/vda1      ext4       20G  2.5G   17G  14% /
tmpfs          tmpfs      90M     0   90M   0% /run/user/0
/dev/vdb       xfs        20G   53M   20G   1% /mnt
Extend the file system based on the file system type.
XFS file system
For an XFS file system, run the following xfs_growfs command to extend the file system:
sudo xfs_growfs /mntIn the preceding command,
/mntis the mount point of the file system.NoteThe new version of xfs_growfs requires a mount point as an argument. Example:
xfs_growfs /mnt. To extend a file system, run the xfs_growfs command with the mount point of the file system specified. You can run thexfs_growfs --helpcommand to check how to use xfs_growfs of different versions.Ext or BTRFS file system
Run the following command to view mount information:
mount | grep "/dev/vdb"Run the following command to unmount the data disk:
sudo umount /dev/vdbRun the following command to check whether the data disk is unmounted:
mount | grep "/dev/vdb"A command output similar to the following one is returned:
[testuser@ecshost ~]# mount | grep "/dev/vdb"
/dev/vdb on /mnt type ext4 (rw,relatime,data=ordered)
[testuser@ecshost ~]# sudo umount /dev/vdb
[testuser@ecshost ~]# mount | grep "/dev/vdb"
Extend the file system.
For an Ext file system, run the following resize2fs command to extend the file system:
sudo resize2fs /dev/vdbFor a BTRFS file system, run the following btrfs command to extend the file system:
sudo btrfs filesystem resize max /mntIn the preceding command,
/mntis the mount point of the file system.
Run the following command to mount the disk to the mount point:
sudo mount /dev/vdb /mnt
Run the
df -hcommand to check whether the file system is extended:df -ThA command output similar to the following one is returned. The command output indicates that the file system has a larger capacity. This indicates that the file system is extended.
[testuser@ecshost ~]# df -Th
Filesystem     Type      Size  Used Avail Use% Mounted on
devtmpfs       devtmpfs  434M     0  434M   0% /dev
tmpfs          tmpfs     446M     0  446M   0% /dev/shm
tmpfs          tmpfs     446M  524K  446M   1% /run
tmpfs          tmpfs     446M     0  446M   0% /sys/fs/cgroup
/dev/vda1      ext4       20G  2.5G   17G  14% /
tmpfs          tmpfs      90M     0   90M   0% /run/user/0
/dev/vdb       xfs        30G   63M   30G   1% /mnt