Deployment options
-
Automated deployment (Terraform): Click Run Now to open Terraform Explorer and automatically create an ECS instance, a public IP address, and the required security group rules.
-
Manual deployment: Deploy Tomcat manually on an existing ECS instance by following the steps below.
Prerequisites
-
Enable public access: A fixed public IP address or Elastic IP (EIP) is assigned to the instance.
-
Security group rules are configured:
-
Linux: Allow inbound traffic on TCP ports 22 (Secure Shell) and 8080 (Tomcat).
-
Windows: Allow inbound traffic on TCP ports 3389 (RDP) and 8080 (Tomcat).
-
-
OpenJDK is deployed on the server.
Procedure
Linux
Step 1: Download and install Tomcat
Log on to an ECS instance.
Go to ECS console - Instances. In the top-left corner, select the region and resource group for the target instance.
Navigate to the details page of the target instance. Click Connect and select Workbench. Follow the on-screen prompts to access the terminal.
-
Download and extract the Tomcat installation package.
This example uses Tomcat v9.0.91. For other versions, get the download URL from the official Tomcat website and replace it in the command.
# Download the Tomcat installation package sudo wget https://archive.apache.org/dist/tomcat/tomcat-9/v9.0.91/bin/apache-tomcat-9.0.91.tar.gz --no-check-certificate # Extract it to the /usr/local/ directory sudo tar -zxvf apache-tomcat-9.0.91.tar.gz -C /usr/local/ -
Create a symbolic link.
A symbolic link lets you upgrade Tomcat by changing only the link target, without modifying service configuration files.
sudo ln -s /usr/local/apache-tomcat-9.0.91 /usr/local/tomcat
Step 2: Configure Tomcat as a system service
Configure Tomcat as a systemd service for automatic startup.
-
Get the JDK path.
sudo readlink -f $(which java)-
JDK 8: Use the parent directory of the
jredirectory in the returned path. -
JDK 11 or later: Use the returned path directly.
-
-
Create the
tomcat.servicefile.Replace
JDK_PATHwith the path obtained in the previous step.sudo tee /etc/systemd/system/tomcat.service > /dev/null <<'EOF' [Unit] Description=Apache Tomcat Web Application Container After=network.target [Service] Type=forking Environment="JAVA_HOME=JDK_PATH" Environment="CATALINA_PID=/usr/local/tomcat/temp/tomcat.pid" Environment="CATALINA_HOME=/usr/local/tomcat" Environment="CATALINA_BASE=/usr/local/tomcat" ExecStart=/usr/local/tomcat/bin/startup.sh ExecStop=/usr/local/tomcat/bin/shutdown.sh Restart=on-failure [Install] WantedBy=multi-user.target EOF -
Start Tomcat and enable it on boot.
# Reload the systemd configuration to apply the new service file
sudo systemctl daemon-reload
# Start the Tomcat service
sudo systemctl start tomcat
# Enable the Tomcat service to start on boot
sudo systemctl enable tomcat
Step 3: Verify the deployment
-
Check the service status.
sudo systemctl status tomcatIf the status shows
active(running), Tomcat is running. -
Verify access.
Open
http://<ECS instance public IP address>:8080in a browser. If the Tomcat welcome page appears, the deployment is successful.
Windows
This example uses Tomcat 9.0.113 on 64-bit Windows Server 2022.
Step 1: Install and configure Tomcat
Log on to an ECS instance.
Go to ECS console - Instances. In the top-left corner, select the region and resource group for the target instance.
Navigate to the details page of the target instance. Click Connect and select Workbench. Set the connection method to Terminal Connection, enter your username and password, and log on to the graphical terminal.
-
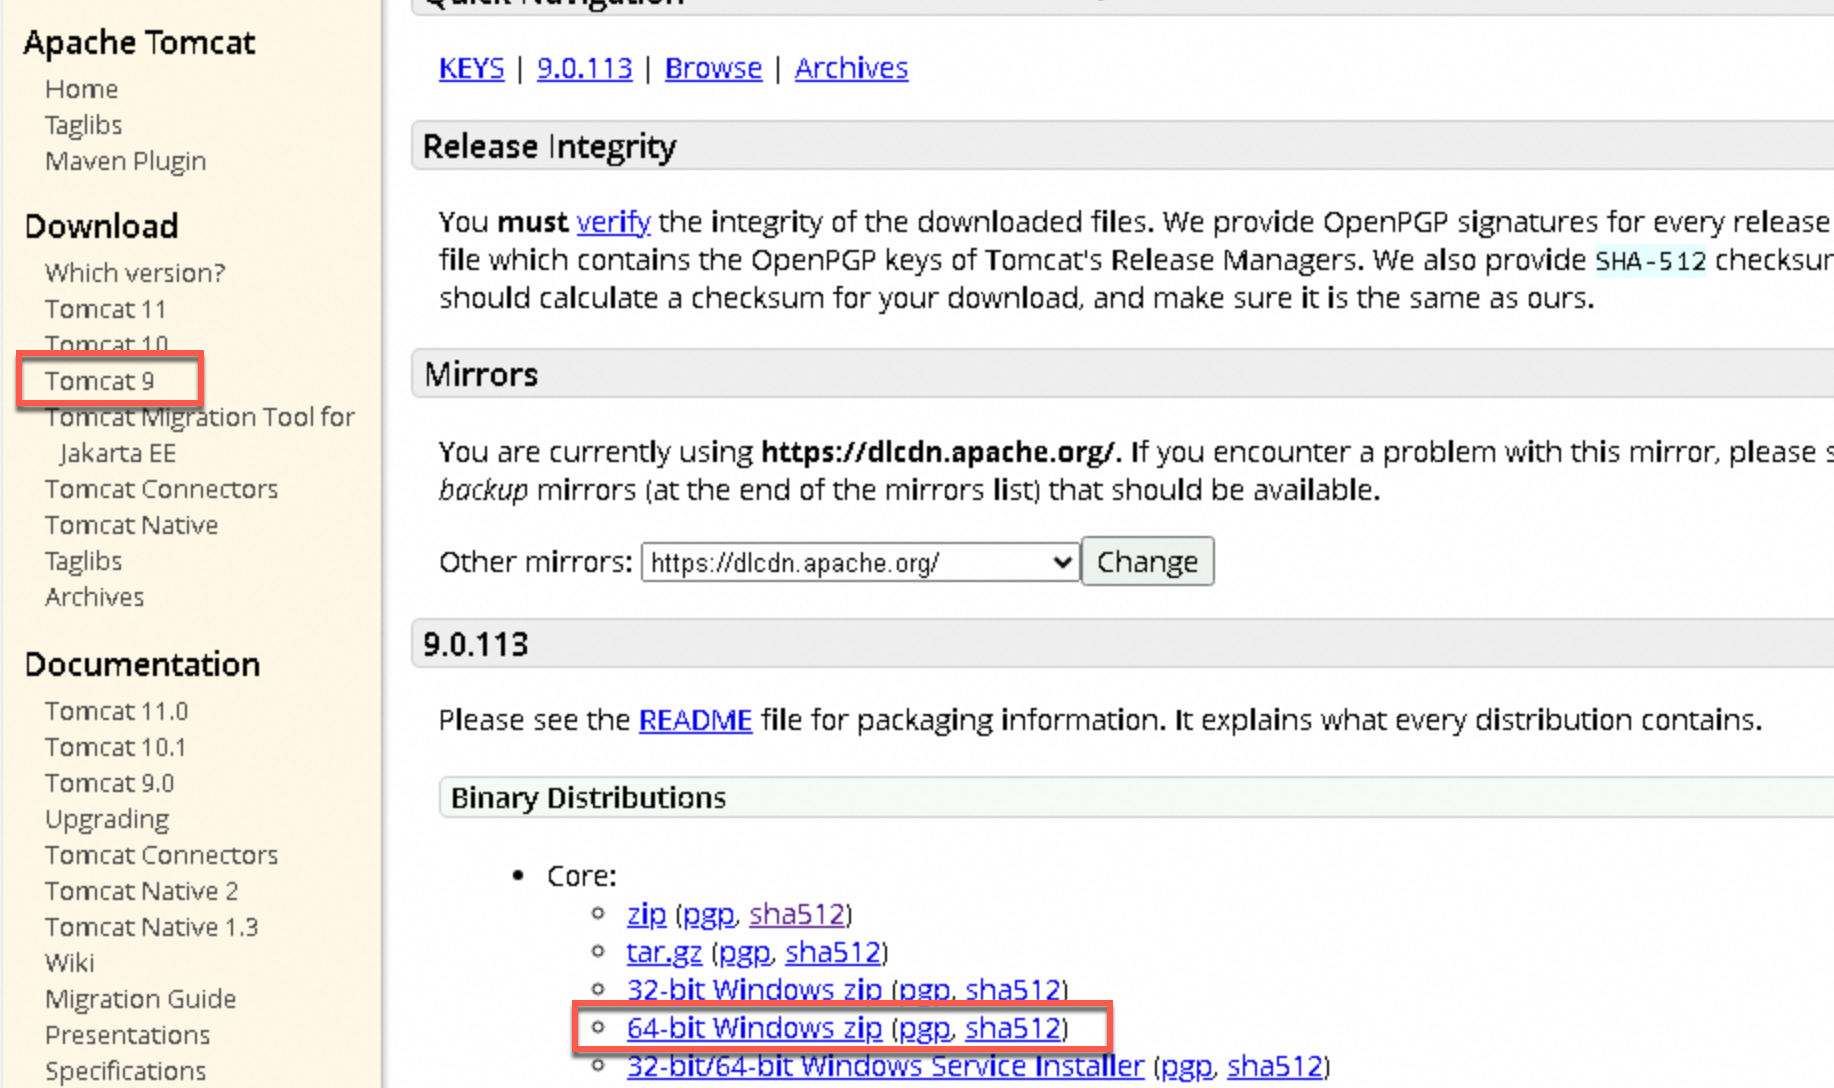
Download Tomcat 9.0.113 and extract it.
Extract to a path without non-ASCII characters, such as
C:\Java\apache-tomcat-9.0.113, to avoid path recognition issues.For other versions, download from the official Tomcat website.
-
Configure environment variables.
-
Right-click This PC and select .
-
In System variables, click New. Create a
CATALINA_HOMEvariable, set its value to the Tomcat extraction path, and click OK.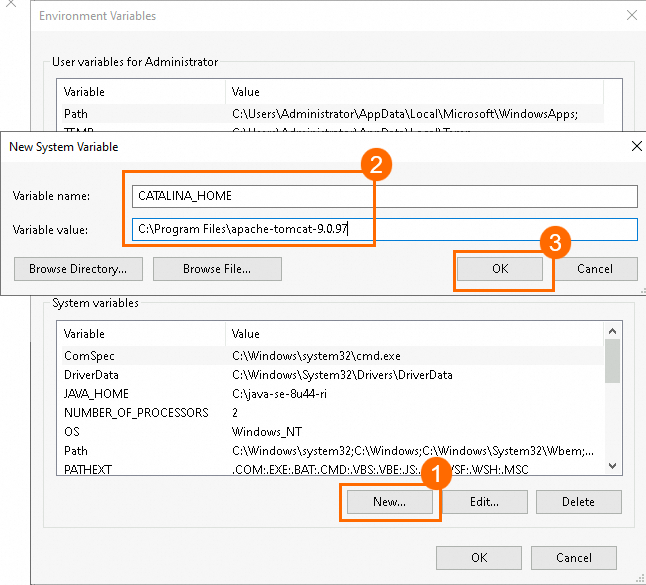
-
In System variables, select
Pathand click Edit.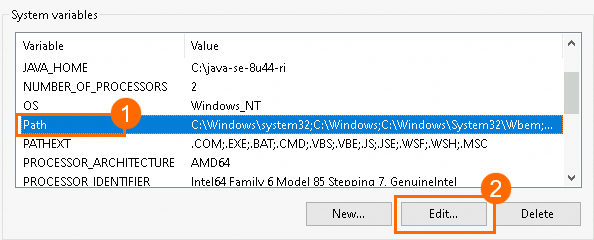
-
In the Edit environment variable window, click New, add
%CATALINA_HOME%\bin, and click OK.
-
Step 2: Install Tomcat as a Windows service and start it
Install Tomcat as a Windows service for stable background execution and automatic startup, instead of running it with startup.bat.
-
Install the service.
Open Command Prompt as administrator, navigate to Tomcat's
bindirectory, and run:service.bat install Tomcat9The message
The service 'Tomcat9' has been installed.confirms success.Tomcat9is a custom service name used to manage the service. -
Start the service and set it to automatic.
-
Right-click
 , click Run, enter
 services.msc, and press Enter to open the Services Manager. -
Locate
Apache Tomcat 9.0 Tomcat9, right-click it, select Properties, set Startup type to Automatic, and click Start.
For garbled log characters, see Tomcat logs display garbled characters.
-
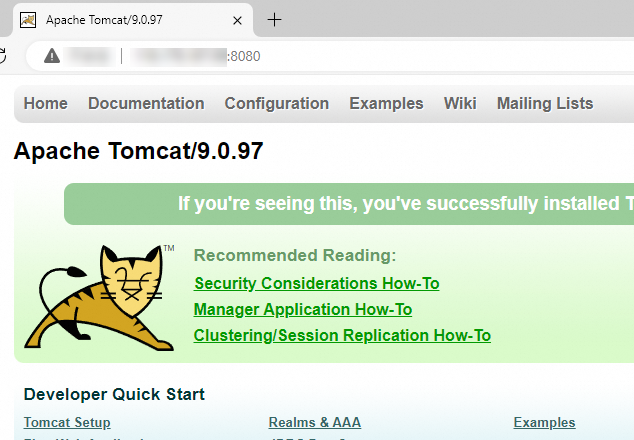
Step 3: Verify the deployment
Open http://<ECS_instance_public_IP_address>:8080 in a browser. If the Tomcat welcome page appears, the deployment is successful.
Next steps
Upload a web project
Use Workbench to upload a web application (.war file) to Tomcat's webapps directory. Tomcat automatically detects and deploys WAR files.
After deployment, access the application at http://<ECS_instance_public_IP_address>:8080/<project_name>.
Configure Tomcat
Modify the configuration file
-
Go to the
conffolder in the Tomcat installation directory and openserver.xml. -
Modify the Tomcat configuration as needed.
-
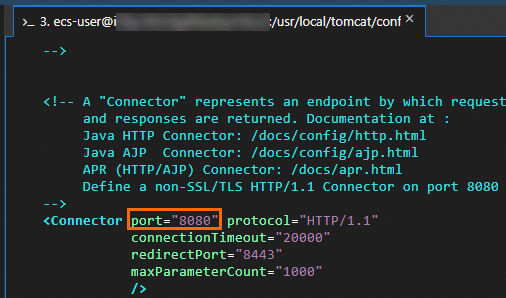
Tomcat uses port
8080by default. To change it, modify theportattribute value.Add a security group rule to allow traffic on the new port.
-
Tomcat's default website root directory is
webapps. To change it, modify theappBaseattribute value.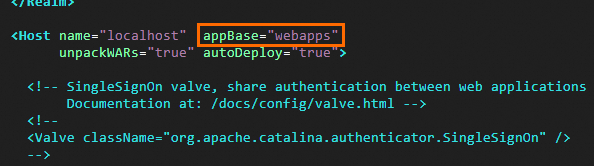
-
Set JVM memory parameters for Tomcat
Linux
-
Create a
setenv.shfile to centrally manage JVM parameters.Adjust heap sizes based on your instance type and application load.
sudo tee /usr/local/tomcat/bin/setenv.sh > /dev/null <<'EOF' #!/bin/bash # Example: For an ECS instance with 2 GB of memory, allocate 512 MB JAVA_OPTS="-server -Xms512m -Xmx512m" export JAVA_OPTS EOF -
Make the file executable.
sudo chmod +x /usr/local/tomcat/bin/setenv.sh -
Restart Tomcat for the changes to take effect.
Windows
-
Go to the
binfolder in the Tomcat installation directory and opencatalina.bat. -
Add or modify the JVM parameters.
Add or modify
JAVA_OPTSnear the beginning of the file (aftersetlocaland beforecall "%CATALINA_HOME%\bin\setenv.bat"). Adjust heap sizes based on your instance type and application load.# Example: For an ECS instance with 2 GB of memory, allocate 512 MB set "JAVA_OPTS=%JAVA_OPTS% -Xms512m -Xmx512m"If
JAVA_OPTSalready exists, append the new parameters separated by spaces. -
Restart Tomcat for the changes to take effect.
Apply in production
Reduce security risks in production by completing the following steps after deployment.
-
Delete default applications
Delete all default applications (
docs,examples,manager,host-manager) from thewebappsdirectory to reduce the attack surface.-
Linux:
sudo rm -rf /usr/local/tomcat/webapps/* -
Windows: Delete all subdirectories in
CATALINA_HOME\webappsusing File Explorer.
-
-
Configure HTTPS
Production environments should use HTTPS. Install an SSL certificate on a Tomcat server (Linux) and use Nginx or Server Load Balancer (SLB) as a reverse proxy for HTTPS.
FAQ
Browser times out or shows "This site can't be reached"
-
Check the security group: Verify that inbound rules allow traffic on port
8080. -
Check the OS firewall: Ensure
firewalldorWindows Defender Firewallallows traffic on port8080. -
Check the port listener: Confirm Tomcat is listening on port
8080.-
Linux:
ss -lntp | grep 8080 -
Windows:
netstat -ano | findstr ":8080"
-
Tomcat fails to start
-
Check the logs: Review
catalina.out(Linux) orcatalina.<date>.log(Windows) andlocalhost.<date>.login thelogsfolder. AnAddress already in useerror means the port is occupied. See Troubleshoot port connectivity issues on an ECS instance that can be pinged. -
Incorrect JDK path: Verify that the
JAVA_HOMEenvironment variable is correct.
Tomcat logs display garbled characters
This is usually caused by a mismatch between the Windows Command Prompt's default encoding (GBK) and Tomcat's log encoding (UTF-8).
-
Open the
conffolder in the Tomcat installation directory and editlogging.properties. -
Change all
UTF-8encoding values toGBK. -
Save the file and restart Tomcat. Verify that log characters display correctly.