Subversion (SVN) is an open-source version control system that efficiently manages data changes over time in a branching management system. This topic describes how to deploy and use SVN on Elastic Compute Service (ECS).
Preparations
Create an ECS instance for deploying SVN. For more information, see Create an instance on the Custom Launch tab.
The instance must meet the following requirements:
The instance is assigned a static public IP address (also called system-assigned or auto-assigned public IP address) or associated with an Elastic IP Address (EIP). For information about how to enable public bandwidth, see Enable public bandwidth.
Operating system: Alibaba Cloud Linux 3, Alibaba Cloud Linux 2, or CentOS 7.x.
Instance type: The instance type required for deploying the SVN service varies based on the project specifications and team scale. We recommend that you use an instance type with 4 vCPUs and 4 GiB or more of memory.
An inbound rule is added to a security group of the instance to allow traffic on ports 22, 80, and 443. For more information, see Add a security group rule.
NoteIf you want to access SVN using svnserve, add an inbound security group rule to open port 3690.
Click here to go to Terraform Explorer, where you can run Terraform code to deploy and use SVN on ECS.
Deploy SVN
SVN supports two access modes: HTTP and svnserve. The main differences between these two modes are as follows. Choose one of the following deployment methods based on your business needs.
Feature | HTTP mode | svnserve mode |
Protocol | HTTP for communication. | Custom SVN protocol for communication. |
Access Method | Web browsers or clients. | Clients only. |
Port | Port 80 for communication. | Port 3690 for communication. |
Security | HTTPS for encrypted communication. | Plaintext communication by default. Encryption settings can be applied for secure communication. |
Configuration | Configurations on the web server. | Configurations on the SVN server. |
Supported Capabilities | More features, such as access control and log query. | Fewer and simpler features. |
Deploy SVN over HTTP
Step 1: Install SVN
Connect to the Linux instance where you want to install SVN.
For more information, see Use Workbench to connect to a Linux instance over SSH.
Run the following command to install SVN:
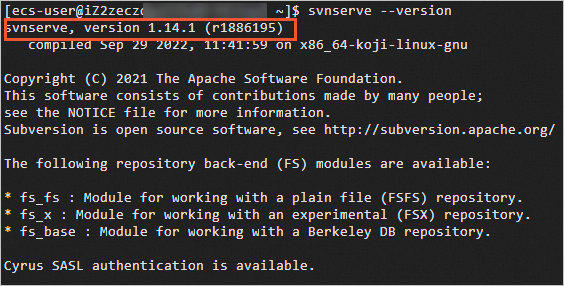
sudo yum install -y subversionRun the following command to check the SVN version:
svnserve --versionThe following sample command output indicates that SVN is installed.
Step 2: Install Apache
Run the following command to install Apache HTTP Server (httpd):
sudo yum install httpd -yRun the following command to check the httpd version:
httpd -versionThe following sample command output indicates that httpd is installed.

Step 3: Install mod_dav_svn
mod_dav_svn is an Apache HTTP Server module that enables web access to SVN repositories.
Run the following command to install mod_dav_svn:
sudo yum install mod_dav_svn -yStep 4: Configure SVN
Run the following commands in sequence to create an SVN repository:
sudo mkdir /var/svn
cd /var/svn
sudo svnadmin create /var/svn/svnrepos
Run the following command to change the ownership of the SVN repository to the apache user:
sudo chown -R apache:apache /var/svn/svnreposRun the following commands in sequence to verify the automatically generated files in the SVN repository:
cd svnrepos
ls
The following table describes the directories and files in an SVN repository.
Folder
Description
db
Stores all version control data files.
hooks
Stores hook scripts.
locks
Stores the SVN repository lock files and can be used to track accesses to the repository.
format
The text file that contains a single integer value. The value indicates the version number of the current SVN repository.
conf
The SVN repository configuration file that stores the usernames and access permissions of the repository.
Run the following command to set a username and password for the SVN repository.
SVN passwords are stored in plaintext. Since HTTP does not support plaintext passwords, create a separate file named passwd. In this example, add a user named
userTestwith the passwordpassWDTest. Use one of the following commands based on your situation:To add the first user to the SVN repository, use the
-cparameter to create the file.sudo htpasswd -c /var/svn/svnrepos/conf/passwd userTestTo add additional users, run the following command:
sudo htpasswd /var/svn/svnrepos/conf/passwd userTest
Enter the password for the user when prompted.
Navigate to the conf directory of the SVN repository.
cd /var/svn/svnrepos/conf/Set read and write permissions for the user.
Open the access control file with the following command:
sudo vim authzPress
ito enter Insert mode.At the end of the file, add the following lines to grant read (r) and write (w) permissions to the user (userTest).
[/]
userTest=rw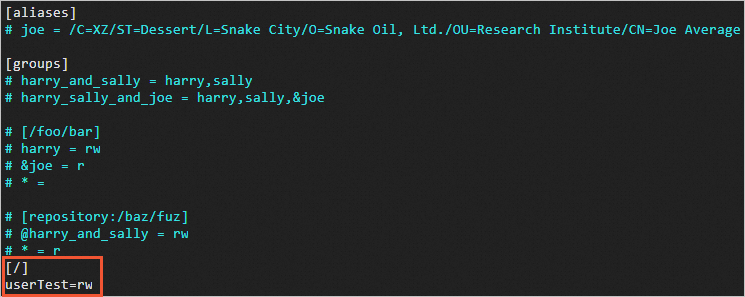
Press
Esc, enter:wq, and then press the Enter key to save the configurations and exit.
Modify the SVN configuration file.
Open the SVN configuration file with the following command:
sudo vim svnserve.confPress
ito enter Insert mode.Remove the number sign (#) and spaces from the start of the following lines:
NoteMake sure that no spaces precede the lines and a space exists before and after the equal sign (=).
anon-access = read
auth-access = write
password-db = passwd
authz-db = authz
realm = /var/svn/svnrepos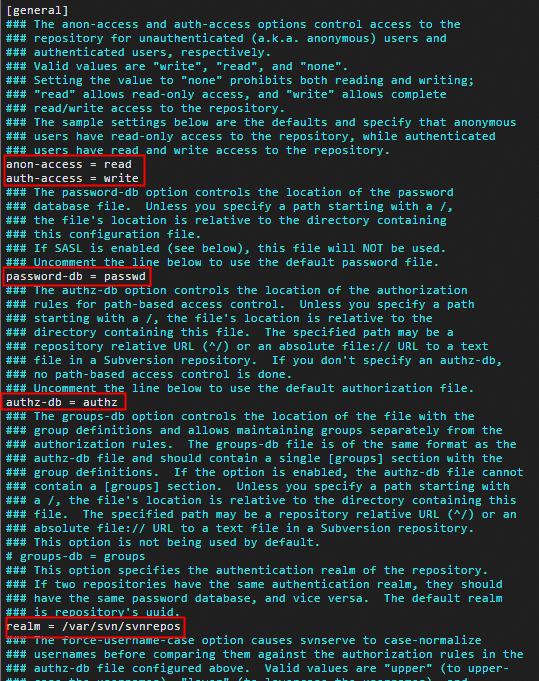
Press
Escand type:wqto save and exit.
Activate the SVN service and specify the absolute path to the SVN repository.
Run the following example command to specify the absolute path to the SVN repository:
sudo svnserve -d -r /var/svn/svnrepos/NoteTo stop the SVN service, run the
killall svnservecommand.Run the following command to check whether the SVN service is enabled:
ps -ef |grep svnThe following sample command output shows that the SVN service is running.

Step 5: Configure Apache
Add and edit the Apache configuration file with the following command:
sudo vim /etc/httpd/conf.d/subversion.confPress
ito enter Insert mode.Enter the following configuration information in the
subversion.conffile:<Location /svn> DAV svn SVNParentPath /var/svn AuthType Basic AuthName "Authorization SVN" AuthzSVNAccessFile /var/svn/svnrepos/conf/authz AuthUserFile /var/svn/svnrepos/conf/passwd Require valid-user </Location>Press
Esc, enter:wq, and then press the Enter key to save the configurations and exit.Start the Apache service.
sudo systemctl start httpd.service
Deploy SVN over svnserve
Step 1: Install SVN
Connect to the Linux instance where you want to install SVN.
For more information, see Use Workbench to connect to a Linux instance over SSH.
Run the following command to install SVN:
sudo yum install -y subversionRun the following command to check the SVN version:
svnserve --versionThe following sample command output indicates that SVN is installed.
Step 2: Configure SVN
Run the following commands in sequence to create an SVN repository:
sudo mkdir /var/svn
cd /var/svn
sudo svnadmin create /var/svn/svnrepos
Run the following commands in sequence to verify the automatically generated files in the SVN repository:
cd svnrepos
ls
The following table describes the directories and files in an SVN repository.
Folder
Description
db
Stores all version control data files.
hooks
Stores hook scripts.
locks
Stores the SVN repository lock files and can be used to track accesses to the repository.
format
The text file that contains a single integer value. The value indicates the version number of the current SVN repository.
conf
The SVN repository configuration file that stores the usernames and access permissions of the repository.
Set the SVN repository username and password.
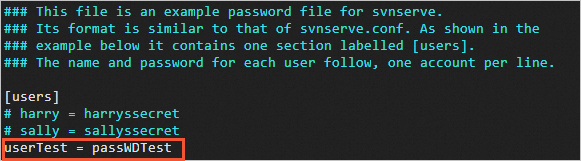
Open the user configuration file with the following command:
cd conf/
sudo vim passwd
Press
ito enter edit mode.Under [users], add the username and password in the following format: username = password. For example,
userTest = passWDTest.NoteAdd a space before and after the equal sign (=).
Press
Escand type:wqto save and exit.
Set read and write permissions for the user.
Open the access control file with the following command:
sudo vim authzPress
ito enter Insert mode.At the end of the file, add the following lines to grant read (r) and write (w) permissions to the user (userTest).
[/]
userTest=rw
Press
Esc, enter:wq, and then press the Enter key to save the configurations and exit.
Modify the SVN configuration file.
Open the SVN configuration file with the following command:
sudo vim svnserve.confPress
ito enter Insert mode.Remove the number sign (#) and spaces from the start of the following lines:
NoteMake sure that no spaces precede the lines and a space exists before and after the equal sign (=).
anon-access = read
auth-access = write
password-db = passwd
authz-db = authz
realm = /var/svn/svnrepos
Press
Escand type:wqto save and exit.
Activate the SVN service and specify the absolute path to the SVN repository.
Run the following example command to specify the absolute path to the SVN repository:
sudo svnserve -d -r /var/svn/svnrepos/NoteTo stop the SVN service, run the
killall svnservecommand.Run the following command to check whether the SVN service is enabled:
ps -ef |grep svnThe following sample command output shows that the SVN service is running.
Use SVN
This section describes the steps to manage code in SVN:
Checkout: Create a working copy of the source code on your local device by checking out from the SVN repository.
Other users may modify and commit changes to the source code in the repository.
Update: Retrieve the latest version of the source code from the repository to your local working copy.
Modify and debug the source code in your local working copy.
Commit: Submit your changes to the repository so that other users can access the updated code.
Check out source code to a local directory (Checkout)
You can download and install the TortoiseSVN client on your on-premises Windows machine.
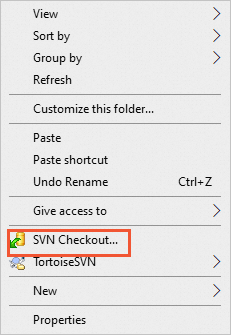
Right-click in the local project folder and select SVN Checkout....
For example, the project folder is
C:\Test.In the pop-up menu, select SVN Checkout....
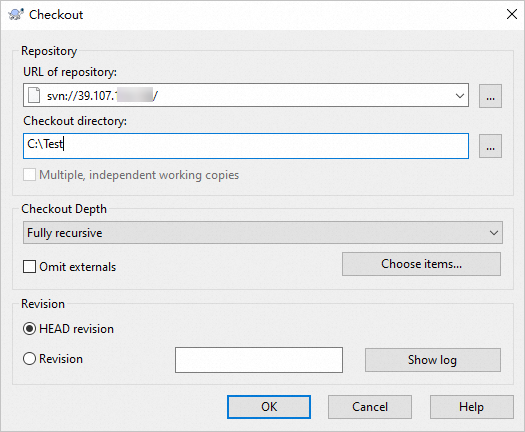
Enter the repository URL and checkout directory, then click OK.
URL of Repository: The URL where the source code is stored.
HTTP access mode: To access via URL, use the format
http://<ECS instance public IP>/svn/<SVN repository name>.For svnserve access mode, the URL format is
svn:///.NoteIf SVN is started in the directory above the SVN repository, include the repository name in the checkout URL.
Checkout Directory: The directory to which the source code is checked out. In this example, the directory is
C:\Test.
 Note
NoteOn the first login, enter the username and password you set in the passwd file.
Below is an illustration of the outcome after performing a checkout operation.

Obtain updates (Update)
After updates are made to the project in the SVN repository, right-click in the local project folder and select SVN Update to download the latest project files. The updates will be displayed.
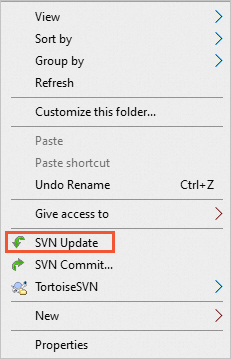
When you select SVN Update, all files in the project folder are overwritten. It is recommended to back up the project before updating to prevent data loss.
Commit changes (Commit)
To commit local modifications to the repository, follow these steps:
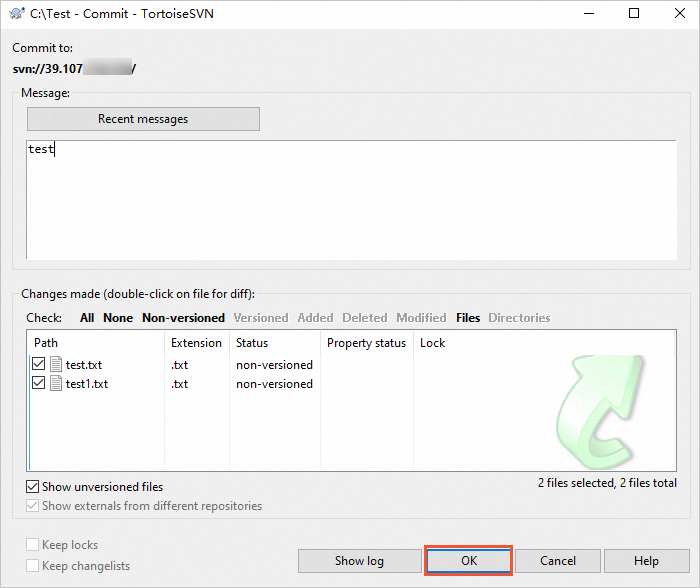
Right-click in the project folder and select SVN Commit....
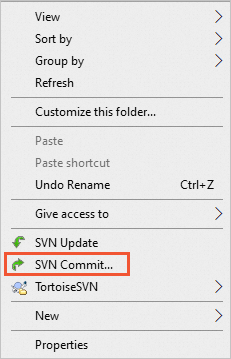
Enter comments for the changes, select the files to commit, and click OK.
Your local changes are now committed to the SVN repository and will be reflected in the project.
 Note
NoteIf a conflict arises because a newer version of a file exists in the repository, your commit will fail. To resolve this, back up your local project, check out the latest files from the SVN repository, make your changes locally, and then commit them to the repository.
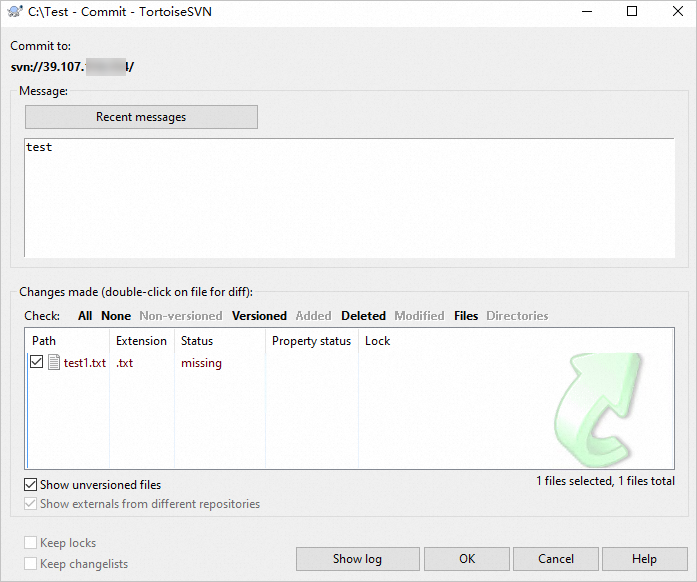
If a file is deleted from the project you are committing, the following message will appear.
Restore files
To restore a deleted file in SVN, follow these steps:
Open the local project folder, right-click and select SVN Checkout... to check out data.
Delete a file from the working copy.
Depending on whether you have committed the delete operation to the SVN repository, use one of the following methods to restore the deleted file:
If the delete operation is not committed, right-click and select .
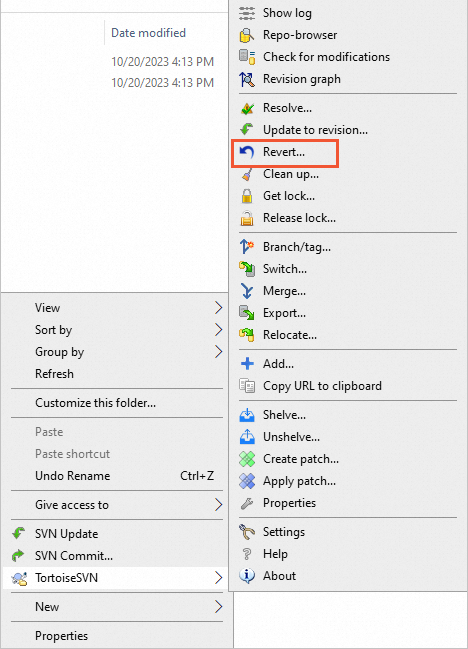
If the delete operation is committed, the file is removed from the repository. To restore it, do the following:
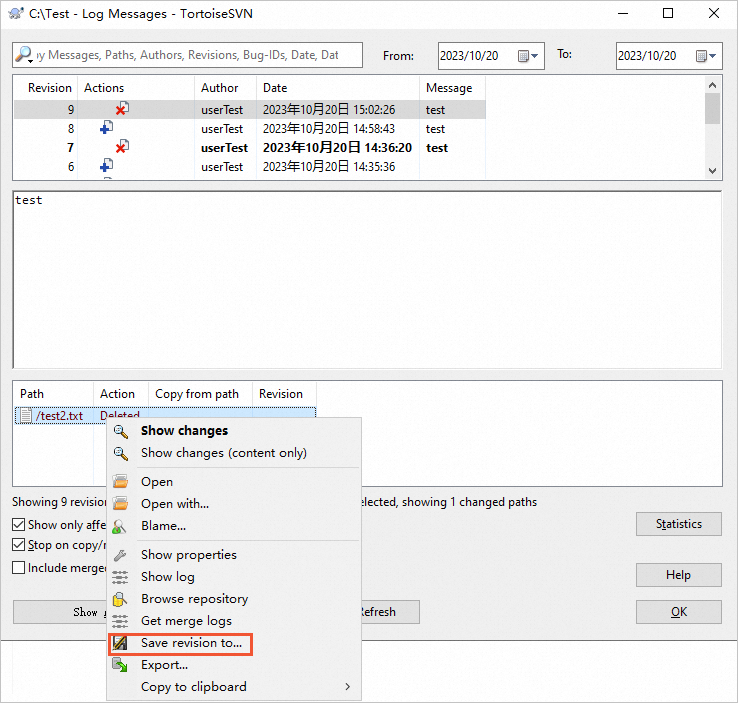
Right-click and select to view the operation log.
In the logs, find and click the deletion entry for the file to see its details.
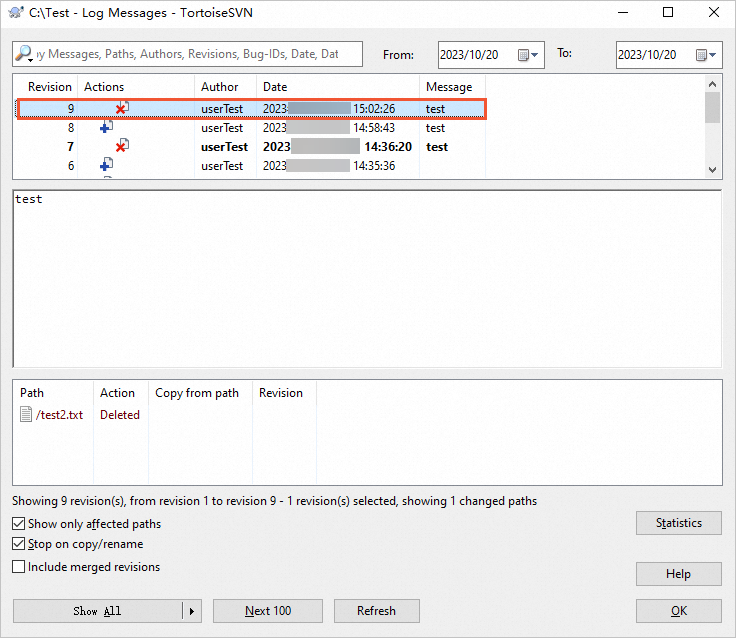
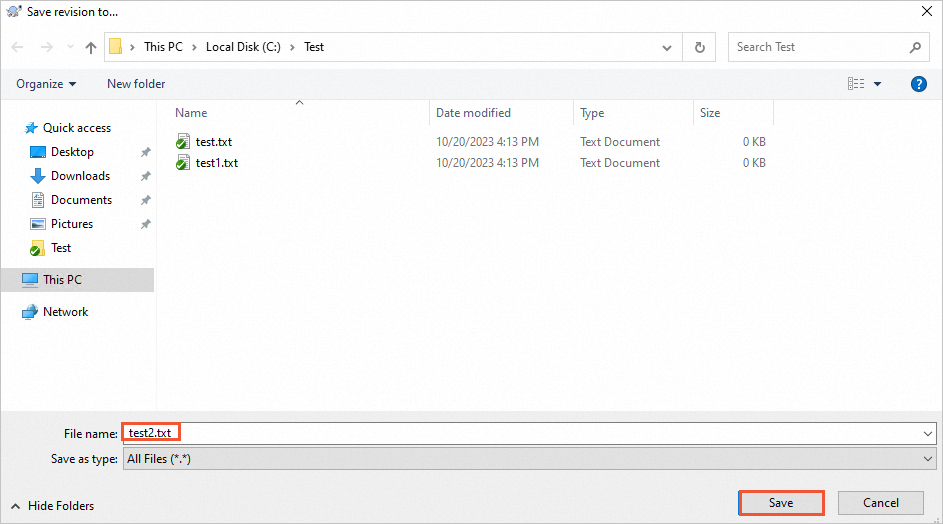
Right-click the deleted file and select Save Revision To....
In the save dialog box, enter the file name and click Save (S) to restore the deleted file to its original location.
Return to the original folder and select SVN Commit... to synchronize the restored file with the repository.
FAQ
Why does an error message indicating that the host does not respond appear when using TortoiseSVN to access the SVN server?
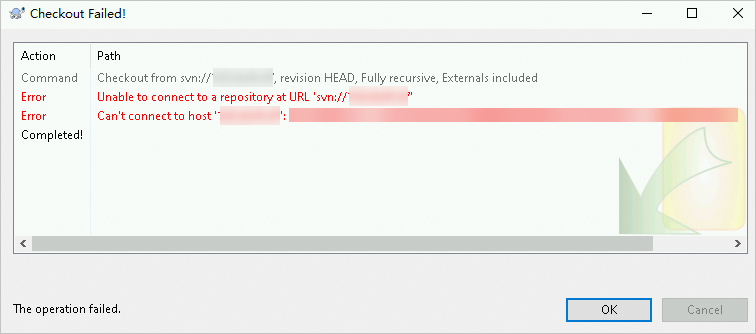
The error message indicating that the host does not respond can be caused by the following:
The SVN server is not running.
The required ports for the SVN server are not open in the associated security group.
The firewalld service is active on the ECS instance, but it does not allow traffic on the ports required by the SVN server.
To troubleshoot the issue, perform the following steps:
Verify the status of the SVN service.
ps -ef |grep svnIf the SVN service is running, you will see output similar to the image below. If not, start the SVN service using the command
sudo svnserve -d -r /var/svn/svnrepos/.
Check if the security group rules for the ECS instance allow the SVN server's required ports.
For HTTP mode: Ensure ports 22, 80, and 443 are open.
For svnserve mode: Ensure ports 22, 80, 443, and 3690 are open.
Check the status of the firewalld service.
Determine if the firewalld service is active.
sudo firewall-cmd --stateIf the command output displays
not running, then the firewalld service is inactive and will not impact the SVN server.If the command output displays
running, the firewalld service has started, and you can proceed to the next step.
Open the necessary ports, such as port 3690, in the firewalld rules for SVN.
sudo firewall-cmd --add-port=3690/tcp --perTo apply the new settings, reload the
firewalldservice configuration.sudo systemctl reload firewalld