To use a data disk that you purchased separately, you must first attach it to a specified ECS instance and then initialize it.
Applicability
A disk can be attached to only one ECS instance if the multi-attach feature is not enabled.
Log on to the ECS console - Block Storage - Cloud Disk. Click the ID of a disk to go to its details page. If Multi-attach is displayed as Not Supported, the feature is disabled.
The ECS instance must be in the Running or Stopped state and not be expired.
Procedure
Go to ECS console - Instances. In the top navigation bar, select the target region and resource group.
Click the ID of the target instance to go to its details page.
Click the Block Storage tab, and then click Attach Cloud Disk.
In the Attach Cloud Disk panel, configure the following parameters and click Next.
Parameter
Description
Disk
Select the disk that you want to attach.
You can attach only disks that are in the same zone as the instance. This restriction does not apply to zone-redundant Enhanced SSDs (ESSDs).
Release Cloud Disk with Instance
Selected: Releasing the instance also releases this disk.
Not selected: The disk is retained when the instance is released.
ImportantIf you attach a system disk that was detached from another instance, the Release Cloud Disk with Instance setting refers to the original ECS instance that the system disk was attached to, not the current instance.
Delete Automatic Snapshots while Releasing Disk
If you select this option, automatic snapshots of the disk are deleted when the disk is released, even if the snapshots have not expired. This applies when the disk is manually released, released with its instance, or when the system disk is replaced.
On the initialization page, verify the cloud disk information and click Initialize Now.
Return to the Cloud Assistant operation page is an invitational preview feature. If you accidentally close this page or choose to initialize the disk later, you must initialize it from the command line.
After you attach the data disk to the instance, you must initialize it. Alibaba Cloud provides two methods for initialization:
Initialize from the console (recommended): Use Cloud Assistant in the console to initialize the disk and mount the file system. This is a convenient method that does not require you to run manual commands.
Initialize from the command line: Log on to the instance and run commands to manually initialize the disk and mount the file system. This method is more flexible and widely applicable.
Initialize from the console (recommended)
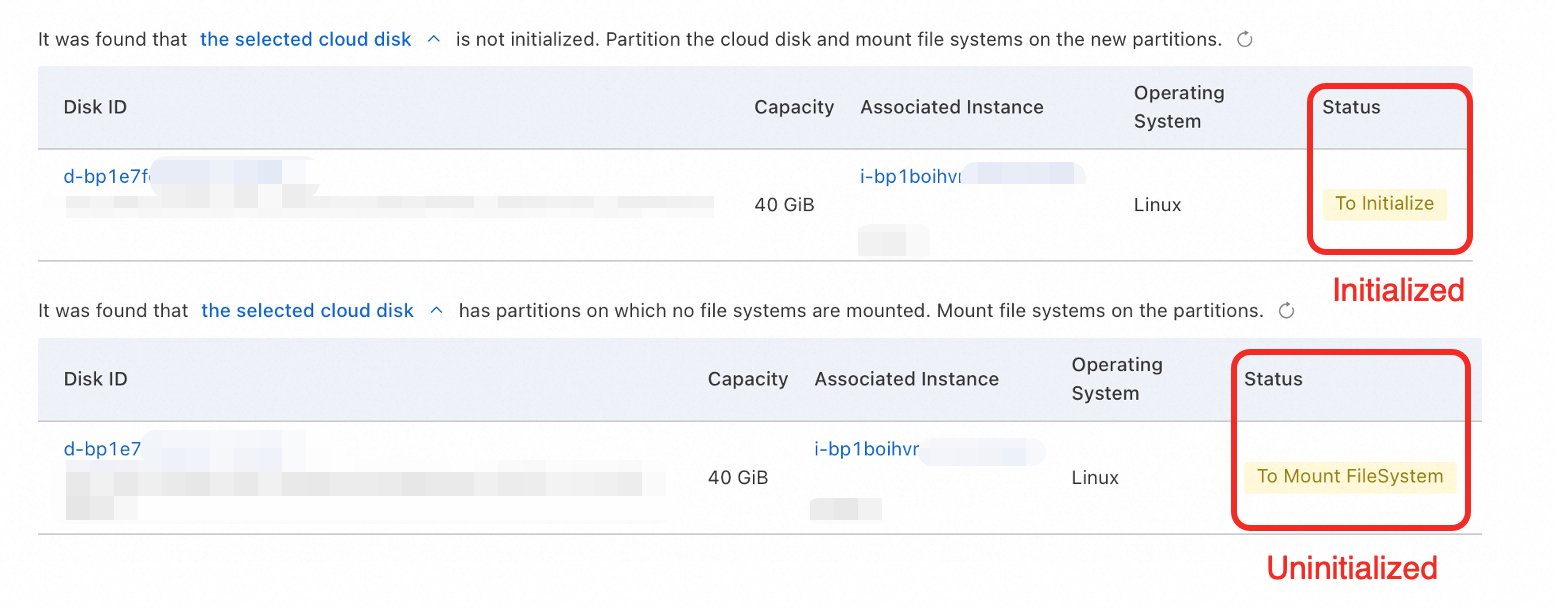
On the disk status check page, check whether the disk has been initialized.
If Cloud Assistant is not authorized, follow the on-screen instructions to grant the required permissions.
If the page displays Cloud Assistant Query or Task Failure or Cloud Assistant is not installed, you can initialize the disk from the command line.
Disk not initialized
Cloud Assistant can create only GUID Partition Table (GPT) partitions and ext4 file systems.
For more information about the differences between partition and file system types, see How do I choose a partition type and file system type?.
To extend the disk to 64 TiB, initialize it from the command line.
ImportantCreating partitions and file systems erases all data on the data disk. Ensure the disk is empty.
On the disk status check page, configure the parameters, select the checkbox to acknowledge the risks, and click OK.
Parameter
Description
Size
The total size of all partitions cannot exceed the disk capacity.
Mount Point
The path must be a unique, empty path that starts with
/. If the directory is not empty, its existing content will be hidden, which may affect your services.Add Partition
You can click Create Partition to create multiple partitions as needed. Each disk supports a maximum of 5 partitions.
When the message The disk check is complete and the disk can be used as expected. is displayed, this indicates that the disk is initialized and the file system is mounted.
ImportantThe disk is mounted temporarily and is unmounted when the instance restarts. To ensure that the disk is automatically mounted after a restart, log on to the instance and configure automatic mounting of partitions at startup.
Disk initialized
On the disk status check page, configure the mount point and click Manually Mount.
Parameter
Description
Mount Point
Must be an empty path that starts with
/. You can customize the path, but it cannot be a duplicate. If the directory is not empty, its content will be overwritten. This makes the original files inaccessible and can affect your services.When the message The disk check is complete and the disk can be used as expected. is displayed, this indicates that the file system is mounted.
ImportantThe disk is mounted temporarily and is unmounted when the instance restarts. To ensure that the disk is automatically mounted after a restart, log on to the instance and configure automatic mounting of partitions at startup.
Initialize from the command line
If you cannot use the console to initialize the disk, you can initialize it manually from the command line:
For Linux instances, see Initialize a data disk (Linux).
For Windows instances, see Initialize a data disk on a Windows instance.
FAQ
How do I return to the Cloud Assistant operation page?
This is an invitational preview feature and is available only to select customers in specific scenarios. This feature lets you enable detection and return to the initialization page.
On the Block Storage tab of the instance details page, enable the Cloud Assistant detection feature.
If the Cloud Assistant detection feature is not available, initialize the disk from the command line.

Return to the Cloud Assistant initialization page.
If the disk is not initialized: Hover over 0/3 Checks Passed under In-system Status Check for the target disk and click Initialize Data Disk.
If the disk is initialized but not mounted: Hover over 1/3 Checks Passed under In-system Status Check for the target disk, and click Mount File Systems to return to the page.
How do I choose a partition type and file system type?
Choose a partition format. Master Boot Record (MBR) partitions do not support capacities over 2 TiB. If your disk is larger than 2 TiB, select the GPT partition format.
Creating partitions helps you manage data and create logical isolation. If you do not need to create partitions, you can skip this step and directly choose a file system type.
Partition format
Maximum partition capacity
Number of partitions
Partition description
GPT (Recommended)
18 EiB (1 EiB = 1,048,576 TiB)
Alibaba Cloud disks support a maximum capacity of 64 TiB.
128
All partitions are primary partitions. There is no distinction between extended and logical partitions.
MBR
2 TiB
MBR supports the following partition schemes:
4 primary partitions
3 primary partitions and 1 extended partition
Partitions are classified as primary, extended, and logical.
Extended partitions cannot be used directly. They must be divided into logical partitions before use. There is no limit on the number of logical partitions.
Choose a file system type. Compared with XFS, ext4 is more suitable for handling small files.
File system type
Maximum file size
Scenarios
ext4
16 TiB
Performs well with small files, making it suitable for scenarios with many small files, such as general-purpose servers and desktop systems, development and testing environments, small log servers, internal management systems, and small database servers.
xfs
8 EiB
Alibaba Cloud disks support a maximum capacity of 64 TiB.
Offers better performance for large-scale directories and large files. It is suitable for scenarios such as large database servers (MySQL/PostgreSQL), high-performance computing (HPC), storage-intensive applications (such as video and image storage), high-concurrency write operations, and big data analytics platforms.
Why are some disk types unavailable when I create a disk?
Different instance families support different disk types. You can call the DescribeAvailableResource API operation to query the supported types.
Why do I receive a message that indicates the instance has reached the maximum number of attachable disks, such as "The current instance has reached the maximum number of disks that can be attached. Please switch to another instance" or "The current instance allows a maximum of x disks to be attached. x disks have been attached. Please switch to another instance or detach an existing disk from the current instance"?
Different instance types support different numbers of disks. You can call the DescribeInstanceTypes API operation to query the limit.
How do I create a disk that can be attached to multiple instances?
You can use the multi-attach feature to attach a single disk, such as an ESSD or ESSD AutoPL disk, to multiple ECS instances that support the NVMe protocol within the same zone.
You can enable this feature only when you create a disk separately.
After you enable multi-attach and attach the disk to multiple ECS instances, you must create a suitable cluster file system for your services. If you use a single-node file system such as ext4 or XFS, data cannot be synchronized across instances, which can cause data inconsistency.
When I attach a data disk, why can't I find the target disk?
Except for zone-redundant ESSDs, the disk to be attached must be in the same zone as the target instance.
Different instance families support different disk types. You can call the DescribeAvailableResource API operation to query the supported types.