An Elastic Network Interface (ENI) on an Elastic Compute Service (ECS) instance supports one or more secondary private IP addresses. Assigning secondary private IP addresses to an ENI lets you host multiple applications, implement failover, or distribute traffic on a single instance without adding more instances.
The following diagram shows the relationship between an ECS instance, its ENIs, and private IP addresses.

Use cases
Multi-application hosting: Assign an independent secondary private IP address to each application on a single ECS instance, so multiple services share the same instance with separate addresses.
Failover: Unbind a secondary ENI from a failed instance and bind it to a standby instance. Traffic directed to the secondary private IP addresses routes to the standby instance automatically, enabling high availability.
Load balancing: Assign multiple secondary private IP addresses to distribute traffic across different services on the same instance.
Limits
The maximum number of private IP addresses per ENI depends on the ENI state:
Available state: Up to 10 private IP addresses per ENI.
InUse state: The limit depends on the instance type. See the Private IPv4 addresses per ENI column in Instance family overview.
A VPC security group has a limited number of allowed private IP addresses. Plan secondary private IP address allocation accordingly. See Security groups.
Assign secondary private IP addresses to an ENI
Assign secondary private IP addresses through the ECS console or API. After console assignment, configure the OS so the instance recognizes the new addresses.
The OS does not automatically recognize secondary private IP addresses assigned through the console. You must complete both the console assignment (this section) and the OS configuration for the addresses to take effect.
To assign secondary private IP addresses through the API, call AssignPrivateIpAddresses or AssignIpv6Addresses.
Procedure
In the top navigation bar, select the region and resource group.

On the ENIs page, find the target ENI and click Manage ENI IP Addresses in the Operation column.
In the Manage ENI IP Addresses dialog box, click Increase in the Secondary Private IPv4 Address or IPv6 section.
Option
Description
Auto-assign
The system assigns a random IP address from the ENI's IPv4 or IPv6 private CIDR block.
Enter manually
Specify a secondary private IP address within the ENI's IPv4 or IPv6 private CIDR block.
Click Confirm.
Verify the assignment
On the ENI details page, confirm that the secondary private IP address appears under the ENI.

Bind the ENI (secondary ENI only)
If you assigned the secondary private IP address to a secondary ENI, bind the ENI to an ECS instance and configure it before proceeding. See Create and use an ENI and Configure an ENI to take effect within an instance.
This step is not required for primary ENIs.
Configure the OS to recognize secondary private IP addresses
After assigning a secondary private IP address through the console, configure the address within the instance's operating system. The configuration steps vary by OS and IP address type.
This section demonstrates IPv4 configuration. For IPv6 configuration, see IPv6 communication.
Before you begin
The instance must be in the Running state. See Start an instance.
Example environment
The following examples use these IP addresses. Replace them with your actual values.
ENI | Primary private IPv4 address | Secondary private IPv4 address 1 | Secondary private IPv4 address 2 |
Primary ENI | 192.168.1.201 | 192.168.1.202 | 192.168.1.203 |
Linux
Connect to the Linux ECS instance. See Connect to Linux.
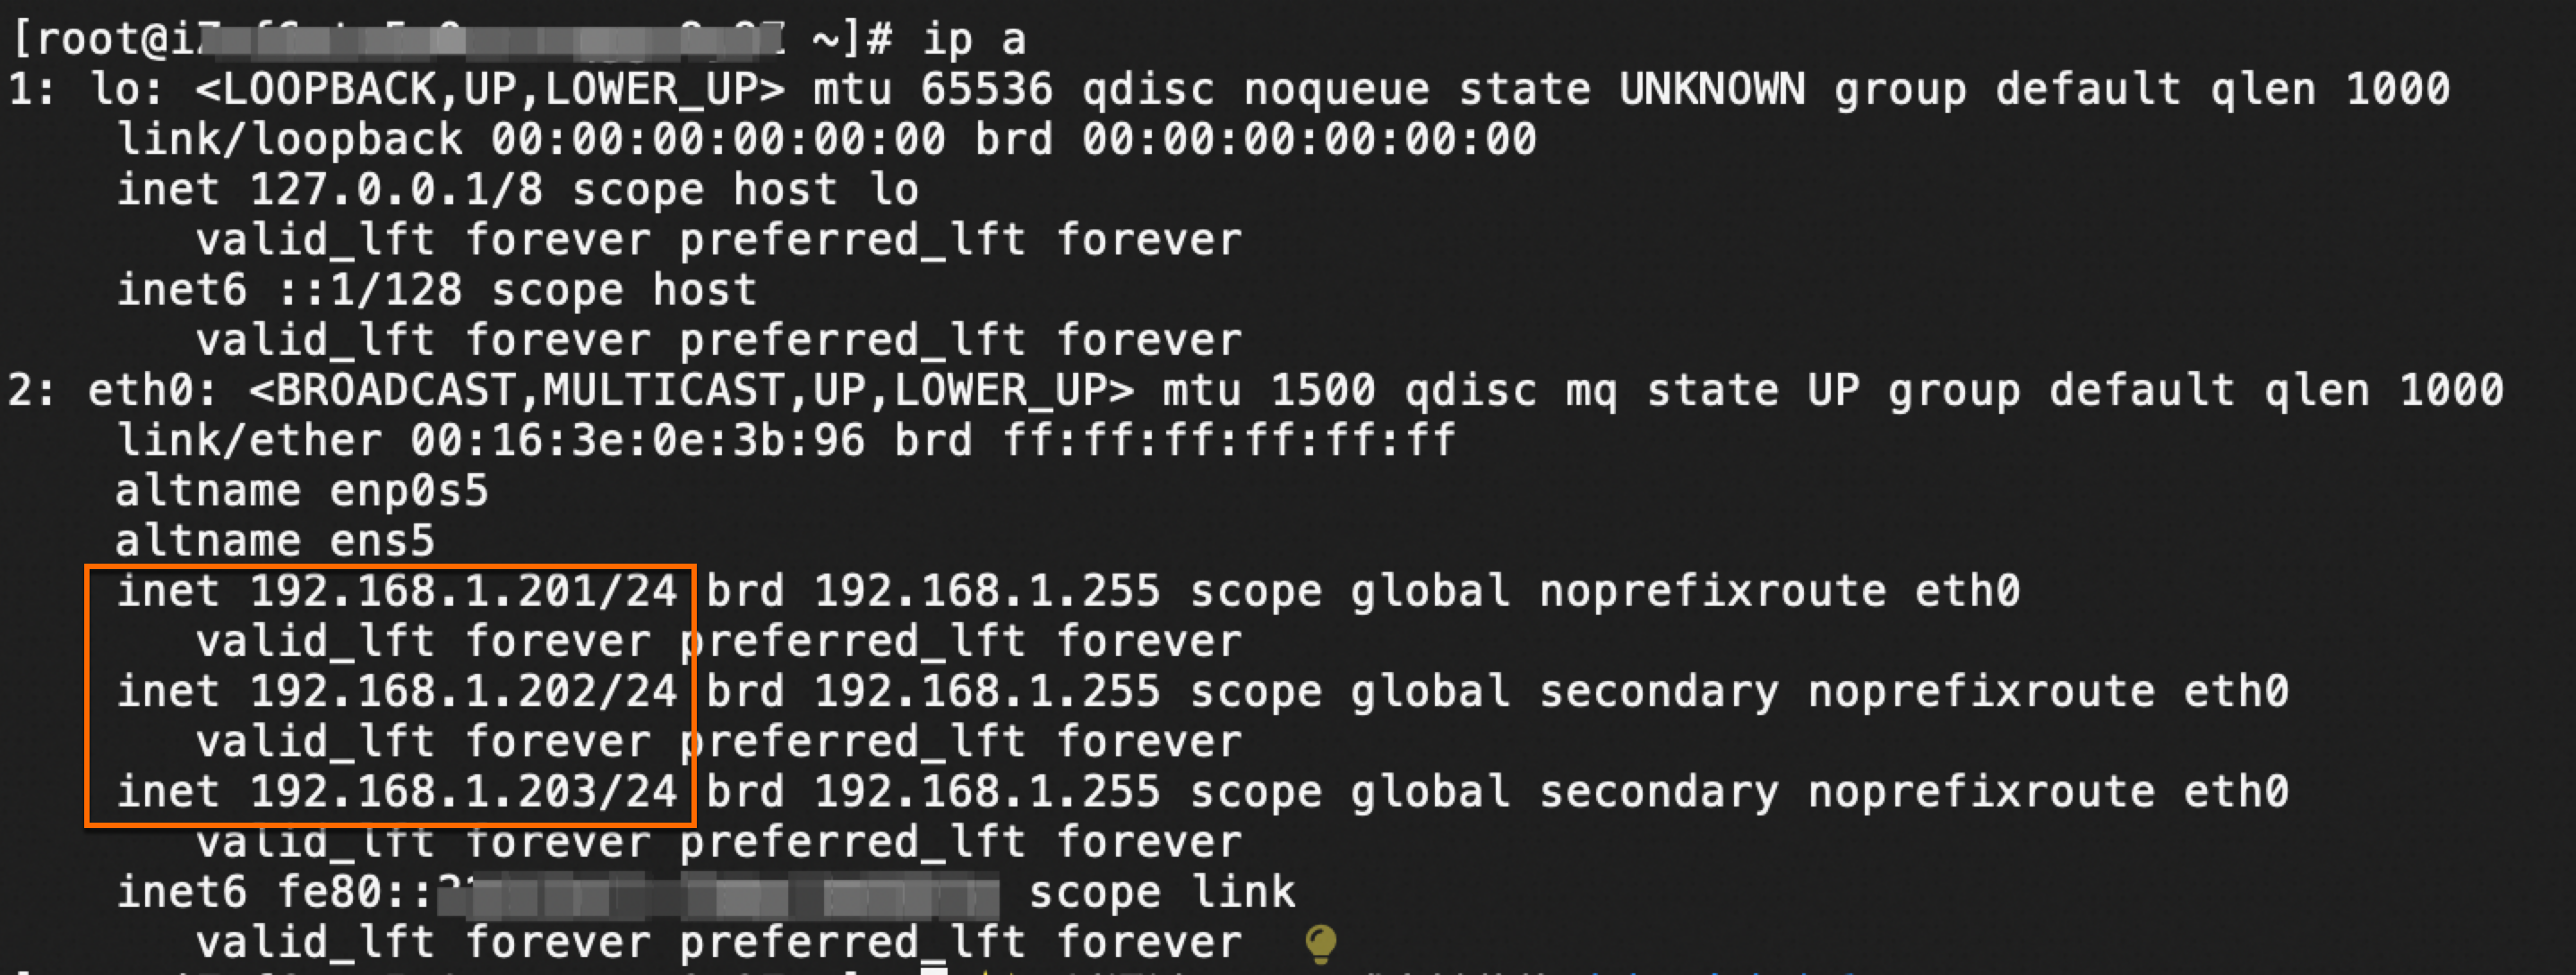
Check the current network configuration and identify the default gateway and subnet mask. Run the following command to view assigned IP addresses: The output shows the primary private IPv4 address assigned to eth0 (for example, 192.168.1.201). Run the following command to check routing information: From the output, note the values for: Summary of the current configuration:
Subnet mask (Genmask): 255.255.255.0
Default gateway (Gateway): 192.168.1.253
ENI
Status
Default gateway
Subnet mask
Primary private IP address
Secondary private IPv4 address 1
Secondary private IPv4 address 2
eth0 (primary ENI)
UP
192.168.1.253
255.255.255.0
192.168.1.201 (auto-configured)
192.168.1.202 (requires manual configuration)
192.168.1.203 (requires manual configuration)
ip aroute -n

Configure the secondary private IPv4 addresses using one of the following methods.
Method 1: nmcli commands (recommended)
NetworkManager provides the nmcli command-line tool for managing network connections. This method works on all OS distributions that use NetworkManager, including Fedora, CentOS, RHEL, Ubuntu, Debian, and derivatives.
The connection name varies across Linux distributions. Runnmcli con showto find the connection name for your ENI (for example,System eth0).
Disable cloud-init network configuration to prevent your settings from being overwritten on reboot. For details, see cloud-init and network configuration. Add the following line:
sudo vim /etc/cloud/cloud.cfg.d/99-disable-network-config.cfgnetwork: {config: disabled}Check the current connection name:
nmcli con show
Configure the secondary private IPv4 addresses:
   sudo nmcli con modify "System eth0" ipv4.addresses 192.168.1.201/24,192.168.1.202/24,192.168.1.203/24
   sudo nmcli con modify "System eth0" ipv4.gateway 192.168.1.253
Activate the updated connection: A message similar to "Connection successfully activated" confirms the change.
sudo nmcli con up "System eth0"
Method 2: Edit network configuration files
Back up the network configuration file before editing. Incorrect configuration can make the instance unreachable.
The configuration file location and format vary by OS distribution:
RHEL series
Applicable OS: Alibaba Cloud Linux 2/3, CentOS 6/7/8, Red Hat 6/7/8/9, Anolis 7/8, Fedora 33/34/35.
Example OS: Alibaba Cloud Linux 3.2. Example ENI: eth0.
Check whether the main configuration file exists: If the file does not exist, create it: Add the following:
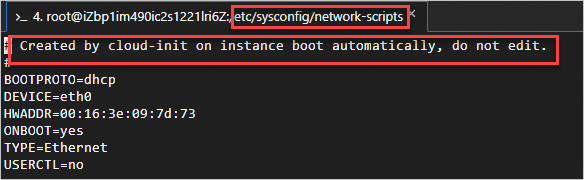
Some distributions (such as Alibaba Cloud Linux 3.2) auto-generate this file through cloud-init. Others (such as CentOS 8.5) require manual creation.
ls /etc/sysconfig/network-scripts/ifcfg-eth0sudo vi /etc/sysconfig/network-scripts/ifcfg-eth0DEVICE=eth0 TYPE=Ethernet BOOTPROTO=dhcp ONBOOT=yesCreate a configuration file for the first secondary private IPv4 address:
sudo vi /etc/sysconfig/network-scripts/ifcfg-eth0:0DEVICE=eth0:0 TYPE=Ethernet BOOTPROTO=static IPADDR=192.168.1.202 NETMASK=255.255.255.0Create a configuration file for the second secondary private IPv4 address:
Increment the sequence number in the filename and
DEVICEname for each additional address. Do not duplicate sequence numbers.sudo vi /etc/sysconfig/network-scripts/ifcfg-eth0:1DEVICE=eth0:1 TYPE=Ethernet BOOTPROTO=static IPADDR=192.168.1.203 NETMASK=255.255.255.0
Ubuntu 18 and Ubuntu 20
Disable cloud-init network configuration: Add the following line:
ImportantThe network configuration file
/etc/netplan/50-cloud-init.yamlis auto-generated by cloud-init at startup. Disable cloud-init network configuration first to prevent your changes from being overwritten. See cloud-init and network configuration.sudo vim /etc/cloud/cloud.cfg.d/99-disable-network-config.cfgnetwork: {config: disabled}Edit the network configuration file: Example configuration:
sudo vim /etc/netplan/50-cloud-init.yamlnetwork: version: 2 ethernets: eth0: dhcp4: false match: macaddress: 00:16:3e:16:43:xx # Replace with your ENI's MAC address set-name: eth0 addresses: - 192.168.1.201/24 # Primary private IP address - 192.168.1.202/24 # Secondary private IP address 1 - 192.168.1.203/24 # Secondary private IP address 2 gateway4: 192.168.1.253 # Default gateway nameservers: addresses: [223.5.5.5, 223.6.6.6] # DNS servers
Ubuntu 22, Ubuntu 24, and Debian 12
Disable cloud-init network configuration: Add the following line:
ImportantThe network configuration file
/etc/netplan/50-cloud-init.yamlis auto-generated by cloud-init at startup. Disable cloud-init network configuration first to prevent your changes from being overwritten. See cloud-init and network configuration.sudo vim /etc/cloud/cloud.cfg.d/99-disable-network-config.cfgnetwork: {config: disabled}Edit the network configuration file: Example configuration:
sudo vim /etc/netplan/50-cloud-init.yamlnetwork: version: 2 ethernets: eth0: dhcp4: false match: macaddress: 00:16:3e:16:43:xx # Replace with your ENI's MAC address set-name: eth0 addresses: - 192.168.1.201/24 # Primary private IP address - 192.168.1.202/24 # Secondary private IP address 1 - 192.168.1.203/24 # Secondary private IP address 2 routes: - to: default via: 192.168.1.253 # Default gateway nameservers: addresses: [223.5.5.5, 223.6.6.6] # DNS servers
Ubuntu 14/16, Debian 8/9/10/11
Edit the network configuration file: Example configuration:
Starting with some versions of Debian 10,
/etc/network/interfacesmay only contain references to files in/etc/network/interfaces.d/. Check your environment and edit the appropriate file.sudo vi /etc/network/interfacesauto lo iface lo inet loopback auto eth0 iface eth0 inet dhcp auto eth0:0 iface eth0:0 inet static address 192.168.1.202 netmask 255.255.255.0 auto eth0:1 iface eth0:1 inet static address 192.168.1.203 netmask 255.255.255.0
SLES series
Applicable OS: SUSE Linux 11/12/15, openSUSE 15.
Example OS: SUSE Linux 15 SP5. Example ENI: eth0.
Edit the ENI configuration file: Example configuration:
For parameter reference, run
sudo cat /etc/sysconfig/network/ifcfg.template.sudo vi /etc/sysconfig/network/ifcfg-eth0BOOTPROTO=static STARTMODE=auto USERCONTROL=no IPADDR_1=192.168.1.201 NETMASK_1=255.255.255.0 LABEL_1= IPADDR_2=192.168.1.202 NETMASK_2=255.255.255.0 LABEL_2=0 IPADDR_3=192.168.1.203 NETMASK_3=255.255.255.0 LABEL_3=1Verify that the global routes file contains the default gateway: If the default gateway is missing, add it:
cat /etc/sysconfig/network/routesdefault 192.168.1.253 - -
Restart the network service
After editing configuration files, restart the network service to apply changes.
If you used the nmcli con method, skip this step. NetworkManager applies changes automatically.Operating system | Restart command |
Alibaba Cloud Linux 2, CentOS 7, Red Hat 7, Anolis 7, SUSE Linux 11/12/15, openSUSE 15/42 |
|
CentOS 6, Red Hat 6 |
|
Alibaba Cloud Linux 3, CentOS 8, Red Hat 8, Anolis 8, Fedora 33/34/35 |
|
Ubuntu 18/20/22, Debian 12 |
|
Ubuntu 14/16, Debian 8/9/10/11 |
|
Verify the configuration
Run ip a again and confirm that the secondary private IP addresses appear on the ENI.
Windows
Example OS: Windows Server 2022. Example ENI: the primary ENI named Ethernet. For a secondary ENI, replace the ENI identifier (for example, Ethernet2).
Connect to the Windows ECS instance. See Connect to Windows.
Open Command Prompt or Windows PowerShell and run the following command to check the current network configuration: Note the following values:
ENI
Subnet mask
Default gateway
Primary private IP address
Secondary private IPv4 address 1
Secondary private IPv4 address 2
Ethernet (primary ENI)
255.255.255.0
192.168.1.253
192.168.1.201 (auto-configured)
192.168.1.202 (requires manual configuration)
192.168.1.203 (requires manual configuration)
ipconfig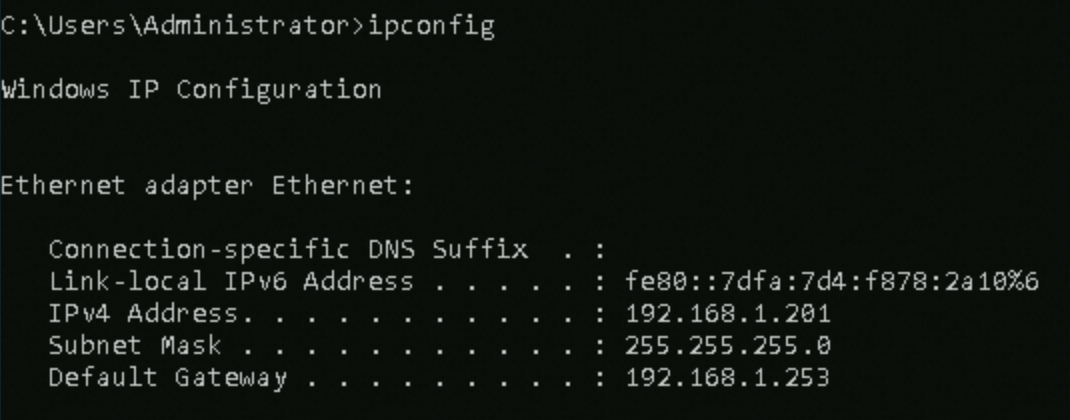
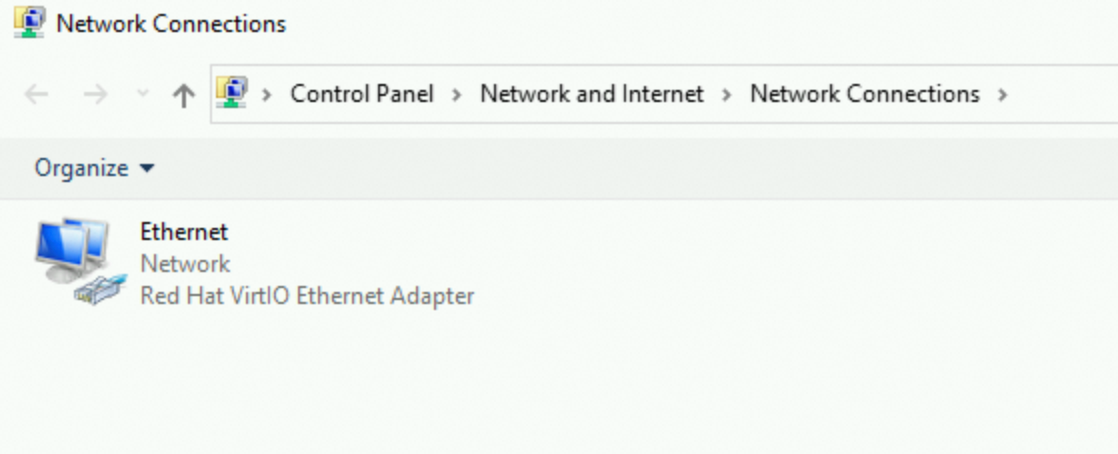
Open Network and Sharing Center.
Click Change adapter settings.
Double-click the primary ENI named Ethernet, then click Properties.
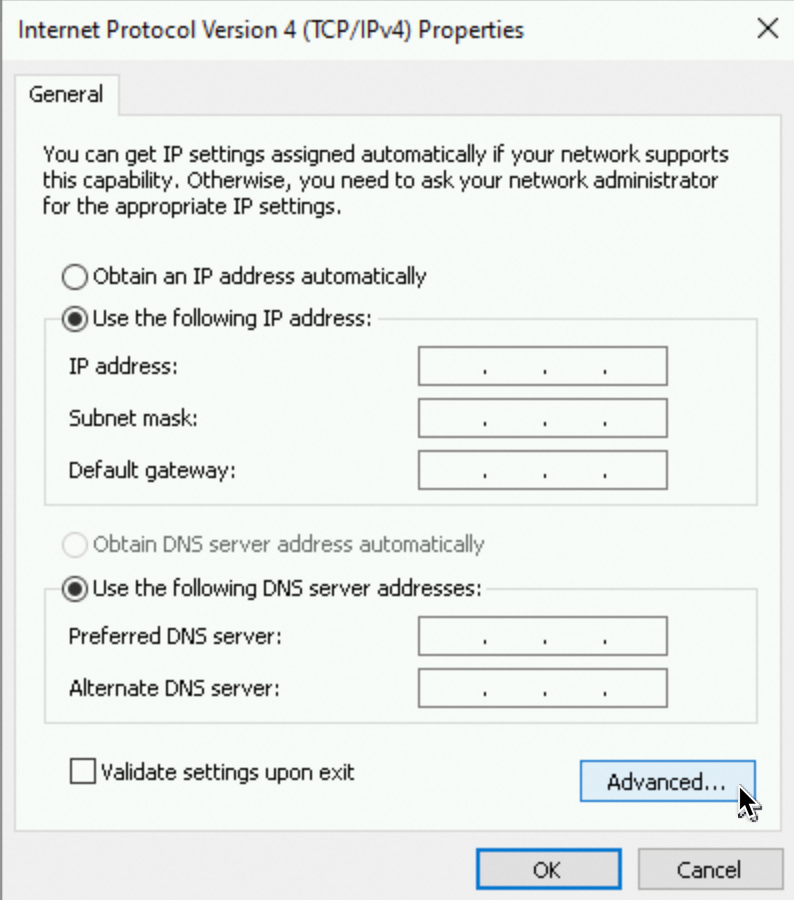
In the Ethernet Properties dialog box, double-click Internet Protocol Version 4 (TCP/IPv4).
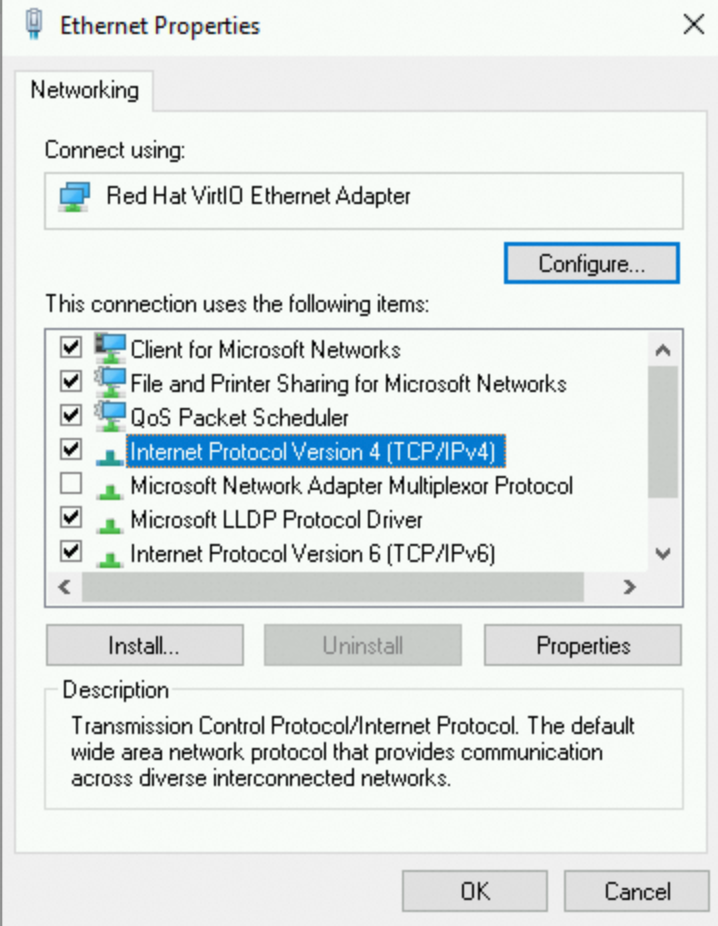
Select Use the following IP address and click Advanced.
ImportantSwitching from automatic to manual IP configuration requires you to also configure the primary private IP address in the following steps. Otherwise, remote connections through the primary private IP address will fail.
In the Advanced TCP/IP Settings dialog box:
Under IP addresses, click Add. Enter the primary and secondary private IP addresses along with the subnet mask from step 2.
Under Default gateways, click Add and enter the default gateway.
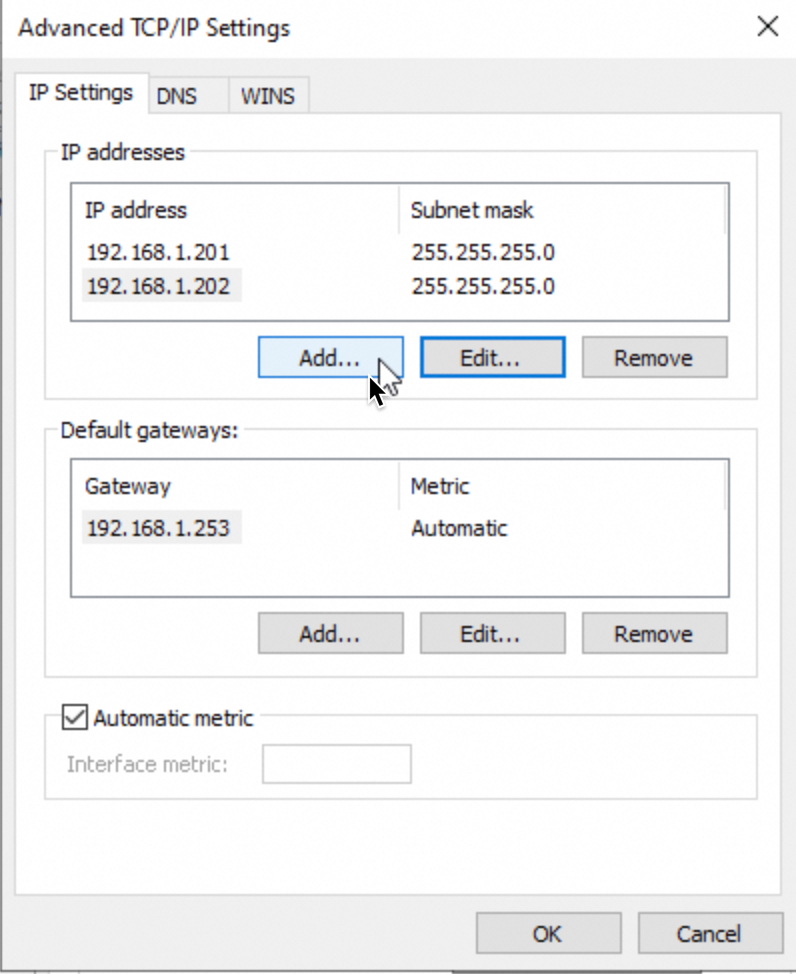
Click OK in each dialog box to save the settings.
Verify the configuration by running
ipconfigagain. Confirm that the secondary private IP addresses appear.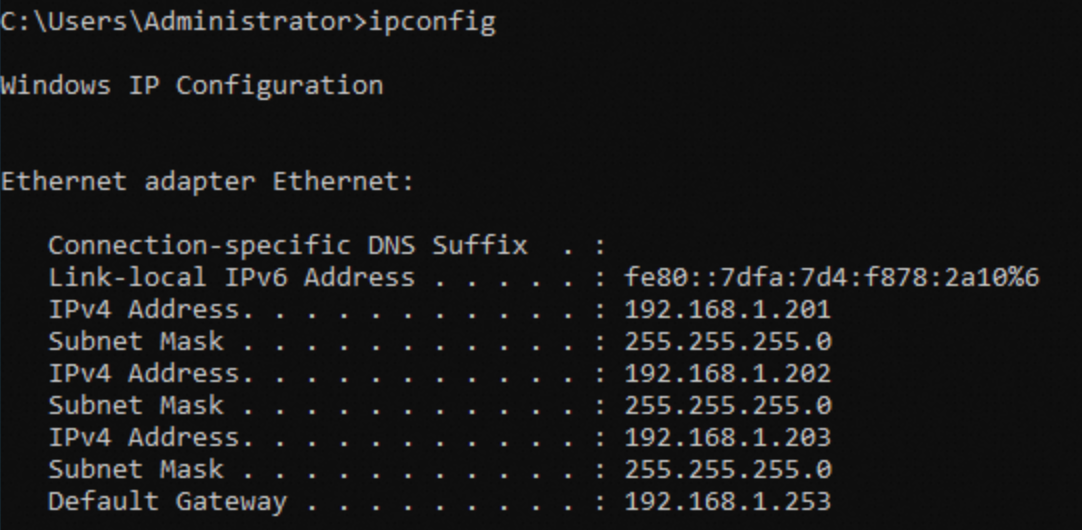
Unassign secondary private IP addresses
Remove secondary private IP addresses from an ENI when they are no longer needed.
Before you begin
Before you begin, ensure that you have:
An ENI with at least one secondary private IP address assigned
The ENI in the Available or InUse state
(For primary ENIs) The bound instance in the Running or Stopped state
To unassign through the API, call UnassignPrivateIpAddresses or UnassignIpv6Addresses.
Procedure
In the top navigation bar, select the region and resource group.
On the ENIs page, find the target ENI and click Manage ENI IP Addresses in the Operation column.
In the Manage ENI IP Addresses dialog box, find the secondary private IP address to unassign in the Secondary Private IPv4 Address section. Click the
 icon next to the address.
Click Confirm.
Refresh the ENI list. The unassigned IP address no longer appears.
cloud-init and IP configuration methods
Automatic network configuration by cloud-init
cloud-init is an open-source initialization tool pre-installed on all Alibaba Cloud public images. On startup, it automatically generates network configuration for the instance.
The auto-generated configuration is noted in the corresponding network configuration file. For example, in /etc/sysconfig/network-scripts/ifcfg-eth0 on Alibaba Cloud Linux 3.2:
When to disable cloud-init network configuration
Disable cloud-init network configuration in either of these situations:
Static network configuration: You manually modify the auto-generated network configuration file.
External network management: You manage the network through services such as NetworkManager.
Without disabling cloud-init, a system reboot may overwrite your custom network settings.
How to disable
Create the file /etc/cloud/cloud.cfg.d/99-disable-network-config.cfg and add:
network: {config: disabled}For more details about cloud-init, see /etc/cloud/cloud.cfg.d/README on the Linux instance.
IP configuration methods
Operating systems support two methods for configuring IP addresses:
Static configuration: Manually configure the subnet mask, default gateway, and DNS server addresses.
DHCP (dynamic acquisition): DHCP automatically assigns IP addresses, subnet masks, default gateways, and DNS server addresses. When configuring secondary private IP addresses, select the appropriate method based on your environment.
Related topics
To set up load balancing with secondary private IP addresses, see Getting started.
To control access to secondary private IP addresses, see Add a security group rule.
After unassigning a secondary private IP address, update security group rules as needed. See Modify a security group rule.
To receive event notifications for private IP address changes, configure EventBridge or CloudMonitor. See Subscribe to ECS system event notifications, ECS events, and Private IPv4 address assignment notification.
If a Windows instance loses internet access after configuring a secondary private IP address, see Windows instance cannot access the internet after configuring a secondary private IP address.