The ID Verification UniApp plugin enables eKYC remote identity verification in UniApp applications.
Before you begin
Some developers have repackaged the Alibaba Cloud ID Verification SDK into third-party plugins and sell them on various platforms. Alibaba Cloud assumes no responsibility or legal liability for issues caused by these unofficial plugins or services. For stability and security, use only the official Alibaba Cloud SDK.
Configure dependencies
To integrate the UniApp plugin, refer to the DCloud official documentation or follow these steps:
-
Go to Client SDK release notes to download the UniApp SDK and decompress it to the `nativePlugins` directory in your project.

-
Import the local plugin.
-
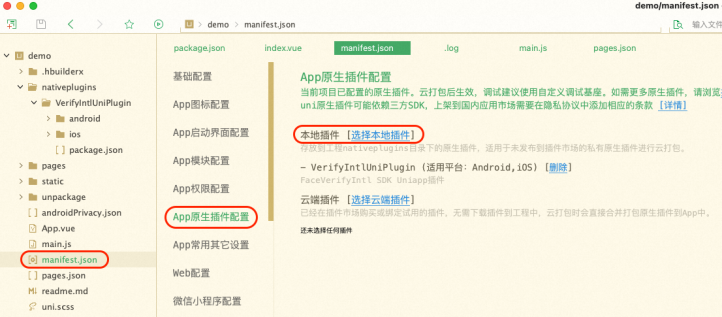
In the manifest.json file, click App Native Plugin Configuration.
-
In the App Native Plugin Configuration section, click Select Local Plugin.
-
In the Select Local Plugin dialog box, select the plugin to package.
-
-
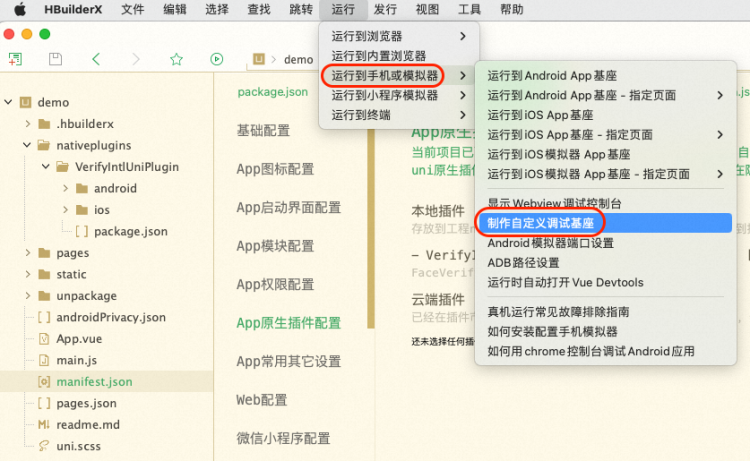
Create a custom debug base.
-
To create a custom debug base, choose in the manifest.json file.
-
To set a custom debug base, in the manifest.json file, choose .
NoteTo package the release version, choose .

-
Call the service
-
Call
initWithOptionswith a JSON options object to initialize the SDK.The options parameter, which is
nullby default, specifies optional data collection settings.ImportantThe ID Verification client includes a built-in security module known as the device helper. The device helper provides various data reporting regions to meet local data collection compliance requirements. You can set
CustomUrlandCustomHostto specify different reporting sites based on user attributes.Only one data reporting region can be specified per application session lifecycle. The region for server-side queries must match the reporting region. The supported regions vary by product. For more information, see Supported regions.
For each region, the
CustomUrlis as follows:China (Hong Kong):
https://cloudauth-device.cn-hongkong.aliyuncs.comSingapore:
https://cloudauth-device.ap-southeast-1.aliyuncs.comIndonesia (Jakarta):
https://cloudauth-device.ap-southeast-5.aliyuncs.comUS (Silicon Valley):
https://cloudauth-device.us-west-1.aliyuncs.comGermany (Frankfurt):
https://cloudauth-device.eu-central-1.aliyuncs.comMalaysia (Kuala Lumpur):
https://cloudauth-device.ap-southeast-3.aliyuncs.com
Parameter
Description
Example
IPv6
Indicates whether to use an IPv6 domain name to report device information:
0 (default): No (uses an IPv4 domain name)
1: Yes (uses an IPv6 domain name)
"1"
DataSwitch
Controls when to report device information:
0 (default): When the SDK initializes
1: When you obtain a token
NoteThe default setting is recommended.
"1"
CustomUrl
Sets the server domain name for data reporting.
CustomHost
Sets the server host for data reporting.
"cloudauth-device.ap-southeast-1.aliyuncs.com"
NoteThis example is for the Singapore region. For server hosts in other regions, see CustomUrl for each region.
-
Call `getMetaInfo` to retrieve MetaInfo data. Pass this value to the ID Verification server when starting a verification request.
-
Call `startVerify` with the transactionId obtained from the server-side Initialize API to start verification.
-
Call
startVerify()to start a verification request.`startVerify()` accepts the following parameters:
-
transactionId: A required parameter.
-
extParams: Optional extension parameters.
The following example shows how to pass parameters:
// For Android,
aliyunVerify.startVerify({
  transactionId:"<verification_id>",// Enter the transactionId obtained from the server.
  SdkLanguage:"cn"// Pass the fields in the extension parameters.
}, function(t){
  console.log(t)
});

// Response format
{
  code:1000,				 // Error code
  message:"CODE_VERIFY_SUCCESS"		// Error code description
}
-
-
Call
setCustomUI()to customize UI colors.params: JSON-formatted data. For UI customization details, see the native SDK documentation:
Complete code example
<template>
  <view class="button-sp-area">
  <button type="primary" plain="true" @click="init">init</button>
  <button type="primary" plain="true" @click="getMetaInfo">getMetaInfo</button>
  <button type="primary" plain="true" @click="verify">verify</button>
  <button type="primary" plain="true" @click="setCustomUi">setCustomUi</button>

  </view>
</template>

<script>
const aliyunVerify = uni.requireNativePlugin('VerifyIntlUniPlugin');

export default {
  data() {
    return {
      title: ''
    }
  },
  onLoad() {

  },
  methods: {
    init:function() {
      console.log("init");
      const json={
        CustomUrl:"https://cloudauth-device.ap-southeast-5.aliyuncs.com",
        CustomHost:"cloudauth-device.ap-southeast-5.aliyuncs.com"
      };
      aliyunVerify.initWithOptions(json);
    },
    getMetaInfo:function() {
      console.log("getMetaInfo");
      var t = aliyunVerify.getMetaInfo();
      console.log(t);
      uni.showToast({
        title: t,
        icon: 'none'
      });
    },
    setCustomUi:function(){
      const json={
        faceConfig:{faceBGColor:"#FF00FF"}
      };
      var t = aliyunVerify.setCustomUI(JSON.stringify(json));
      console.log("setCustomUi"+t);
    },
    verify:function(){
      console.log("Face Verify");
      aliyunVerify.startVerify({
          transactionId:"xxxxx",// Verification ID
        },
       function(t){
         console.log(t);
         const msg = JSON.stringify(t);
         console.log(msg);
         // uni.showToast({
         // 	title: t,
         // 	icon: 'none'
         // });
       });
    }
  }
}
</script>
<style>
button {
  margin-top: 30upx;
  margin-bottom: 30upx;
}

.button-sp-area {
  margin: 0 auto;
  width: 60%;
}

.content {
  text-align: center;
  height: 400upx;
}

.wrapper {
  flex-direction: column;
  justify-content: center;
}

.button {
  width: 200px;
  margin-top: 30px;
  margin-left: 20px;
  padding-top: 20px;
  padding-bottom: 20px;
  border-width: 2px;
  border-style: solid;
  border-color: #458B00;
  background-color: #458B00;
}

.text {
  font-size: 30px;
  color: #666666;
  text-align: center;
}
</style>
For a complete example, download the UniApp Demo from Client SDK release notes.
This demo is for reference only. Always use the latest SDK version in your application.
Error codes
|
Error code |
Description |
|
1000 |
Verification successful. This result is for reference only. Call the server-side CheckResult API for the final verification result. |
|
1001 |
Verification failed. For failure details, call the server-side CheckResult API. |
|
1002 |
System error. |
|
1003 |
SDK initialization failed. Verify that the client time is correct. |
|
1004 |
Camera permission error. To resolve this issue:
|
|
1005 |
Network error. |
|
1006 |
User exited. |
|
1007 |
Invalid TransactionId. |
|
1009 |
Client timestamp error. |
|
1011 |
Incorrect certificate type submitted. |
|
1012 |
Key information is missing from the certificate, or the format check failed. |
|
1013 |
Poor image quality. |
|
1014 |
Error count exceeded the maximum limit. |
|
1015 |
Android system version too low. |
|
1016 |
Camera permission not granted. |