When security rules block requests, ESA returns a default 403 intercept page or slider verification page branded with Edge Security Accelerator (ESA). Custom pages let you upload branded intercept pages or customize the slider verification page to match your brand. The custom pages feature consists of custom intercept pages and custom slider pages.
Usage notes
Up to 10 custom pages per Alibaba Cloud account, including both intercept and slider pages.
Each intercept page must not exceed 2 KB. Supported formats: HTML and JSON.
Custom intercept pages
When security rules block requests, ESA returns a default 403 intercept page with the ESA identifier. You can replace this with a custom intercept page that matches your brand.
Create a custom intercept page
Sign in to the ESA console and in the left-side navigation pane, choose .
On the Custom Pages page, select Block Page, click Create Block Page.
Enter Page Name, select Page Type, enter your code in Source Code, and click OK.
Parameter
Description
Page Name
Name of the intercept page. Supports letters, digits, and underscores (
_). Maximum 30 characters.Description
A brief description, up to 100 characters.
Page Type
MIME type of the page. Valid values:
text/htmlapplication/json
Source Code
Source code of the intercept page, up to 2 KB. Use the
{{REQUEST_ID}}and{{RULE_ID}}variables to display the request ID and triggered rule ID to clients for troubleshooting.Applicable Sites
Advanced: Select the sites where this intercept page takes effect. All rules on selected sites that use Default Error Page automatically apply this custom page.
NoteRule-level intercept pages take precedence over the global configuration. To apply a uniform style across a site, set all rule-level intercept page settings to Default Error Page.
Reference a custom intercept page
A custom intercept page takes effect only after you reference it in a WAF rule.
Supported rule types
The following rule types support custom intercept pages.
Rule type | Reference method |
When you create a rule, in the Then execute... or Then execute... section, set the Action action to | |
Intercept pages triggered by WAF rules — default or custom — do not consume subscription data or incur additional charges.
Procedure
Reference a custom intercept page in a custom rule.
In the ESA console, select Websites, and in the Website column, click the target site.
In the left-side navigation pane, click to go to the Add Rule page, and enter a Rule Name.
In the If requests match... section, set Match Type to Client IP, set Match Condition to In Group, and select the group you created.
In the Then execute... section, set Action to Block, select your custom intercept page for Error Page, change the response code to 400 for differentiation, and click OK.
Trigger the WAF rule and verify that the returned page displays your custom style.
You can select Default Error Page or a custom intercept page. If you select Default Error Page, ESA uses the default page branded with ESA.
Custom slider pages
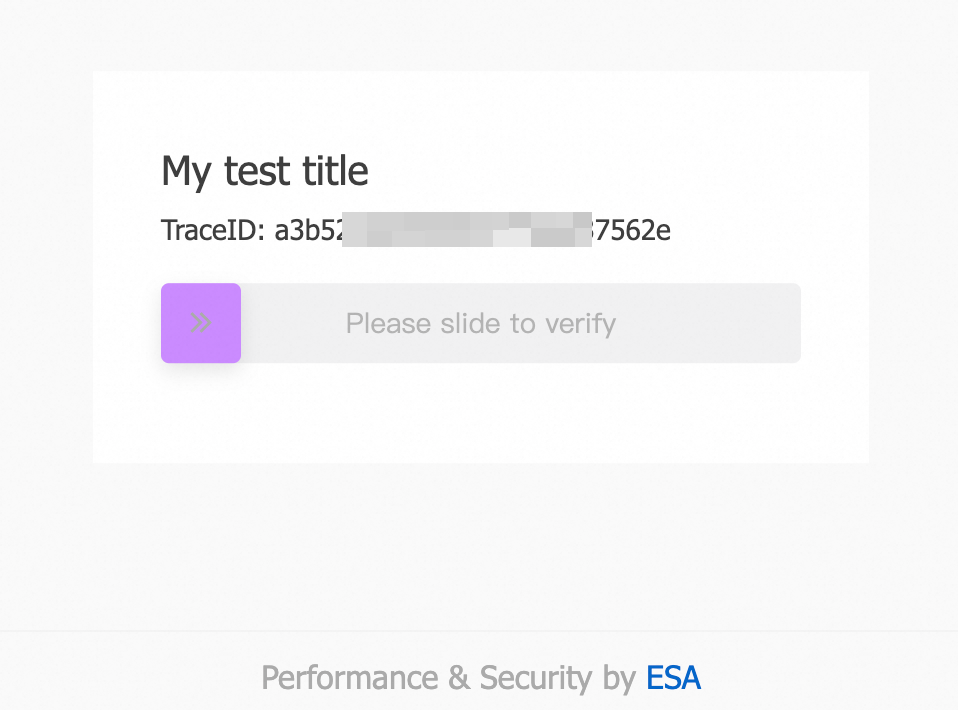
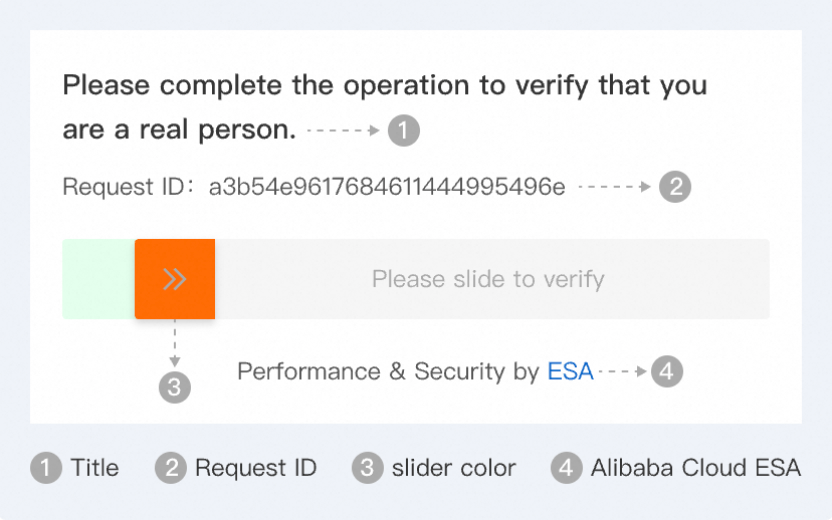
When security rules trigger slider verification, ESA returns a default slider page with the ESA identifier. Custom slider pages let you customize the title, color, language, and other elements to match your brand.
Console-configured slider page settings apply only to H5 web scenarios. For Android, iOS, and mini programs, customize the slider style through the corresponding SDK.
Create a custom slider page
Sign in to the ESA console and in the left-side navigation pane, choose .
On the custom pages management page, switch to the Slider Page tab, click Create Slider Page, configure the parameters below, and click OK:
Page Name: Title shown on the slider page. Supports Chinese, English, digits, and common symbols.
Slider Styles by Language: Select at least one language. You can select both Chinese and English. After selecting a language, configure the following style settings for that language:
Title: The main title displayed on the slider.
Show Request ID: Whether to show the request ID on the slider page.
Slider Color: Color of the slider button. Use the color picker or enter a hex value.
Show Alibaba Cloud ESA: Whether to show the ESA identifier.
Specify Language: Forces the slider page to display in Chinese or English only.
Applicable Sites: Select the sites where this slider page takes effect. All slider verification on selected sites automatically uses this style.
Apply a custom slider page
A custom slider page takes effect only after you select at least one site. All slider verification on selected sites automatically uses this style. Unlike intercept pages, slider pages do not need to be referenced in individual rules. If no site is selected for global application, the custom slider page will not take effect on any site.
Verification
Verify the custom intercept page
After you configure the custom intercept page in a WAF rule, access the accelerated domain name.
Verify that the returned intercept page displays your custom style, confirming that DNS resolution and the security policy work as expected.

Verify the custom slider page
Before you verify, ensure the WAF rule action is set to Slider CAPTCHA and a custom slider page is configured with at least one site selected.
Access a domain with a slider verification rule to trigger the slider page.
Verify that the slider page displays your custom title, color, and styles.