Use NAT Gateway, SLB, or session management instead of assigning public IP addresses directly to ECS instances.
Security risks
Assigning a public IP address, such as an EIP or a static public IP address, directly to an ECS instance expands the attack surface and introduces the following risks:
Passive scanning and discovery: Exposed service ports are discovered by scanners, leading to DDoS attacks or exploitation of remote vulnerabilities that can compromise the host.
Attacks on vulnerable ports: Misconfigured security groups may expose management ports such as SSH (port 22), RDP (port 3389), and SMB (port 445) to the Internet. These ports are highly susceptible to brute-force attacks, password guessing, and credential theft, leading to compromised hosts and data breaches.
Increased management complexity: Managing public IP addresses and access control policies per instance increases O&M complexity, raises the risk of configuration errors, and creates single points of failure.
Non-compliance with classified protection requirements: Standards such as MLPS 2.0 require all public network access to be secure, controllable, and auditable. Use SLB, NAT Gateway, or Bastionhost to centralize public network access control instead of exposing instances directly.
Best practices
Configure security groups
A security group is a virtual firewall that controls inbound and outbound traffic for ECS instances. Proper security group configuration is the foundation of ECS network defense.
Core principle: Least privilege. Follow the principle of least privilege for all inbound and outbound rules:
Specify authorization objects: Use specific IP addresses or CIDR blocks, such as your company's egress IP or private IP addresses of other cloud resources. Avoid 0.0.0.0/0 unless the service must be publicly accessible, such as web services on ports 80/443.
Specify authorized ports: Open only required ports. Never expose remote management or database ports to the Internet.
Bad example:
A user attached a public IP address to an ECS instance and set the source address for SSH (22) and Redis (6379) to 0.0.0.0/0 in the security group. The root user had a weak password and Redis had no password. Within 5 minutes, an automated scanner compromised the server and stole data.
Restricting port 22 to the company's IP address and port 6379 to the VPC internal network would have blocked direct Internet exploitation, even with a weak password.
Common vulnerable ports. Always restrict the source IP address range for the following ports:
Port Category | Port/Protocol | Service Name | Core Risk |
Remote management | 22/TCP, 3389/TCP | SSH, RDP | Brute-force attacks, gaining full control of the server |
Database | 3306/TCP, 6379/TCP, 1433/TCP | MySQL, Redis, SQL Server | Unauthorized access, data breach, remote code execution (RCE) |
File sharing | 445/TCP, 139/TCP | SMB, NetBIOS | Worm propagation (such as EternalBlue), file theft |
Web application management | 7001/TCP, 8080/TCP | WebLogic, Tomcat | Weak backend passwords, deserialization vulnerabilities, leading to RCE |
Connect to ECS instances securely
Exposing SSH (port 22) or RDP (port 3389) to the Internet makes instances vulnerable to brute-force attacks. Use the following Alibaba Cloud O&M tools instead.
Solution | Scenarios |
Workbench terminal connection | Quick, temporary daily management, suitable for beginners |
Session management | Daily use by developers and O&M engineers, with zero port exposure |
Bastionhost | Enterprise-level use with strict compliance and audit requirements |
Connect with Workbench
Workbench opens a secure shell or RDP session in your browser. Recommended for daily management.
How it works: Requests are authenticated and relayed through the Workbench service cluster before reaching the instance. The security group only needs to allow the Workbench service IP address range on the management port, minimizing the attack surface.
How to use:
Connect with session management
Session management provides zero port exposure for flexible instance management.
How it works: The Cloud Assistant Agent establishes an encrypted reverse connection to the Cloud Assistant service. All O&M operations pass through this tunnel, so the instance does not listen on any inbound ports.
How to use:
Secure outbound Internet access
ECS instances often need outbound Internet access to download packages, update systems, or call third-party APIs.
Use a NAT gateway

How it works:
ECS instances within a VPC have no public IP addresses.
VPC routes direct all outbound traffic to the NAT gateway.
The NAT gateway translates private IP addresses to its public IP address before sending requests to the Internet.
Core advantages:
Hide backend instances: Only the NAT gateway's public IP address is visible from the Internet. Backend ECS instances cannot be discovered or directly accessed.
Centralized management: Manage outbound traffic through a single VPC egress point.
Save public IP addresses: Multiple ECS instances share one or more public IP addresses.
See Use the SNAT feature of an Internet NAT gateway to access the Internet.
Configure outbound security group rules
Even with outbound-only access, a compromised instance can connect to external command and control (C&C) servers. Outbound security group rules block such malicious connections.
Set a default deny policy. Add an outbound rule with the lowest priority (such as 100): policy "Deny", destination 0.0.0.0/0, port range all.
Allow necessary Alibaba Cloud services. Add high-priority allow rules for basic Alibaba Cloud service addresses. For example:
Security Center Agent: 100.100.0.0/16, 106.11.0.0/16, and others on ports 80/443.
Cloud Assistant Agent: 100.100.100.200:80 and the Cloud Assistant service domain names for each region.
Alibaba Cloud mirror source/OSS/SLS: Resolve regional domain names and add their IP addresses.
Allow business destinations. To access a specific domain (such as github.com), resolve its IP addresses with
digornslookupand add them to the outbound allow rules.
Secure inbound Internet access
When ECS instances serve websites, app backends, or APIs to Internet users, avoid attaching public IP addresses directly.
Use SLB
Attaching a public IP address directly to an ECS instance exposes the backend server and provides no high availability. Use Server Load Balancer (SLB), such as Application Load Balancer (ALB) or Network Load Balancer (NLB), in production environments.
How it works:
User requests reach the SLB public endpoint.
SLB distributes requests to healthy backend ECS instances based on forwarding rules and health checks.
Backend ECS instances communicate with SLB over the internal network only.
Core advantages:
Hide backend servers: The SLB instance serves as the user-facing endpoint, hiding backend ECS instance IP addresses.
High availability: SLB automatically removes unhealthy instances and performs failover.
Load distribution: SLB distributes traffic across multiple ECS instances for horizontal scaling.
Integrated security: Integrate SLB with WAF and other security products to protect against application-layer attacks.
See Quickly implement load balancing for IPv4 services.
Configure security groups for backend instances
Configure the security groups for backend ECS instances as follows:
In the inbound rules, allow traffic from the SLB service IP address range to service ports such as 80/443.
Deny all other source IP addresses.
Use Cloud Assistant port forwarding for local access
Use Cloud Assistant port forwarding for a small number of ECS instances with private network access or temporary trials, where network quality requirements are low and public bandwidth costs should be avoided. Suitable for small-scale testing or remote service calls before a full security defense system is in place.

Example: Access a PostgreSQL service on an ECS instance from a local machine
A PostgreSQL service on an ECS instance listens on port 5432. You can access it locally without attaching a public IP address or opening port 5432 in the security group.
Port forwarding via the session management CLI maps a remote port (such as 5432) to a local port (such as 8080). Traffic to 127.0.0.1:8080 is forwarded through an encrypted Cloud Assistant channel to the ECS instance.
Map port
5432of the target ECS instance to port8080on your local machine:ali-instance-cli.exe portforward -i <instance_id> -r <target_port> -l <local_port>instance_id: The ID of the instance.target_port: The port of the target instance.local_port: The local port.Start pgAdmin and connect to
127.0.0.1:8080. Requests are forwarded to port5432on the ECS instance through the Cloud Assistant channel.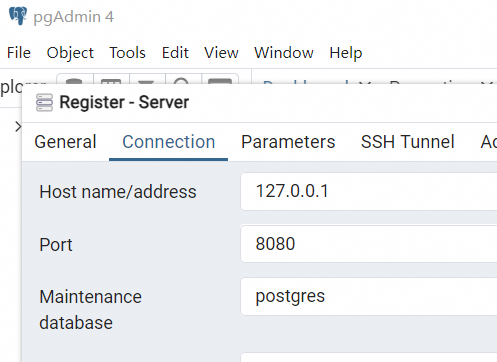
Compliance capabilities
Check
Query ECS instances with public IP addresses
Go to the Security Center console.
In the navigation pane, choose . On the Cloud Product Configuration Risk tab, find Use SSH key pairs for logon and click Scan in the Operation column.
A Failed status indicates Linux instances not using key pair authentication. Click Details to view them.
Check security groups with exposed vulnerable ports
Go to ECS Insight.
On the Security tab, click Unrestricted Access to Specific Security Group Ports to view instances with unrestricted access to vulnerable ports.
Block
Prohibit attaching public IP addresses to ECS instances
For enterprise users:
Log on to the Resource Directory console. In the navigation pane, click Control Policies. Create a custom policy with the following JSON content.
{
    "Version": "1",
    "Statement": [
        {
            "Effect": "Deny",
            "Action": [
                "ecs:RunInstances",
                "ecs:CreateInstance",
                "ecs:ModifyInstanceSpec",
                "ecs:ModifyInstanceNetworkSpec"
            ],
            "Resource": "*",
            "Condition": {
                "Bool": {
                    "ecs:AssociatePublicIpAddress": [
                        "true"
                    ]
                }
            }
        },
        {
            "Effect": "Deny",
            "Action": [
                "vpc:AllocateEipAddress",
                "vpc:AllocateEipAddressPro",
                "vpc:AllocateEipSegmentAddress",
                "eipanycast:AllocateAnycastEipAddress"
            ],
            "Resource": "*"
        }
    ]
}
Attach the policy to the appropriate resource directory node. The policy blocks the specified operations for all accounts under that node.
For non-enterprise users:
Log on to the RAM console. In the navigation pane, click Permission Policy and create a custom policy with the same content.
Use access policy authorization management to grant the policy to a RAM user, RAM user group, or RAM role.
Restrict access to vulnerable ports from any address
For enterprise users:
Log on to the Resource Directory console. In the navigation pane, click Control Policies. Create a custom policy with the following JSON content.
{
    "Version": "1",
    "Statement": [
        {
            "Effect": "Deny",   # Deny
            "Action": [
                "ecs:AuthorizeSecurityGroup",    # Add an inbound security group rule
                "ecs:ConfigureSecurityGroupPermissions",   # Add or modify security group rules
                "ecs:ModifySecurityGroupRule"   # Modify a security group rule
            ],
            "Resource": "acs:ecs:*:*:securitygroup/*",   # For all security groups
            "Condition": {
                "StringEquals": {
                    "ecs:SecurityGroupSourceCidrIps": [   # Source IP for access
                        "0.0.0.0/0",
                        "::/0"
                    ]
                },
                "ForAllValue:StringEquals": {
                    "ecs:SecurityGroupPort" : [    # Includes the following destination port numbers
                        "22",
                        "3389",
                        "445"
                    ]
                }
            }
        }
    ]
}
Attach the policy to the appropriate resource directory node. The policy blocks the specified operations for all accounts under that node.
For non-enterprise users:
Log on to the RAM console. In the navigation pane, click Permission Policy and create a custom policy with the same content.
Use access policy authorization management to grant the policy to a RAM user, RAM user group, or RAM role.
Remediate
Detach a static public IP address: Set bandwidth to 0 Mbps to automatically release it. See Modify the bandwidth of a subscription instance and Modify the bandwidth of a pay-as-you-go instance.
Detach an EIP: See Disassociate an EIP from an ECS instance.