Distribute packet processing across multiple CPU cores to improve network throughput and reduce latency.
Why use NIC multi-queue
A single-queue network interface relies on one CPU core for all packets, which can cause CPU overload, latency, and packet loss. NIC multi-queue distributes traffic across multiple cores to improve resource utilization.
Under the same PPS and bandwidth conditions, two queues improve network performance by 50% to 100% over a single queue. Four queues yield even greater gains:
-
Better multi-core utilization: Distributes traffic across CPU cores for balanced load and higher utilization.
-
Higher throughput: Parallel packet processing increases throughput, especially under high loads.
-
Lower latency: Distributing packets across queues reduces congestion and latency.
-
Reduced packet loss: Prevents packet loss from single-queue overload during high traffic.
Improper configuration can degrade performance. For example, incorrect queue count or CPU affinity settings cause unnecessary context switching, and too few queues underutilize hardware resources.
When an ENI is attached to an instance, its queue count defaults to the instance type setting. To manually adjust the queue count, evaluate your use case and hardware conditions first.
How NIC multi-queue works
-
Queue architecture
An ENI supports multiple combined queues, each processed by an independent CPU core. This enables parallel packet processing, reduces lock contention, and fully utilizes multi-core performance.
Receive (RX) and Transmit (TX) queues are the two types of queues used for processing packets. Each combined queue consists of one RX queue and one TX queue:
-
RX queue: Processes incoming packets. The network interface distributes each packet to a specific RX queue based on Receive Side Scaling (RSS) rules, such as round-robin or flow-based hashing.
Some instance type families support Custom RSS for ENIs, which uses hash algorithms to distribute traffic to different RX queues.
-
TX queue: Manages outgoing packets. Applications place packets into a TX queue, and the network interface sends them based on sequence or priority.
-
-
IRQ affinity support
Each queue has an independent interrupt. IRQ affinity distributes interrupt handling across CPU cores to prevent any single core from being overloaded.
IRQ affinity is enabled by default on all public images except Red Hat Enterprise Linux. See Configure IRQ affinity.
Limitations
-
Only some instance types support NIC multi-queue. See Instance type families. If the Multi-queue column value is greater than 1, the instance type supports NIC multi-queue.
-
For supported instance types, NIC multi-queue is enabled automatically when you attach an ENI.
-
The queue count listed for an instance type is the maximum queues per ENI supported by that type.
-
Call the DescribeInstanceTypes API operation with the InstanceTypeFamily parameter to query queue-related metrics:
-
Default queue count
PrimaryEniQueueNumber: default queue count for the primary ENI. SecondaryEniQueueNumber: default queue count for a secondary ENI.
-
Maximum queues per ENI
MaximumQueueNumberPerEni: maximum queues per ENI for the instance type family.
-
Total queue quota
TotalEniQueueQuantity: total queue quota for the instance type family.
-
-
-
Public images with kernel versions earlier than 2.6 may not support NIC multi-queue. Use the latest public images.
View the ENI queue count
Use the console
In the upper-left corner of the page, select a region and resource group.

-
Click the target secondary ENI ID to open its details page.
-
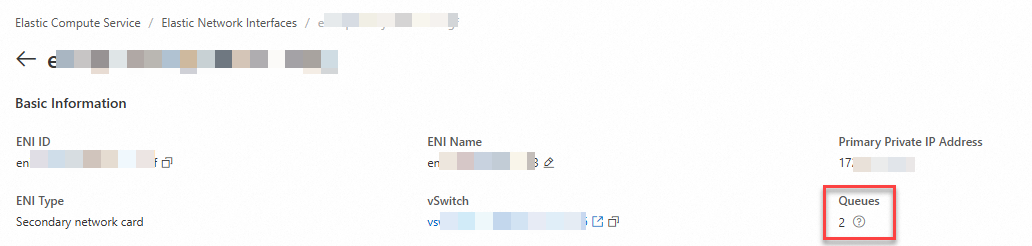
In the Basic Information section, find the Queues parameter. This value is the current queue count.
-
If you modified the queue count, the modified value is displayed.
-
If you have not modified the queue count:
-
If the ENI is not attached to an instance, no value is displayed.
-
If the ENI is attached to an instance, the default queue count for the instance type is displayed.
-
-
Use the API
Call the DescribeNetworkInterfaceAttribute operation. The QueueNumber response parameter indicates the queue count.
-
If you modified the queue count, the modified value is displayed.
-
If you have not modified the queue count:
-
If the ENI is not attached to an instance, no value is displayed.
-
If the ENI is attached to an instance, the default queue count for the instance type is displayed.
-
Check within the instance
-
Note
For Windows instances, view the ENI queue count in the ECS console or by calling an API operation.
-
View the network configuration with
ip a: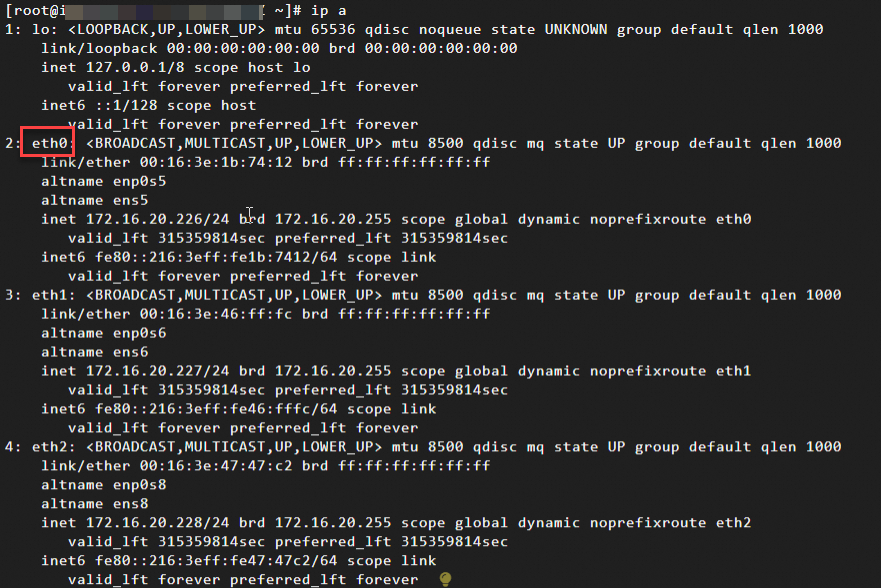
-
Check if the primary ENI eth0 supports NIC multi-queue.
This example uses the primary ENI. To check a secondary ENI, replace the identifier with eth1, eth2, or another value.
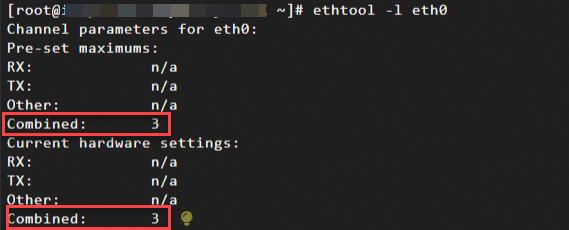
ethtool -l eth0Check the output:
-
If "Combined" under "Pre-set maximums" is greater than 1, the ENI supports NIC multi-queue. This value is the maximum queue count.
-
"Combined" under "Current hardware settings" is the current queue count in use.
In this example, the ENI supports a maximum of three combined (RX+TX) queues and currently uses three.
-
To modify the maximum queue count, see Modify the queue count for an ENI.
-
To modify the OS queue count, see Modify the queue count used by the OS.
-
Modify the ENI queue count
When you attach an ENI to an instance, its queue count defaults to the instance type setting. You can adjust it in the console or by calling an API operation. Note the following:
-
You can modify the queue count only when the ENI is Available, or Bound with the instance Stopped.
-
The queue count cannot exceed the maximum queues per ENI for the instance type.
-
The total queue count of all ENIs on an instance cannot exceed the total queue quota for the instance type.
Use the console
In the upper-left corner of the page, select a region and resource group.
-
Click the target secondary ENI ID to open its details page.
-
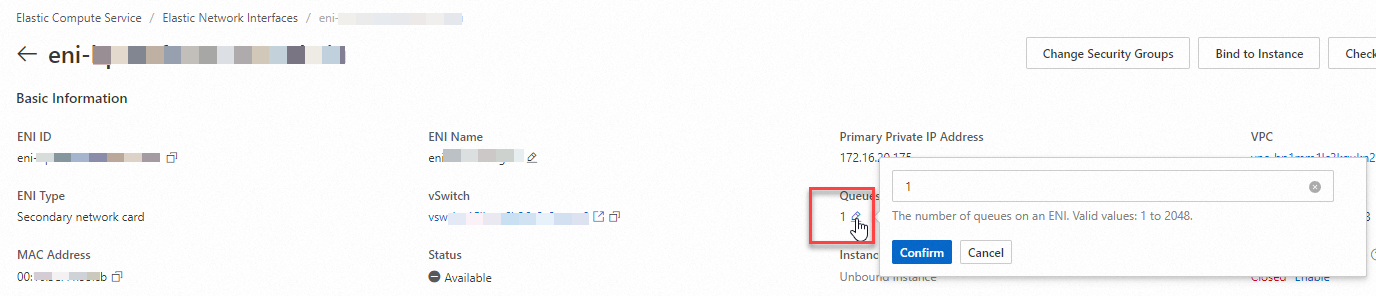
Click Modify Queue Count.
-
Click OK.
Use the API
Call the ModifyNetworkInterfaceAttribute operation and set the QueueNumber parameter to modify the queue count.
The new queue count takes effect the next time the attached instance starts.
Modify the OS queue count
When you modify the ENI queue count, the OS automatically applies the new setting.
You can also tune the number of queues the ENI actively uses. This value must be less than or equal to the configured queue count.
-
Changing the queue count used by the OS does not affect the ENI's configured queue count or appear in the console or API responses.
-
This change is temporary and does not persist across instance restarts.
The following example adjusts the number of queues on an Alibaba Cloud Linux 3 instance with NIC multi-queue.
-
View the network configuration with
ip address show: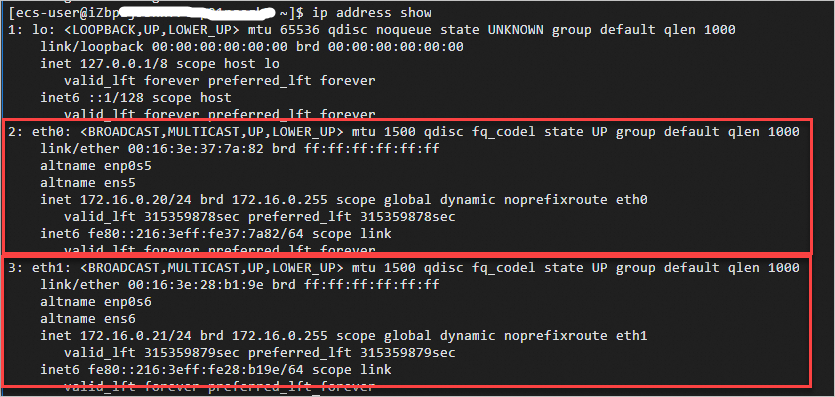
-
Check if the primary ENI eth0 supports NIC multi-queue.
This example uses the primary ENI. To check a secondary ENI, replace the identifier with eth1, eth2, or another value.
ethtool -l eth0 -
Check the output:
-
If "Combined" under "Pre-set maximums" is greater than 1, the ENI supports NIC multi-queue. This value is the maximum queue count.
-
"Combined" under "Current hardware settings" is the current queue count in use.
In this example, the ENI supports a maximum of three combined (RX+TX) queues and three are in use.
-
-
Set the number of active queues for the primary ENI eth0 to 2.
This example uses the primary ENI. To adjust a secondary ENI, replace the identifier with eth1, eth2, or another value.
sudo ethtool -L eth0 combined NNis the number of queues that you want the ENI to use.Nmust be less than or equal to the "Combined" value under "Pre-set maximums".Set the primary ENI queue count to 2:
sudo ethtool -L eth0 combined 2
Configure IRQ affinity
NIC multi-queue typically requires IRQ affinity configuration to assign interrupts from different queues to specific CPU cores, reducing contention and improving performance.
-
All public images except Red Hat Enterprise Linux have IRQ affinity enabled by default.
-
Red Hat Enterprise Linux supports IRQ affinity but does not enable it by default. Follow the steps below to configure it.
The following steps use the ecs_mq script to configure IRQ affinity on a Red Hat Enterprise Linux 9.2 image. Other images have IRQ affinity enabled by default.
-
(Optional) Stop the irqbalance service.
The irqbalance service dynamically adjusts IRQ affinity, which can conflict with
ecs_mq. Stop it first.systemctl stop irqbalance.service -
Download the latest
ecs_mqscript:wget https://ecs-image-tools.oss-cn-hangzhou.aliyuncs.com/ecs_mq/ecs_mq_latest.tgz -
Decompress the
ecs_mqpackage:tar -xzf ecs_mq_latest.tgz -
Change to the working directory:
cd ecs_mq/ -
Run the
ecs_mqinstallation script:bash install.sh redhat 9NoteReplace
redhatand9with the name and major version number of your operating system. -
Start the
ecs_mqservice:systemctl start ecs_mqThe service automatically enables IRQ affinity.
Test different queue count and IRQ affinity combinations while monitoring throughput and latency to find the optimal balance.