Java Web is a technology stack that integrates the Java programming language and various technologies and frameworks to facilitate the development of dynamic web applications. Developers can use Java Web to develop complex, high-performance web applications that can be deployed across platforms. Jetty is an open source Servlet container, which is mainly used to run Java web applications. Compared with Apache Tomcat, Jetty is more lightweight and more suitable for lightweight applications, high-concurrency scenarios, and distributed environments. This topic describes how to deploy a Java web environment on an Elastic Compute Service (ECS) instance by using Jetty.
Prerequisites
Before you deploy a Java web environment on an ECS instance, make sure that the instance meets the following requirements:
The ECS instance is assigned a static public IP address (also called system-assigned or auto-assigned public IP address) or associated with an elastic IP address (EIP). For more information, see EIPs.
Rules are added to a security group of the instance to allow inbound traffic on remote connection and Jetty ports, such as ports 22, 3389, and 8080. For information about how to add a security group rule, see Add a security group rule.
A Java environment is deployed on the instance. For more information, see Deploy a Java environment.
Procedure
Perform the following operations based on the operating system of your ECS instance.
Linux
In this example, Jetty 12.0.16 is installed. If you install another version of Jetty or use other directories, replace the version and directories in the following commands with the actual version and directories.
Connect to your Linux instance. For more information, see Use Workbench to connect to a Linux instance over SSH.
Run the following commands to download and decompress the Jetty 12 installation package.
ImportantIf you want to install another version of Jetty or the following download URL is invalid, visit the official Jetty website to obtain the latest download URL and replace the URL in the following wget command with the URL that you obtained.
Different versions of Jetty support different Java Development Kit (JDK) versions. Select an appropriate version of Jetty based on the JDK version that is installed when you deploy the Java environment. For more information, visit the official Jetty website.

wget https://repo1.maven.org/maven2/org/eclipse/jetty/jetty-home/12.0.16/jetty-home-12.0.16.tar.gz --no-check-certificate
tar -zxvf jetty-home-12.0.16.tar.gz
Run the following command to move the Jetty installation files to the /usr/local/jetty/ directory:
sudo mv jetty-home-12.0.16 /usr/local/jetty/Run the following command to create the
jetty-basedirectory:sudo mkdir /usr/local/jetty-baseConfigure environment variables.
Run the following command to modify the
~/.bashrcfile:sudo vim ~/.bashrcPress the
Ikey to enter Insert mode and add the following content to the file.NoteSet the
JETTY_HOMEparameter to the actual directory in which you want to install Jetty. Set theJETTY_BASEparameter to thejetty-basedirectory.export JETTY_HOME=/usr/local/jetty export JETTY_BASE=/usr/local/jetty-basePress the
Esckey to exit Insert mode. Enter:wqand press theEnterkey to save and close the file.Run the following command for the changes to take effect:
source ~/.bashrc
Start the Jetty module and initialize the
jetty-basedirectory.Run the following command to go to the
jetty-basedirectory:cd /usr/local/jetty-baseRun the following command to initialize the
jetty-basedirectory. After the command is run, the$JETTY_BASE/start.d/directory and other directories that contain server configuration information are created.NoteYou can run the
java -jar $JETTY_HOME/start.jar --list-modules=*command to view which modules are available.If you use Jetty 9, replace
--add-modulewith--add-to-start.
sudo java -jar $JETTY_HOME/start.jar --add-module=server,http,deploy
Check the environment configuration.
ImportantThe following commands must be run in the
jetty-basedirectory.Run the following command to deploy the sample web applications provided by Jetty.
If you use Jetty 10 or 11, replace
demosin the following command withdemo.If you use Jetty 9, run the
sudo mv $JETTY_HOME/demo-base/webapps/ROOT $JETTY_BASE/webappscommand to deploy the sample web applications.
NoteYou can also upload the WAR package of an on-premises test project to the
$JETTY_BASE/webappsdirectory for testing. For more information, see Upload or download files.sudo java -jar $JETTY_HOME/start.jar --add-module=demosRun the following command to start Jetty.
NoteBy default, Jetty listens on port 8080. You can run the
sudo netstat -tunlp | grep 8080command to check whether the port is already in use. If the port is already in use, you can specify another port to remove the port conflict when you start Jetty. For example, run thenohup sudo java -jar $JETTY_HOME/start.jar jetty.http.port=8081 &command to specify a port for Jetty.nohup sudo java -jar $JETTY_HOME/start.jar &In the address bar of a web browser on your on-premises device, enter
http://<Public IP address of the ECS instance>:8080. If the Jetty test page appears, the Java web environment is configured as expected.NoteIf you changed the Jetty port number, replace 8080 with the new Jetty port number that you specified and confirm that a security group of the instance allows inbound traffic on the port. For information about how to add a security group rule, see Add a security group rule.
If you uploaded the WAR package of an on-premises test project, visit
http://<Public IP address of the ECS instance>:8080/<Package name>to check whether you can access the project.

Windows
This tutorial applies only to Jetty 12, Jetty 11, and Jetty 10.
In this example, Jetty 12.0.16 is installed. If you install another version of Jetty or use other directories, replace the version and directories in the following steps with the actual version and directories.
Connect to your Windows instance. For more information, see Use Workbench to connect to a Windows instance over RDP.
Download the Jetty installation package that you want to install.
Different versions of Jetty support different JDK versions. Select an appropriate version of Jetty based on the JDK version that is installed when you deploy the Java environment. For more information, visit the official Jetty website.


Decompress the downloaded Jetty installation package.
Decompress the downloaded installation package to the directory in which you want to install Jetty. In this example, the
C:\downloaddirectory is used.ImportantYou must decompress the Jetty installation package to a path that does not contain spaces.
Configure the
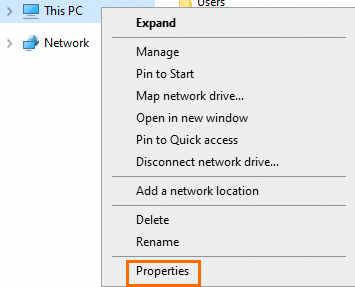
JETTY_HOMEenvironment variable.Right-click This PC and select Properties.
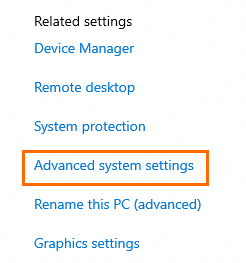
On the About page, scroll down to the bottom and click Advanced system settings.
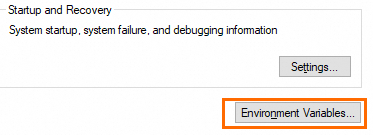
Click Environment Variables.
In the System variables section, click New to create a system variable and configure the parameters. Then, click OK. Set the variable name to
JETTY_HOMEand the variable value to the directory in which Jetty is installed, such asC:\download\jetty-home-12.0.16.
Click OK to save the environment variable settings.
Create the
jetty-basefolder. In this example, the folder is created in theC:\downloaddirectory.
Initialize the
jetty-basefolder.Go to the
jetty-basefolder, entercmdin the address bar, and then press theEnterkey to open the command prompt.
Run the following command to initialize the
jetty-basefolder. After the command is run, thestart.ddirectory and other directories that contain server configuration information are created.java -jar %JETTY_HOME%/start.jar --add-module=http,server,deploy
Verify Jetty.
Run the following command to deploy the sample web applications provided by Jetty.
If you use Jetty 10 or 11, replace
demosin the following command withdemo.NoteYou can also upload the WAR package of an on-premises test project to the
<jetty-base>/webappsdirectory for testing. Replace<jetty-base>with the actual path of thejetty-basefolder, such asC:\download\jetty-base. For more information, see Upload or download files.java -jar %JETTY_HOME%/start.jar --add-module=demosRun the following command to start Jetty. Do not close the command prompt window after Jetty is started.
NoteBy default, Jetty listens on port 8080. You can run the
netstat -ano | findstr :8080command to check whether the port is already in use. If the port is already in use, you can specify another port to remove the port conflict when you start Jetty. For example, run thejava -jar %JETTY_HOME%/start.jar jetty.http.port=8081command to specify a port for Jetty.java -jar %JETTY_HOME%/start.jarIn the address bar of a web browser on your on-premises device, enter
http://<Public IP address of the ECS instance>:8080. If the Jetty test page appears, the Java web environment is configured as expected.NoteIf you changed the Jetty port number, replace 8080 with the new Jetty port number that you specified and confirm that a security group of the instance allows inbound traffic on the port. For information about how to add a security group rule, see Add a security group rule.
If you uploaded the WAR package of an on-premises test project, visit
http://<Public IP address of the ECS instance>:8080/<Package name>to check whether you can access the project.
What to do next
After you deploy a Java web environment on an ECS instance, you can configure a website on the instance and bind a domain name to the public IP address of the instance. For more information, see Build a website.
Select an appropriate development tool to develop web applications. If an application requires a database to store application data, add database configurations to the relevant configuration file of the corresponding web project, such as the Properties file, and connect to the database. After the development is complete, you can deploy the Java web applications to Jetty, such as to the
$JETTY_BASE/webappsdirectory. After the Java web applications are deployed and started, you can access your applications over the web interface. For more information about Jetty, visit the official Jetty website.NoteIf you use a different version of Jetty, replace the version number in the URL with the corresponding version number.
You can upload on-premises files to the ECS instance. For more information, see Upload a file to or download a file from a Linux instance.
If you want to use a database to store and manage the data of a web application, you can use an ApsaraDB RDS for MySQL instance or deploy a MySQL database on the ECS instance. For more information, see Database overview.
You can use a Server Load Balancer (SLB) instance to improve the availability and performance of your website. For more information, see Getting Started.
FAQ
What do I do if I cannot access http://<Public IP address of the ECS instance>:8080 from my on-premises computer after I deploy a Java web environment by using Jetty on an ECS instance?
After you deploy a Java web environment on an ECS instance by using Jetty, you cannot access http://<Public IP address of the instance>:8080 from a web browser. This issue may occur due to the following causes:
Cause 1:
The system firewall or Security-Enhanced Linux (SELinux) is enabled on the instance and rules are configured to block external access. As a result, you cannot access the Jetty website. You can use the following solutions to resolve the issue:
If your instance runs a Linux operating system, make sure that the system firewall and SELinux are disabled. For more information, see Enable or disable the system firewall on a Linux ECS instance and Enable or disable SELinux.
If your instance runs a Windows operating system, make sure that the system firewall is disabled. For more information, see Manage the system firewall of a Windows instance.
Cause 2:
When you started Jetty, you changed the listening port of Jetty. You can use the following solution to resolve the issue:
Replace 8080 in
http://<Public IP address of the ECS instance>:8080with the port number that you specified, and check the security group rules of the instance to confirm that the port is allowed. For information about how to add a security group rule, see Add a security group rule.