You can use the instance health diagnostics feature to diagnose and resolve the startup failure of an Elastic Compute Service (ECS) instance. After a repair disk is attached to the instance, you can start and log on to the instance to correct the problematic operating system configurations that cause the startup failure. This topic describes how to use the instance health diagnostics feature and a repair disk to diagnose and resolve an ECS instance startup failure.
Scenarios
When you start or restart an ECS instance, the instance remains in the Starting or Running lifecycle state and in the Initializing heath state. The operating system of the instance fails to start, and you cannot connect to the ECS instance by using SSH or Remote Desktop Protocol (RDP). You can log on to the instance only by using Virtual Network Computing (VNC) and then view the startup progress and specific error log messages.
The issue may be caused by incorrect operating system configurations of the ECS instance. You can use the instance health diagnostics feature to diagnose and resolve the issue based on diagnostic results.
Prerequisites
An ECS instance is in the Stopped state. For information about how to stop the instance, see Stop an instance.
Procedure
The following figure shows the procedure for resolving the instance startup failure by using the instance health diagnostics feature.

Step 1: Diagnose the instance connection failure or startup exception
During the troubleshooting process, you may modify the system configurations of the instance's current system disk. To avoid unnecessary risks, we recommend creating a snapshot for the disk for data restoration before proceeding.
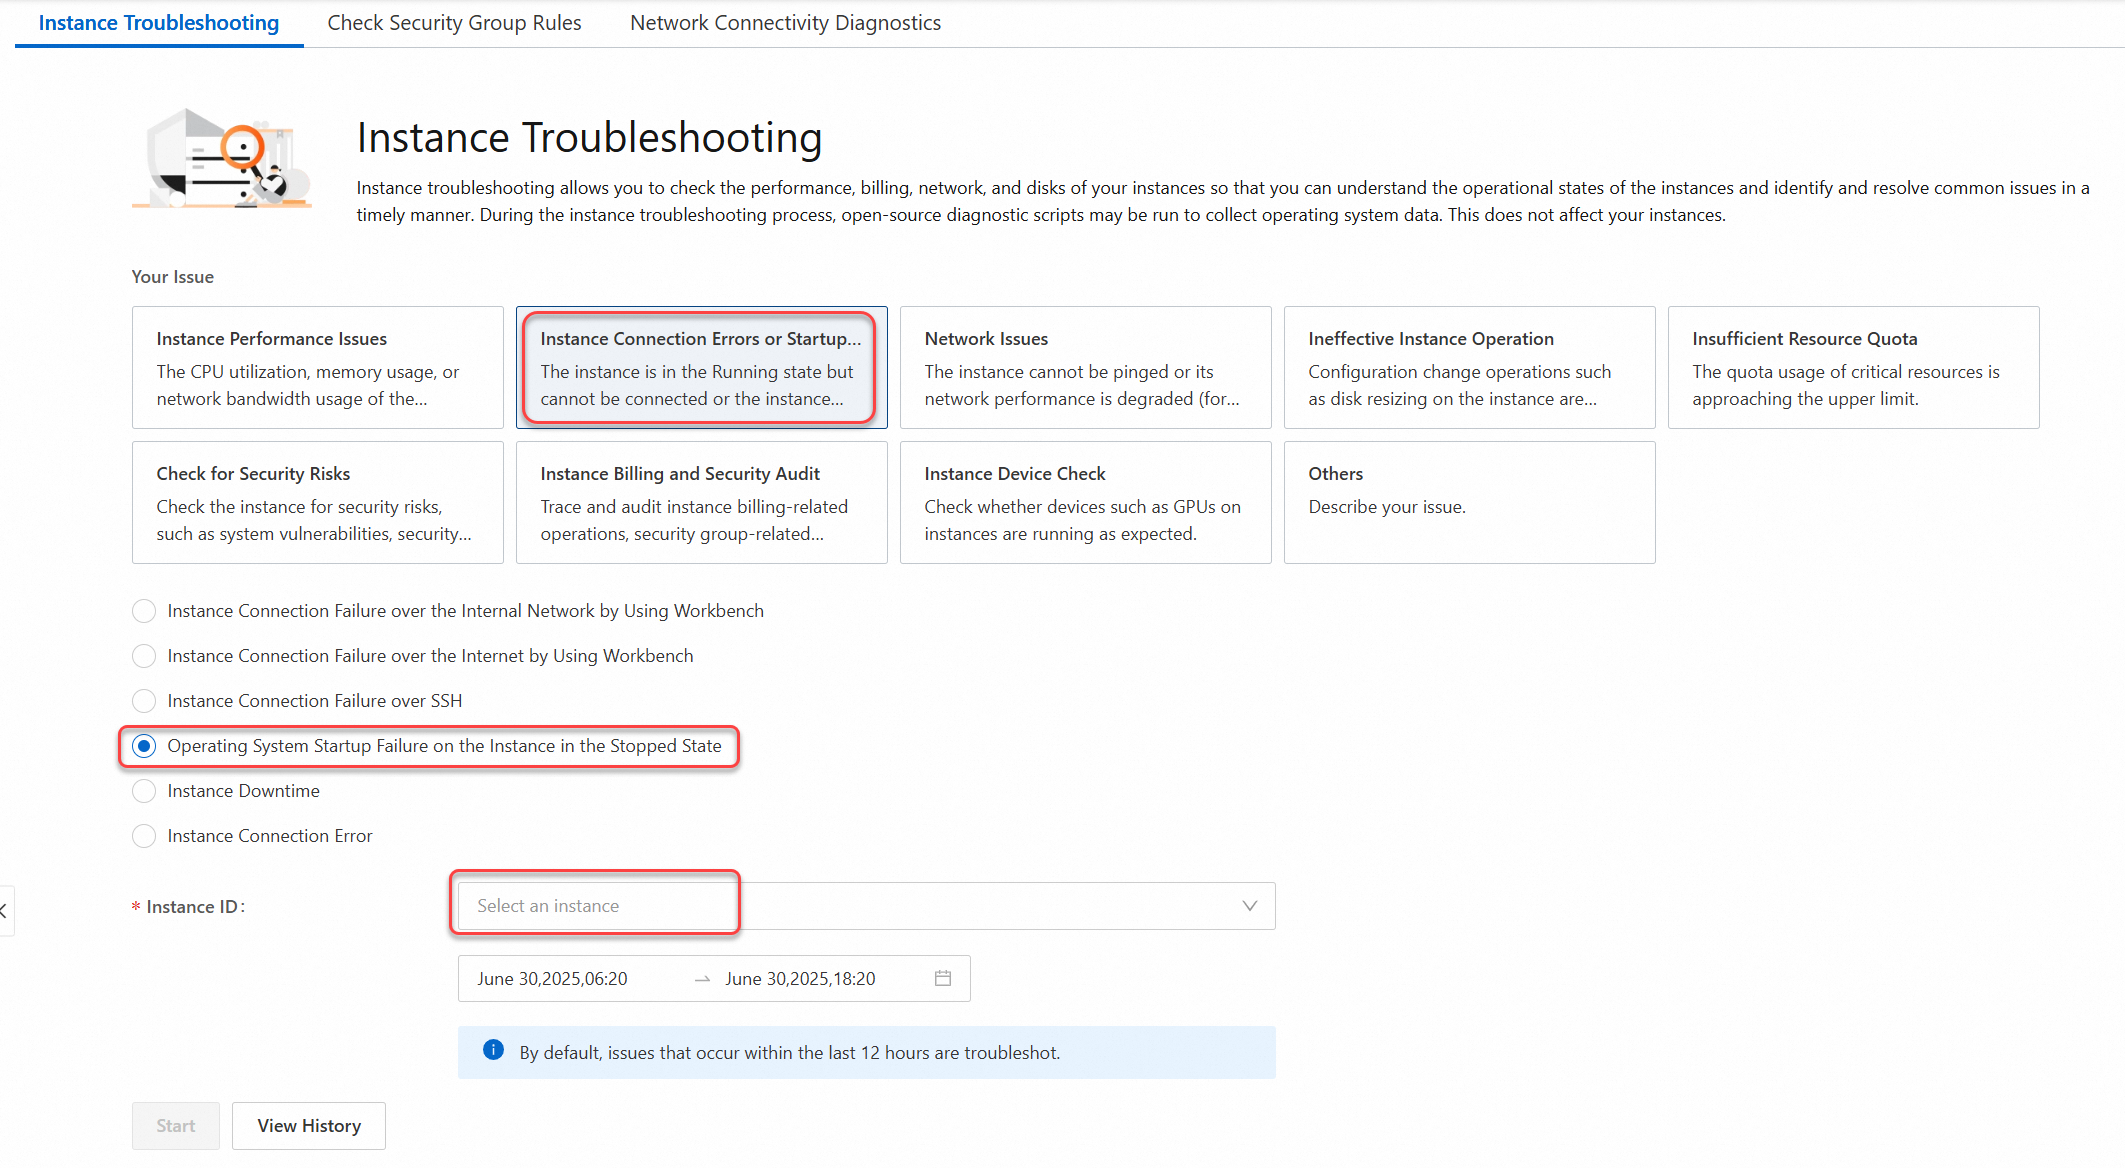
In the top navigation bar, select the region and resource group of the resource that you want to manage.

On the Instance Troubleshooting tab, click Instance Connection Errors or Startup Exceptions.
Select Operating System Startup Failure on the Instance in the Stopped State . Select an Instance ID value, specify a time range, and then click Start.
NoteThe ECS instance you want to diagnose must be in the Stopped state. For information about how to stop an instance, see Stop an instance.
When the diagnostic is complete, the instance enters the Running or Repairing state.

Step 2: View diagnostic results
Unlike other health diagnostics scenarios, after the health diagnostics for an instance that failed to be started is completed, a repair disk is attached to it, regardless of the diagnostic result (Critical, Warning, or Passed). You can view the repair disk information in the diagnostic report and repair the instance based on the reasons in the report. For information about how to view diagnostic reports, see Diagnostic items and results.
Repair disk attached to the instance
The following table provides information about the repair disk from which the instance is started.
Repair disk information | Description |
Operating system |
|
Logon account |
|
Password | View the diagnostic report to obtain the password. Important Even if you change the password of the instance in the operating system of the repair disk, the password provided by ECS is restored when the instance restarts. You cannot use the username or password in the original operating system to log on to the instance. |
Read and write operations on the disk |
|
Snapshot creation |
|
Diagnostic results
The diagnostic results contain repair disk information, diagnosis, and suggestions, as shown in the following figure.

Repair disk information:
①: the username (root for Linux and Administrator for Windows) and password provided by ECS. You can use them to log on to the ECS instance.
②: a URL to use VNC to connect to the ECS instance. You can use only VNC to log on to the ECS instance to which the repair disk is attached to resolve the issue.
③: an entrance for detaching the repair disk. You can detach the disk based on the health diagnostic results and the repair progress. Then, you can restore the original operating system of the instance. Take note of the following items:
If the health diagnostic result is Passed, no instance exceptions are detected. You can perform the operations described in Step 4: Restore the ECS instance and use VNC to connect to the ECS instance for further troubleshooting. If the issue persists, submit a ticket to contact technical support.
If the health diagnostic result is Critical or Warning, the ECS instance is abnormal. On the Diagnostic Result page, select VNC to connect to the ECS instance (as shown in ② in the preceding figure), and then use the logon information of the repair disk (as shown in ① in the preceding figure) to log on to the instance. After you repair the instance, detach the repair disk.
Exception details and suggestions:
This section describes the incorrect operating system configurations of an instance and provides suggestions. You can refer to the recommended document for configuration error details and handling suggestions. For more information, see Step 3: Correct the operating system configurations of the instance.
Step 3: Correct the operating system configurations of the instance
View the mount information of the original system disk attached to the instance.
Linux operating system
On the temporarily attached repair disk of the instance, the file systems of the instance's original system disk are mounted to a temporary directory. You can use one of the following methods to view the temporary directory:
On the system disk details page, click the Associated Instances tab to view the temporary directory. Example:
/tmp/ecs-offline-diagnose_disk-uf67g4wwius3metl****.uf67g4wwius3metl****is the serial number of the instance's original system disk.On the temporarily attached repair disk, run the
mountcommand to view the temporary directory. In this example, the device name of the original system disk is/dev/vda.mount | grep /dev/vdaA command output similar to the following one is returned.
/dev/vda1 on /tmp/ecs-offline-diagnose_disk-uf67g4wwius3metl**** type ext4 (rw,relatime)Windows operating system: The drive letter of the repair disk is X. The drive letters of the system disk and data disks in the original system remain unchanged.
Correct the problematic configurations of the instance's operating system.
The following section describes common solutions to instance startup failures. You can view the reasons based on the diagnostic items in the diagnostic results, and then select a solution based on the reasons.
Linux operating system:
Windows operating system:
Step 4: Restore the ECS instance
After you resolve the startup failure of the instance, detach the repair disk and restore the original operating system of the instance.
After you detach the repair disk, it cannot be automatically re-attached to the instance. You can trigger the system to attach the repair disk to the instance only by using the instance health diagnostics feature to diagnose the startup issue.
Method 1: Restore the original operating system of the instance on the Diagnostic Result panel
In the top navigation bar, select the region and resource group of the resource that you want to manage.
Click the Instance Troubleshooting tab and then click View History.
On the Instance Health Diagnostics tab, find the diagnostic report you want to view and click View Report in the Actions column.
Click Detach Repair Disk.
The Are you sure that you want to detach the repair disk? message appears. Read the notes and click Detach Immediately.
ImportantBefore you detach the repair disk, stop the instance as prompted.
Start and connect to the instance. Make sure that the instance can be connected.
After the repair disk is detached, the instance enters the Stopped state. Start the instance before you connect to it.

Method 2: Restore the instance on the Instance page
Go to ECS console - Instance.
In the top navigation bar, select the region and resource group of the resource that you want to manage.
Find the instance you want to manage and click Stop in the Actions column.
For more information, see Stop an instance.
Move the pointer over the Fixing state and click Detach Repair Disk.
You can also click the instance ID. On the Instance Details tab, click Detach Repair Disk.

The Are you sure that you want to detach the repair disk? message appears. Read the notes and click Detach Immediately.
Start and connect to the instance. Make sure that the instance can be connected.
After the repair disk is detached, the instance enters the Stopped state. Start the instance before you connect to it.