FAQ: Instance upgrades and downgrades
Instance information
Start, stop, release, and change properties
ICP filing and compliance
Database installation on instances
Spot instance management
Changing spot instances
Releasing spot instances
If I set my maximum bid for a spot instance to the pay-as-you-go price, can it still be released?
I have set a release time for my spot instance. Can I cancel or change it?
I have no overdue payments. Why was my spot instance released?
How is the release rate on the purchase page calculated? Why is it usually between 0% and 3%?
Will I receive a notification when my spot instance is about to be released? If so, how?
Is data automatically retained after a spot instance is released?
I enabled economical mode when I stopped a spot instance. What should I do if it fails to restart?
How can I best retain the public IP address of a spot instance?
Spot instances with no protection period
Are spot instances with no protection period more cost-effective?
Are spot instances with no protection period released with a higher priority?
Do spot instances with no protection period still get a 5-minute release notification?
Do spot instances with no protection period have less available capacity?
Troubleshoot instance downtime
Instance startup failures
Instance runtime environment configuration
Cloud Assistant FAQ
Are there permission restrictions when running commands on an ECS instance?
Can I run a Cloud Assistant command on multiple instances simultaneously?
The run log shows "Failed to open gshell: Device or resource busy". What should I do?
Why do scripts that work locally fail in Cloud Assistant with a "command not found" error?
Why do Chinese characters in a Cloud Assistant script appear garbled in the output?
How do I uninstall the CloudMonitor plugin from an ECS instance?
Instance workload
Upload and download files
Instance security issues
File backup
Other questions
How do I resolve WeChat Official Accounts Platform token verification failures on an ECS instance?
How do I fix garbled Chinese characters on a Linux instance?
Can I transfer remaining service time from one ECS instance to another?
Why can't I add a sound card or a graphics card to my ECS instance?
How do I change the owner and group of a file or directory on a Linux instance?
Appendix
Upgrading a subscription instance
Yes. For more information, see Change the instance type of a subscription instance.
Upgrading a pay-as-you-go instance
Yes, but you must stop the instance first. For more information, see Change the instance type of a pay-as-you-go instance or call the ModifyInstanceSpec API operation to upgrade the configurations of a pay-as-you-go instance.
Upgrade duration
Upgrading the instance type of a subscription instance takes about 15 minutes and does not require you to stop the instance.
Upgrading the instance type of a pay-as-you-go instance requires you to stop the instance and takes about 15 minutes.
Upgrading the bandwidth of an instance does not require you to stop the instance and takes about 5 minutes.
Upgrade fees
When you upgrade the instance type and configuration of an ECS instance, the fees are displayed on the page. You can also go to the Billing Management console to view the fee details.
Service impact from upgrades
Upgrading a pay-as-you-go instance requires you to stop it, while upgrading a subscription instance requires a restart for the new configuration to take effect. The upgrade operation causes a brief service interruption. We recommend that you perform upgrades during off-peak hours. After the upgrade, the instance seamlessly integrates with your services. You do not need to reconfigure the ECS environment.
Upgrading ECS resources
For information about how to upgrade ECS resources, see Overview of instance upgrades and downgrades.
Except for instances with local storage, ECS supports online upgrades of vCPUs, memory, and bandwidth. After an upgrade takes effect, you can downgrade the instance.
You can attach a maximum of 16 data disks to an ECS instance. You can resize a single cloud disk to a larger size, but you cannot decrease its size after the change takes effect.
The bandwidth of an ECS instance is measured in Mbit/s (megabits per second), and the available bandwidth ranges from 0 Mbit/s to 200 Mbit/s. You can change the bandwidth or the bandwidth billing method.
When upgrades do not take effect
For the new configuration to take effect, you must restart the instance through the console or by using an API operation.
Canceling upgrade orders
No. After an upgrade order takes effect, the configuration is upgraded, and the order cannot be canceled. To restore the original configuration, you must downgrade the instance. You will then be billed based on the new, downgraded configuration.
Viewing all subscription instances
Go to the renewal management page to view all subscription instances across all regions.
Log on to the ECS console.
In the top menu bar, choose .
Exporting resource usage
You can download an intelligent water level analysis report from Enterprise Cloud Monitor to export resource information from the last month. If you are using Enterprise Cloud Monitor for the first time, you must activate it separately. Enterprise Cloud Monitor uses a pay-as-you-go billing method. Activating the service is free of charge, and you are subsequently charged based on your actual usage. For more information about billing, see Intelligent water level analysis.
Instance stuck in Starting state
Symptom: After you start an ECS instance, it remains in the Starting state for an extended period before automatically shutting down. When you log on to the system and check the system services, you find that Aliyun Assist Service is deleted or disabled.
Solution:
If Aliyun Assist Service is disabled:
Change the startup type of Aliyun Assist Service to Automatic.
Restart the ECS instance.
If Aliyun Assist Service is deleted:
Run the following command to re-add the service.
sc.exe create AliyunService type= "own" start= "auto" binPath= "C:\ProgramData\aliyun\assist\{Version}\aliyun_assist_service.exe -d" tag= "no" DisplayName= "AliyunService"NoteEnsure a space follows each
=sign.Open the registry editor, navigate to HKEY_LOCAL_MACHINE\SYSTEM\CurrentControlSet\services\AliyunService, and change
C:\ProgramData\aliyun\assist\{Version}\aliyun_assist_service.exe -dto"C:\ProgramData\aliyun\assist\{Version}\aliyun_assist_service.exe" -d.Restart the ECS instance.
Instance fails to load kernel
Symptom: During system startup, selecting any option from the GRUB menu results in no response. After you attach a LiveCD image to the ECS instance and log on to the system, the file system permissions and message log appear normal.
Cause: The system is infected with ransomware.
Solution: Back up important data and then re-initialize the system disk.
Force-stopping an instance
If an instance cannot be stopped through the normal shutdown process, you can force stop it. Force-stopping an instance is equivalent to a power-off and may cause the loss of data that has not been written to the disks of the instance.
Restart failures
A restart may fail for the following reasons:
Your account has an overdue payment. Please settle the bill and try again.
The system is busy. Try again later.
The resources are out of stock.
NoteYou can go to the ECS Instance Types Available for Each Region page to view the instance types available in each region.
Auto Scaling release protection
After Auto Scaling automatically creates an ECS instance, enabling release protection for that instance on the Instances page of the ECS console or by calling the ModifyInstanceAttribute operation does not prevent Auto Scaling from automatically releasing the instance.
To prevent an ECS instance in a scaling group from being automatically released, you must put the instance into the Protected state in the Auto Scaling console. For more information, see Put an instance into the Protected state.
Instance startup or restart failures
If an ECS instance fails to start or restart, you can use the instance diagnosis feature in the ECS console to troubleshoot the issue:
Log on to the ECS console.
In the navigation pane on the left, choose Operations & Maintenance > Diagnose.
Select the region where the instance is located, enter the instance ID, and select Instance Start/Stop Failure.
View the diagnostic report and follow the suggested solutions.
Common causes of startup failures include insufficient resources, overdue payments, or system disk anomalies. If the diagnostic feature does not resolve the issue, see ECS system events for more information.
Obtaining an ICP filing
The purchased ECS instance must meet ICP filing requirements. For more information, see Prepare and check the instance and access information for ICP filing.
Default database
No, an ECS instance does not provide a database by default. You can:
Deploy a database yourself.
Separately purchase the ApsaraDB for RDS service.
Use an Alibaba Cloud Marketplace image to configure a database environment.
Installing a database
Yes. You can install database software and configure the environment based on your requirements. ECS does not impose restrictions on this. You can also separately purchase the ApsaraDB for RDS service.
Oracle Database support
Yes. We recommend that you stress-test the ECS performance before you install Oracle Database to confirm that the instance meets your database's read and write requirements.
Changing the instance region
No, you cannot change the region of an ECS instance after it is purchased. However, you can use the public template ACS-ECS-CloneInstancesAcrossRegion provided by CloudOps Orchestration Service to copy an ECS instance to another region. The copied instance has identical disk data, but its IP address may change.
Using instances for load balancing
Both Linux and Windows ECS instances can be used for load balancing. However, you must ensure that the web server configurations and the website code are consistent across all instances. While a single ECS instance can be used for load balancing, we recommend using two or more for optimal performance.
Data migration between instances
Migration methods vary based on the regions and accounts of the source and destination ECS instances:
The source and destination instances are in the same region and belong to the same account
Migrate instance data by using an image
Create a custom image from the source ECS instance.
Use the image to create a new ECS instance or change the operating system of the destination ECS instance. For more information, see Create an instance by using a custom image or a shared image and Change the operating system (system disk).
Migrate instance data by using a snapshot
Create a snapshot of the cloud disk of the source instance. For more information, see Create a snapshot for a disk.
Create a new cloud disk from the snapshot. For more information, see Create a disk from a snapshot.
Attach the new cloud disk to the destination instance. For more information, see Attach a data disk.
The source and destination instances are in different regions
Create a custom image from the source ECS instance.
Copy the custom image to the region of the destination instance. For more information, see Copy a custom image.
Use the image to create a new ECS instance or change the operating system of the destination ECS instance. For more information, see Create an instance by using a custom image or a shared image and Change the operating system (system disk).
The source and destination instances are in the same region and belong to different accounts
Create a custom image from the source ECS instance.
Share the image with the account that owns the destination instance. For more information, see Share a custom image.
Use the image to create a new ECS instance or change the operating system of the destination ECS instance. For more information, see Create an instance by using a custom image or a shared image and Change the operating system (system disk).
The source and destination instances are in different regions and belong to different accounts
Create a custom image from the source ECS instance.
Copy the image to the destination region. For more information, see Copy a custom image.
Share the image with the account that owns the destination instance. For more information, see Share a custom image.
Use the image to create a new ECS instance or change the operating system of the destination ECS instance. For more information, see Create an instance by using a custom image or a shared image and Change the operating system (system disk).
For more information, see Copy an ECS instance across regions by using a custom image.
You can also use SMC to migrate ECS instances. SMC supports various features, such as full migration, incremental migration, batch migration, and migration within a VPC. For more information, see Migrate ECS instances between accounts or within the same account.
Transferring remaining service time
No. For a flexible and cost-effective alternative, we recommend that you purchase pay-as-you-go instances and use them with reserved instance coupons. For more information, see Overview of reserved instances.
Adding a sound or graphics card
Alibaba Cloud ECS provides standard servers, not multimedia servers, and does not include sound or graphics card components by default. Therefore, you cannot add them in the operating system.
Changing file ownership on Linux
Incorrect file or directory permissions on a web server can cause a 403 error when you access a website. Before you adjust permissions, confirm the running identity of the related process.
You can run the ps and grep commands to query the running identity of the process that is related to a file or directory.
You can run the ls -l command to query the owner and group of a file or directory.
You can run the chown command to modify ownership. For example, the chown -R www.www /alidata/www/phpwind/ command changes the owner and group of all files and directories in the /alidata/www/phpwind/ directory to the www account.
Converting to a subscription instance
No.
Changing the instance type
No.
Upgrading an underpowered spot instance
Because you cannot change the instance type of a spot instance, we recommend that you create a custom image from the system disk of the spot instance. You can then use the custom image to create a spot instance with a larger instance type. For more information, see Create a custom image from a snapshot and Create an instance by using a custom image or a shared image.
Release with automatic bidding
Automatic bidding caps the price at the pay-as-you-go rate, which prevents release if the market price exceeds your bid. However, the instance can still be released if the inventory for the specified instance type is insufficient.
Release with maximum bid price
Setting the maximum price to the pay-as-you-go rate prevents the instance from being released due to market price fluctuations. However, the instance can still be released if the inventory for the specified instance type is insufficient.
Cancel or change a scheduled release
Yes. You can cancel or change the release time at any point before the spot instance is released.
Unexplained instance release
After the protection period of a spot instance ends, the instance is reclaimed if the market price exceeds your bid or if the supply of ECS resources changes.
Release rate calculation
The release rate is calculated based on the availability zone and instance type. The daily release rate is calculated by using the following formula: Daily release rate = Total number of released instances in a day / Total number of active instances in a day. A release rate between 0% and 3% is expected. Alibaba Cloud continuously works to lower the release rate so that you can use spot instances more reliably.
Release notifications
Yes. When a spot instance is scheduled for release due to market price changes or supply and demand adjustments, it first enters a pending-release state and is then automatically released approximately 5 minutes later.
To receive notifications, subscribe to spot instance interruption notifications in CloudMonitor. For more information, see Configure event-triggered alert rules.
To confirm whether an instance is in a pending-release state, you can query its instance metadata or the OperationLocks information returned by the DescribeInstances operation. For more information, see Instance metadata and DescribeInstances.
Data retention after release
No. If you temporarily do not need a spot instance, we recommend that you create a snapshot to back up your data and environment, and then release the instance. You can then purchase a new spot instance when needed. For more information, see Create a snapshot for a disk.
Startup failure in economical mode
After you enable economical mode, the instance may fail to start if the resource inventory is insufficient. To save the business data in the instance, follow these steps:
Create a snapshot of the cloud disk for the instance (Instance A). For more information, see Create a snapshot for a disk.
The snapshot is complete once the creation progress reaches 100%.
Create a custom image from the snapshot. For more information, see Create a custom image from a snapshot.
The custom image is ready for use when its status changes to Available.
Use the custom image to create another instance (Instance B).
For more information, see Create an instance by using a custom image or a shared image.
Check whether the business data in Instance B is intact.
If the business data is intact, you can release Instance A. For more information, see Release an instance.
If the business data is corrupted, detach the cloud disk from Instance A, ensuring you deselect Release with instance when detaching. Then, attach it to Instance B and release Instance A. For more information, see Detach a data disk and Release an instance.
Release reversal
No, the spot instance will not be retained. After an instance receives a pending-release notification, it is marked for release. This state is irreversible, and the instance will be released on schedule.
Retaining a public IP address
When a spot instance is released, its public IP address is also reclaimed. If you need to use a specific public IP address, we recommend that you use an EIP.
You can convert an existing public IP address to an EIP. For more information, see Convert a public IP address of a VPC-type ECS instance to an EIP.
Cost-effectiveness
A spot instance with no protection period is always more cost-effective. It is approximately 10% cheaper than a spot instance with a protection period.
Release rate
You can view the release rate for a specific instance type on the buy page. This rate applies to spot instances both with and without a protection period. The release rate is determined primarily by the supply and demand for the instance type and the bidding policy.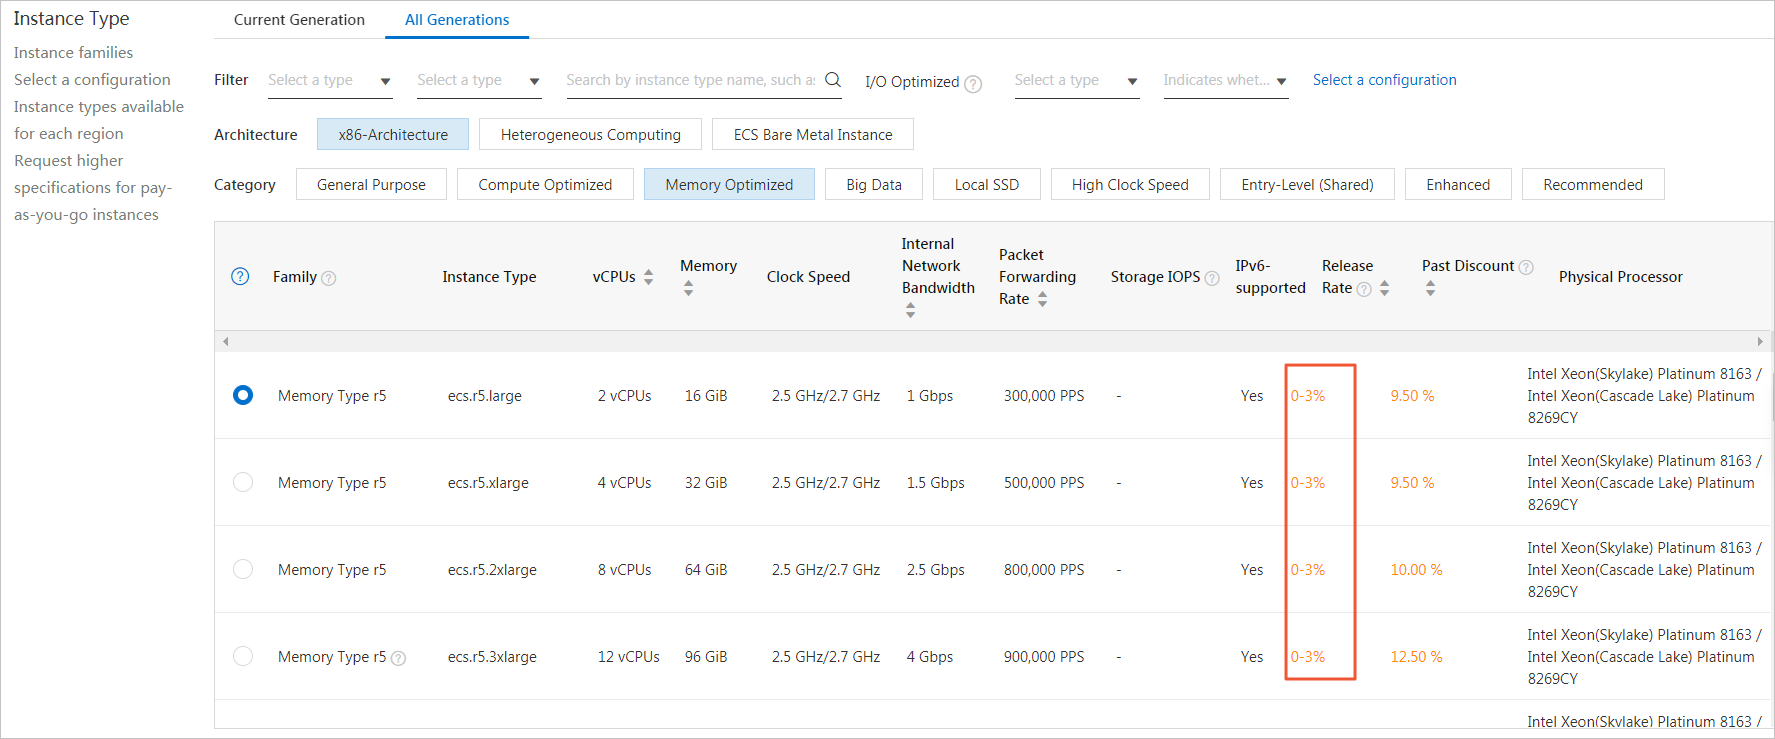
Release priority
No.
Default protection period
No. To ensure a consistent experience, a spot instance with no protection period is created only when you explicitly select that option. Otherwise, new spot instances default to a 1-hour protection period.
You can set the protection period only when you create a spot instance.
Release notification
Yes. You receive the same notification as you would for a spot instance with a protection period, which provides you with time to handle the interruption.
Resource availability
There is no significant difference in the resource availability for the two types of spot instances.
Switching the protection period
No. By default, a spot instance has a 1-hour protection period. You can specify whether to have a protection period only when you create a spot instance. You cannot change this setting after the instance is created.
MySQL remote connection error (1045)
Symptom
After you install MySQL on an ECS instance, you can log on locally. However, when you try to connect to the MySQL database remotely by using the same username and password, the connection fails and the error message "1045 - Access denied for user 'root'@'****'(using password:YES)" is displayed. You have confirmed that you entered the correct username and password.
Cause
By default, after you install MySQL on an ECS instance, MySQL allows only local logons. The database does not permit remote connections from other IP addresses.
Solution
Grant remote logon permission to other IP addresses.
Connect to the ECS instance.
For more information, see Connection methods.
Log on to the database and run the following SQL commands to grant remote logon permission to the MySQL database.
Replace
<user_name>and<password>with the username and password that caused the remote logon failure.CREATE USER '<user_name>'@'%' IDENTIFIED BY '<password>'; GRANT ALL PRIVILEGES ON *.* TO '<user_name>'@'%' WITH GRANT OPTION; FLUSH PRIVILEGES;NoteAfter running this command sequence, the user can log on to the database from any IP address and operate on any object in any database.Note: This command sequence is for MySQL 8.0 and later. MySQL 5.7 and earlier may support the original single GRANT command. For security reasons, do not allow access from any IP address (specified by %) in a production environment. We recommend that you: 1) restrict access to specific IP addresses, such as 'root'@'192.168.1.100'; 2) create a dedicated account for remote access; 3) set a strong password; and 4) avoid granting ALL PRIVILEGES.
The following table describes the parameters in the SQL commands.
Parameter
Description
*.*
The first asterisk (*) is a placeholder for databases. If you enter
*, it represents all databases. The second asterisk (*) is a placeholder for tables. If you enter*, it represents all tables in the specified databases.'root'@'%'
rootis the database account for which you want to grant logon permissions, and the percent sign (%) is a placeholder for an IP address. To allow logons only from the IP address1.1.1.1, replace%with1.1.1.1. If you specify%, logons from any IP address are allowed.Run the following SQL statement to refresh the permissions:
flush privileges;Try to remotely connect to the MySQL database again. If the error no longer appears, the issue is resolved.
MySQL remote connection error (2003)
Symptom
A remote connection to MySQL on a Linux ECS instance fails, and the error message "ERROR 2003 (HY000): Can't connect to MySQL server on '39.106.**.**' (110)" is displayed.
Cause
The remote connection to MySQL may fail because the IP address 39.106.**.** lacks permission to access MySQL, meaning port 3306 is not listening for connections from this IP address.
Solution
Log on to the Linux instance on which MySQL is installed.
For more information, see Connect to a Linux instance by using a password or key.
Run the following command to back up the
my.cnffile:cp /etc/my.cnf /etc/my.cnf.bakModify the
my.cnfconfiguration file.Run the following command to open the
my.cnffile:vim /etc/my.cnfPress the
ikey to enter edit mode, and add the following content to themy.cnffile.bind-address = 0.0.0.0Add the content as shown in the following figure.

After you add the content, press the
Esckey to exit Edit mode, enter:wq, and then press theEnterkey to save the file and exit.
Run the following command to restart the MySQL service and verify that port 3306 is listening as expected:
service mysqld restart
Daily O&M for websites
We recommend that you follow these operations and maintenance (O&M) best practices to maintain your website application:
Back up cloud disk data daily. For more information, see Create a snapshot for a disk or Create an automatic snapshot policy.
We recommend that you use an SSL certificate for website identity verification and encrypted data transmission. For more information, see What is Certificate Management Service?
Install a malware scanning plug-in, enable an anti-DDoS service, or activate Security Center. ECS provides free security services. For more information, see Basic security services or Anti-DDoS Origin Basic.
Monitor inbound and outbound traffic to your website to identify abnormal traffic patterns. Add security group rules to deny access and temporarily manage abnormal requests from a single source. For more information, see View monitoring information of an instance and Add a security group rule.
Monitor the performance of your ECS instance and cloud disks, and identify peak traffic periods. Familiarize yourself with instance upgrade/downgrade, Auto Scaling, and disk resizing operations to handle traffic surges. For more information, see Overview of instance upgrades and downgrades, What is Auto Scaling?, or Resize a disk.
If you log on to your ECS instance by using the root or administrator user, change the password regularly. For more information, see Reset the password of an instance.
Regularly update software patches. Alibaba Cloud periodically updates security patches for its public images. We recommend that you regularly create custom images from the latest public images. For more information, see Update a custom image.
Upload files to a Linux instance
You can use an FTP service to upload files to a Linux instance.
Upload files from macOS by using FTP
Method 1: Use the built-in macOS terminal
You can upload files using the macOS terminal or iTerm2 (Download iTerm2). Make sure to specify the correct upload path.
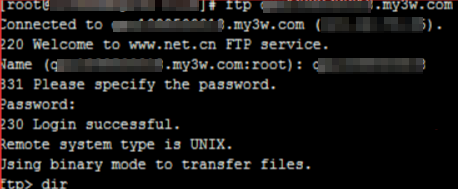
Connect to the FTP service.
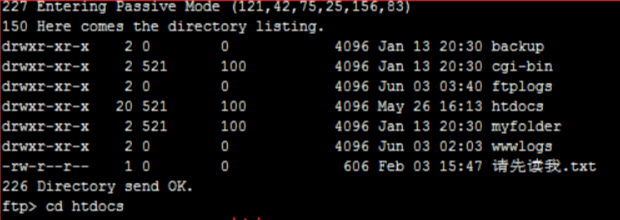
Navigate to the correct directory. This step is not required for Windows instances. For Linux instances, switch to the htdocs directory.
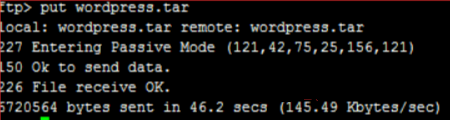
Run the put command to upload the file.
Method 2: Use a third-party tool
Download Yummy FTP.
Install Yummy FTP on macOS.
Enter the IP address, username, and password of the FTP server. For Protocol, select Standard (FTP). For Port, use the default port 21 or a custom port. Do not select an SSH key.
Click Connect.
In the right-side pane, select the destination directory. This step is not required for Windows instances. For Linux instances, select the htdocs directory. In the left-side pane, select the file to upload and click Upload.
If the message "Your security preferences allow installation of only apps from the Mac App Store and identified developers" appears when you install Yummy FTP, perform the following steps:
Go to .
Click the lock icon in the lower-left corner and enter the administrator password to unlock the settings.
In the Allow apps downloaded from section, select Anywhere.
After you configure the settings, you can install the software.
553 Could not create file error
Cause
The Linux instance has run out of disk space.
The FTP
homedirectory does not have thewritepermission.
Solution
Follow these steps to check the disk space of your Linux instance and the permissions of the FTP
homedirectory.Log on to the Linux instance.
For more information, see Log on to a Linux instance by using a password or key.
Run the following command to check the disk space of the Linux instance.
df -hNoteA disk space usage of 100% for any partition indicates that the disk is full.
The command output is similar to the following. For example, the disk space usage of the
/dev/xvda1partition is 59%.
Run the following command to check whether the FTP
homedirectory has thewritepermission.NoteBefore you run the following command, replace
/home/userwith the actual FTPhomedirectory.ls -l /home/userIf the letter
wis not present in the permission string, as shown in the following figure, you do not havewritepermission.
Run the following command to grant the
writepermission.chmod +w /home/userRun the following command to verify that the permission is granted. If the letter
wappears in the command output, thewritepermission has been granted.ls -l /home/user
550 Permission denied error
Symptom
When uploading a file to FileZilla Server on a Windows instance using FTP, you receive a "550 Permission denied" error.
Cause
The FTP account does not have the
writepermission in FileZilla Server.Solution
Log on to the Windows instance.
For more information, see Log on to a Windows instance by using a password or key.
Start the FileZilla Server software. On the Users page, click Shared folders.
Select the user and directory, check the Write checkbox, and then click OK to grant the permission.

Linux agent installation failure
Cloud Assistant run logs
Default installation paths
Checking Cloud Assistant service status
After connecting to the ECS instance remotely, use one of the following methods:
Check the status of the Cloud Assistant service to verify that it is running:
On a Linux system:
Method 1
sudo systemctl status aliyunMethod 2
ps aux | grep aliyunOn a Windows Server system:
Go to Computer Management > Services and Applications > Services and find Aliyun Service.
Check the log file in the corresponding directory. Example:
tail -n 100 /usr/local/share/aliyun-assist/$(/usr/sbin/aliyun-service -v)/log/aliyun_assist_main.logCheck the heartbeat or update log file in the corresponding directory. Example:
tail -n 100 /usr/local/share/aliyun-assist/$(/usr/sbin/aliyun-service -v)/log/aliyun_assist_update.log
Shell script failure on Ubuntu
The default shell on later versions of Ubuntu is dash, not bash. The syntax of dash is not fully compatible with bash. To resolve this issue, switch the default shell environment.
Run the following command to check whether the shell environment is dash.
ls /bin/shRun the following command to switch the default shell environment.
dpkg-reconfigure dash
Follow the on-screen instructions and choose not to set dash as the default shell.
"Service not installed" error
This issue occurs because Cloud Assistant did not receive the expected heartbeat information. To resolve this issue, use the following method.
If the Cloud Assistant service process is stopped, restart the service. For a Windows Server system, see How do I check the Cloud Assistant service status?. For a Linux system, perform the following steps:
Run the following command to restart the Cloud Assistant service.
sudo systemctl restart aliyunRun the following command to check whether the Cloud Assistant service is enabled to start on boot.
sudo systemctl status aliyunIf the status is
disabled, run the following command to enable the service to start on boot.sudo systemctl enable aliyun
Resolving "Device or resource busy" error
Symptom: The log contains the following information.
2019-11-06 03:10:15,993 INFO  [default] /dev/virtio-ports/org.qemu.guest_agent.0:-1
2019-11-06 03:10:15,993 ERROR [default] Failed to open gshell: Device or resource busy
Troubleshooting:
Method 1
Run the following command to check whether multiple Cloud Assistant Agent processes are running. If so, stop all of them, and then restart the Cloud Assistant Agent.
ps aux | grep aliyunMethod 2
Run the following command to check which processes are using the
org.qemu.guest_agent.0file. Cloud Assistant processes are named in thealiyun-**format. Stop all non-Cloud Assistant processes.lsof /dev/virtio-ports/org.qemu.guest_agent.0
Resolving "command not found" error
First, check the environment variables of the Cloud Assistant session to ensure that they include the path to the command in your script.
Linux instance
Run the following command to view the environment variables:
exportRun the following command to set the environment variables. Use the actual environment variables on your instance.
export PATH=$PATH:/usr/local/sbin:/usr/local/bin:/usr/sbin:/usr/bin:/root/bin
Windows instance
Run the following command to view the environment variables.
setRun the following command to set the environment variables. Use the actual environment variables on your instance.
set PATH=%PATH%;C:\Windows\system32;C:\Windows;C:\Windows\System32\Wbem;C:\Windows\System32\WindowsPowerShell\v1.0\;C:\Windows\System32\OpenSSH\;C:\Users\Administrator\A
Task status: Failed
Check the following items to troubleshoot the issue:
If you use a Windows instance, check whether PowerShell is working correctly.
Check whether the task failed due to a timeout.
Verify that the Cloud Assistant service is running correctly. You can call the DescribeCloudAssistantStatus API operation to check the status.
Check the Cloud Assistant logs. The default log paths are as follows:
Linux instance: /usr/local/share/aliyun-assist/<Cloud Assistant version>/log/
Windows instance: C:\ProgramData\aliyun\assist\<Cloud Assistant version>\log
Task status: Abort
A task status of Abort indicates that the task was not delivered to the instance within one minute. We recommend running the task again.
If the task continues to fail, check the Cloud Assistant logs.
Garbled characters in output
This issue is typically caused by character encoding differences. Linux instances use UTF-8 by default, whereas Windows instances use GBK.
If a Cloud Assistant script contains Chinese characters, the output is not re-encoded. Decode the result by using the script's original encoding.
Uninstalling the Cloud Monitor agent
The Cloud Monitor agent (process name argusagent) collects operating system-level monitoring data from an ECS instance, such as memory, network, and disk.
After you uninstall the Cloud Monitor agent, the Cloud Monitor console no longer collects OS-level monitoring data for the instance. Historical data is not affected. Basic monitoring in the ECS console, such as CPU utilization and network traffic, is agent-independent and remains available after uninstallation.
Linux system
Log on to the instance as the root user and run the following commands in order.
bash /usr/local/cloudmonitor/cloudmonitorCtl.sh stop
bash /usr/local/cloudmonitor/cloudmonitorCtl.sh uninstall
rm -rf /usr/local/cloudmonitor
Windows system
Log on to the instance as an administrator, open Command Prompt by pressing Win+R and entering cmd, and then run the following commands in order.
net stop argusagent
"C:\Program Files\Alibaba\cloudmonitor\bin\argusagent_service.exe" uninstall
cd C:\Program Files\Alibaba
rd /s /q cloudmonitorTo pause data collection without uninstalling the agent, stop the service. On a Linux system, run bash /usr/local/cloudmonitor/cloudmonitorCtl.sh stop. On a Windows system, run net stop argusagent. To resume data collection, run the corresponding start command.
For more information, see Install and uninstall the Cloud Monitor agent.
Troubleshoot WeChat token verification on ECS
Symptom
WeChat Official Accounts Platform token verification fails on an ECS instance.
Cause
Common causes for this issue include:
Improper file editing, for example, with Notepad or an online editor, adds a UTF-8 byte-order mark (BOM) to the file.
Security software such as Safedog or Security Center is installed on the ECS instance, which may block requests from Tencent servers.
On a HiChina virtual host, using a temporary domain name for verification causes the system to block the request.
The PHP file contains a newline or other characters after the closing tag.
You are using a debugging method that does not accurately simulate WeChat API requests.
The application encounters a Gzip encoding exception.
Solution
The following solutions correspond to the potential causes.
Improper file editing, such as using Notepad or an online editor
Use an advanced text editor to remove the BOM.
The ECS instance has Safedog or Security Center installed
Uninstall Safedog, or configure a whitelist in Security Center.
Using a temporary domain name for verification on a virtual host
Use a registered domain name that has a valid Alibaba Cloud ICP filing for verification.
A PHP file contains a newline or other characters after the closing tag
Remove the extra characters.
Using an inaccurate debugging method
To simulate a WeChat API request for debugging and analysis, run the
curl http://xxx/index.php/api/xxcommand.Gzip encoding exception
Temporarily disable the Gzip feature in your application.
Fix garbled characters on Linux ECS
Symptom
When you connect to a Linux ECS instance by using a third-party SSH client, Chinese characters appear as garbled text.
Cause
Possible causes for this issue include:
The Chinese language pack is not installed on the Linux operating system, so the system cannot display Chinese characters. To fix this, see Method 1: Install the Chinese language pack.
The character set is misconfigured in the third-party SSH client. To fix this, see Method 2: Modify character set settings in the SSH client.
Solution
Choose a method based on the cause.
Method 1: Install the Chinese language pack
The following steps use CentOS 7.8 as an example. For other versions of CentOS or other distributions such as Red Hat, Debian, or Ubuntu, refer to their official documentation for the corresponding configurations and commands.
Connect to the Linux instance.
For more information, see Connect to a Linux instance by using a password or key.
Run the following command to check the current system language:
echo $LANGNoteIf the language is English, proceed to Step 3.
If the language is Chinese, the language pack is already installed. Skip to Method 2: Modify character set settings in the SSH client.
Run the following command to check whether the Chinese language pack is installed:
locale -a | grep "zh_CN"The system displays output similar to the following, where
zhindicates Chinese,CNindicates China, andgb18030,gb2312,gbk, andutf8are character sets.zh_CN zh_CN.gb18030 zh_CN.gb2312 zh_CN.gbk zh_CN.utf8If this command returns no output, the Chinese language pack is not installed. Run the following command to install it:
sudo yum groupinstall "fonts"To edit the
/etc/locale.confconfiguration file, run the following command:vim /etc/locale.confPress the
ikey to enter edit mode. ChangeLANG=en_US.UTF-8toLANG=zh_CN.UTF-8to set the system language to Chinese.Press the
Esckey, enter:wq, and press Enter to save and close the file.
To apply the changes, run the following command:
source /etc/locale.confTo restart the server, run the following command:
reboot(Optional) If the system language is still English after the restart, run the following command to edit the
/etc/profile.d/lang.shconfiguration file:vim /etc/profile.d/lang.shPress the
ikey to enter edit mode. Changezh*) LANG=en_US.UTF-8tozh*) LANG=zh_CN.UTF-8. The modified content is shown in the following figure.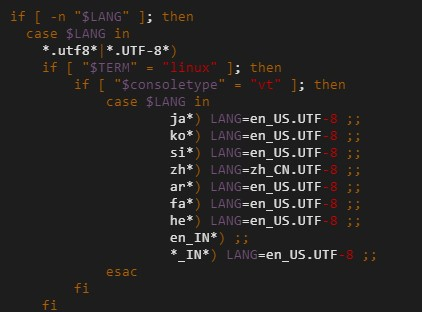
Press the
Esckey, enter:wq, and press Enter to save and close the file.To restart the server, run the following command:
reboot
Method 2: Modify SSH client character set
The following steps use the XShell client as an example.
Open the XShell client.
In the XShell client, set Default Language to Unicode (UTF-8).
Reconnect to the instance. The issue is resolved if the garbled text no longer appears.
AliVulfix process
The AliVulfix process is a vulnerability scanner in Security Center that detects vulnerabilities on ECS instances.
Network attack defense
ECS instances include Security Center, which defends against DDoS attacks. When a network attack occurs, the Alibaba Cloud monitoring system automatically detects and scrubs abnormal traffic. If the attack volume is exceptionally large, Alibaba Cloud applies blackhole routing to protect your ECS instance. For enhanced security, install additional protection software and close unused ports.
Alibaba Cloud security services
Security Center uses the powerful data analytics of the Alibaba Cloud platform to provide a one-stop security solution that includes services such as vulnerability detection, web trojan detection, host intrusion detection for ECS instances, and defense against DDoS attacks.
For more information about security services, see the Security Products page.
For more security services, see the Security Products page.
Detecting mining programs
According to Best practices for handling mining programs, you can use the following methods to detect whether your server is being used for mining.
Check for abnormal CPU usage.
NoteIf the CPU usage on your server is unusually high, such as 80% or higher, and an unknown process is continuously sending outbound network packets, it is likely that a mining program is running on your server.
Log on to the Security Alerts page of the Security Center console and check for any security alerts.
For more information, see Best practices for defending against a mining program and Best practices for handling a mining program.
Handling mining programs and requesting unblocks
Handle a mining program
Investigate mining programs in Security Center and mining worms in Cloud Firewall. For more information, see Best practices for defending against a mining program and Best practices for handling a mining program.
Request an unblock for an ECS instance
A server may be locked for reasons such as a mining program or an attack. To request an unblock, go to the Penalty List page.
Note the following about unblocking requests:
You can request self-service unblocking only once.
After a successful unblocking request, an automatic check runs within 3 days. If this check detects mining behavior again, the server is blocked permanently.
After your server is unblocked, back up your data immediately.