When a container crashes, a core dump captures the program's memory state at the exact moment of failure. Analyzing this file reveals the root cause of the crash. This topic describes how to enable core dumps on an Elastic Container Instance (ECI) and retrieve the generated core files for analysis.
How it works
When a Linux program terminates unexpectedly, the kernel records the program's memory state and writes it to a file — a process called a core dump. The following figure lists the Linux signals that trigger core dumps (signals whose default action is Core).

For the full list of signals and their behavior, see the core(5) Linux man page.
By default, coredump is disabled on ECI instances to prevent service unavailability that can be caused by excessive disk usage. Two methods let you enable it:
| Method | How core files are saved | Best for |
|---|---|---|
| Method 1: One-time diagnostic task | Automatically uploaded to OSS | Temporary debugging sessions |
| Method 2: Persistent path on external storage | Saved to a mounted NFS volume or other external storage | Unstable programs with recurring crashes |
Method 1: Enable a coredump O&M task
This method generates a one-time O&M task. After the task captures a core file, coredump is automatically disabled. The task is valid for 12 hours; if no crash occurs within that window, the task expires.
Method 1 is not available in the following regions: China (Ulanqab), China (Heyuan), China (Guangzhou), China (Nanjing - Local Region) (decommissioning), Philippines (Manila), South Korea (Seoul), and Thailand (Bangkok). For instances in these regions, use Method 2.
Console
Log on to the Elastic Container Instance console.
Click the ID of the target instance to open the instance details page.
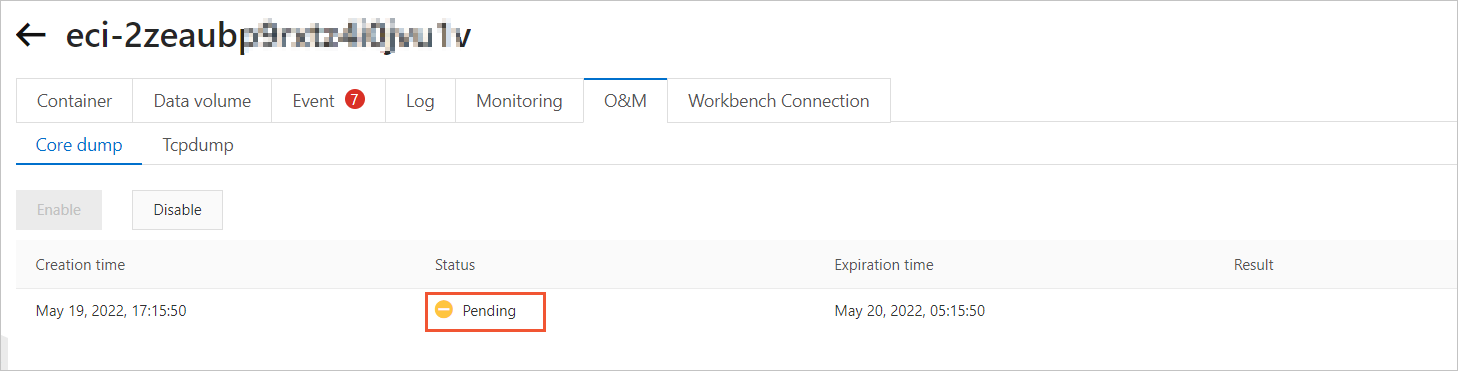
Click the O&M tab, select the Core dump tab, and then click Enable. An O&M task is created. While coredump has not been triggered yet, the task status shows Pending.
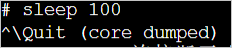
Connect to the ECI instance. In the container, run the following command and press
Ctrl+\to trigger a coredump.sleep 100The generated core file is automatically saved to Object Storage Service (OSS).
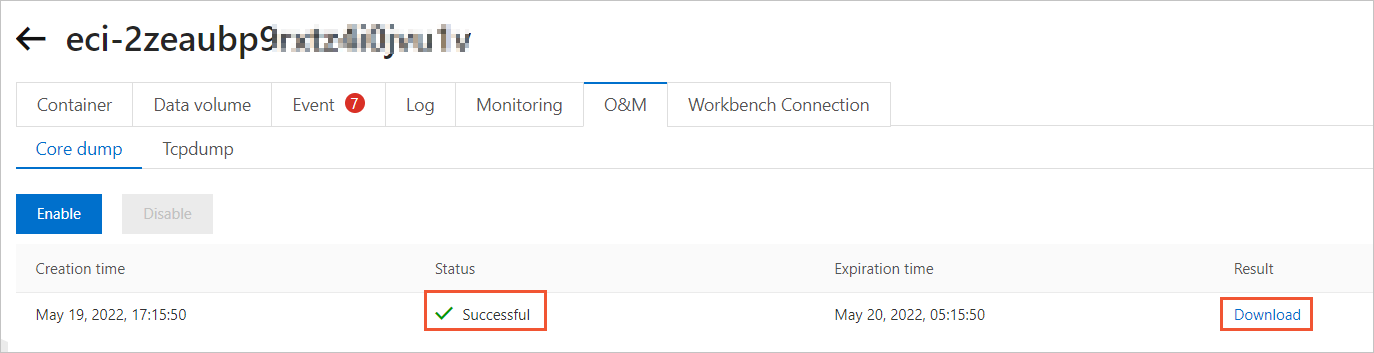
After the coredump is triggered, the O&M task status changes to Successful. Click Download in the Result column to save the core file to your local computer.
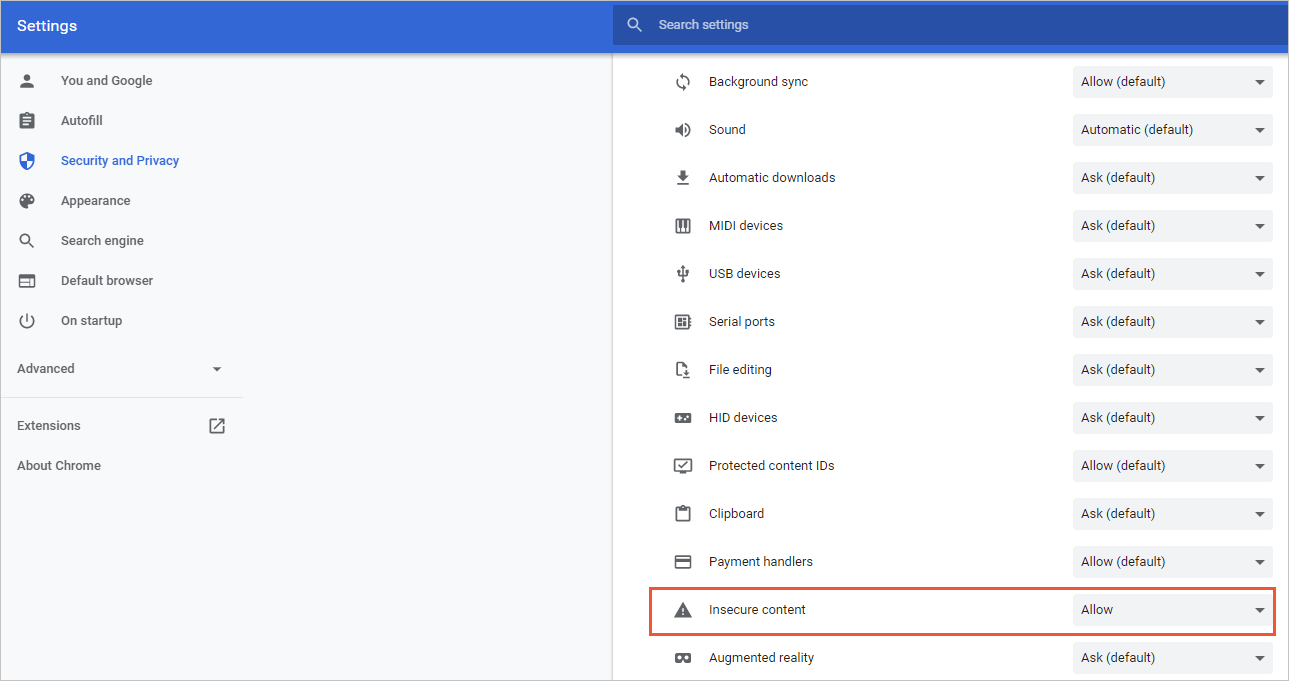
If the download does not start, check the website permission settings in your browser. See FAQ for instructions on granting permissions in Chrome.
OpenAPI
TheCorePatternparameter must not have been set when the instance was created. IfCorePatternwas set, use Method 2 instead.
Call CreateInstanceOpsTask to enable coredump on the target instance. Set
OpsTypetocoredumpandOpsValuetoenable.Connect to the ECI instance. In the container, run the following command and press
Ctrl+\to trigger a coredump.sleep 100The generated core file is automatically saved to OSS.
Call DescribeInstanceOpsRecords to view the task result. The
ResultContentfield in the response contains the OSS URL of the core file. Access that URL to download the file.
Method 2: Set a persistent save path
This method saves core files to external storage, so the files persist even after the container exits. Set the CorePattern parameter when creating an ECI instance — coredump is enabled automatically once the path is configured.
Crash loops can generate large numbers of core files in a short time, consuming significant storage space. Monitor your external storage usage when debugging unstable programs.
Prerequisites
Before you begin, ensure that you have:
An NFS volume or other external storage ready to mount to the container
A
CorePatternpath set to a directory within the container's mount point (not a local container path)
This example usesNFSVolume. Adjust theVolumeparameters based on your actual volume type.
Parameters
Pass the following parameters to CreateContainerGroup when creating the instance.
| Parameter | Type | Example | Description |
|---|---|---|---|
CorePattern | String | /data/dump-a/core | The path where core files are saved. Cannot start with a vertical bar (|). Cannot point to an executable program. |
Volume.N.Name | String | volume1 | The name of the volume. |
Volume.N.Type | String | NFSVolume | The volume type. |
Volume.N.NFSVolume.Path | String | /dump | The path on the NFS server. |
Volume.N.NFSVolume.Server | String | 143b24****-gfn3.cn-beijing.nas.aliyuncs.com | The NFS server address. For Alibaba Cloud File Storage NAS, this is the mount target address. |
Container.N.VolumeMount.N.Name | String | volume1 | The volume to mount. Must match Volume.N.Name. |
Container.N.VolumeMount.N.MountPath | String | /data/dump-a/ | The mount directory inside the container. Content in this directory is overwritten by the volume. |
Example: Use a NAS file system to persist core files
This example shows how to capture a core file in Instance A, release Instance A, and then retrieve the core file from Instance B — demonstrating that the file persists on external storage after the original instance is deleted.
Step 1: Create Instance A with the core dump path configured.
Call CreateContainerGroup with the following parameters. This mounts the /dump/ directory of the NAS file system to /data/dump-a/ in the container and sets the core dump save path to /data/dump-a/core.
ContainerGroupName=test-a
SecurityGroupId=sg-bp1daxpbz9lzpvvc****
VSwitchId=vsw-bp1gds63lmlm7ib05****
# Declare a volume
Volume.1.Name=volume1
Volume.1.Type=NFSVolume
Volume.1.NFSVolume.Path=/dump/
Volume.1.NFSVolume.Server=143b24****-gfn3.cn-beijing.nas.aliyuncs.com
# Mount the volume to the container
Container.1.Name=nginx
Container.1.Image=registry-vpc.cn-beijing.aliyuncs.com/eci_open/nginx:1.14.2
Container.1.VolumeMount.1.Name=volume1
Container.1.VolumeMount.1.MountPath=/data/dump-a/
# Set the save path for the core file
CorePattern=/data/dump-a/core
Step 2: Trigger a core dump in Instance A.
Connect to the container and run the following command, then press Ctrl+\ to trigger a core dump. The core file is saved to /data/dump-a/ in the container.
sleep 100
Step 3: Release Instance A.
Step 4: Create Instance B and mount the same NAS file system.
Call CreateContainerGroup with the following parameters. This mounts the same /dump/ directory of the NAS file system to /data/dump-b/ in the new container.
ContainerGroupName=test-nas-b
SecurityGroupId=sg-bp1daxpbz9lzpvvc****
VSwitchId=vsw-bp1gds63lmlm7ib05****
# Declare a volume
Volume.1.Name=volume1
Volume.1.Type=NFSVolume
Volume.1.NFSVolume.Path=/dump/
Volume.1.NFSVolume.Server=143b24****-gfn3.cn-beijing.nas.aliyuncs.com
# Mount the volume to the container
Container.1.Name=nginx
Container.1.Image=registry-vpc.cn-beijing.aliyuncs.com/eci_open/nginx:1.14.2
Container.1.VolumeMount.1.Name=volume1
Container.1.VolumeMount.1.MountPath=/data/dump-b/
Step 5: Retrieve the core file from Instance B.
The core file is available at /data/dump-b/ in the container.

FAQ
The download does not start when I click Download in the console. What should I do?
Check the website permission settings in your browser. In Chrome, grant the permission as follows:
In the address bar, click the
 icon and select Site Settings.
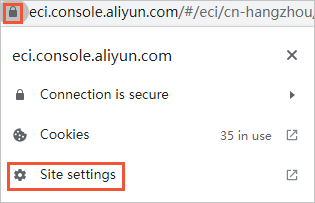
Set Insecure Content to Allow.