The JindoFSx storage acceleration system provides the transparent caching feature and is compatible with the object storage format of Object Storage Service (OSS) and HDFS. Files are stored as objects in OSS or OSS-HDFS buckets. When you use JindoFSx, frequently accessed objects are cached on local disks to improve the data access efficiency of OSS or OSS-HDFS. JindoFSx allows you to access objects in OSS or OSS-HDFS without the need to convert the object formats. JindoFSx is fully compatible with OSS and OSS-HDFS clients. This way, no modification needs to be made to the way in which jobs access data stored in OSS or OSS-HDFS buckets.
Prerequisites
A cluster of EMR V3.42.0 or a later minor version, or a cluster of EMR V5.6.0 or a later minor version is created in the EMR console, and the JindoData service is selected from the optional services when you create the cluster. For more information, see Create a cluster.
Limits
Only clusters of EMR V3.42.0 or a later minor version and clusters of EMR V5.6.0 or a later minor version support this feature.
Procedure
In this topic, a cluster of EMR V3.42.0 is used.
Step 1: Configure an AccessKey pair
Go to the common tab of the JindoData service.
Log on to the EMR console.
In the top navigation bar, select the region where your cluster resides and select a resource group based on your business requirements.
On the EMR on ECS page, find the cluster that you want to manage and click Services in the Actions column.
Click Configure in the JindoData section.
Click the common tab.
Add configuration items.
Click Add Configuration Item.
In the Add Configuration Item dialog box, add the following configuration items.
For more information about how to add configuration items, see the "Add configuration items" section of the Add configuration items topic. You can add either global configuration items that apply to all buckets or bucket-specific configuration items that apply only to the specified bucket.
Global configuration items for all buckets
Parameter
Description
jindofsx.oss.accessKeyId
The AccessKey ID that is used to access OSS or OSS-HDFS.
jindofsx.oss.accessKeySecret
The AccessKey secret that is used to access OSS or OSS-HDFS.
jindofsx.oss.endpoint
The endpoint of OSS or OSS-HDFS. Examples:
OSS: oss-cn-***-internal.aliyuncs.com
OSS-HDFS: cn-***.oss-dls.aliyuncs.com
Bucket-specific configuration items
Parameter
Description
jindofsx.oss.bucket.XXX.accessKeyId
The AccessKey ID that is used to access the
XXXbucket.jindofsx.oss.bucket.XXX.accessKeySecret
The AccessKey secret that is used to access the
XXXbucket.jindofsx.oss.bucket.XXX.endpoint
The endpoint of the
XXXbucket. Examples:OSS: oss-cn-***-internal.aliyuncs.com
OSS-HDFS: cn-***.oss-dls.aliyuncs.com
NoteXXXspecifies the name of an OSS or OSS-HDFS bucket.
Click OK.
Restart the JindoData service.
On the Services tab of JindoData, choose in the upper-right corner.
In the dialog box that appears, specify the execution reason, retain the default values for other parameters, and then click OK.
In the Confirm message, click OK.
Step 2: Configure JindoSDK
This step is to configure the client. You do not need to restart the JindoData service after you complete this step.
Go to the core-site.xml tab of the HADOOP-COMMON service.
Log on to the EMR console.
In the top navigation bar, select the region where your cluster resides and select a resource group based on your business requirements.
On the EMR on ECS page, find the cluster that you want to manage and click Services in the Actions column.
On the Services tab, click Configure in the HADOOP-COMMON section.
Click the core-site.xml tab.
Modify configuration items.
For more information about how to modify a configuration item, see Modify configuration items.
Item
Required
Parameter
Description
Configure the implementation class of OSS
Yes
fs.AbstractFileSystem.oss.impl
Set the value to com.aliyun.jindodata.oss.OSS.
fs.oss.impl
Set the value to com.aliyun.jindodata.oss.JindoOssFileSystem.
Configure the xengine type
Yes
fs.xengine
Set the value to jindofsx.
Configure the endpoint of JindoFSx Namespace Service
Yes
fs.jindofsx.namespace.rpc.address
Set the value in the format of ${headerhost}:8101. Example: master-1-1:8101.
NoteFor more information about how to configure and use the Namespace service in high availability mode, see Configure and use the JindoFSx Namespace service in high availability mode.
Enable data caching for access acceleration
NoteAfter you enable data caching, hot data is cached on local disks. By default, this feature is disabled, and you can directly read data from OSS or OSS-HDFS.
Yes
fs.jindofsx.data.cache.enable
Specifies whether to enable data caching. Valid values:
false: disables data caching. This is the default value.
true: enables data caching.
Configure the AccessKey pair
Yes
fs.oss.accessKeyId
The AccessKey ID that is used to access OSS or OSS-HDFS.
fs.oss.accessKeySecret
The AccessKey secret that is used to access OSS or OSS-HDFS.
fs.oss.endpoint
The endpoint of OSS or OSS-HDFS. Examples:
OSS: oss-cn-***-internal.aliyuncs.com
OSS-HDFS: cn-***.oss-dls.aliyuncs.com
The following table describes optional configuration items.
Item
Parameter
Description
(Optional) Configure the metadata caching feature
fs.jindofsx.meta.cache.enable
Specifies whether to enable metadata caching. Valid values:
false: disables metadata caching. This is the default value.
true: enables metadata caching.
(Optional) Configure the caching feature for small files
fs.jindofsx.slice.cache.enable
Specifies whether to enable caching of small files. Valid values:
false: disables caching of small files. This is the default value.
true: enables caching of small files.
(Optional) Configure the short-circuit read feature
fs.jindofsx.short.circuit.enable
Specifies whether to enable short-circuit read. Valid values:
true: enables short-circuit read. This is the default value.
false: disables short-circuit read.
Save the configurations.
Click Save in the lower-left corner.
In the dialog box that appears, specify the execution reason, turn on Automatically Update Configurations, and then click Save.
Step 3: Control disk space usage
After you enable the caching features, JindoFSx automatically manages cached data. JindoFSx clears cached data based on the disk space usage that you configure for cached data. JindoFSx uses OSS or OSS-HDFS as the backend storage. Although OSS and OSS-HDFS can store a large volume of data, the capacity of local disks is limited. JindoFSx automatically deletes cold data on local disks. You can modify the storage.watermark.high.ratio and storage.watermark.low.ratio configuration items to adjust the space usage for cached data on local disks. Valid values: 0 to 1.
Modify the configuration items of disk space usage for cached data.
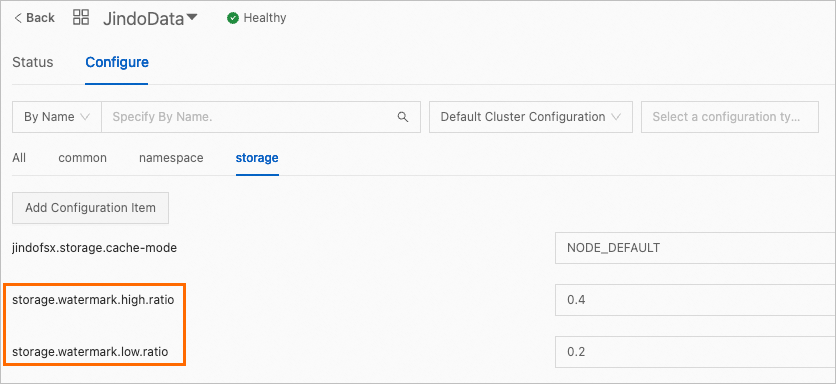
On the Configure tab of the JindoData service, click the storage tab. On the page that appears, modify the following configuration items.
Configuration item
Description
storage.watermark.low.ratio
The lower limit of disk space usage. After automatic data deletion is triggered, JindoFSx deletes cached data until the disk space usage of cached data is reduced to the specified value. Default value: 0.2.
storage.watermark.high.ratio
The upper limit of disk space usage. When the disk space usage of cached data reaches this limit, JindoFSx automatically deletes cached data on local disks. Default value: 0.4. If you want to allocate more disk space for cached data, you can set a larger value for this parameter.
NoteSpecify appropriate low and upper limits based on your business requirements. Make sure that the lower limit is smaller than the upper limit.
Save the configurations.
Click Save in the lower-left corner.
In the dialog box that appears, specify the execution reason and then click Save.
Restart the JindoData service.
On the Services tab of JindoData, choose in the upper-right corner.
In the dialog box that appears, specify the execution reason, retain the default values for other parameters, and then click OK.
In the Confirm message, click OK.