This topic describes how to enable Hadoop Distributed File System (HDFS) in Ranger and how to configure the related permissions.
Background information
The permissions that you configured on HDFS by using Ranger and HDFS access control list (ACL)-based permissions take effect at the same time. The following figure shows the authentication process. 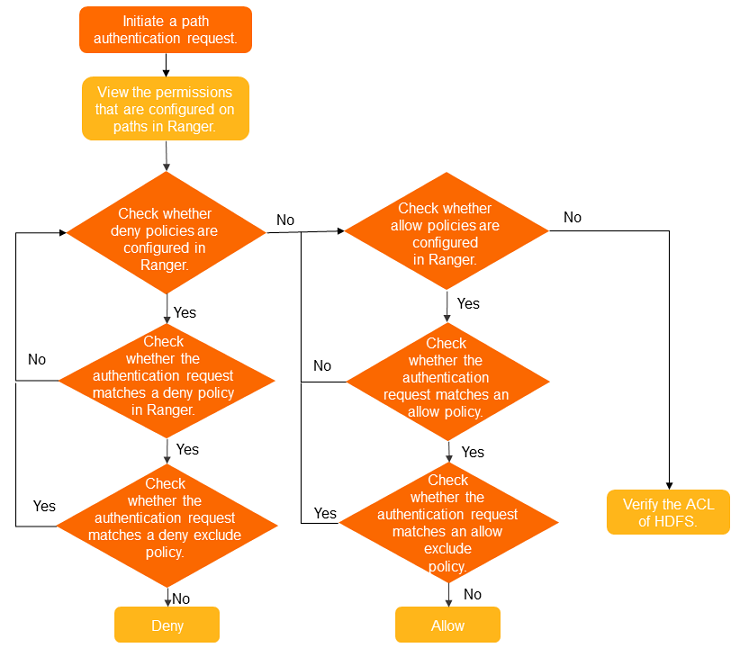
Prerequisites
A cluster of a version that is earlier than EMR V5.11.0 or EMR V3.45.0 is created, and Ranger is selected for the cluster. For more information about how to create a cluster, see Create a cluster.
For clusters of EMR V5.11.0 or a later minor version and clusters of EMR V3.45.0 or a later minor version, RangerUserSync automatically connects to an LDAP server if OpenLDAP is installed in the cluster. You can search for the ranger.usersync.sync.source configuration item on the Configure tab of the Ranger service page to view the user source (UNIX or LDAP) of RangerUserSync.
Procedure
Go to the Services tab.
Log on to the EMR console.
In the top navigation bar, select the region where your cluster resides and select a resource group based on your business requirements.
On the EMR on ECS page, find the desired cluster and click Services in the Actions column.
Enable HDFS in Ranger.
On the Services tab of the page that appears, click Status in the Ranger-plugin section.
In the Service Overview section of the Status tab, turn on enableHDFS.
In the Confirm message, click OK.
Restart HDFS.
On the Services tab, click the
 icon and select HDFS.
 In the Components section of the Status tab, find NameNode and click Restart in the Actions column.
In the dialog box that appears, configure the Execution Reason parameter and click OK.
In the Confirm message, click OK.
Optional:Configure permissions.
By default, the HDFS service is added after you enable HDFS in Ranger.
You can perform the following steps to grant users the permissions on resources in a directory. For example, you can grant the Write and Execute permissions on resources in the /user/foo directory to the test user:
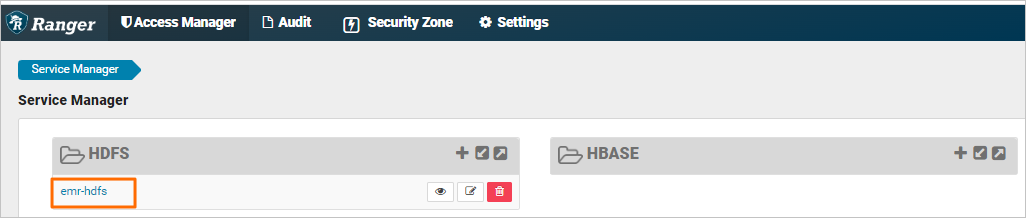
Access the web UI of Ranger. For more information, see Access the web UI of Ranger.
Click emr-hdfs.
Click Add New Policy in the upper-right corner.
Configure the parameters based on your business requirements. The following table describes the parameters.
Parameter
Description
Policy Name
The name of the policy. You can specify a custom name.
Resource Path
The path of the resources. Example: /user/foo.
recursive
Specifies whether the permissions take effect on subdirectories or files.
Select Group
The user group to which you want to attach the policy.
Select User
The user to whom you want to attach the policy. Example: test.
Permissions
The permissions that you want to grant. Example: Write and Execute permissions.
Click Add.
After you attach the policy to the test user, the test user is granted the permissions. The test user is granted the Write and Execute permissions on the HDFS path /user/foo.
NoteAfter you add, remove, or modify a policy, it takes about 1 minute for the configuration to take effect.