Data Transmission Service (DTS) migrates data from a self-managed PostgreSQL database to an AnalyticDB for PostgreSQL instance with minimal downtime. Combine schema migration, full data migration, and incremental data migration to keep your source database online throughout the process.
Prerequisites
Before you begin, make sure you have:
-
A destination AnalyticDB for PostgreSQL instance. See Create an instance
-
Free disk space on the destination instance that exceeds the disk space occupied by the source database
-
Reviewed the supported source and destination database versions. See Overview of data migration scenarios
Migration types
DTS supports three migration types. Use them together for a live migration with no downtime.
| Migration type | What it does |
|---|---|
| Schema migration | Copies the schemas of selected objects to the destination. DTS also migrates foreign keys from the source. |
| Full data migration | Copies all existing data to the destination. |
| Incremental data migration | Continuously replicates changes from the source after full migration completes, so your applications keep running without interruption. |
Schema migration and full data migration are free. Incremental data migration is billed. For schema migration and full data migration, Internet traffic is charged when the destination Access Method is set to Public IP Address. For billing details, see Billing overview.
Limitations
Review these limitations before configuring your migration task.
Source database requirements
-
The source server must have sufficient outbound bandwidth. Low bandwidth reduces migration speed.
-
Tables must have PRIMARY KEY or UNIQUE constraints, and all fields must be unique. Tables without these constraints may produce duplicate records in the destination.
-
The source database name cannot contain hyphens (
-). For example,dts-testdatais not a valid name. -
If you select tables as migration objects and need to rename tables or columns in the destination, a single migration task supports at most 1,000 tables. For larger migrations, split them into multiple tasks or migrate at the database level.
-
Incremental migration requires the
wal_levelparameter set tologicalin the source database. -
Write-ahead log (WAL) retention:
-
Incremental data migration only: retain WAL logs for more than 24 hours.
-
Full data migration + incremental data migration: retain WAL logs for at least 7 days.
-
After full migration completes, you can reduce the retention period to more than 24 hours. Insufficient retention may cause DTS to fail to read WAL logs, leading to task failure or data loss.
-
-
During migration, avoid the following operations on the source database:
-
A primary/secondary switchover — this fails the migration task.
-
DDL operations during full data migration — this fails the migration task.
-
Writing data to the source during full-only migration — this causes data inconsistency. To avoid this risk, include incremental data migration in your task.
-
-
Long-running transactions with open write-ahead logs can accumulate and exhaust disk space on the source when incremental migration is running.
Destination database requirements
-
During full data migration and incremental data migration, DTS temporarily disables constraint checks and cascade operations on foreign keys at the session level. If you perform cascade update or delete operations on the source database during migration, data inconsistency may occur.
-
The destination table cannot be an append-optimized (AO) table.
-
DTS does not migrate the following object types: DATATYPE, SEQUENCE, INDEX, PROCEDURE, FUNCTION, VIEW, OPERATOR, DEFAULT_CONSTRAINT, UK, PK, RULE, DOMAIN, AGGREGATE, EXTENSION, FK, and TRIGGER.
-
If you use column mapping for partial table migration, data in source columns that have no matching destination column is lost.
-
For tables with a primary key: the primary key columns in the destination must match those in the source.
-
For tables without a primary key: the primary key column and the distribution key in the destination must be the same.
-
A unique key in the destination must contain all columns of its distribution key (including primary key columns).
-
DTS does not support migrating TimescaleDB extension tables or tables with cross-schema inheritance relationships.
-
DTS does not support migrating partitioned tables unless you include both the parent table and all child tables as migration objects. The parent table holds no data — all data is in the child tables.
Incremental migration behavior
REPLICA IDENTITY and UPDATE/DELETE replication
PostgreSQL uses REPLICA IDENTITY to control how much column data is written into WAL records for UPDATE and DELETE events. The default setting (DEFAULT) only includes primary key columns in those records. When DTS replicates UPDATE or DELETE operations, it needs the previous values of all columns to identify and apply changes correctly in the destination. Without FULL identity, DTS cannot reliably replicate UPDATE or DELETE events, which can lead to data inconsistency.
If your migration task includes incremental data migration, run the following command on each table to be migrated before writing data to it. This sets REPLICA IDENTITY to FULL, which records all column values for UPDATE and DELETE events:
ALTER TABLE schema.table REPLICA IDENTITY FULL;Replace schema and table with the actual schema name and table name. Run this command during off-peak hours and avoid table locking while it executes.
Run this command in the following situations:
-
When the DTS instance starts for the first time.
-
When the migration object granularity is Schema, and you create a new table or rebuild a table using the RENAME command in the schema being migrated.
If you skip the related precheck item, DTS automatically runs this command during instance initialization.
Temporary tables and replication slots
DTS creates the following temporary tables in the source database. Do not delete them during migration — the task may fail if they are removed. DTS deletes them automatically after the instance is released.
public.dts_pg_class, public.dts_pg_attribute, public.dts_pg_type, public.dts_pg_enum, public.dts_postgres_heartbeat, public.dts_ddl_command, public.dts_args_session, public.aliyun_dts_instance
The dts_postgres_heartbeat table is a heartbeat table that DTS uses to ensure the accuracy of incremental migration latency.
DTS also creates a replication slot with the prefix dts_sync_ and clears its historical data every 90 minutes to reduce storage usage. If the migration task is released or fails, DTS automatically clears the replication slot. If a primary/secondary switchover is performed on an ApsaraDB RDS for PostgreSQL instance, log on to the secondary database and clear the replication slot manually.
Other incremental migration notes
-
To use a data migration task created before May 12, 2023 to migrate DDL operations, you must create a trigger and a function in the source database to capture DDL information before you configure the data migration task. For more information, see Use triggers and functions to implement incremental DDL migration for PostgreSQL databases.
-
Incremental data migration does not support columns of the BIT data type.
-
When DTS writes UPDATE statements to the destination AnalyticDB for PostgreSQL instance, it automatically converts them to REPLACE INTO. If the UPDATE targets primary key columns, DTS converts it to DELETE + INSERT.
-
DTS supports DDL replication only for tasks created after October 1, 2020. For tasks created before May 12, 2023, create a trigger and function in the source database to capture DDL before configuring the task. See Use triggers and functions to implement incremental DDL migration for PostgreSQL databases.
-
The database account used for incremental migration must have superuser permissions to replicate DDL. Supported DDL operations:
-
CREATE TABLE, DROP TABLE
-
ALTER TABLE: RENAME TABLE, ADD COLUMN, ADD COLUMN DEFAULT, ALTER COLUMN TYPE, DROP COLUMN, ADD CONSTRAINT, ADD CONSTRAINT CHECK, ALTER COLUMN DROP DEFAULT
-
TRUNCATE TABLE (requires PostgreSQL V11 or later on the source)
-
CREATE INDEX ON TABLE
-
-
DTS does not replicate: DDL with CASCADE or RESTRICT, DDL from sessions running
SET session_replication_role = replica, DDL executed via function calls, CREATE SEQUENCE, or batches that mix DML and DDL.
Other notes
-
One migration task covers one database. Create a separate task for each additional database.
-
Before you migrate data, evaluate the impact on the performance of the source and destination databases. We recommend that you migrate data during off-peak hours. During full data migration, DTS uses the read and write resources of both databases, which may increase the load on the database servers.
-
Full data migration uses concurrent INSERT operations, which causes fragmentation in destination tables. After migration, the destination tablespace is larger than the source.
-
DTS uses
ROUND(COLUMN, PRECISION)to read FLOAT and DOUBLE columns. Default precision: 38 digits for FLOAT, 308 digits for DOUBLE. Verify this meets your precision requirements before migrating. -
DTS attempts to resume failed tasks for up to 7 days. Before switching workloads to the destination, stop or release any failed tasks, or run REVOKE to remove DTS write permissions from the destination. If a failed task resumes after you switch, it overwrites data in the destination.
-
DTS does not validate sequence metadata. Check sequence validity manually.
-
After you switch to the destination, new sequences do not start from the maximum value in the source. Before switching, query the source sequence values and set them as the initial values in the destination:
do language plpgsql $$
declare
  nsp name;
  rel name;
  val int8;
begin
  for nsp,rel in select nspname,relname from pg_class t2 , pg_namespace t3 where t2.relnamespace=t3.oid and t2.relkind='S'
  loop
    execute format($_$select last_value from %I.%I$_$, nsp, rel) into val;
    raise notice '%',
    format($_$select setval('%I.%I'::regclass, %s);$_$, nsp, rel, val+1);
  end loop;
end;
$$;
The output contains setval statements for all sequences in the source. Run only the statements that apply to your migration objects in the destination.
-
If a DTS instance fails, the helpdesk attempts to recover it within 8 hours. Recovery may include restarting the instance or adjusting DTS instance parameters (not database parameters). For adjustable parameters, see Modify instance parameters.
Required permissions
| Database | Schema migration | Full migration | Incremental migration |
|---|---|---|---|
| Self-managed PostgreSQL | USAGE on pg_catalog |
SELECT on migration objects | Superuser |
| AnalyticDB for PostgreSQL | Schema owner (or the initial account) | ||
To create accounts and grant permissions:
-
Self-managed PostgreSQL: see the PostgreSQL documentation for CREATE USER and GRANT.
-
AnalyticDB for PostgreSQL: see Create and manage a user and User permission management.
Prepare the source database
Complete the steps for your PostgreSQL version before configuring the migration task.
This guide uses a self-managed PostgreSQL database on a Linux server as an example. If your source is an Amazon RDS for PostgreSQL or Amazon Aurora PostgreSQL instance, see the preparation steps in the corresponding migration topics before continuing.
PostgreSQL 10.1 or later
-
Log on to the server running the self-managed PostgreSQL database.
-
Open
postgresql.confand update the following parameters: Example configuration:-
Set
wal_leveltological. -
Set
max_wal_sendersandmax_replication_slotsto values greater than the sum of: the number of replication slots currently in use on the source, plus the number of DTS instances that use this source database.
# - Settings -

wal_level = logical			# minimal, replica, or logical
					# (change requires restart)

......

# - Sending Server(s) -

# Set these on the master and on any standby that will send replication data.

max_wal_senders = 10		# max number of walsender processes
				# (change requires restart)
#wal_keep_segments = 0		# in logfile segments, 16MB each; 0 disables
#wal_sender_timeout = 60s	# in milliseconds; 0 disables

max_replication_slots = 10	# max number of replication slots
				# (change requires restart)
Restart the database to apply the changes.
-
-
Add the DTS server CIDR blocks to
pg_hba.conf. Add only the CIDR blocks for DTS servers in the same region as the destination database. For the list of CIDR blocks, see Add DTS server IP addresses to a whitelist. After editingpg_hba.conf, runSELECT pg_reload_conf();or restart the database to apply the changes. Skip this step if the IP address inpg_hba.confis already set to0.0.0.0/0.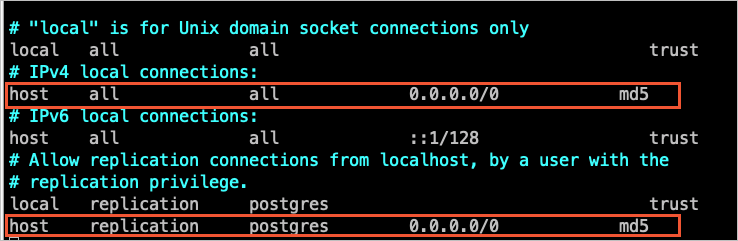
-
Create the matching database and schema in the destination AnalyticDB for PostgreSQL instance.
PostgreSQL 9.4.8 to 10.0
PostgreSQL versions below 10.1 require the ali_decoding plug-in to support logical replication. Follow these steps to compile and install it.
-
Download the PostgreSQL source code that matches your database version from the PostgreSQL official website.
-
Compile and install PostgreSQL by running the following commands in sequence:
Important- The OS version must be compatible with the GNU Compiler Collection (GCC) version. - If
sudo ./configurefails with a readline error, runsudo ./configure --without-readlineinstead. - If you install PostgreSQL using another method, compile theali_decodingplug-in in a test environment with the same OS version and GCC version.sudo ./configure sudo make sudo make install -
Download the ali_decoding plug-in.
-
Copy the
ali_decodingdirectory to thecontribdirectory of the compiled PostgreSQL installation.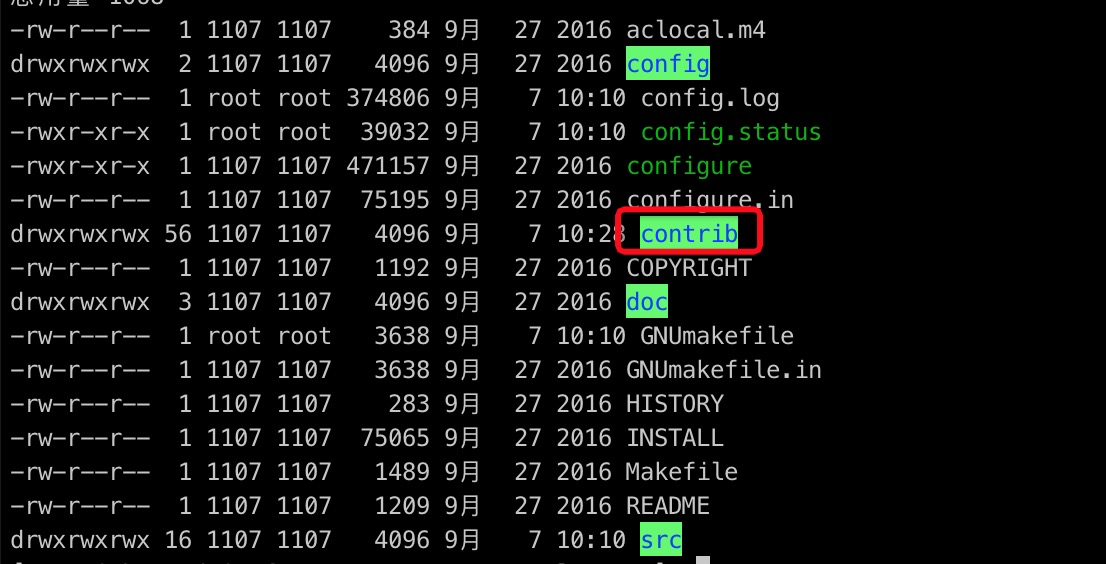
-
Replace the content of the
Makefilein theali_decodingdirectory with the following:# contrib/ali_decoding/Makefile MODULE_big = ali_decoding MODULES = ali_decoding OBJS = ali_decoding.o DATA = ali_decoding--0.0.1.sql ali_decoding--unpackaged--0.0.1.sql EXTENSION = ali_decoding NAME = ali_decoding #subdir = contrib/ali_decoding #top_builddir = ../.. #include $(top_builddir)/src/Makefile.global #include $(top_srcdir)/contrib/contrib-global.mk #PG_CONFIG = /usr/pgsql-9.6/bin/pg_config #pgsql_lib_dir := $(shell $(PG_CONFIG) --libdir) #PGXS := $(shell $(PG_CONFIG) --pgxs) #include $(PGXS) # Run the following commands to install the ali_decoding plug-in: ifdef USE_PGXS PG_CONFIG = pg_config PGXS := $(shell $(PG_CONFIG) --pgxs) include $(PGXS) else subdir = contrib/ali_decoding top_builddir = ../.. include $(top_builddir)/src/Makefile.global include $(top_srcdir)/contrib/contrib-global.mk endif -
From the
ali_decodingdirectory, run the following commands in sequence to compile and install the plug-in:sudo make sudo make install -
Copy the compiled files to the required directories.

-
Create the matching database and schema in the destination AnalyticDB for PostgreSQL instance.
Create a migration task
After selecting the source and destination instances, read the Limits section at the top of the configuration page before proceeding.
Step 1: Go to the Data Migration page
Use either the DTS console or the DMS console.
DTS console
-
Log on to the DTS console.DTS console
-
In the left-side navigation pane, click Data Migration.
-
In the upper-left corner, select the region where the migration instance resides.
DMS console
The exact steps may vary based on the DMS console mode and layout. See Simple mode and Customize the layout and style of the DMS console.
-
Log on to the DMS console.DMS console
-
In the top navigation bar, go to Data + AI > DTS (DTS) > Data Migration.
-
From the drop-down list next to Data Migration Tasks, select the region where the migration instance resides.
Step 2: Configure source and destination databases
Click Create Task, then configure the following parameters.
Source database
| Parameter | Description |
|---|---|
| Task name | DTS generates a name automatically. Specify a descriptive name to help identify the task. The name does not need to be unique. |
| Select existing connection | Select a registered database instance to auto-populate the connection parameters. If no registered instance is available, configure the parameters manually. |
| Database type | Select PostgreSQL. |
| Access method | Select the deployment method for the source database. This guide uses Self-managed Database on ECS as an example. For other access methods, see Preparations. |
| Instance region | Select the region where the source database resides. |
| ECS instance ID | Enter the ID of the ECS instance hosting the source database. |
| Port number | The service port of the source database. Default: 5432. |
| Database name | The name of the database that contains the objects to migrate. |
| Database account | The account for the source database. See Required permissions. |
| Database password | The password for the database account. |
| Encryption | Select Non-encrypted or SSL-encrypted. For SSL encryption, upload the CA certificate. Optionally upload the Client certificate and Private key of client certificate, and enter the Private key password of client certificate. |
Destination database
| Parameter | Description |
|---|---|
| Select existing connection | Select a registered database instance to auto-populate the connection parameters. |
| Database type | Select AnalyticDB for PostgreSQL. |
| Access method | Select Alibaba Cloud Instance. |
| Instance region | Select the region where the destination instance resides. |
| Instance ID | Select the destination AnalyticDB for PostgreSQL instance. |
| Database name | The name of the database in the destination instance. |
| Database account | The account for the destination database. See Required permissions. |
| Database password | The password for the database account. |
Step 3: Test connectivity
Click Test Connectivity and Proceed.
DTS needs access to both databases. Make sure DTS server CIDR blocks are added to the security settings of both the source and destination databases. See Add DTS server IP addresses to a whitelist.
If the source or destination is a self-managed database not accessed as Alibaba Cloud Instance, click Test Connectivity in the CIDR Blocks of DTS Servers dialog box.
Step 4: Configure migration objects
Migration types and objects
| Parameter | Description |
|---|---|
| Migration types | Select Schema Migration and Full Data Migration for a one-time migration. To keep your source online during migration, also select Incremental Data Migration. If you skip Schema Migration, create the target database and tables manually and enable object name mapping in Selected Objects. |
| Processing mode of conflicting tables | Precheck and Report Errors: the precheck fails if any destination table shares a name with a source table. Use object name mapping to resolve conflicts. Ignore Errors and Proceed: skips the name conflict check, but risks data inconsistency — during full migration, conflicting records are kept in the destination; during incremental migration, they are overwritten. |
| DDL and DML operations to be synchronized | Select the SQL operations to replicate during incremental migration. See Incremental migration behavior for supported operations. To configure at the database or table level, right-click the object in Selected Objects and select the operations. |
| Storage engine type | Default: Beam. Available only when the destination AnalyticDB for PostgreSQL minor version is v7.0.6.6 or later and Schema Migration is selected. |
| Capitalization of object names in destination instance | Controls the case of database, table, and column names in the destination. Default: DTS default policy. See Specify the capitalization of object names in the destination instance. |
| Source objects | Select the objects to migrate and click |
| Selected objects | To rename a single object, right-click it. To rename multiple objects at once, click Batch Edit. See Map object names. To filter rows, right-click a table and set a WHERE condition. See Set filter conditions. |
Step 5: Configure advanced settings
Click Next: Advanced Settings and configure the following parameters.
| Parameter | Description |
|---|---|
| Dedicated cluster for task scheduling | By default, DTS schedules tasks to the shared cluster. Purchase a dedicated cluster for better task stability. See What is a DTS dedicated cluster. |
| Retry time for failed connections | How long DTS retries after a connection failure. Valid values: 10–1,440 minutes. Default: 720. Set to at least 30 minutes. If the connection is restored within this period, DTS resumes the task. The retry time specified later takes precedence when multiple tasks share the same database. |
| Retry time for other issues | How long DTS retries after DDL or DML failures. Valid values: 1–1,440 minutes. Default: 10. Set to at least 10 minutes. Must be less than Retry time for failed connections. |
| Enable throttling for full data migration | Limits the read/write rate during full migration to reduce load on the source and destination. Configure Queries per second (QPS) to the source database, RPS of Full Data Migration, and Data migration speed for full migration (MB/s). Available only when Full Data Migration is selected. |
| Enable throttling for incremental data migration | Limits the replication rate during incremental migration. Configure RPS of Incremental Data Migration and Data migration speed for incremental migration (MB/s). Available only when Incremental Data Migration is selected. |
| Environment tag | Optionally tag the instance to identify its environment. |
| Configure ETL | Select Yesalert notification settings to transform data during migration using extract, transform, and load (ETL) statements. See Configure ETL in a data migration or data synchronization task. |
| Monitoring and alerting | Select Yes to receive notifications when the task fails or migration latency exceeds the threshold. Configure alert thresholds and contacts. See Configure monitoring and alerting. |
Step 6: Configure data verification (optional)
Click Next Step: Data Verification. For setup instructions, see Configure a data verification task.
Step 7: Configure primary key and distribution columns
Click Next: Configure Database and Table Fields to set the primary key and distribution columns for migrated tables in the destination AnalyticDB for PostgreSQL instance.
This page appears only when Schema Migration is selected. For more information about primary key columns and distribution columns, see Data Table Management and Table Distribution Definition.
Step 8: Run the precheck
Click Next: Save Task Settings and Precheck.
To preview the API parameters for this configuration, hover over Next: Save Task Settings and Precheck and click Preview OpenAPI parameters.
DTS runs a precheck before starting the migration. You can start the task only after it passes the precheck.
If the precheck fails, click View Details next to each failed item, fix the issue, and click Precheck Again.
If an alert appears for an item:
-
If the alert cannot be ignored, click View Details, fix the issue, and run the precheck again.
-
If the alert can be ignored, click Confirm Alert Details > Ignore > OK, then click Precheck Again.
Ignoring a precheck alert may result in data inconsistency.
Step 9: Purchase and start the instance
-
Wait until Success Rate reaches 100%, then click Next: Purchase Instance.
-
On the Purchase Instance page, configure:
Parameter Description Resource group The resource group for the migration instance. Default: default resource group. Instance class Select an instance class based on the required migration speed. See Instance classes of data migration instances. -
Read and accept Data Transmission Service (Pay-as-you-go) Service Terms.
-
Click Buy and Start, then click OK in the confirmation dialog.
Track progress on the Data Migration page.
Schema migration + full data migration tasks stop automatically when complete. The status shows Completed.
Incremental data migration tasks run continuously. The status shows Running. Stop the task manually when you are ready to switch workloads to the destination.
What's next
After migration completes and before switching your workloads to the destination database:
-
Fix sequence initial values. Query the maximum sequence values in the source and set them as the initial values in the destination. See the sequence query command in the Limitations section.
-
Stop or release failed tasks. DTS retries failed tasks for up to 7 days. Stop or release any failed tasks, or revoke DTS write permissions from the destination to prevent source data from overwriting the destination after you switch.
-
Switch workloads. Stop writes to the source, then point your applications to the destination.