Enable GitOps, connect a Git repository, and deploy your first application to a destination cluster.
After this guide, you will have:
-
Enabled public access to the Argo CD console
-
Connected a Git repository to Argo CD
-
Deployed an application to a destination cluster
Prerequisites
Before you begin, make sure you have:
-
Fleet management is enabled.
-
Multiple clusters are associated with the fleet instance.
-
The AliyunAdcpFullAccess permission is granted to your RAM user.
-
(CLI only) The fleet instance kubeconfig is downloaded from the ACK One console, and kubectl is configured to connect to the fleet.
-
(CLI only) the latest version of Alibaba Cloud CLI installedlatest version of Cloud Assistant CLI installed and configured.
Billing
Enabling GitOps creates these billable resources:
-
An SLB instance to expose the Argo CD API and UI endpoints
-
A pay-as-you-go ECI instance with 2 vCPUs and 4 GB of memory for the Argo CD service
Supported regions
GitOps is supported in all regions that support multi-cluster fleets and workflow clusters.
Step 1: Enable public access to the GitOps console
GitOps is enabled by default with ACK One fleet instances, but the Argo CD console is accessible only within a Virtual Private Cloud (VPC). Enable public access to manage applications over the Internet.
Enabling public access introduces security risks. Always configure an Access Control List (ACL) to restrict access to trusted IP addresses or CIDR blocks.
Using the console
-
Log on to the ACK One console. In the left navigation pane, choose Fleet > Multi-cluster Applications.
-
On the Multi-cluster GitOps page, click the
 icon next to the fleet name and select your fleet.
 -
If GitOps is not enabled, click Enable GitOps, then click OK. If already enabled, the GitOps Console button is visible.
-
Click Enable next to Public Access. In the Enable Public Access dialog box, enter the IP addresses or CIDR blocks for the whitelist, then click OK.
-
After the fleet updates, click GitOps Console to open the Argo CD console.
Using Cloud Assistant CLI
Enable GitOps and public access simultaneously. Replace <your_clusterid> with your fleet instance ID and the AccessControlList value with your trusted CIDR blocks.
See Enable public access to Argo CD for CIDR block details.
aliyun adcp UpdateHubClusterFeature --ClusterId <your_clusterid> --PublicAccessEnabled true --AccessControlList "[\"10.100.XX.XX/24\"]" --ArgoCDEnabled trueIf using a RAM user's AccessKey, grant the AliyunAdcpFullAccess permission to the RAM user first. See Grant permissions to a RAM user.
Step 2: Deploy an application to a destination cluster
Connect a Git repository and deploy an application with the gitops-demo example. Use either the Argo CD UI or CLI.
Deploy using the Argo CD UI
Log on to Argo CD
On the Multi-cluster GitOps page, click GitOps Console. On the sign-in page, click LOG IN VIA ALIYUN to sign in with your Alibaba Cloud account via SSO.
Connect a repository
-
In the left navigation pane, click Settings, then choose Repositories > + Connect Repo.
-
Configure these parameters and click CONNECT. On success, CONNECTION STATUS shows Successful.
Area Parameter Value Choose your connection method — VIA HTTP/HTTPS CONNECT REPO USING HTTP/HTTPS Type git Project default Repository URL https://github.com/AliyunContainerService/gitops-demo.gitSkip server verification Select this checkbox 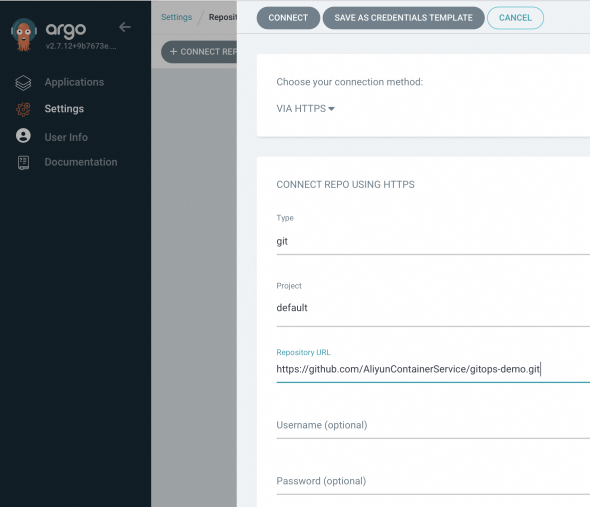

Create an application
-
In the left navigation pane, choose Applications, then click + NEW APP.
-
Configure these parameters and click CREATE.
Area Parameter Value GENERAL Application Name echo-server-demoProject Name default SYNC POLICY — Select Automatic. Argo CD checks the repository every 3 minutes and auto-deploys changes. With Manual, click SYNC to trigger deployment. SYNC OPTIONS — Select AUTO-CREATE NAMESPACE SOURCE Repository URL Select https://github.com/AliyunContainerService/gitops-demo.gitRevision HEAD Path manifests/helm/echo-serverDESTINATION Cluster URL Select your destination cluster Namespace echo-server-demoHELM VALUES FILES values.yaml -
On the Applications page, confirm the
echo-server-demoapplication shows Status: Healthy and Synced. If you set SYNC POLICY to Manual, click SYNC to trigger deployment.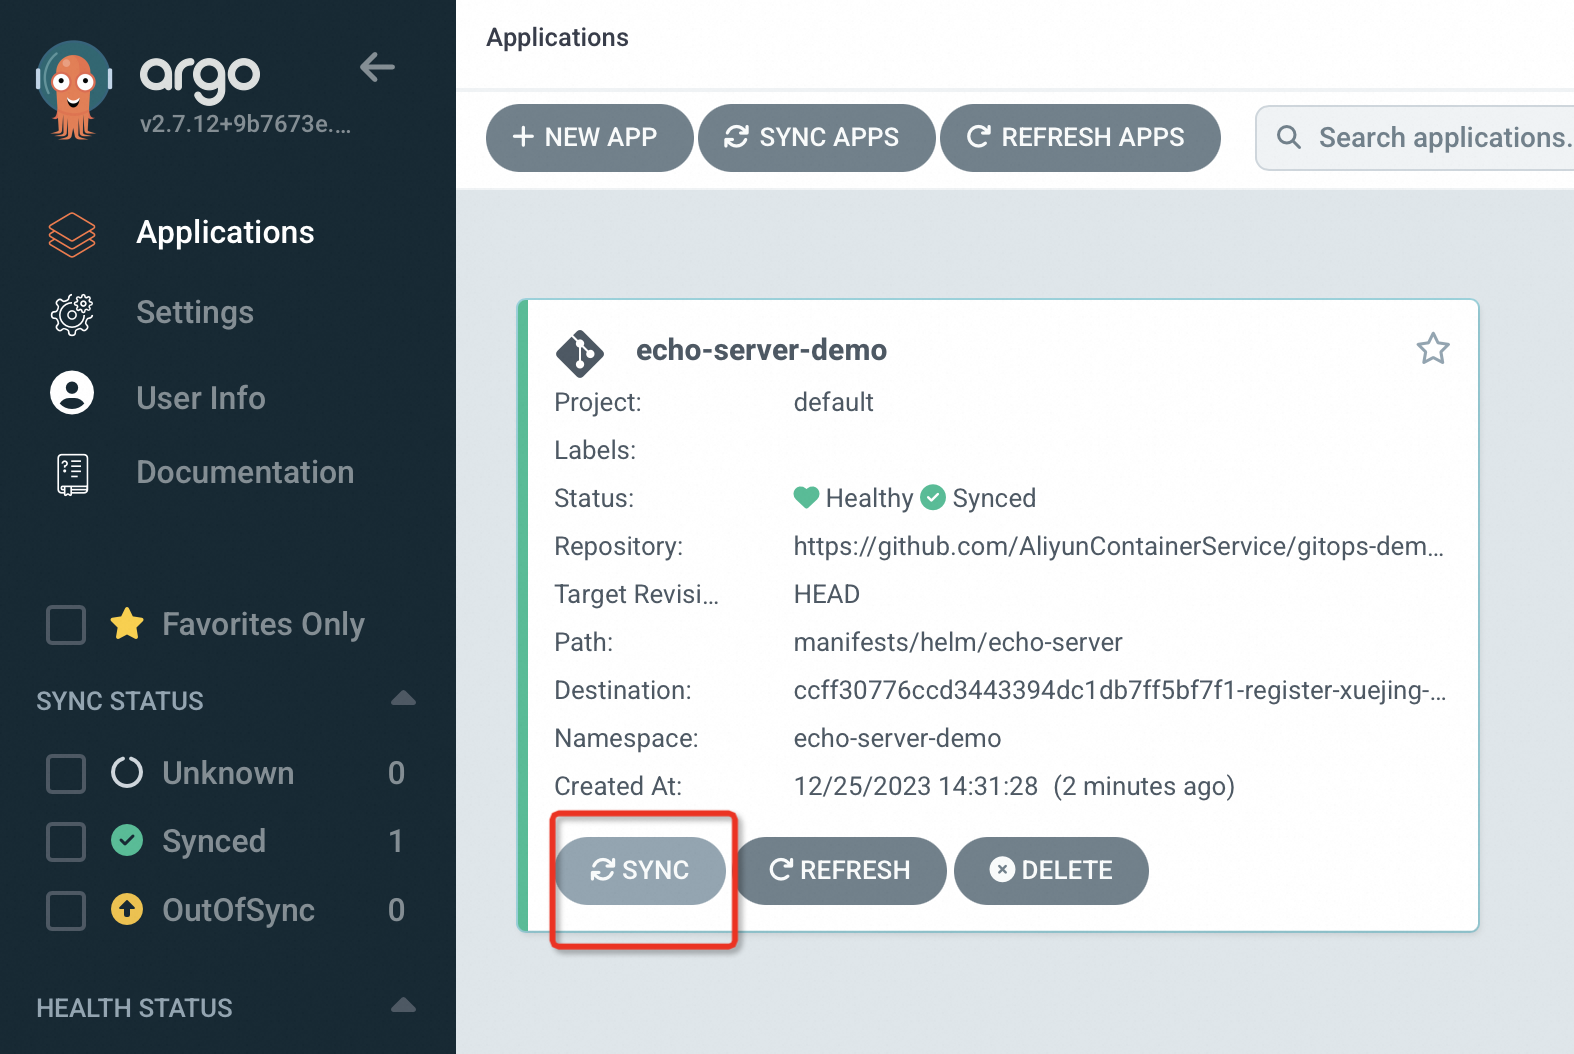
-
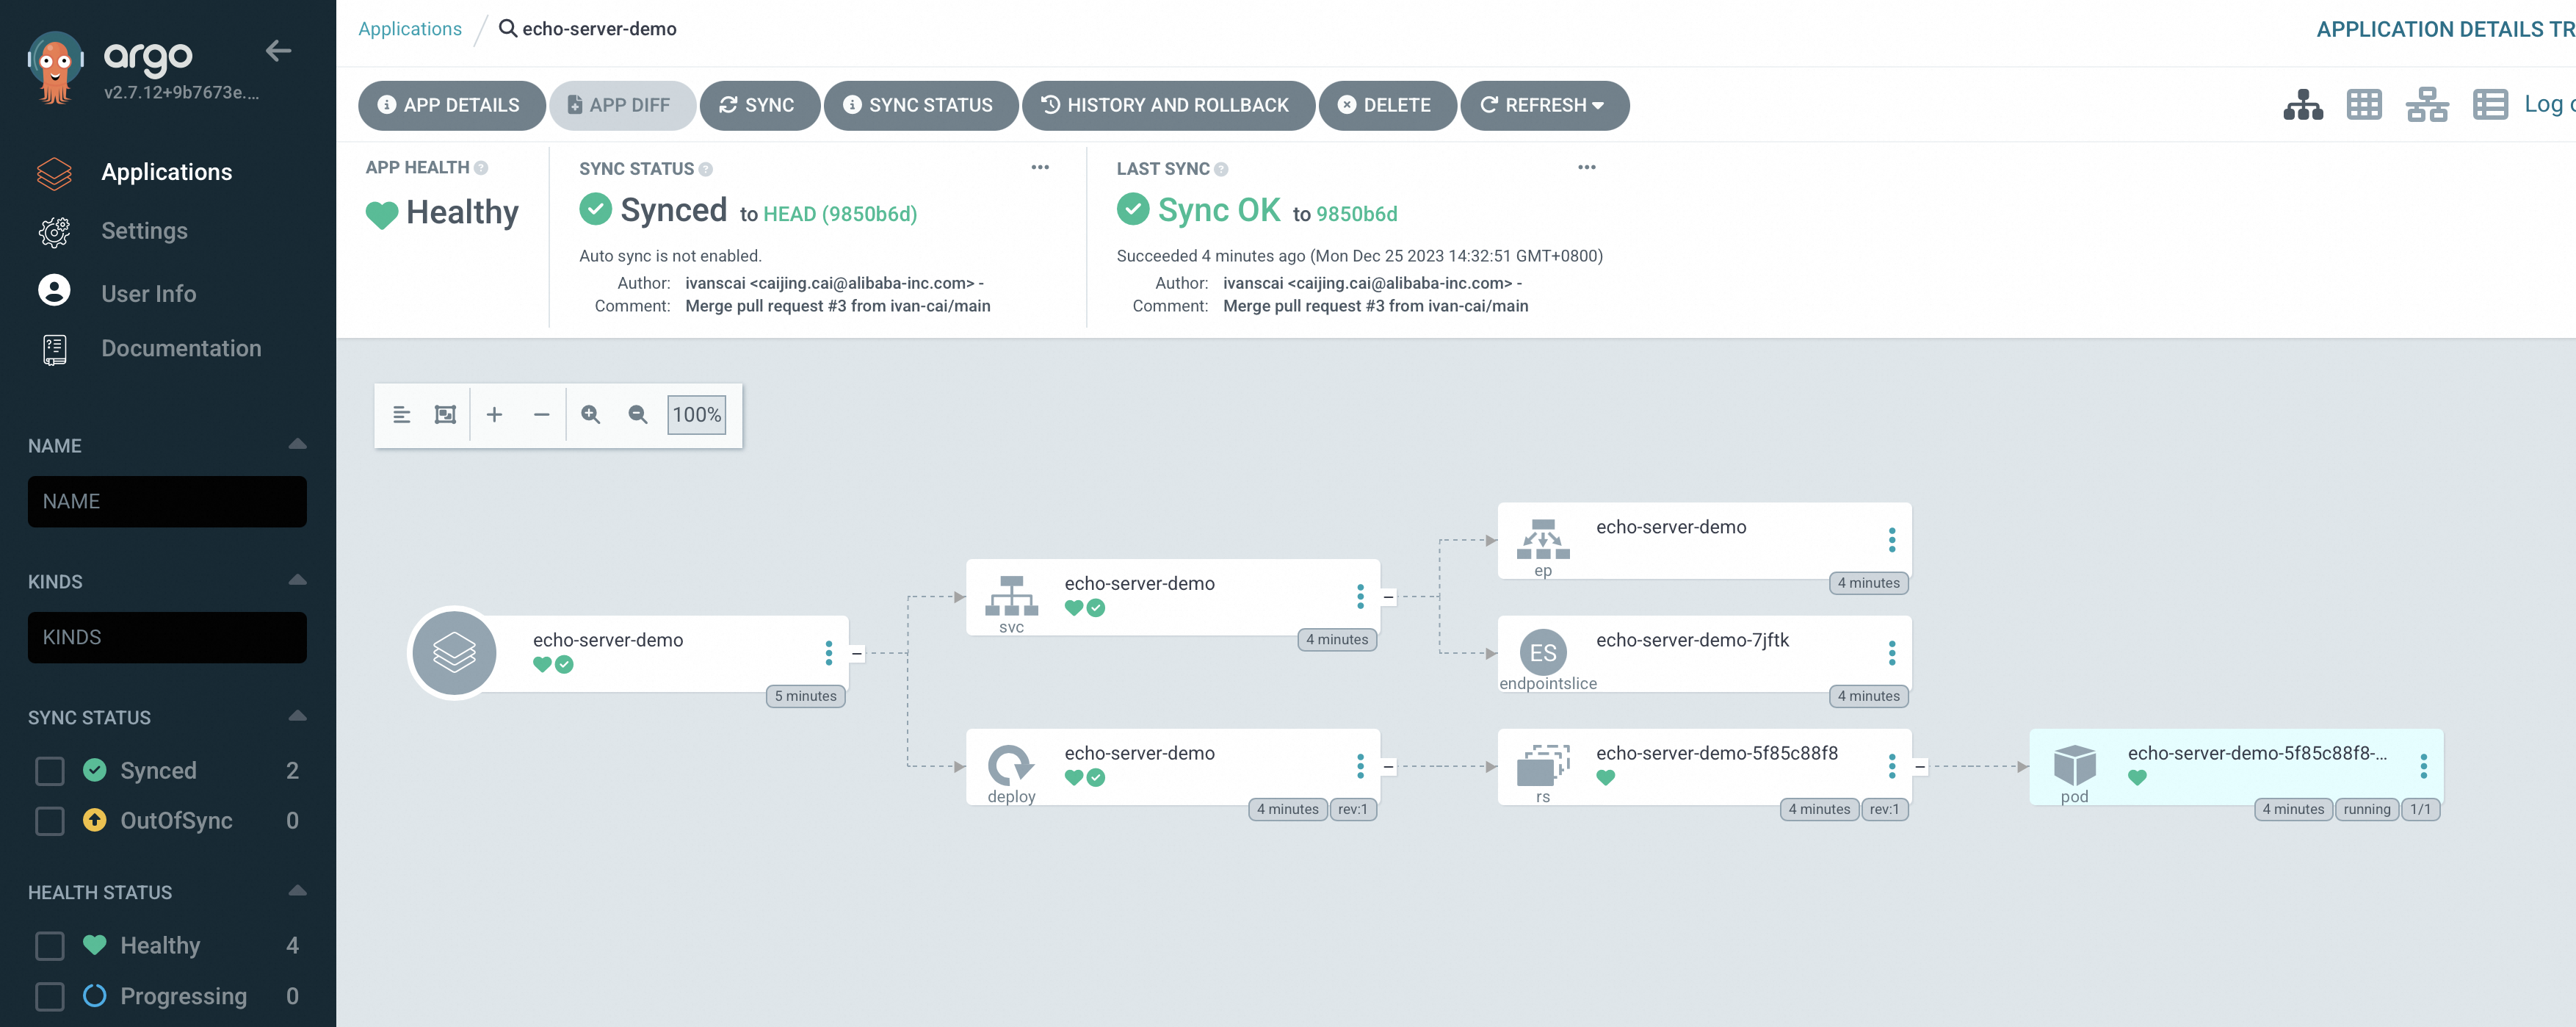
Click the application name to view the topology and status of its Kubernetes resources.
Deploy using the Argo CD CLI
Log on to Argo CD
-
Download and install Argo CD CLI v2.8.7.
-
Get the initial admin password from the fleet instance:
kubectl -n argocd get secret argocd-initial-admin-secret -o jsonpath="{.data.password}" | base64 -d -
Log on using port forwarding. The default username is
admin.export ARGOCD_OPTS='--port-forward-namespace argocd --port-forward' argocd login Username: admin Password:Expected output:
'admin:login' logged in successfully Context 'port-forward' updated -
Update the default
adminpassword:argocd account update-password *** Enter password of currently logged in user (admin): *** Enter new password for user admin: *** Confirm new password for user admin:Expected output:
Password updated
Context 'port-forward' updated
Connect a repository
-
Add the Git repository:
argocd repo add https://github.com/AliyunContainerService/gitops-demo.git --name echo-serverExpected output:
Repository 'https://github.com/AliyunContainerService/gitops-demo.git' added -
Verify the repository was added:
argocd repo listExpected output:
TYPE NAME REPO INSECURE OCI LFS CREDS STATUS MESSAGE PROJECT git https://github.com/AliyunContainerService/gitops-demo.git false false false false Successful default -
List available clusters. The output shows all clusters associated with the fleet instance.
argocd cluster listExpected output:
SERVER                          NAME                                        VERSION  STATUS      MESSAGE                                                  PROJECT
https://47.97.XX.XX:6443      c83f3cbc90a****-temp02   1.22+    Successful
https://kubernetes.default.svc  in-cluster                                           Unknown     Cluster has no applications and is not being monitored.
Note your destination cluster's server URL for the next step.
Create and sync an application
-
Create the application. Replace
https://47.97.XX.XX:6443with your destination cluster's server URL.argocd app create echo-server --repo https://github.com/AliyunContainerService/gitops-demo.git --path manifests/helm --dest-namespace echo-server-cli --dest-server https://47.97.XX.XX:6443Expected output:
application 'echo-server' created -
Sync the application to the destination cluster:
argocd app sync echo-serverExpected output:
TIMESTAMP GROUP KIND NAMESPACE NAME STATUS HEALTH HOOK MESSAGE 2022-09-22T14:32:45+08:00 Service echo-server-cli echo-server OutOfSync Missing 2022-09-22T14:32:45+08:00 apps Deployment echo-server-cli echo-server OutOfSync Missing 2022-09-22T14:32:45+08:00 Service echo-server-cli echo-server Synced Progressing 2022-09-22T14:32:45+08:00 Service echo-server-cli echo-server Synced Progressing service/echo-server created 2022-09-22T14:32:45+08:00 apps Deployment echo-server-cli echo-server OutOfSync Missing deployment.apps/echo-server created 2022-09-22T14:32:45+08:00 apps Deployment echo-server-cli echo-server Synced Progressing deployment.apps/echo-server created Name: echo-server Project: default Server: https://47.97.XX.XX:6443 Namespace: echo-server-cli URL: https://127.0.0.1:52742/applications/echo-server Repo: https://github.com/AliyunContainerService/gitops-demo.git Target: Path: manifests/helm SyncWindow: Sync Allowed Sync Policy: <none> Sync Status: Synced to (e5c2618) Health Status: Progressing Operation: Sync Sync Revision: e5c261880a4072cdbfa5173add2be426f7f3**** Phase: Succeeded Start: 2022-09-22 14:32:44 +0800 CST Finished: 2022-09-22 14:32:45 +0800 CST Duration: 1s Message: successfully synced (all tasks run) GROUP KIND NAMESPACE NAME STATUS HEALTH HOOK MESSAGE Service echo-server-cli echo-server Synced Progressing service/echo-server created apps Deployment echo-server-cli echo-server Synced Progressing deployment.apps/echo-server created -
Confirm the application is running:
argocd app listExpected output:
NAME             CLUSTER                     NAMESPACE        PROJECT  STATUS  HEALTH   SYNCPOLICY  CONDITIONS  REPO                                                     PATH              TARGET
echo-server      https://47.97.XX.XX:6443  echo-server-cli  default  Synced  Healthy  <none>      <none>      https://github.com/AliyunContainerService/gitops-demo.git  manifests/helm
The application is deployed when STATUS is Synced and HEALTH is Healthy.
More operations
Use these operations to maintain your GitOps setup.
Configure the Argo CD ConfigMap
-
On the Multi-cluster GitOps page, find Argo CD ConfigMap in the GitOps collapsed section.
-
Click Configure next to Argo CD ConfigMap.
-
On the Argo CD ConfigMap Settings page, select a configuration item from the Select Configuration Item drop-down list and edit it in the Modify Configurations code editor. See Common configuration items for restart policies.
Restart Argo CD components
-
On the Multi-cluster GitOps page, find Argo CD Component in the GitOps collapsed section.
-
Click Restart next to Argo CD Components.
-
Select the component from the Select Application to Restart drop-down list (for example, argocd-server), then click OK.
Disable GitOps
Delete all applications before disabling GitOps. Disable GitOps before deleting an ACK One fleet instance.
Using the console:
-
Log on to the ACK One console. In the left navigation pane, choose Fleet > Multi-cluster Applications.
-
On the Multi-cluster GitOps page, click the
icon and select your fleet. -
Click Disable GitOps, then click OK.
Using Cloud Assistant CLI:
aliyun adcp UpdateHubClusterFeature --ClusterId <your_clusterid> --ArgoCDEnabled falseNext steps
-
Enable public access to Argo CD — configure additional access control settings
-
Common configuration items — customize Argo CD behavior with ConfigMap settings
-
Billing of cloud resources for multi-cluster fleets — review GitOps resource costs