The DMS policy feature allows you to manage access to DMS features and data resources with fine-grained control. By defining a policy, you can specify permissions, such as query and modification permissions, for data resources at various levels like instances and databases. You can also control which actions are allowed for specific DMS features.
Features
-
Control access to data resources
You can use both policies and the standard permission system to grant permissions, including query and modification permissions, for data resources at different levels, such as an instance, database, logical database, or table.
-
Control access to features
You can use policies to control actions for DMS features, such as allowing or denying the creation and viewing of sub-features.
Notes
This feature is in canary release.
Differences between policies and permission templates
|
Item |
Policy |
Permission template |
|
Manageable objects |
Data resources and DMS features |
Data resources |
|
Scope of manageable data resources |
Wide scope, including data resources like instances, physical databases, logical databases, and tables. |
Narrow scope, including only instances, databases, and tables. |
|
Scope of supported authorization targets |
Users and roles |
Users |
Authentication
DMS policies and the standard permission system are complementary.
For example, if a user is granted query permissions on the dmstest_db database through a policy and is also granted modification permissions on the same database through the standard permission system, the user has both query and modification permissions on the database.
Data resource authentication process

Prerequisites
You must have permissions to manage policies. If not, ask an administrator to grant you the administrator system role. For more information, see Edit user information.
By default, users with the administrator role have the permissions to manage policies.
Step 1: Create and configure a policy
Log in to DMS 5.0.
-
In the upper-left corner of the console, click the
 icon and choose .Note
-
If you are using the console in normal mode, choose from the top navigation bar.
-
This feature is in canary release.
-
-
Click Create Policy. On the page that opens, fill in the Basic Information and Remarks.
-
Configure the policy content.
NoteAfter configuring a policy statement, you can click Add Policy at the bottom of the page to add more statements for data and feature resources.
Data resources
-
Select an Effect.
An effect of Allow grants authorized users or roles access to the data resources and related features defined in the policy. Conversely, an effect of Deny prohibits authorized users or roles from accessing the resources and features defined in the policy.
-
On the tab, select the resources you want to control, such as Instance, Database, or Logical Database.
NoteThe console lists all supported data resource types.
-
In the Actions section, select an action type, such as Read actions (query permissions) or Write actions (modification permissions).
All Actions includes both Read actions and Write actions. For Specified Actions, you can select read or write actions based on your needs. After making your selection, click the
 icon to add it to the Selected Actions area.
Under Read actions, select Instance Query (
instance:InstanceQuery), and under Write actions, select Instance Modification (instance:InstanceCorrect). Then, click the icon to add them to the Selected Actions area. -
In the Resource section, select the resource scope: All Resources or Specified Resources.
If you select Specified Resources, click Add Resource in the lower-right corner.
In the Add Resource dialog box, select the target instance in the Instance field (you can search by keyword), and then click Confirm.
-
(Optional) Configure policy conditions.
In the Condition section, click Add Condition. In the Add Condition dialog box, configure the Condition Key, Operator, and value.
NoteThe available condition parameters depend on the resource type and actions you selected.
Examples of condition key configurations:
-
Select database type
For example, if you set Operator to StringEqualsIgnoreCase (case-insensitive string match) and Condition Value to MySQL, the policy applies only to MySQL databases.
-
Select time
For example, if you set Operator to DateGreaterThan and Condition Value to 2024-09-19 05:00, the policy takes effect only after 2024-09-19 05:00.
-
Feature usage
-
Select an Effect.
An effect of Allow grants authorized users or roles access to the data resources and related features defined in the policy. Conversely, an effect of Deny prohibits authorized users or roles from accessing the resources and features defined in the policy.
-
On the tab, select the feature you want to control, such as data export ticket, user management, role management, or sensitive data protection.
-
In the Actions section, select an action type.
For Specified Actions, you can select read or write actions based on your needs. After making your selection, click the
icon to add it to the Selected Actions area. -
In the Resource section, select the resource scope: All Resources or Specified Resources.
If you select Specified Resources, click Add Resource to add resources.
-
(Optional) Configure policy conditions.
In the Condition section, click Add Condition. In the Add Condition dialog box, configure the Condition Key, Operator, and value.
NoteThe available condition parameters depend on the resource type and actions you selected.
For example, if you select Data Export Ticket as the Resource Type, you can use the Instance Environment Type condition key as follows:
If you set Operator to StringEqualsIgnoreCase (case-insensitive string match) and Condition Value to dev, the policy takes effect only for databases in the development (dev) environment.
-
-
Click Confirm in the lower-left corner of the page to generate the policy.
Step 2: Authorize a user or role
-
On the policy list page, find the target policy and click Authorize in the policy's row.
-
In the Authorize dialog box, select the Users or Roles you want to authorize. You can select multiple items.
A role refers to a custom role. Users who are assigned this role are subject to the policy.
-
Click Confirm.
Manage policies
On the policy list page, you can modify, delete, or create a similar policy.
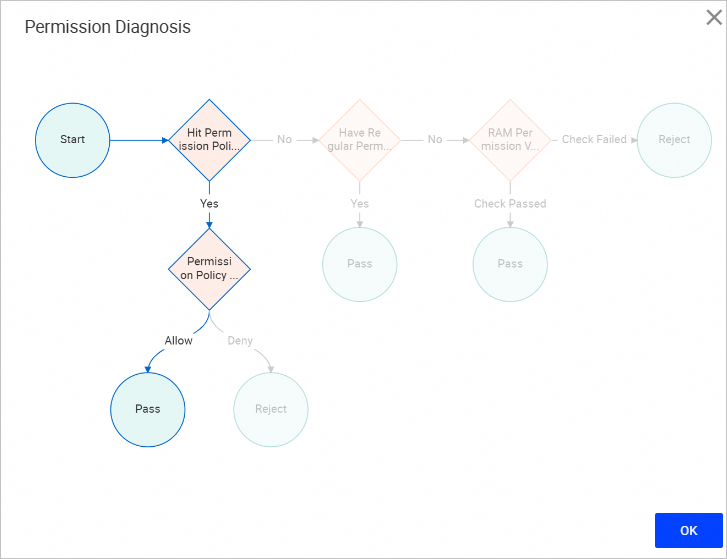
Permission diagnosis
-
Currently, DMS only supports permission diagnosis for data resources.
-
On the operation log page, you can only perform permission diagnosis on operations from the last three months.
The permission diagnosis feature helps you trace the source of a user's permissions for data resources. You can start a diagnosis in two ways:
From operation logs
-
Move the pointer over the
icon in the upper-left corner and choose . NoteIf you use the DMS console in normal mode, choose in the top navigation bar.
-
On the Operation Logs tab, filter for operation logs from the SQL Console.
-
Click Permission Diagnosis to the right of a log entry.
The Permission Diagnosis dialog box opens and displays the authentication process. The system first checks for a matching policy. If a policy matches, its effect determines the outcome: 'Allow' grants access, and 'Deny' revokes it. If no policy matches, the system then checks for standard permissions. If standard permissions exist, access is granted. Otherwise, the system performs a final RAM permission check on the instance, granting access on success and denying it on failure.
From the SQL Console
-
In the database instance list on the left, find and double-click the target database to open the SQL Console.
-
At the top of the page in the My Permissions section, select a permission type and then click Permission Diagnosis.
-
Click Permission Diagnosis to view the authentication process.