This guide covers the complete task flow development lifecycle in Data Management (DMS): creating the flow, wiring up task nodes, configuring scheduling and error handling, running a test, and publishing to production.
By the end of this guide, you will have:
-
Created a task flow on a directed acyclic graph (DAG) canvas.
-
Added, configured, and connected task nodes.
-
Set error handling, concurrency, and scheduling policies.
-
Run the flow and published it for automated execution.
Prerequisites
Before you begin, ensure that you have:
-
An Alibaba Cloud account with access to DMS console V5.0
-
The permissions to create and publish task flows in DMS
Key concepts
| Concept | Description |
|---|---|
| Task flow | A collection of task nodes organized into a DAG that defines the execution order and dependencies of your data tasks. |
| Task node | A single unit of work within a task flow — for example, running a SQL script or triggering a data sync. |
| DAG | A directed acyclic graph (DAG) is the visual canvas where you arrange and connect task nodes. Connections flow in one direction with no circular dependencies. |
Step 1: Create a task flow
-
Log on to the DMS console V5.0.
-
In the top navigation bar, click DTS > Data Development > Task Orchestration.
If you use DMS in simple mode, hover over the
 icon in the upper-left corner, then choose All functions > DTS > Data Development > Task Orchestration.
 -
Click Create Task Flow.
-
In the Create Task Flow dialog box, configure Business Scenario and Task Flow Name, then click OK.
Step 2: Add task nodes
-
In the Task Type list on the left side of the DAG canvas, drag the nodes you want to add onto the blank area of the DAG.
-
Double-click a node to open its configuration page and configure it.
-
To define dependencies between nodes, hover over an upstream node until a hollow circle appears on its right edge. Drag from that circle to the downstream node to draw a connection.
Step 3: Configure the task flow
Click the ![]() icon at the bottom of the task flow page to open the configuration panel.
icon at the bottom of the task flow page to open the configuration panel.
Task flow information
On the Task Flow Information tab, configure the following parameters. Leave Variable Configuration and Notification Configurations at their default values for now.
| Parameter | Description |
|---|---|
| Owner | The user who can modify nodes and configurations, run tests, and receive failure alerts. If you change the owner, republish the task flow for the change to take effect. |
| Stakeholders | Users who can view the task flow and run tests, but cannot modify it. DMS administrators and database administrators (DBAs) are default stakeholders of every task flow. They can also change the task flow owner. |
| Error Handling Policy | The action to take when an error occurs during execution. Options: Complete Running Tasks (let running tasks finish; remaining tasks are not run, and the task flow is marked as failed once complete), Immediately Stop All Tasks (halt all tasks immediately), or Complete Unrelated Tasks (let running tasks and tasks not related to the failed task node continue). |
| Concurrency Control Policy | The behavior when a task flow is triggered while a previous run is still in progress. Options: Skip (ignore the new trigger), Ignore (run the task flow; make sure that the previous execution is not affected), or Run in Parallel (run concurrently — Mode 1 waits until the same task in the previous run finishes; Mode 2 waits until that task and all its downstream tasks finish). |
| Set task flow to public | When enabled, all users in your tenant can view the task flow but cannot modify or run it. Public flows are excluded from dashboard statistics unless you are the owner. |
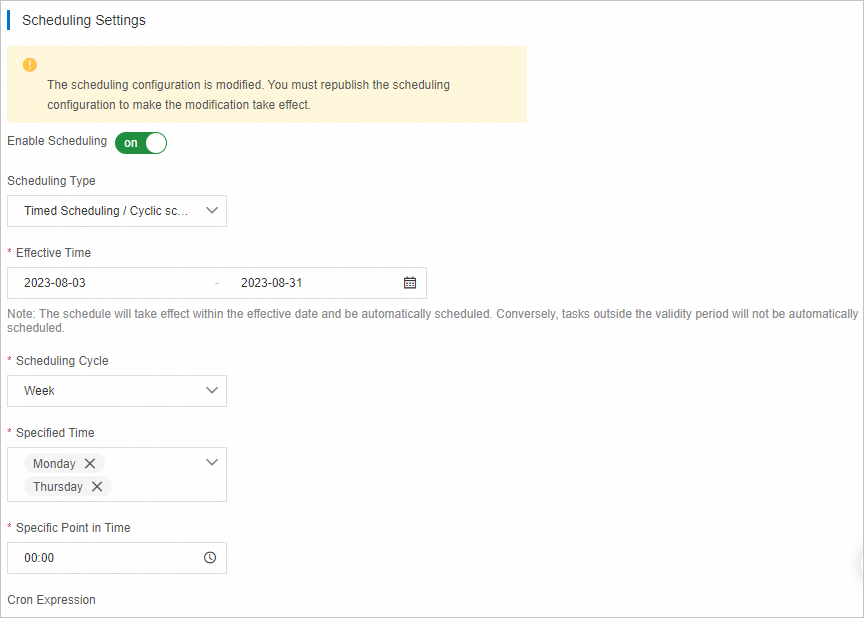
Scheduling settings
In the Scheduling Settings section of the Task Flow Information tab, turn on Enable Scheduling and configure a scheduling policy.
For example, to run a flow at 00:00 every Monday and Thursday from August 3 to August 31, 2023:
Step 4: Run the task flow
After configuring the task flow, click Try Run. DMS executes the task nodes in sequence.
If you need a different execution mode, DMS also supports Dry Run, Run at a Specific Point in Time, and Run at a Specific Time Range. For details on each mode, see Terms.
Step 5: Publish the task flow
Verify that the task flow is correctly configured, then click Publish.
After publishing, click Go to O&M in the upper-right corner. In the Task Flow Information section, you can review the creator, scheduling policy, and other configuration details.
What's next
Now that your task flow is running, explore these topics to take it further:
-
Monitor run status and view execution history in the O&M center.
-
Edit the scheduling policy to change the trigger frequency or time window.
-
Add more task nodes or adjust dependencies to expand the task flow.
-
Grant stakeholder access to let team members view and test the flow.