This topic describes how to view the number of remaining mitigation sessions, service monitoring data, and operation logs of Anti-DDoS Origin instances. This topic also describes how to upgrade and renew Anti-DDoS Origin instances.
View the information about an instance
Log on to the Traffic Security console.
In the left-side navigation pane, choose .
In the top navigation bar, select the resource group to which the instance belongs and the region in which the instance resides.
Anti-DDoS Origin 1.0 (Subscription) instance: Select the region in which the instance resides.
Anti-DDoS Origin 2.0 (Subscription) instance and Anti-DDoS Origin 2.0 (Pay-as-you-go): Select All Regions.
View the information about the instance and perform operations based on your business requirements.
Query the number of remaining mitigation sessions for an instance of Inclusive Edition for Small and Medium Enterprises
After you purchase an instance of Inclusive Edition for Small and Medium Enterprises, two advanced mitigation sessions are provided per month by default. You can query the number of remaining mitigation sessions on the Instance Management page. For more information about the definition of advanced mitigation sessions, see Definition of mitigation sessions.
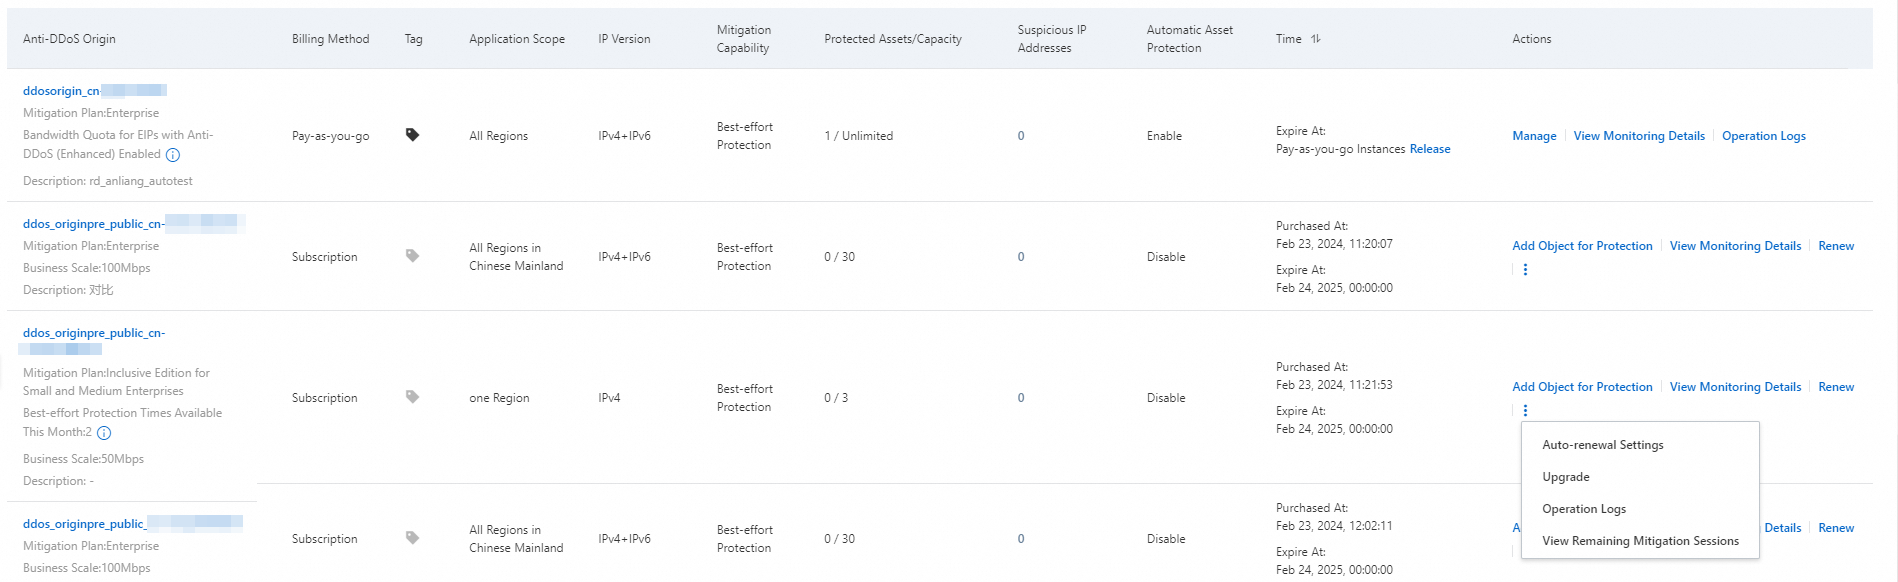
In the Anti-DDoS Origin column, find the instance that you want to manage and view the number to the right of Best-effort Protection Times Available This Month. Alternatively, choose
 > View Remaining Mitigation Sessions in the Actions column.
View the details of advanced mitigation sessions.
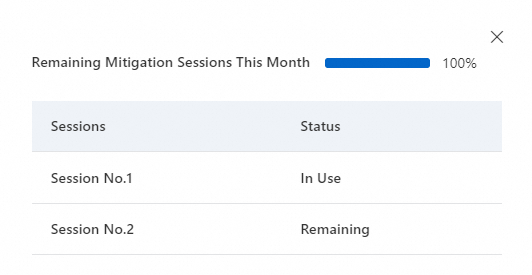
Remaining: The percentage of remaining mitigation sessions is 100%, and the first mitigation session is in use, as shown in the preceding figure.
Exhausted: The actual percentage and status of mitigation sessions are displayed.
View service monitoring data
After you add an object to an Anti-DDoS Origin instance for protection, you can view the traffic overview of the instance, traffic information about each IP address, and DDoS attack events. You can query security reports of the last 30 days.
Find the instance that you want to manage and click View Monitoring Details in the Actions column. The Business Monitoring page appears.
On the Business Monitoring page, select a protected object and a time range. The console shows the trend of network traffic and DDoS attack events. The network traffic metrics include the inbound traffic and number of received data packets. For more information, see Use the service monitoring feature.
View operation logs
You can view the operation logs of Anti-DDoS Origin instances to trace configuration changes of each instance. You can view operation logs of the last 30 days.
Find the instance that you want to manage and click Operation Logs in the Actions column.
On the Operation Logs page, specify a time range and view the configuration change logs of the instance.
Upgrade an instance
You can upgrade only subscription instances. You can upgrade the specifications of an instance. You can also upgrade an instance of Inclusive Edition for Small and Medium Enterprises to Enterprise. For more information, see Scenarios in which you can upgrade specifications.
Find the instance that you want to manage and choose
> Upgrade in the Actions column. In the Upgrade panel, change the specifications of the instance based on your business requirements.
Read and select Anti-DDoS Origin Terms of Service, click Buy Now, and then complete the payment.
Renew an instance
You can renew only subscription instances. Anti-DDoS Origin supports the following renewal methods: manual renewal and auto-renewal.
Manual renewal
Find the instance that you want to manage and click Renew in the Actions column. In the Renew panel, configure the Subscription Duration parameter.
Read and select Terms of Service, click Buy Now, and then complete the payment.
Auto-renewal
Log on to the Expenses and Costs console and click Renewal in the left-side navigation pane.
On the Manual tab, find the instance for which you want to enable auto-renewal and click Enable Auto Renewal in the Actions column. In the Enable Auto Renewal dialog box, select an auto-renewal cycle and click Auto Renew.
After auto-renewal is enabled for the instance, you can view the instance on the Auto tab.
After you enable auto-renewal, the system automatically deducts the renewal fees from your account balance nine days before the expiration date. Make sure that you have a sufficient balance in your payment account. You cannot enable auto-renewal for your instance one day before its expiration date. To continue using the instance in this case, you must manually renew it.
If you manually renew the instance before the system automatically deducts fees for auto-renewal, the next auto-renewal is performed based on the expiration date of the manual renewal.
Auto-renewal takes effect the next day after you enable it. Coupons can be used for auto-renewal.
Specify an alias for an instance
If you have multiple Anti-DDoS Origin instances, you can specify an alias for each instance based on the characteristics of the instances. The characteristics include the applicable object, usage scenario, and application scope. You can use aliases to differentiate instances to simplify identification and management of your instances.
Find the instance that you want to manage and click the
 icon to the right of Description.
 In the Modify Description dialog box, enter an alias and click OK.