This topic describes how to deploy both Anti-DDoS Origin and Web Application Firewall (WAF) for website services. This solution defends against Layer 4 DDoS attacks and Layer 7 web attacks, including CC attacks.
Prerequisites
You have created an ECS instance and deployed your application on it. The ECS instance has a public IP address, and your website has a domain name.
NoteIf your website serves users in the Chinese mainland, its domain name must complete ICP filing. Otherwise, you cannot connect the website to a WAF instance in the Chinese mainland.
You have purchased Anti-DDoS Origin. For more information, see Purchase an Anti-DDoS Origin instance.
NoteWhen purchasing an Anti-DDoS Origin instance, select the region where your resources reside. This region must match the region of your ECS instance.
You have purchased WAF 3.0. For more information, see Purchase a subscription WAF 3.0 instance.
Background information
When you enable Anti-DDoS Origin for website services and your service requires protection not only from DDoS attacks but also from web attacks and CC attacks, we recommend enabling WAF as well. WAF helps defend against common web attacks and CC attacks. For more information about WAF, see What is Web Application Firewall?.
When using Anti-DDoS Origin and WAF together, first connect your website to WAF for protection. Then add the IP address of your WAF instance as a protected object in your Anti-DDoS Origin instance. After completing this deployment, all service traffic passes through WAF for security scrubbing. Attack traffic—including DDoS, web, and CC attacks—is dropped. Only normal service traffic is forwarded to your origin server.
Procedure
Log on to the Web Application Firewall 3.0 console. In the top menu bar, select the resource group and region for the WAF instance (Chinese Mainland or Outside Chinese Mainland). In the navigation pane on the left, click Onboarding. On the CNAME Record tab, click Add.
Step 1: Configure listeners
Enter a Domain Name. You can enter only one domain name to protect. It can be an exact-match domain name (such as
www.aliyundoc.com) or a wildcard domain name (such as*.aliyundoc.com).Wildcard domain matching rules:
A wildcard matches only subdomains at the same level. For example,
*.aliyundoc.commatcheswww.aliyundoc.comandexample.aliyundoc.com, but does not matchwww.example.aliyundoc.com.When a wildcard applies to a second-level domain (such as
*.aliyundoc.com), it matches the second-level domain itself (that is,aliyundoc.com).When a wildcard applies to a third-level domain (such as
*.example.aliyundoc.com), it does not match the third-level domain itself (that is,example.aliyundoc.com).
Priority rule: If both an exact-match domain name and a wildcard domain name are added and the domain name to protect matches both, the system applies the protection rules of the exact-match domain name first.
To verify domain ownership, complete domain validation. If the system prompts you to validate after entering the domain name, choose one of the following validation methods.
DNS validation: Manually add the TXT record provided by WAF in your DNS provider console. We recommend this method.
File validation: Upload the validation file provided by WAF to the root directory of your origin server. You need permissions to manage your origin server and must configure a security group rule that allows access from all IP addresses. This ensures WAF can validate the file over the Internet.
DNS validation
In the validation prompt area, click the Method 1: DNS Record tab.
Use the Record Type, Hostname, and Record Value provided in the WAF console to add a TXT record in your DNS provider console.
If you use Alibaba Cloud DNS, follow the steps below. If you use another DNS provider, perform similar steps in their console.
Wait for the TXT record to take effect. A newly configured TXT record takes effect immediately. However, changes to an existing TXT record usually take 10 minutes to take effect. The actual time depends on the TTL setting of your DNS record, which defaults to 10 minutes.
Return to the WAF console and click Verify.
If Verification succeeded appears, domain ownership verification is complete.
If Verification failed appears, troubleshoot as follows:
Check the TXT record: Ensure the host record and record value match exactly what the WAF console shows. If they differ, delete the incorrect record, add the correct one, and verify again.
Wait for DNS propagation: DNS changes may not take effect immediately. The time depends on the TTL setting of your DNS server. Wait 10 minutes and verify again.
Switch validation methods: If verification fails repeatedly, use Method 2: Verification File.
File validation
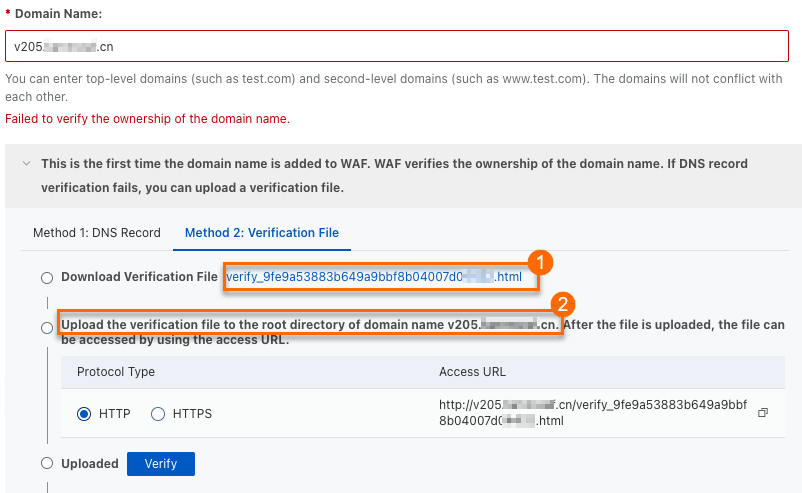
In the validation prompt area, click the Method 2: Verification File tab.
Click the download link for the validation file (①) to download it.
 Important
The validation file is valid for three days after download. If you do not complete validation within this period, download it again.
Do not modify the validation file. Do not edit or rename it.
WAF accesses your origin server based on the protocol type you select. Ensure your origin server allows traffic from the corresponding security group or firewall rule:
If you select HTTP, allow inbound TCP port 80 from 0.0.0.0/0.
If you select HTTPS, allow inbound TCP port 443 from 0.0.0.0/0.
Manually upload the validation file to the root directory of your origin server (for example, ECS, OSS, CVM, COS, or EC2) (②).
NoteIf you add a wildcard domain name, such as
*.aliyun.com, upload the validation file to the root directory ofaliyun.com.After uploading, check whether the file was uploaded successfully using one of the following methods.
Return to the WAF console and click Verify.
If Verification succeeded appears, domain ownership verification is complete.
If Verification failed appears, troubleshoot based on the error message:
Issue
Solution
Cannot access the domain name
Check your domain name DNS resolution. Ensure a DNS record points to your origin server. For example, if you use Alibaba Cloud DNS, see Add a DNS record.
Check your origin server security group or firewall rules. Ensure inbound requests from the Internet are allowed. For example, if you use an ECS security group, see Add a security group rule.
Validation file not found
Re-upload the validation file to your origin server.
Incorrect file content
Go to your origin server and delete the incorrect validation file.
Re-upload the validation file.
Because allowing access from all IP addresses poses a security risk, remove the security group rule used for validation after completing ownership verification—unless your origin server's initial security group configuration already includes the 0.0.0.0/0 rule.
Select the website Protocol Type (HTTP or HTTPS) and enter the required configuration. You can configure both protocols.
NoteThe Shared Virtual Host Edition of WAF does not support HTTPS.
HTTP
HTTP Port
Enter the port users use to access your website. We recommend using port 80 for HTTP. To use a custom port, select one from the port range. Press Enter after each port entry.
HTTPS
HTTPS Port
Enter the port users use to access your website. We recommend using port 443 for HTTPS. To use a custom port, select one from the port range. Press Enter after each port entry.
HTTPS Upload Type
To let WAF listen to and protect your website’s HTTPS traffic, upload the SSL certificate associated with your domain name to WAF. Options include the following:
Manual upload: Use this if your certificate is not yet uploaded to Alibaba Cloud Certificate Management Service (Original SSL Certificate).
Select existing certificate: Choose a certificate already issued or uploaded in Alibaba Cloud Certificate Management Service (Original SSL Certificate).
Apply for a new certificate: If you do not own an SSL certificate for this domain, purchase one first. After the certificate is issued, connect it to WAF.
Manual upload
Certificate Name: Enter a unique name for the certificate. It must not duplicate any existing certificate name.
Certificate File: Open and paste the certificate text content in PEM, CER, or CRT format into a text editor.
Example format:
-----BEGIN CERTIFICATE-----......-----END CERTIFICATE-----Format conversion: If your certificate is in PFX or P7B format, use the certificate tool to convert it to PEM format.
Certificate chain: If your certificate includes intermediate certificates, paste them in order: server certificate first, then intermediate certificates.
Private Key: Open and paste the private key text content in PEM format into a text editor.
RSA:
-----BEGIN RSA PRIVATE KEY-----......-----END RSA PRIVATE KEY-----ECC:
-----BEGIN EC PRIVATE KEY-----......-----END EC PRIVATE KEY-----
Select existing certificate
Select the certificate to upload to WAF from the dropdown list.
NoteIf the WAF console displays Failed to verify the integrity of the certificate chain. If you use this certificate, service access may be affected., the certificate chain is incomplete. Check the correctness and completeness of the certificate content. Then re-upload it in the Certificate Management Service console. For instructions, see Upload, synchronize, and share SSL certificates.
Apply for a new certificate
If you have not purchased a certificate, see Purchase a commercial certificate. Click Apply to read related documentation.
Step 2: Configure forwarding
In the Server address section, enter the IP address or domain name of your origin server based on its server type. WAF forwards normal service requests to your origin server using this setting.
After confirming your origin server type, complete the following configuration.
IP
Origin Port: The port your website uses. Users access your website through the HTTP/HTTPS port configured in Step 1. WAF accesses your origin server through the Origin Port set here.

By default, this matches the HTTP/HTTPS port configured in the previous step’s Protocol Type. You can customize the origin port from the port range. Use this when you need WAF to use a specific port to fetch from your origin server.
Origin IP Address: Enter the IP address of your origin server.
It must be a publicly accessible IP address.
You can enter multiple IP addresses. Press Enter after each one. You can add up to 20 origin server IP addresses. If you enter multiple IP addresses, WAF forwards origin requests based on your load balancing algorithm setting.
You can configure IPv4 and IPv6 addresses separately or together. To configure IPv6 addresses, ensure you enable IPv6 protection in Configure Listener.
Domain Name (Such as CNAME)
Origin Port: The port your website uses. Users access your website through the HTTP/HTTPS port configured in Step 1. WAF accesses your origin server through the Origin Port set here.

By default, this matches the port configured in the previous step’s Protocol Type. You can customize the origin port from the port range. Use this when you need WAF to use a specific port to fetch from your origin server.
Origin Domain Name: Enter the domain name of your origin server.
WAF supports forwarding client requests only to the IPv4 address resolved from this domain name. For IPv6 websites, use the IP address method.
ImportantIf your origin server address changes, update the server address here promptly.
To customize advanced configurations such as load balancing algorithm, secondary origin server, HTTP origin fetch, origin SNI, request header field configuration, traffic tagging, origin connection timeout, retry on 5XX error, origin keep-alive, SM SSL, HTTP/2, force redirect, TLS version, SSL cipher suite, Layer 7 proxy before WAF (such as CDN), IPv6, exclusive IP address, and intelligent load balancing for WAF clusters, see Advanced configuration. If no customization is needed, keep all other settings at their defaults and click Submit.
Step 3: Switch traffic
After completing the preceding configuration in the WAF console, you must switch traffic to WAF. Otherwise, WAF protection will not take effect.
Allow WAF origin-facing IP ranges: If your origin server uses security group rules, firewall rules, or security software such as SafeDog or YunSuo, you must allow WAF origin-facing IP ranges on your origin server. Otherwise, WAF origin traffic may be blocked, causing service interruption.
NoteWe recommend configuring your origin server to allow traffic only from WAF origin-facing IP ranges. This ensures only WAF can communicate with your origin server and prevents attackers from bypassing WAF by accessing your origin server’s public IP address.
In the upper-right corner of the Add Completed wizard page, click WAF IP address.
In the Back-to-origin CIDR Block dialog box, click Copy to copy all WAF origin-facing IP ranges to your clipboard.
NoteThe copied origin-facing IP ranges are separated by English commas (,). Some addresses, such as 2408:400a:3c:xxxx::/56, are IPv6 address ranges.
Allow these IP ranges in your server firewall. For example, if your origin server is an Alibaba Cloud ECS instance, allow them in the ECS security group. For more information about security groups, see Add a security group rule.
In the ECS instance details page, click , select the target security group, and go to its details page.
In the security group details page, under , click Add Rule.
Because a single security group rule cannot contain both IPv4 and IPv6 addresses, perform two steps:
Add an IPv4 rule: In the Create Security Group Rule panel, paste the IP ranges copied in the previous step into the Source field. Manually delete the IPv6 addresses. Set Destination (this instance) to the origin port configured in Step 2. Keep other parameters at their defaults and click Submit.
Add an IPv6 rule: Click Add Rule again. In the Source field, select IPv6 and paste the IPv6 address ranges.
Locally verify WAF configuration: Before changing your domain name’s DNS settings, verify your WAF configuration by mapping the domain name in your local
hostsfile. This prevents service interruption caused by misconfiguration.In the Add Completed wizard page, click Copy CNAME to get the CNAME address provided by WAF.
Open Network diagnostics and analysis, select Network diagnostics and analysis, enter the copied CNAME address (for example,
xxx.c.yundunwaf2.com), and click Run test now.Copy the IP address from the DNS provider resolution result. Then modify your local computer’s
hostsfile.Windows
Open the
C:\Windows\System32\drivers\etc\hostsfile in Notepad. Add the following line at the end and save the file.<IP address copied in the previous step> <domain name added to WAF>Open
cmdand runping <domain name added to WAF>. If the returned IP address matches the one you added, the hosts change took effect. Otherwise, runipconfig /flushdnsto flush the DNS cache and run ping again.Open a browser and enter the protected domain name in the address bar.
If the website loads normally, your WAF domain name configuration is correct. Proceed to the next step: DNS resolution change.
If the website fails to load, your WAF domain name configuration may be incorrect. Review the preceding configuration, fix issues, and re-verify locally.
After local verification, restore your hosts file to its original state.
macOS
Press
Command + Spaceto search for and openTerminal.Run
sudo vim /etc/hoststo open thehostsfile.Add the following line at the end of the file and save it.
<IP address copied in the previous step> <domain name added to WAF>Run
ping <domain name added to WAF>. If the returned IP address matches the one you added, the hosts change took effect. Otherwise, runsudo killall -HUP mDNSResponderto flush the DNS cache and run ping again.Open a browser and enter the protected domain name in the address bar.
If the website loads normally, your WAF domain name configuration is correct. Proceed to the next step: DNS resolution change.
If the website fails to load, your WAF domain name configuration may be incorrect. Review the preceding configuration, fix issues, and re-verify locally.
After local verification, restore your hosts file to its original state.
Change domain name DNS resolution: Point your domain name’s DNS resolution to the CNAME address provided by WAF. This ensures web requests for your domain name resolve to WAF for security protection.
NoteWe recommend performing this operation during off-peak hours to minimize impact on your service.
In the Add Completed wizard page, click Copy CNAME to get the CNAME address provided by WAF.
Set your domain name’s DNS resolution to the address copied in the previous step. If your DNS is hosted on Alibaba Cloud DNS, follow the steps below. If you use another DNS provider, perform similar steps in their console.
In the Public authoritative DNS resolution page, locate your domain name and click Actions, then Settings.
In the Settings page, locate the Hostname you want to configure. Click Actions, then Edit. For example, if your domain name connected to WAF is
www.aliyundoc.com, locate the host recordwwwunder the primary domainaliyundoc.comand edit it.On the Edit Record panel, set Record Type to CNAME. Set Record Value to the CNAME address provided by WAF. Keep other settings unchanged.
When modifying DNS records:
For the same host record, you can specify only one CNAME record value. Replace the current value with the WAF CNAME address.
CNAME records conflict with other record types such as A, MX, and TXT for the same host record. Delete conflicting records before adding the new CNAME record.
WarningDuring DNS changes, some users may experience service interruptions. Therefore, delete the original record and add the new CNAME record immediately.
Click OK to save the DNS settings. Wait for the updated DNS record to take effect.
NoteDNS changes require time to propagate. If your website fails to load after the change, wait 10 minutes and refresh the page.
Step 4: Add protected objects
Log on to the Traffic Security console.
In the left-side navigation pane, choose .
In the top navigation bar, select the resource group where your instance resides. Set the region to All Regions.
Click Add Object for Protection. In the Add Asset tab, select WAF in the Objects to Select section. Move it to the Selected Objects section and click Confirm. For detailed steps, see Protected objects.
After you add a protected object, the WAF instance gains the unlimited protection capability of an Anti-DDoS Origin instance against DDoS attacks and automatically triggers traffic scrubbing when your business is under a DDoS attack.