If a project user has permission to query sensitive data in a MaxCompute project but you do not want the user to see the complete information, you can dynamically mask the data in query results. This topic shows you how to enable dynamic data masking for MaxCompute and provides an example.
Background information
MaxCompute does not have a built-in dynamic data masking feature. It relies on the data masking capability of DataWorks Data Security Guard. You must first activate the Data Security Guard service in DataWorks before you can enable dynamic data masking for a MaxCompute project. After enabling dynamic data masking, you can configure data masking rules for the project based on the data identification rules in Data Security Guard. These rules define which sensitive data to mask.
The new version of the underlying data masking feature for MaxCompute offers the following capabilities:
After you configure data masking rules in Data Security Guard, the rules take effect when you query sensitive data from a MaxCompute project entry point. Examples include connecting using Java Database Connectivity (JDBC), local client (odpscmd).
If you enable underlying data masking for MaxCompute and set the corresponding rules, the Underlying data masking for MaxCompute rule is applied when you query sensitive data.
This feature helps protect sensitive information such as phone numbers, ID card numbers, bank card numbers, license plate numbers, and IP addresses. Dynamic data masking only masks data in query results. It does not affect the underlying stored data.
Limits
This feature is available only in DataWorks Professional Edition and higher. It is not available in DataWorks Basic Edition. If you use DataWorks Basic Edition, upgrade it to a suitable edition. For more information, see Upgrade versions.
Underlying data masking for MaxCompute is supported only in the following regions: China (Beijing), China (Shanghai), China (Hangzhou), China (Chengdu), China (Shenzhen), China (Beijing) Gov Cloud, China (Shanghai) Finance Cloud, China (Hong Kong), Singapore, Germany (Frankfurt), Malaysia (Kuala Lumpur), US (Silicon Valley), and Indonesia (Jakarta).
If you enable underlying data masking for MaxCompute and configure the corresponding rules, the Underlying data masking for MaxCompute rule is applied when you query sensitive data. If you do not enable underlying data masking or do not configure any rules, the configured Upper-layer masking scenario rule is applied.
Underlying data masking for MaxCompute does not support masking primary key fields in MaxCompute tables.
This feature can be used only for MaxCompute projects that contain data created more than 24 hours ago.
Preparations
Prepare the MaxCompute project and data to be masked. For more information, see Create a MaxCompute project and Import data.
Go to the Data Security Guard service and activate it. For more information, see Go to Data Security Guard.
On the Terms of Service page, select I have read and agree to the preceding terms, and then click Activate Now.
Enable data masking
Select a data masking scenario.
In the navigation pane on the left, click Rule Configuration > Data Masking Management to go to the Data Masking Management page.
In the Masking Scenario area, select .
NoteIf you want to see the masking effect on the DataWorks interface, enable Data Development/Data Map Display Masking. For more information about how to create a data masking scenario, see Create a data masking scenario.
(Optional) Configure a whitelist.
If data specified by a masking rule does not need to be masked for certain users, you can configure a whitelist for the rule.
On the Data Masking Management page, click Whitelist Configuration.
In the upper-right corner, click +Whitelist.
In the Create Whitelist dialog box, select Sensitive Field Type, User Group Scope, and Effective Period.
NoteAfter you set the effective period for the whitelist, if a user queries the sensitive information outside this period, the data will still be masked.
Configure the project.
Click MaxCompute engine layer masking_New to show all MaxCompute projects for which underlying data masking is enabled.
Click the Status switch for the target project to enable the underlying data masking rule for that project.
NoteIf you enable underlying data masking for MaxCompute and configure the corresponding rules, the Underlying data masking for MaxCompute rule is applied when you query sensitive data. If you do not enable underlying data masking or do not configure any rules, the configured Upper-layer masking scenario rule is applied.
Query data and check the masking results
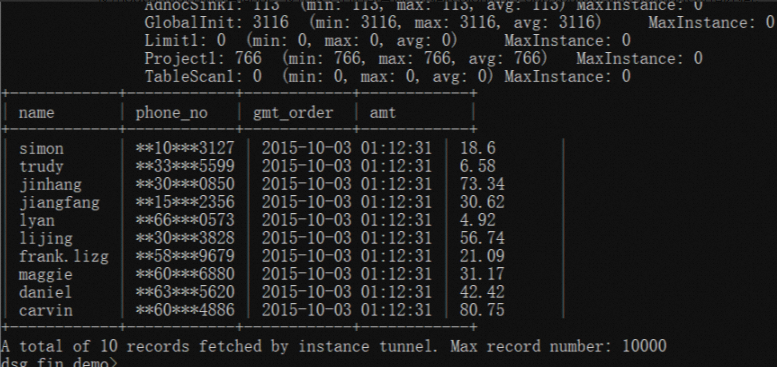
This example shows how to query data and check the masking results using SQL statements on the odpscmd interface.
Execute the query SQL statement.
NoteUnderlying data masking for MaxCompute is supported only at the session level.
Take the China (Hangzhou) region as an example. The complete script to implement underlying data masking for MaxCompute is as follows.
select * from table;View the masking results.