Use a DataWorks Data Integration batch synchronization task to synchronize the ods_user_info_d table (basic user information) from MySQL and the user_log.txt file (website access log data) from OSS to the ods_user_info_d_starrocks and ods_raw_log_d_starrocks tables in StarRocks.
Prerequisites
Make sure the required environment is ready before you begin. For more information, see Prepare the environment.
Objective
Synchronize the following public data sources to StarRocks.
|
Source type |
Source data |
Source schema |
Destination type |
Destination table |
Destination schema |
|
MySQL |
Table: ods_user_info_d Basic user information |
|
StarRocks |
|
|
|
HttpFile |
File: user_log.txt User website access logs |
Each line represents a user access record. |
StarRocks |
|
|
DataStudio
Log on to the DataWorks console. In the target region, click in the left-side navigation pane. Select a workspace from the drop-down list and click Go to Data Development.
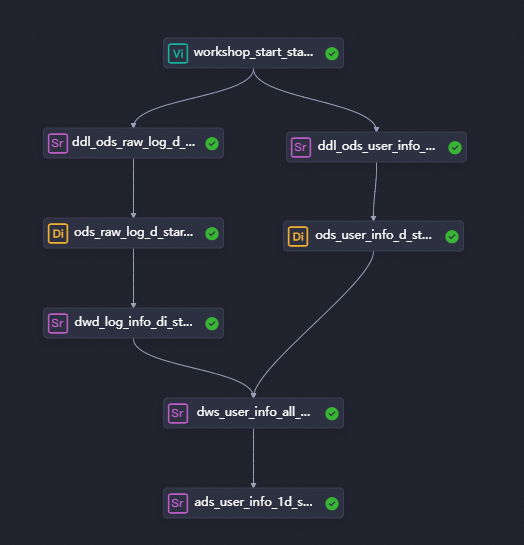
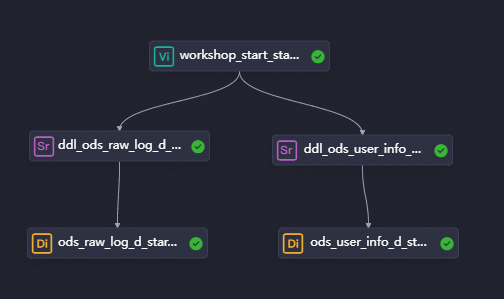
1. Design a workflow
Design the workflow
-
Create a workflow.
All development in DataWorks occurs within a workflow, so you must create one before adding nodes. For more information, see Create a workflow.
Name the workflow: User Profile Analysis_StarRocks.
-
Design the workflow.
After the workflow is created, its canvas opens automatically. As outlined in the workflow design guide, click New Node on the canvas, drag nodes onto the canvas, and connect them to define their dependencies.
-
Because the virtual node and the synchronization nodes have no data lineage in this tutorial, you must define their scheduling dependencies by connecting them on the canvas. For more information about other ways to configure dependencies, see Scheduling dependency configuration guide. The following table describes each node.
Node classification
Node type
Node name
(Named after the final output table)
Description
General
virtual node

workshop_start_starrocksManages the user profile analysis workflow and clarifies data flow paths. This node is a dry-run task that requires no code.
Database
StarRocks

ddl_ods_user_info_d_starrocksRun this node before the synchronization task. It creates the StarRocks table
ods_user_info_d_starrocksto receive basic user information from the MySQL source.Database
StarRocks

ddl_ods_raw_log_d_starrocksRun this node before the synchronization task. It creates the StarRocks table
ods_raw_log_d_starrocksto receive user website access records from the OSS source.Data Integration
offline synchronization

ods_user_info_d_starrocksSynchronizes basic user information from MySQL to the StarRocks table
ods_user_info_d_starrocks.Data Integration
offline synchronization

ods_raw_log_d_starrocksSynchronizes user website access records from OSS to the StarRocks table
ods_raw_log_d_starrocks.
Configure scheduling logic
The virtual node workshop_start_starrocks controls the entire workflow, scheduling it to run at 00:30 every day. The following table describes the key scheduling configurations for the virtual node. You do not need to change the scheduling for other nodes. For details about the implementation logic, see Advanced time property configurations. For information about other scheduling configurations, see Overview of task scheduling property configuration.
|
Scheduling configuration |
Setting |
Description |
|
Scheduling time configuration |
In the Time Property section, set Scheduled Time to 00:30. |
The virtual node is scheduled to run at 00:30, triggering the workflow to run daily. |
|
Scheduling dependency configuration |
In the Upstream Dependencies section, select the Use Workspace Root Node checkbox. |
Since the virtual node |
In DataWorks, all nodes must have upstream dependencies. All tasks in the data synchronization stage depend on the virtual node workshop_start_starrocks. Therefore, the workshop_start_starrocks node triggers the data synchronization workflow.
2. Build the synchronization pipeline
Create the destination StarRocks tables
Create the destination StarRocks tables before synchronizing data.
The StarRocks table is generated based on the source table schema. For more information, see Chapter Objectives. On the workflow panel, double-click the databaseddl_ods_user_info_d_starrocks node and the databaseddl_ods_raw_log_d_starrocks node, go to the node editing page, enter the corresponding StarRocks table creation command for each, and click ![]() to save.
to save.
-
ddl_ods_user_info_d_starrocksCREATE TABLE IF NOT EXISTS ods_user_info_d_starrocks ( uid STRING COMMENT 'User ID', gender STRING COMMENT 'Gender', age_range STRING COMMENT 'Age range', zodiac STRING COMMENT 'Zodiac sign', dt STRING not null COMMENT 'Time' ) DUPLICATE KEY(uid) COMMENT 'User behavior analysis example - basic user information table' PARTITION BY(dt) PROPERTIES("replication_num" = "1"); -
ddl_ods_raw_info_d_starrocksCREATE TABLE IF NOT EXISTS ods_raw_log_d_starrocks ( col STRING COMMENT 'Log', dt DATE not null COMMENT 'Time' ) DUPLICATE KEY(col) COMMENT 'User behavior analysis example - raw website access log table' PARTITION BY(dt) PROPERTIES ("replication_num" = "1");
Configure user data batch synchronization
On the workflow panel, double-click the batch synchronization node ods_user_info_d_starrocks to open its configuration panel. Configure the synchronization pipeline to synchronize basic user information from the MySQL table ods_user_info_d to the StarRocks table ods_user_info_d_starrocks.
-
Configure network and resources.
After you configure the Data source, My Resource Group, and Data going, click The next Step and complete the connectivity test. The following table details the settings.
Parameter
Value
Data source
-
Data source: MySQL
-
Data Source Name:
user_behavior_analysis_mysql
My Resource Group
Select the Serverless resource group created during the environment preparation stage.
Data going
-
Data going: StarRocks
-
Data Source Name:
Doc_StarRocks_Storage_Compute_Tightly_01
-
-
Configure the task.
-
Configure the source and destination.
Module
Parameter
Value
Data source
Table
Select the MySQL table
ods_user_info_d.Shard Key
Use a primary key or an indexed integer column as the split key. Only integer-type fields are supported.
Here, the split key is set to the
uidfield.Data going
Table
Select the StarRocks table
ods_user_info_d_starrocks.Statement Run Before Writing
Data is dynamically partitioned by the
dtfield. To prevent duplicate data writes when a node is rerun, the following SQL statement deletes the existing destination partition before each synchronization.ALTER TABLE ods_user_info_d_starrocks DROP PARTITION IF EXISTS p${var} FORCE, where${var}is a parameter. You can assign a scheduling parameter to it during the scheduling properties configuration stage to implement dynamic parameter input in scheduling scenarios. For more information, see Scheduling Settings.Streamload Request Parameters
Request parameters for StreamLoad in JSON format.
{ "row_delimiter": "\\x02", "column_separator": "\\x01" } -
Configure field mapping.
Field mapping defines the relationship between source and destination fields. By assigning a scheduling parameter to a variable, you can dynamically assign values to the StarRocks partition field to ensure daily data is written to the correct partition.
Click Map Fields with Same Name to automatically map source fields to destination fields with the same name.
Click Add a Row, enter
'${var}', and manually map this value to thedtfield in StarRocks. -
Configure scheduling properties.
On the configuration page, click Scheduling Properties on the right side to open the Scheduling Configuration panel. For more information, see Node Scheduling Properties.
Parameter
Value
Notes
Scheduling Parameters
In the Scheduling Parameters section, click Add Parameter and add the following:
-
Name: var
-
Value: $[yyyymmdd-1]
The scheduling parameter list also includes the bizdate parameter with the value
$bizdate.Scheduling Dependency
In the Scheduling Dependency section, set the table as an output for this node.
The format is
worksspacename.tablename.Under Output Name of This Node, manually add an output name, such as
workspace_name.ods_user_info_d_starrocks. This name must match the table name configured for the destination. -
-
Configure user log batch synchronization
On the workflow panel, double-click the batch synchronization ods_raw_log_d_starrocks node to open its configuration panel. Configure the synchronization pipeline to transfer user website access logs from the user_log.txt HttpFile to the ods_raw_log_d_starrocks StarRocks table.
-
Configure network and resources.
After you configure the Data source, My Resource Group, and Data going, click The next Step and complete the connectivity test. The following table details the settings.
Parameter
Value
Data source
-
Data source: HttpFile
-
Data Source Name:
user_behavior_analysis_HttpFile
My Resource Group
Select the Serverless resource group that you created during the environment preparation stage.
Data going
-
Data going: StarRocks
-
Data Source Name:
Doc_StarRocks_Storage_Compute_Tightly_01
-
-
Configure the task.
-
Configure the source and destination.
Module
Parameter
Value
Data source
File Path
/user_log.txtFile Type
textField Delimiter
|No
After you finish configuring the source, click Confirm Data Structure.
Data going
Table
ods_raw_log_d_starrocksStatement Run Before Writing
Data is dynamically partitioned by the
dtfield. To prevent duplicate data writes when a node is rerun, the following SQL statement deletes the existing destination partition before each synchronization.ALTER TABLE ods_user_info_d_starrocks DROP PARTITION IF EXISTS p${var} FORCEHere,
${var}is a variable parameter. You can assign a scheduling parameter to it when you configure the scheduling properties to enable dynamic parameter input in scheduling scenarios.Streamload Request Parameters
{
  "row_delimiter": "\\x02",
  "column_separator": "\\x01"
}
In the Source module, select the user_behavior_analysis_httpfile (HttpFile type) data source. In the advanced settings, set Encoding to UTF-8, Null Value to No processing, and Compression Format to None. In the Destination module, select StarRocks as the data source type.
-
Configure field mapping.
Click the
 icon in the node toolbar to switch from Wizard Mode to Script Mode. This allows you to configure the field mapping for the HttpFile source and dynamically assign a value to the
 dtpartition field in StarRocks.In the source HttpFile configuration, add the following to the
columnarray:{ "type": "STRING", "value": "${var}" } -
The following provides a complete script example for the
ods_raw_log_d_starrocksnode:{ "type": "job", "version": "2.0", "steps": [ { "stepType": "httpfile", "parameter": { "fileName": "/user_log.txt", "nullFormat": "", "compress": "", "requestMethod": "GET", "connectTimeoutSeconds": 60, "column": [ { "index": 0, "type": "STRING" }, { "type": "STRING", "value": "${var}" } ], "skipHeader": "false", "encoding": "UTF-8", "fieldDelimiter": "|", "fieldDelimiterOrigin": "|", "socketTimeoutSeconds": 3600, "envType": 0, "datasource": "user_behavior_analysis", "bufferByteSizeInKB": 1024, "fileFormat": "text" }, "name": "Reader", "category": "reader" }, { "stepType": "starrocks", "parameter": { "loadProps": { "row_delimiter": "\\x02", "column_separator": "\\x01" }, "envType": 0, "datasource": "Doc_StarRocks_Storage_Compute_Tightly_01", "column": [ "col", "dt" ], "tableComment": "", "table": "ods_raw_log_d_starrocks", "preSql": "ALTER TABLE ods_raw_log_d_starrocks DROP PARTITION IF EXISTS p${var} FORCE ; " }, "name": "Writer", "category": "writer" }, { "copies": 1, "parameter": { "nodes": [], "edges": [], "groups": [], "version": "2.0" }, "name": "Processor", "category": "processor" } ], "setting": { "errorLimit": { "record": "0" }, "locale": "zh", "speed": { "throttle": false, "concurrent": 2 } }, "order": { "hops": [ { "from": "Reader", "to": "Writer" } ] } } -
Configure scheduling properties.
On the configuration page, click Scheduling properties on the right to open the Scheduling Configuration panel.
Parameter
Value
Notes
Scheduling Parameters
In the Scheduling Parameters section, click Add Parameter and add the following:
-
Name: var
-
Value: $[yyyymmdd-1]
Scheduling Dependency
In the Scheduling Dependency section, set the table as an output for this node.
The format is
worksspacename.tablename.Ensure the value in the table field in the Writer step (for example,
ods_raw_log_d_starrocks) is manually added as an output name in the Output Name of This Node table. The output name format isworkspacename.tablename. -
-
Step 3: Verify synchronized data
Run the workflow
-
Go to the workflow panel.
Under Workflow, double-click User Profile Analysis_StarRocks to open the workflow canvas.
-
Run the workflow.
On the workflow canvas, click the
 icon in the toolbar. The nodes in the data integration stage of the workflow will run according to their dependencies.
 -
Check the task run status.
A node with the
 status indicates a successful synchronization.
 -
View the task execution logs.
On the canvas, right-click the
ods_user_info_d_starrocksnode or theods_raw_log_d_starrocksnode and select View Log.
View the synchronization results
-
Create an ad hoc query node.
In the navigation pane on the left of the DataStudio page, click
 to open the Ad Hoc Query panel. Right-click Ad Hoc Query and select .
 -
Query the destination tables.
-- The partition column in the query must be updated to the business date. For example, if the task runs on 20240102, the business date is 20240101, which is the day before the task execution date.
SELECT * from ods_raw_log_d_starrocks where dt=your_business_date;
SELECT * from ods_user_info_d_starrocks where dt=your_business_date;
Next steps
Now that you have synchronized the data, proceed to process basic user information and website access logs in StarRocks. For details, see Process data.