You can use an aggregate table to store statistical data of multiple derived metrics that have the same period and dimension in a data domain. An aggregate table can be used for subsequent business query, online analytical processing (OLAP) analysis, and data distribution. This topic describes how to create an aggregate table.
Prerequisites
A data layer is created. You can store tables that are used for the same purpose at the same data layer. This helps you easily find and use tables. In most cases, an aggregate table is stored at the data warehouse summary (DWS) layer and contains statistical data of multiple derived metrics in a dimension or a set of dimensions. The statistical data can be used for subsequent business query and data distribution. You can also store aggregate tables at another data layer based on your business requirements. For information about how to create a data layer, see Define data warehouse layers.
A data domain is created. An aggregate table is created based on a data domain. The data domain determines the business category based on which you want to build a model and is used to bear business processes. For information about how to create a data domain, see Data domains.
A period is created to determine the time range of which you want to aggregate statistical data. For information about how to create a period, see Period.
Background information
An aggregate table integrates multiple derived metrics in a data domain based on the period and associated dimension that you specified. The associated dimension, period, and derived metrics are used to generate statistical fields in the aggregate table to help you analyze and generate reports. You can use an aggregate table to display the status of your business based on the statistics of multiple derived metrics that have the same period and same dimension.
Create an aggregate table
Go to the Data Modeling page.
Log on to the DataWorks console. In the top navigation bar, select the desired region. In the left-side navigation pane, choose . On the page that appears, select the desired workspace from the drop-down list and click Go to Data Modeling.
In the top navigation bar of the Data Modeling page, click Dimensional Modeling to go to the Dimensional Modeling page.
Create an aggregate table.
On the Dimensional Modeling page, move the pointer over the
 icon and choose .
 In the Basic Information section of the configuration tab that appears, configure basic information for the aggregate table.

Parameter
Description
Example value
Data Layer
The data layer at which you want to store the aggregate table. By default, DWS that belongs to the common layer category is selected. You can also store the aggregate table at another data layer based on your business requirements. For information about how to create a data layer, see Define data warehouse layers.
DWS
Business Category
The business category in which you want to store the aggregate table. For information about how to create a business category, see Business categories.
Sales
Data Domain
The data domain in which you want to store the aggregate table. The data domain determines the subject of statistical data in the aggregate table after data aggregation. For information about how to create a data domain, see Data domains.
NoteEach aggregate table can belong to only one data domain.
Transaction
Granularity
The dimension that you want to associate with the aggregate table. For information about how to create a dimension, see Create a conceptual model: Dimension.
Order type
Period
The time range of statistical data that you want to aggregate. Examples: last day and last week.
You can select a period from existing periods. If the existing periods do not meet your business requirements, you can create a period. For information about how to create a period, see Period.
Last week
Modifiers
The business scope of the statistical data that you want to aggregate.
You can select one or more modifiers from existing modifiers. If the existing modifiers do not meet your business requirements, you can create a modifier. For information about how to create a modifier, see Modifier.
Online shop
Naming Rule
The checker that is used to check whether the name of the aggregate table conforms to the configured naming conventions. You can select the checker that you created at each data layer during data warehouse planning. For information about how to configure and use a checker, see Configure data warehouse layer checkers and Use checkers.
-
Table Name
The name of the aggregate table. If you configure the Naming Rule parameter, the name that you specify must conform to the naming conventions defined in the checker specified by the Naming Rule parameter.
dws_trade_buyer_subpay_1dDisplay Name
The display name of the aggregate table.
Phased payments for transactions
Lifecycle
The lifecycle of the aggregate table. Unit: day.
90
Owner
The owner of the aggregate table. The default owner is the creator of the aggregate table.
-
Description
The description of the aggregate table.
-
Click Save in the upper part of the configuration tab to save the basic information of the aggregate table.
Add fields for the aggregate table
You can add fields for a table in shortcut mode or script mode. The shortcut mode supports the following methods that can be used to add fields for a table:
Import from Table/View: This method allows you to import fields from existing physical tables or views that are created within a compute engine instance to the table. To use this method to add fields for an aggregate table, you must import all or specific fields from a physical table or view that is selected from the Search for Existing Table/View drop-down lists.
NoteYou can import fields only from physical tables or views that are created within MaxCompute, Hologres, and E-MapReduce (EMR) Hive compute engine instances.
Import from Metrics: This method allows you to use derived metrics that are created in Data Metric as fields in the table.
Shortcut Mode: Import from Table/View
Click Expand next to Import from Table/View.
In the Search For Existing Table/View drop-down lists, select a compute engine type from the left one, and enter a keyword and select the desired physical table or view from the displayed search results from the right one. Click the following icons next to the name of the selected physical table or view to import all or specific fields from the physical table or view to the aggregate table.
NoteWhen you search for the desired physical table or view, keyword-based fuzzy match is supported. After you enter a keyword, all physical tables or views whose names contain the keyword are displayed.
You can search for only tables in the production environment. You cannot search for tables in the development environment.
 : imports all fields from the selected physical table or view to the aggregate table.
  : imports specific fields from the selected physical table or view to the aggregate table.
If you choose to import specific fields, select the fields from the physical table or view in the dialog box that appears. Then, click Import.
NoteIf a field in the fields that are imported has no display name, you can fill the description of the field as the display name of the field as prompted.
Shortcut Mode: Import from Metrics
Click Quick Import next to Import from Metrics.
In the Import from Metrics dialog box, select the desired derived metrics from all derived metrics that are created and displayed. You can also specify filter conditions such as Period, Business Process, Modifiers, and Atomic Metric to search for the desired derived metric.
Click Import in the lower part of the dialog box.
Script Mode
The script mode allows you to edit code to manage the fields in the table. After you click Script Mode, the statement that is used to create the table is displayed in the code editor in the Script Mode dialog box. You can modify the statement based on your business requirements. Then, click OK.
Configure attributes and associations for fields in the table
After fields are added for the table, you can configure Associated Field Standard, Associated Lookup Table, Redundant Field, and Associated Granularity/Metric for the fields.
Configure attributes for fields in the table.
By default, the following basic attributes are displayed for fields: Field Name, Type, Field Display Name, Description, Primary Key, Not Empty, Measurement Unit, and Actions. You can click Field Display Settings in the upper-right corner of the list of the fields that are added and select the attributes that you want to display. You can also modify the values of the attributes based on your business requirements.
Configure Field Standard to Associate for fields in the table.
You can associate field standards and lookup tables with the added fields by configuring Field Standard to Associate and Associated Lookup Table for fields in the table.
Field Standard to Associate: allows you to manage the values of the fields that have the same meaning but different names in a centralized manner. A field standard can also be used to define the value range and measurement unit for the fields.
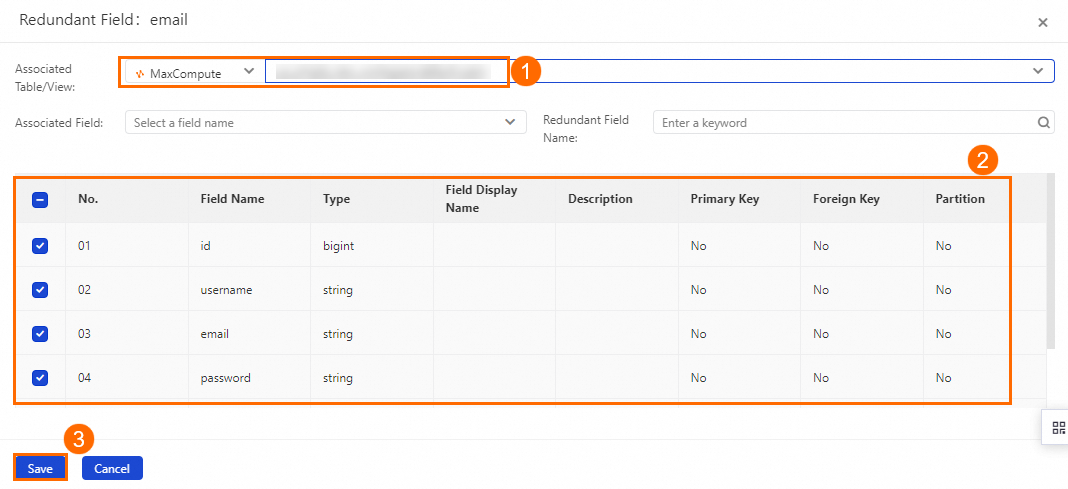
Configure Redundant Field for fields in the table.
Find the field for which you want to configure redundant fields and click Redundant Field in the Actions column. In the dialog box that appears, select one or more fields that you want to associate with the field and click Save.
Configure Association Type for fields in the table.
You can configure Association Type to specify the statistical type of the value of each field in an aggregate or application table. Association Type has the following options: Statistical Granularity, Derived/Composite Metric, and Atomic Metric.
Statistical Granularity: allows you to associate a dimension table and fields in the dimension table with fields in an aggregate table or application table. For example, you can associate a commodity or merchant dimension table and fields in the commodity or merchant dimension table with fields in an aggregate table or application table.
Derived/Composite Metric: allows you to associate a derived metric or composite metric with a field in an aggregate table. For example, you can associate the derived metric payment amount of orders placed in the last seven days with a field in an aggregate table.
Atomic Metric: allows you to associate an atomic metric with a field in an aggregate table. For example, you can associate the atomic metric payment account of orders that are placed with a field in an aggregate table or application table.
NoteBy default, Association Type is not configured for fields that are imported from a table or added in script mode. You can configure Association Type for the fields based on your business requirements.
Then, click Save in the upper part of the configuration tab of the table.
Next steps
After the aggregate table is created, you must configure partitions for the table and publish the table to the required environment. For more information, see Materialize a table to a compute engine.