This topic describes how to create a synchronization task to synchronize data from MaxCompute to a MySQL data source.
Prerequisites
An ApsaraDB RDS for MySQL instance is created, and the ID of the instance is obtained. A whitelist is configured for the instance in the ApsaraDB RDS console. For more information, see Create an ApsaraDB RDS for MySQL instance.
NoteIf you use a serverless resource group to run a synchronization task configured for an ApsaraDB RDS for MySQL data source, take note of the following items:
If you want to access the data source over a virtual private cloud (VPC), you must add the CIDR block of the vSwitch with which the serverless resource group is associated to the IP address whitelist of the data source.
If you want to access the data source over the Internet, you must add the elastic IP address (EIP) configured for the VPC with which the serverless resource group is associated to the IP address whitelist of the data source.
For more information, see Configure an IP address whitelist.
A table named odps_result is created in the ApsaraDB RDS for MySQL database to which you want to synchronize data. You can create the table by executing the following statement:
CREATE TABLE `ODPS_RESULT` (
`education`  varchar(255) NULL ,
`num`  int(10) NULL
);
After the table is created, you can execute the
desc odps_result;statement to view the table details.A result table named result_table is prepared. For more information, see Create tables and upload data.
A zero load node named start and an ODPS SQL node named insert_data are created. For more information, see Create a workflow.
Background information
You can use Data Integration to periodically synchronize the business data that is generated in a business system to a DataWorks workspace. You can create SQL tasks to compute the data and use Data Integration to periodically synchronize the computing results to a specified data source for further display or use.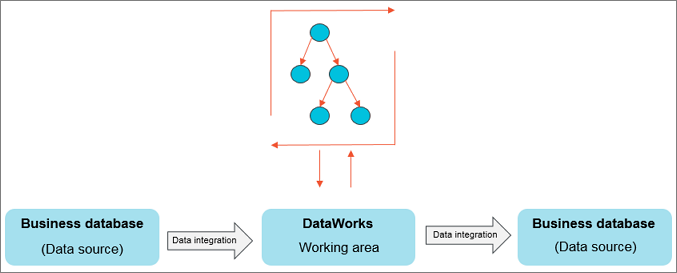
Data Integration allows you to import data to and export data from various data sources, such as ApsaraDB RDS, MySQL, SQL Server, PostgreSQL, MaxCompute, ApsaraDB for Memcache (OCS), PolarDB-X 1.0, Object Storage Service (OSS), Oracle, File Transfer Protocol (FTP), Dameng (DM), Hadoop Distributed File System (HDFS), and MongoDB. For more information about data source types, see Supported data source types, Reader plug-ins, and Writer plug-ins.
Step 1: Add a data source
Only the workspace administrator can add data sources. Members that are assigned other roles can only view data sources.
Go to the SettingCenter page.
Log on to the DataWorks console. In the top navigation bar, select the desired region. In the left-side navigation pane, choose . On the page that appears, select the desired workspace from the drop-down list and click Go to Management Center.
Add a MySQL data source.
In the left-side navigation pane of the SettingCenter page, choose to go to the Data Sources page.
In the upper-left corner of the Data Sources page, click Add Data Source. In the Add Data Source dialog box, click MySQL.
Configure information about the MySQL data source.
On the Add MySQL Data Source page, configure the parameters. In this example, set the Configuration Mode parameter to Alibaba Cloud Instance Mode.
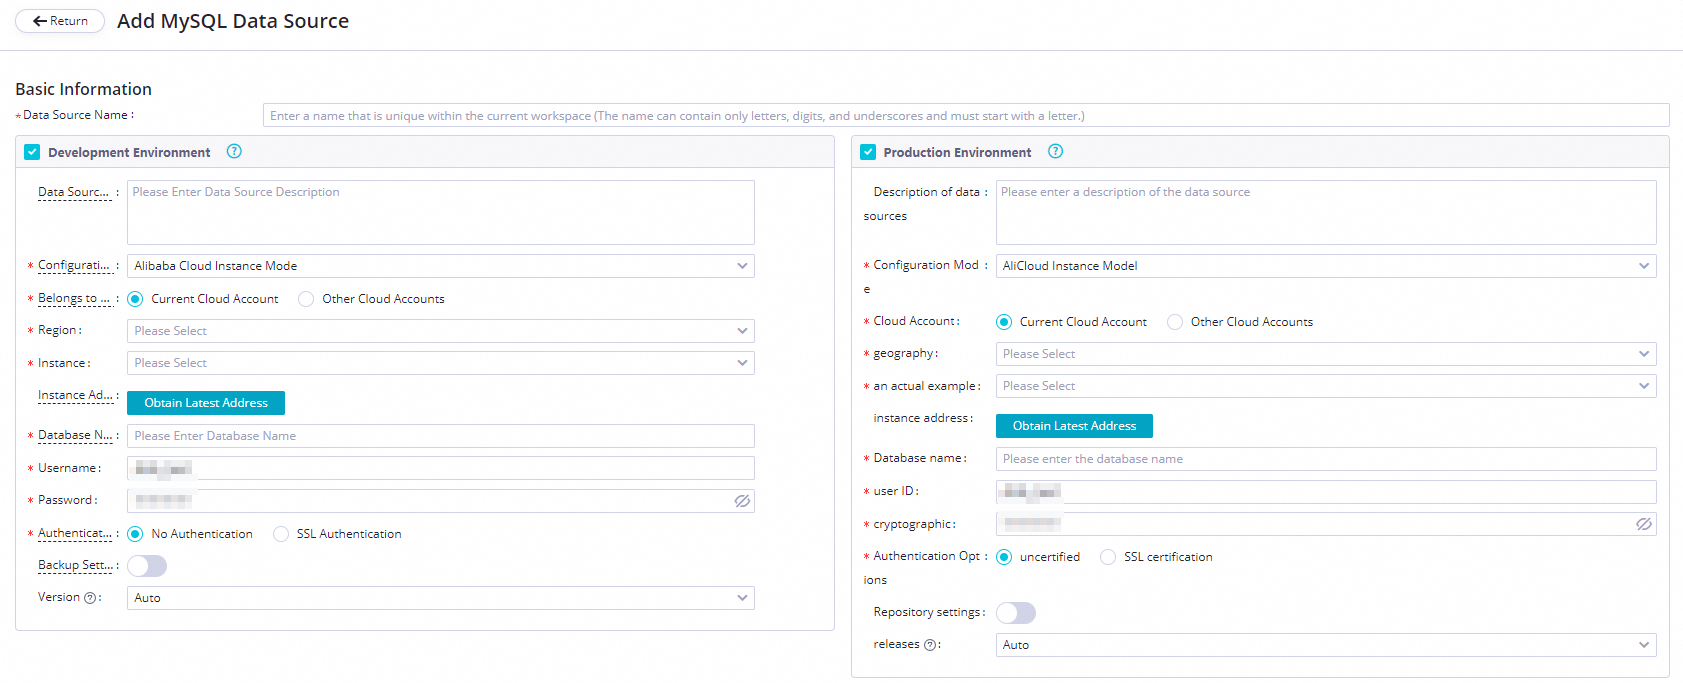
The following table describes the key parameters for adding a MySQL data source.
Parameter
Description
Applicable environment
The environment in which the data source is used. Valid values: Development Environment and Production Environment.
Configuration Mode
The mode in which you want to add the data source. Select Alibaba Cloud Instance Mode.
Alibaba Cloud Account
Select Current Alibaba Cloud Account.
Region
The region in which the data source resides.
Instance
Select the ApsaraDB RDS for MySQL instance that you create. After you select the instance, you can click Obtain Latest Address to view the information about the instance.
If no instance is available, you can create an instance in the ApsaraDB RDS console.
Database Name, Username, and Password
The name of the default ApsaraDB RDS for MySQL database, and the username and password that are used to log on to the database. Do not use at signs (@) in the password.
The following descriptions provide instructions for you to configure a synchronization task that uses a MySQL data source:
When you configure a database-level real-time or batch synchronization task that uses a MySQL data source, you can select one or more databases on which you have access permissions in the ApsaraDB RDS for MySQL instance.
If you select multiple databases when you configure a batch synchronization task, you must add a data source for each database.
Authentication Method
Select No Authentication.
Configure Secondary Instance
If the ApsaraDB RDS for MySQL instance is a primary instance and has a secondary read-only instance, you can turn on Configure Secondary Instance, and select the ID of the secondary instance. This prevents the primary instance from being affected and ensures the performance of the primary instance. If the primary instance has multiple secondary read-only instances, only the data of one of the read-only instances is read.
NoteThis feature supports only serverless resource groups.
Test network connectivity between the data source and resource groups that you select.
Separately click Data Integration and Data Scheduling in the Connection Configuration section, find the resource group for Data Integration and the resource group for scheduling that you want to use, and then click Test Network Connectivity in the Connection Status column. If the connectivity status is Connected, the resource groups are connected to the data source.
NoteA synchronization task can use only one resource group of a specific type.
To ensure that your synchronization task can be run as expected, you must test network connectivity between the data source and all types of resource groups on which your synchronization task will be run.
If the data source passes the network connectivity test, click Complete Creation.
Step 2: Create and configure a synchronization task
This section describes how to create a synchronization node named write_result to generate a synchronization task. The task is used to synchronize data in the result_table table to your MySQL data source. Procedure:
Go to the DataStudio page.
Log on to the DataWorks console. In the top navigation bar, select the desired region. In the left-side navigation pane, choose . On the page that appears, select the desired workspace from the drop-down list and click Go to Data Development.
Create a batch synchronization node.
In the Scheduled Workflow pane of the DataStudio page, click the
 icon and choose to create a batch synchronization node named write_result to generate a synchronization task.
 Establish network connections between a specific resource group and the data sources.
In the Configure Network Connections and Resource Group step on the configuration tab of the synchronization node, select MaxCompute(ODPS) for Source and MySQL for Destination, select a resource group that you want to use to run the synchronization task, and then test network connectivity between the resource group and data sources. For more information about how to establish network connections, see Network connectivity solutions.

Click Next to go to the Configure tasks step.
Configure information for data synchronization.
Configure the source and destination.
Select the result_table table as the source table and select the odps_result table as the destination table. Configure other parameters based on your business requirements. For more information, see Configure a batch synchronization task by using the codeless UI.

Configure mappings between source fields and destination fields.
After the source and destination are configured, you must configure mappings between source fields and destination fields. After you configure the mappings, the batch synchronization task writes the values of the source fields to the destination fields of the same data type based on the mappings. Make sure that fields in the source table have a one-to-one mapping with fields in the destination table.
Configure channel control policies.
Parameter
Description
Task Expected Maximum Concurrency
The maximum number of parallel threads that the batch synchronization task uses to read data from the source or write data to the destination.
NoteThe actual number of parallel threads that are used during data synchronization may be less than or equal to the specified threshold due to the specifications of the resource group. You are charged for the resource group based on the number of parallel threads that are used. For more information, see Performance metrics.
DataWorks uses resource groups for scheduling to issue batch synchronization tasks in Data Integration to resource groups for Data Integration and run the tasks by using the resource groups for Data Integration. You are charged for using resource groups for scheduling to schedule batch synchronization tasks based on the number of tasks. For more information about the task issuing mechanism, see Mechanism for issuing tasks that are run on old-version resource groups.
Synchronization rate
Specifies whether to enable throttling.
If you enable throttling, you can specify a maximum transmission rate to prevent heavy read workloads on the source. The minimum value of this parameter is 1 MB/s.
If you do not enable throttling, data is transmitted at the maximum transmission rate allowed by the hardware based on the specified maximum number of parallel threads.
NoteThe bandwidth is a metric provided by Data Integration and does not represent the actual traffic of an elastic network interface (ENI). In most cases, the ENI traffic is one to two times the channel traffic. The actual ENI traffic depends on the serialization of the data storage system.
Policy for Dirty Data Records
The maximum number of dirty data records allowed.
ImportantIf a large amount of dirty data is generated during data synchronization, the overall data synchronization speed is affected.
If this parameter is not configured, dirty data records are allowed during data synchronization, and the batch synchronization task can continue to run if dirty data records are generated.
If you set this parameter to 0, no dirty data records are allowed. If dirty data records are generated during data synchronization, the batch synchronization task fails.
If you specify a value that is greater than 0 for this parameter, the following situations occur:
If the number of dirty data records that are generated during data synchronization is less than or equal to the value that you specified, the dirty data records are ignored and are not written to the destination, and the batch synchronization task continues to run.
If the number of dirty data records that are generated during data synchronization is greater than the value that you specified, the batch synchronization task fails.
NoteDirty data indicates data that is meaningless to business, does not match the specified data type, or leads to an exception during data synchronization. If an exception occurs when a single data record is written to the destination, the data record is considered as dirty data. Data records that fail to be written to a destination are considered as dirty data.
For example, when a batch synchronization task attempts to write VARCHAR-type data in a source to an INT-type field in a destination, a data conversion error occurs, and the data fails to be written to the destination. In this case, the data is dirty data. When you configure a batch synchronization task, you can control whether dirty data is allowed. You can also specify the maximum number of dirty data records that are allowed during data synchronization. If the number of generated dirty data records exceeds the upper limit that you specified, the batch synchronization task fails and exits.
Distributed Execution
Specifies whether to enable the distributed execution mode for the batch synchronization task.
If you enable the distributed execution mode for a batch synchronization task, the system splits the task into slices and distributes them to multiple Elastic Compute Service (ECS) instances for parallel running. In this case, the more ECS instances, the higher the data synchronization speed.
If you do not enable the distributed execution mode for a batch synchronization task, the specified maximum number of parallel threads is used only for a single ECS instance to run the task.
If you have a high requirement for data synchronization performance, you can use the distributed execution mode to run your batch synchronization task. If you run your batch synchronization task in distributed execution mode, fragment resources of ECS instances can be utilized. This improves resource utilization.
ImportantIf you use an exclusive resource group for Data Integration and the resource group contains only one ECS instance, we recommend that you do not run your batch synchronization task in distributed execution mode.
If one ECS instance can meet your business requirements for data transmission speed, you do not need to enable the distributed execution mode. This can simplify the execution mode of your task.
The distributed execution mode can be enabled only if the maximum number of parallel threads that you specified is greater than or equal to 8.
If you enable the distributed execution mode for a batch synchronization task, more resources will be occupied. If an out of memory (OOM) error is reported during the running of the batch synchronization task, you can disable the distributed execution mode.
Configure scheduling dependencies for the synchronization task.
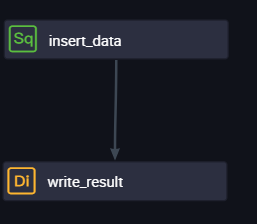
Double-click the name of the desired workflow. On the configuration tab of the workflow, configure the insert_data node as an ancestor node of the write_result node.
After the configuration is complete, click the
 icon in the top toolbar to save the task.
Step 3: Commit and deploy the synchronization task
After you save the synchronization task, return to the configuration tab of the workflow to which the synchronization task belongs. Click the ![]() icon in the top toolbar of the configuration tab of the workflow to commit the synchronization task to the scheduling system. The scheduling system automatically runs the node at the scheduling time from the next day based on your settings.
icon in the top toolbar of the configuration tab of the workflow to commit the synchronization task to the scheduling system. The scheduling system automatically runs the node at the scheduling time from the next day based on your settings.
What to do next
Now you have learned how to create a synchronization task to synchronize data to a specific data source. You can proceed with the next tutorial. In the next tutorial, you will learn how to configure scheduling properties and scheduling dependencies for a synchronization task. For more information, see Configure scheduling properties and scheduling dependencies for a task.
References
For more information about how to configure a batch synchronization task, see Configure a batch synchronization task by using the codeless UI.