You can run Spark on MaxCompute jobs in Local Mode or Cluster Mode. Within DataWorks, you can also run Offline Jobs in Cluster Mode to integrate them with other Node types. This topic describes how to configure and schedule these Jobs.
Overview
Spark on MaxCompute is a computing service provided by MaxCompute that is compatible with open-source Spark. It provides the Spark computing framework on top of a unified computing resource and data permission system, letting you use familiar development methods for data processing and analysis. In DataWorks, the ODPS Spark Node lets you schedule these Jobs and integrate them with others.
Spark on MaxCompute Jobs can be developed in Java, Scala, or Python. When run as Offline Jobs in DataWorks, they are executed in Cluster Mode. For more information about Spark on MaxCompute run modes, seeRuntime modes.
Limitations
If submission fails for an ODPS Spark Node that uses Spark 3.x, you must purchase and use a Serverless Resource Group. For more information, seeUse serverless resource groups.
Prerequisites
ODPS Spark Nodes support running Spark on MaxCompute Offline Jobs using Java/Scala or Python. The development process and configuration options vary by language.
Java/Scala
To run Java or Scala code in an ODPS Spark Node, you must first develop the Job and upload the packaged code to DataWorks as a MaxCompute Resource.
Prepare the development environment.
Prepare your development environment according to your operating system. For more information, see Set up a Linux development environment and Set up a Windows development environment.
Develop the Java/Scala code.
Develop the Spark on MaxCompute code in your local environment. We recommend using the sample project template provided by Spark on MaxCompute.
Package the code and upload it to DataWorks.
After you finish developing the code, package it and upload it to DataWorks as a MaxCompute
Resource. For more information, see Create and use MaxCompute resources.
Python (using the default environment)
In DataWorks, you can write PySpark code directly in a Python Resource and use an ODPS Spark Node to submit and run it. For more information about how to create a Python Resource in DataWorks, see Create and use MaxCompute resources. For a PySpark development example, see Develop a Spark on MaxCompute application by using PySpark.
This method uses the default Python environment provided by DataWorks, which has limited support for third-party packages. If your Job requires other dependencies, you can prepare a custom Python environment as described in the Python (using a custom environment) section. Alternatively, you can use the PyODPS 2 Node or PyODPS 3 Node, which offer better support for Python Resources.
Python (using a custom environment)
If the default Python environment does not meet your needs, prepare a custom one to run your Spark on MaxCompute Job.
Prepare a local Python environment.
See
PySpark Python version and dependency supportfor instructions on configuring a suitable Python environment.Package the environment and upload it to DataWorks.
Compress the Python environment into a ZIP package and upload it to DataWorks as a MaxCompute
Resource. This package provides the execution environment for your Spark on MaxComputeJob. For more information, see Create and use MaxCompute resources.
Parameters
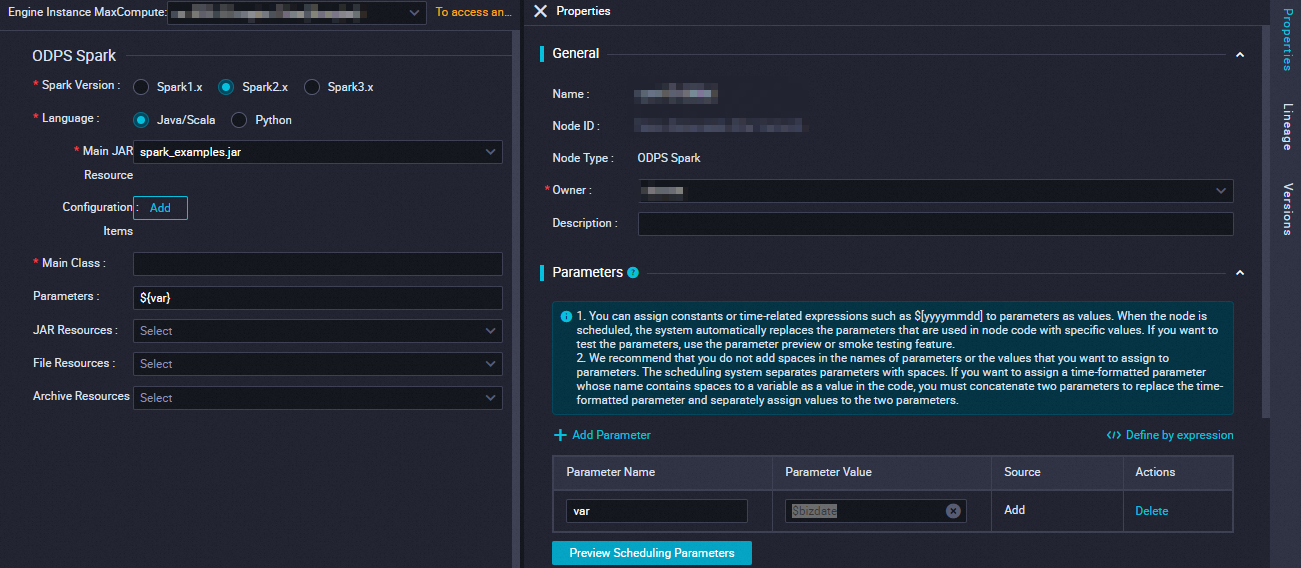
DataWorks runs Spark on MaxCompute Offline Jobs in Cluster Mode. In this mode, you must specify a custom program entry point, main. The Spark Job terminates when the main method completes, returning a Success or Fail status. Additionally, configurations from spark-defaults.conf must be added one by one to the Configuration Item section of the ODPS Spark Node. Examples include the number of executor instances, Memory, and the spark.hadoop.odps.runtime.end.point configuration.
Do not upload the spark-defaults.conf file. Instead, add each of its settings as a separate Configuration Item on the ODPS Spark Node.
Parameter | Description | spark-submit command |
Spark version | Available versions include Spark 1.x, Spark 2.x, and Spark 3.x. Note If submission fails for an ODPS Spark | — |
Language | Select Java/Scala or Python based on the development language of your Spark on MaxCompute | — |
Select main resource | Specify the main JAR You must first upload and commit the |
|
Configuration Item | Specify the configuration items for submitting the
|
|
Main Class | Specify the name of the |
|
Arguments | You can add arguments as needed, separated by spaces. DataWorks supports scheduling parameters. The format for Arguments is ${variable_name}. After configuration, assign a value to the variable in the section on the right-side pane. Note For information about the supported formats for assigning values to scheduling parameters, see Supported formats for scheduling parameters. |
|
Select other resources | You can select the following
You must first upload and commit the | Different
|
Simple example
This section demonstrates how to use an ODPS Spark Node with a simple example: checking if a string is numeric.
Create a resource.
On the Data Development page, create a new Python
Resourceand name it spark_is_number.py. For more information, see Create and use MaxCompute resources.# -*- coding: utf-8 -*- import sys from pyspark.sql import SparkSession try: # for python 2 reload(sys) sys.setdefaultencoding('utf8') except: # python 3 not needed pass if __name__ == '__main__': spark = SparkSession.builder\ .appName("spark sql")\ .config("spark.sql.broadcastTimeout", 20 * 60)\ .config("spark.sql.crossJoin.enabled", True)\ .config("odps.exec.dynamic.partition.mode", "nonstrict")\ .config("spark.sql.catalogImplementation", "odps")\ .getOrCreate() def is_number(s): try: float(s) return True except ValueError: pass try: import unicodedata unicodedata.numeric(s) return True except (TypeError, ValueError): pass return False print(is_number('foo')) print(is_number('1')) print(is_number('1.3')) print(is_number('-1.37')) print(is_number('1e3'))Save and commit the
Resource.
In the ODPS Spark
Nodeyou created, configure the nodeParametersand schedulingParametersas described in Parameters, then save and commit theNode.Parameter
Description
Spark version
Spark 2.x
Language
Python
Select main Python resource
From the drop-down list, select the Python
Resourceyou created: spark_is_number.py.Go to the
Operation Centerfor the development environment and run aData BackfillJob. For detailed instructions, see Data backfill instance O&M.NoteBecause ODPS Spark
NodesinData Developmentcannot be run directly, you must execute theJobfrom theOperation Centerin the development environment.View the results.
After the
Data BackfillInstanceruns successfully, go to its tracking URL in theRun Logto view the results:False True True True True
Advanced examples
For more examples of developing Spark on MaxCompute Jobs for different use cases, see the following topics:
Next steps
After you develop the Job, you can perform the following operations.
Scheduling: Configure the scheduling properties for the node. If the task must run periodically, you must configure properties such as rerun settings and scheduling dependencies. For more information, see Overview of task scheduling properties.
Task debugging: Test and run the code of the current node to verify that the code logic is correct. For more information, see Task debugging process.
Task deployment: After you complete all development-related operations, you must deploy all nodes. After deployment, the nodes run periodically based on their scheduling configurations. For more information, see Deploy tasks.
Diagnose Spark Jobs: MaxCompute provides the Logview tool and Spark web UI for Spark
Jobs. You can check theRun Logto verify correct submission and execution.