Data Integration supports offline synchronization of entire databases from sources such as MySQL, PolarDB, and SQL Server to Elasticsearch. This topic uses MySQL as the source and Elasticsearch as the destination to describe how to synchronize an entire MySQL database to Elasticsearch in offline mode.
Prerequisites
You have purchased a Serverless resource group or an exclusive resource group for Data Integration.
You have created MySQL and Elasticsearch data sources. For more information, see Create a data source for Data Integration.
You have established network connectivity between the resource group and data sources. For more information, see Network connectivity solutions.
Procedure
Step 1: Select the synchronization task type
Go to the Data Integration page.
Log on to the DataWorks console. In the top navigation bar, select the desired region. In the left-side navigation pane, choose . On the page that appears, select the desired workspace from the drop-down list and click Go to Data Integration.
In the left-side navigation pane, click Sync Task, and then click Create Sync Task at the top of the page to go to the sync task creation page. Configure the following basic information:
Data Source And Destination:
MySQL→ElasticsearchNew Task Name: Customize a name for the sync task.
Sync Type:
Offline synchronization of the entire database to Elasticsearch.
Step 2: Configure network and resources
In the Network And Resources section, select a Resource Group for the sync task. You can allocate the number of compute units (CUs) for Task Resource Usage.
For Source Data Source, select the added
MySQLdata source. For Destination Data Source, select the addedElasticsearchdata source. Then, click Test Connectivity.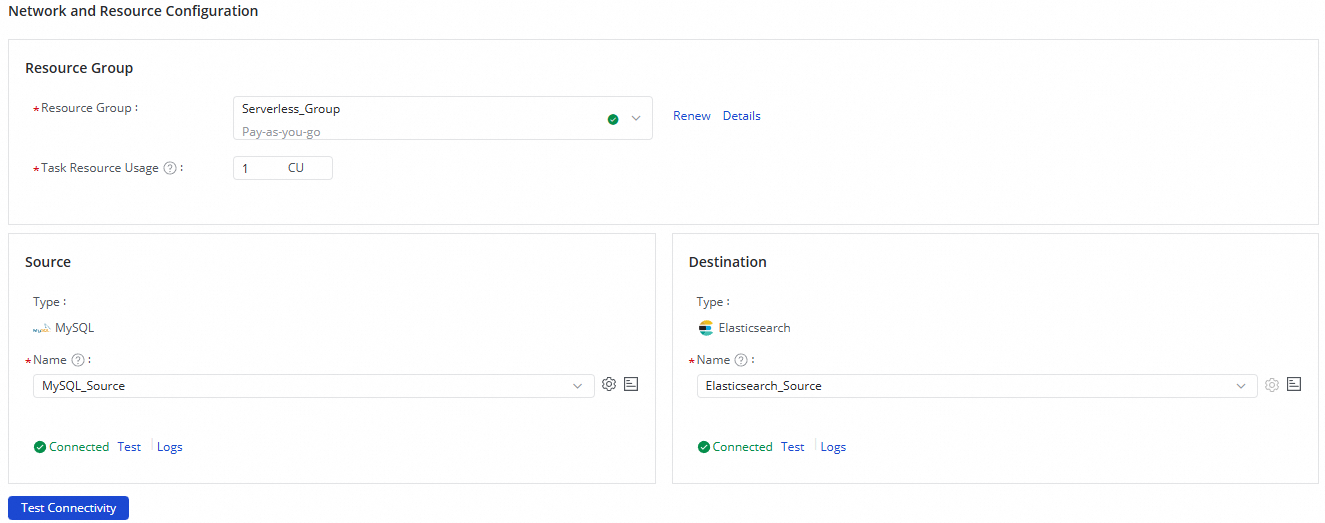
After you confirm that both the source and destination data sources are connected, click Next.
Step 3: Configure the synchronization source and rules
Select the table that you want to synchronize.
In this step, you can select the tables that you want to synchronize from the source database in the Source Database Tables section, and click the
 icon to move them to the Selected Tables section on the right.
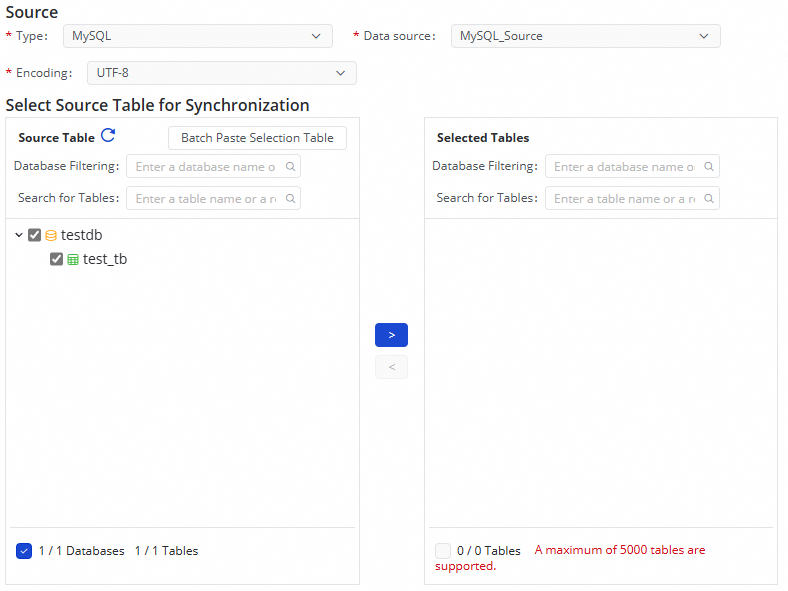
Set the mapping rules from table names to index names.
After you select a source database and a table, data is written to the destination schema and table that are named the same as the source database and table by default. If no such destination schema or table exists, the system automatically creates the schema or table in the destination. You can also customize the schema or index names that are written to the destination by using Set Mapping Rules From Table Names To Index Names.
Configuration description:
Conversion Rules For Source Database Names And Destination Schema Names: All conversion rules are applied to the original database names. After the conversion is complete, you can use the result as a variable
${db_name_src_transed}in Destination Index Name Rule.ImportantIf you do not use Destination Index Name Rule, this rule directly affects the final actual destination schema name.
If you use Destination Index Name Rule, this rule not only affects the value of the variable
${db_name_src_transed}, but also affects the final actual destination schema name.
Conversion Rules For Source Table Names And Destination Index Names: All conversion rules are applied to the original table names. After the conversion is complete, you can use the result as a variable
${db_table_name_src_transed}in Destination Index Name Rule.ImportantIf you do not use Destination Index Name Rule, this rule directly affects the final actual destination index name.
If you use Destination Index Name Rule, this rule only affects the value of the variable
${db_table_name_src_transed}and does not directly affect the final actual destination index name. The final destination index name is determined by Destination Index Name Rule.
Destination Index Name Rule: You can use built-in variables to name the destination index.
The following built-in variables are available:
${db_table_name_src_transed}: The index name after the conversion in "Conversion Rules for Source Table Names and Destination Index Names".${db_name_src_transed}: The destination schema name after the conversion in "Conversion Rules for Source Database Names and Destination Schema Names".${ds_name_src}: The source data source name.
For example, to replace the
doc_prefix in the source database name with thepre_prefix, and synchronize the source tablestable_01,table_02, andtable_03to an index namedmy_table, and finally add the suffix_postto this index, you should configure the following: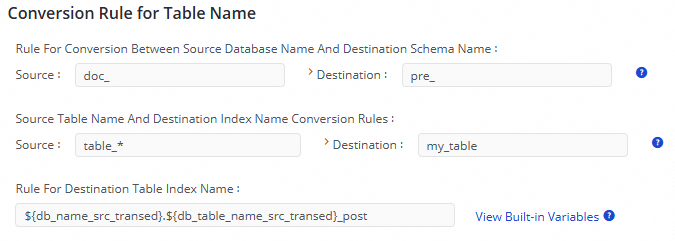
Click Next to configure the destination index.
Step 4: Configure the destination index
Click Refresh Source Tables And Elasticsearch Index Mapping to generate the destination index based on the Set Mapping Rules From Table Names To Index Names that you configured in Step 3. If you did not configure mapping rules in Step 3, data is written to the destination index that has the same name as the source table by default. If no such destination index exists, the system creates one by default. You can also modify the synchronization primary key and index creation method.
The destination table name is automatically converted based on the table name conversion rules that you configured in Set Mapping Rules From Table Names To Index Names.
In the Sync Primary Key column, select a primary key replacement solution.
If the tables in the source database have primary keys, the system removes duplicate data based on the primary keys during data synchronization.
If the tables in the source database do not have primary keys, you need to click the
 icon to customize a primary key. This means using one or more non-primary key fields as a composite key to replace the primary key for removing duplicate data during synchronization.
In the Index Creation Method column, select whether to automatically create an index or use an existing index.
When Index Creation Method is set to Automatically Create Index, the Elasticsearch Index Name column displays the automatically created Elasticsearch index name. You can click the name of the index to modify the values of the parameters that are related to the index.
When Index Creation Method is set to Use Existing Index, you can select the index name that you want to use from the drop-down list in the Elasticsearch Index Name column.
Click Next to configure synchronization rules.
Step 5: Configure synchronization rules
The following offline synchronization solutions for entire databases are supported. You can select a solution based on your needs. Different solutions require different parameters.
Synchronization Solution | Description |
Full One-time Synchronization Followed By Periodic Incremental Synchronization | If you select this method, the system first synchronizes all data to Elasticsearch. Then, the system synchronizes only incremental data in the source to Elasticsearch each time the system runs the solution based on the specified filter conditions and scheduling cycle. |
Full One-time Synchronization Only | If you select this method, you need to perform the synchronization operations only once to synchronize all data in the source to Elasticsearch. |
Incremental One-time Synchronization Only | If you select this method, you need to perform synchronization operations only once to synchronize incremental data in the source to Elasticsearch based on the specified filter conditions. |
Periodic Full Synchronization | If you select this method, you must specify a scheduling cycle for the batch synchronization solution. Then, the system synchronizes all data in the source to Elasticsearch each time the system runs the solution based on the specified scheduling cycle. |
Periodic Incremental Synchronization | If you select this method, the system synchronizes only incremental data in the source to Elasticsearch each time the system runs the solution based on the specified filter conditions and scheduling cycle. |
Full One-time Synchronization Followed by Periodic Incremental Synchronization
Full Synchronization | |
Parameter | Description |
Clear The Original Index Before Writing |
Important If you set this parameter to Yes, all data in the destination index is deleted before new data is written. Exercise caution when you select this option. |
Write Type |
|
Batch Size | The number of data records that can be written to Elasticsearch at a time. The default value is |
Incremental Synchronization | |
Write Type |
|
Batch Size | The number of data records that can be written to Elasticsearch at a time. The default value is |
Incremental Condition | You can use a WHERE clause to filter the tables that you want to synchronize. You only need to enter the WHERE clause in the Incremental Condition field without the WHERE keyword. When you write the WHERE clause, you can use built-in system variables, such as |
Scheduling Settings | |
Because periodic scheduling is required, you need to define the related properties for the periodic scheduling task, including Scheduling Cycle, Effective Date, and Pause Scheduling. The scheduling configuration for the current synchronization task is the same as the scheduling configuration for nodes in Data Development. For more information about the parameters, see Node scheduling. | |
Full one-time synchronization only
Full Synchronization | |
Parameter | Description |
Clear The Original Index Before Writing |
Important If you set this parameter to Yes, all data in the destination index is deleted before new data is written. Exercise caution when you select this option. |
Write Type |
|
Batch Size | The number of data records that can be written to Elasticsearch at a time. The default value is |
Incremental one-time synchronization only
Incremental Synchronization | |
Parameter | Description |
Write Type |
|
Batch Size | The number of data records that can be written to Elasticsearch at a time. The default value is |
Incremental Condition | You can use a WHERE clause to filter the tables that you want to synchronize. You only need to enter the WHERE clause in the Incremental Condition field without the WHERE keyword. When you write the WHERE clause, you can use built-in system variables, such as |
Periodic full synchronization
Full Synchronization | |
Parameter | Description |
Clear The Original Index Before Writing |
Important If you set this parameter to Yes, all data in the destination index is deleted before new data is written. Exercise caution when you select this option. |
Write Type |
|
Batch Size | The number of data records that can be written to Elasticsearch at a time. The default value is |
Scheduling Settings | |
Because periodic scheduling is required, you need to define the related properties for the periodic scheduling task, including Scheduling Cycle, Effective Date, and Pause Scheduling. The scheduling configuration for the current synchronization task is the same as the scheduling configuration for nodes in Data Development. For more information about the parameters, see Node scheduling. | |
Periodic incremental synchronization
Incremental Synchronization | |
Parameter | Description |
Write Type |
|
Batch Size | The number of data records that can be written to Elasticsearch at a time. The default value is |
Incremental Condition | You can use a WHERE clause to filter the tables that you want to synchronize. You only need to enter the WHERE clause in the Incremental Condition field without the WHERE keyword. When you write the WHERE clause, you can use built-in system variables, such as |
Scheduling Settings | |
Because periodic scheduling is required, you need to define the related properties for the periodic scheduling task, including Scheduling Cycle, Effective Date, and Pause Scheduling. The scheduling configuration for the current synchronization task is the same as the scheduling configuration for nodes in Data Development. For more information about the parameters, see Node scheduling. | |
After you complete the configuration, click Next to configure runtime resources.
Step 6: Configure runtime resources
Based on the synchronization solution that you selected in the previous step, different runtime resources need to be configured in this step. The synchronization task creates both full offline synchronization tasks and incremental offline synchronization tasks. You can configure the task names and resource groups (full offline task resource group, incremental offline task resource group, and scheduling resource group) that are used to execute the tasks. You can also modify advanced parameters provided by Data Integration, such as Advanced Configuration, Expected Maximum Concurrency, Synchronization Rate, Dirty Data Tolerance, and Maximum Number Of Connections Supported By The Source.
Step 7: Execute the synchronization task
After you complete all configurations, click Complete Configuration at the bottom of the page.
On the page, find the created synchronization task and click Submit And Execute in the Operation column.
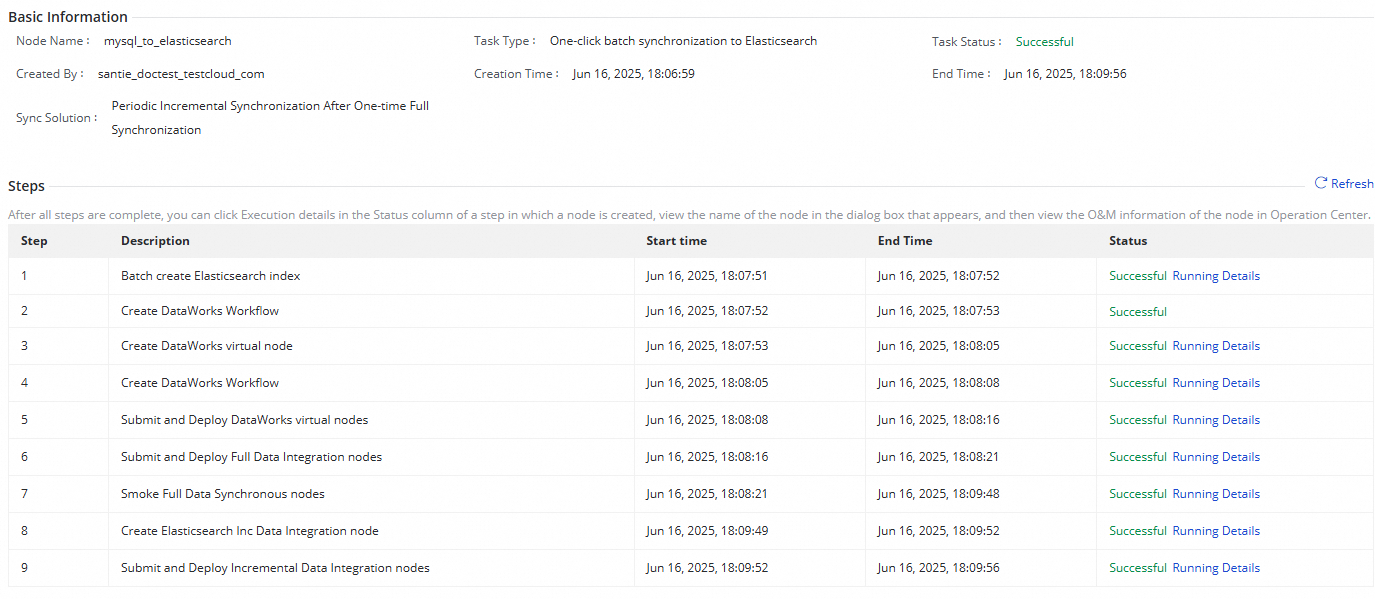
Click Task List and then click the Name/ID of the corresponding task to view the detailed execution procedure of the task.
Perform O&M operations on the synchronization task
View the status of the synchronization task
After you create a synchronization task, you can view the list of created synchronization tasks and the basic information of each task on the Sync Task page.
You can click Execution Details in the Operation column to go to the task details page and view the execution status of the task.