Scheduling parameters can be used in each stage of the configuration of a data synchronization node. This topic describes the common usage scenarios of scheduling parameters.
Background information
The following table describes the scenarios in which you can configure scheduling parameters for a data synchronization node.
Scenario | Description | References |
Synchronize incremental data | DataWorks allows you to configure scheduling parameters for specific types of Reader plug-ins to synchronize only incremental data that is generated within a specific period of time to a destination. DataWorks also allows you to use the data backfill feature provided in Operation Center to synchronize data within a specific period of time to a specified partition in a destination table. For example, you can configure scheduling parameters for MySQL, LogHub, or Kafka Reader in this scenario. | Scenario 1: Synchronize incremental data and Scenario 4: Synchronize historical data |
Synchronize data from a table or file with dynamic table names or file names | When you configure specific types of Reader plug-ins, you can use scheduling parameters to specify the name format of a table or file from which you want to synchronize data. This way, the related data synchronization node can synchronize data from the table or file with dynamic table names or file names each time the node is run. For example, you can configure scheduling parameters for Object Storage Service (OSS), FTP, or MySQL Reader in this scenario. For specific types of Reader plug-ins, you may need to use the code editor to configure scheduling parameters. | Scenario 2: Synchronize data from a table or file with dynamic table names or file names |
Assign a constant or a time-related variable to a field in a destination table | When you configure mappings between fields in a source table and fields in a destination table, you can assign a constant that is obtained based on the data timestamp of the data synchronization node to a field in a destination table. Then, the system dynamically assigns values to the field every day based on the scheduling parameter that is configured. Support for the operation varies based on the data source type. |
Precautions
Before you click the ![]() or
or ![]() icon in the top toolbar of the configuration tab of a batch synchronization node, you must manually assign constants to the variables that you want to reference in the code of the node. Data Integration does not support smoke testing on the node in the development environment. We recommend that you use one of the following methods to check whether the scheduling parameters are replaced as expected in a scheduling scenario:
icon in the top toolbar of the configuration tab of a batch synchronization node, you must manually assign constants to the variables that you want to reference in the code of the node. Data Integration does not support smoke testing on the node in the development environment. We recommend that you use one of the following methods to check whether the scheduling parameters are replaced as expected in a scheduling scenario:
Perform smoke testing on an SQL node for which the scheduling parameters are used. If the SQL node passes the smoke test, use the scheduling parameters for the node. For more information about smoke testing on an SQL node to check whether the scheduling parameters that are used for the node work as expected, see Configure and use scheduling parameters.
Commit the node to Operation Center in the development environment.
Scenario 1: Synchronize incremental data
When you configure a data synchronization node, you can use scheduling parameters in a filter condition to implement incremental synchronization. You must make sure that the syntax of the filter condition is supported by the source. For more information about how to implement incremental synchronization, see Scenario: Configure an incremental offline data synchronization task.
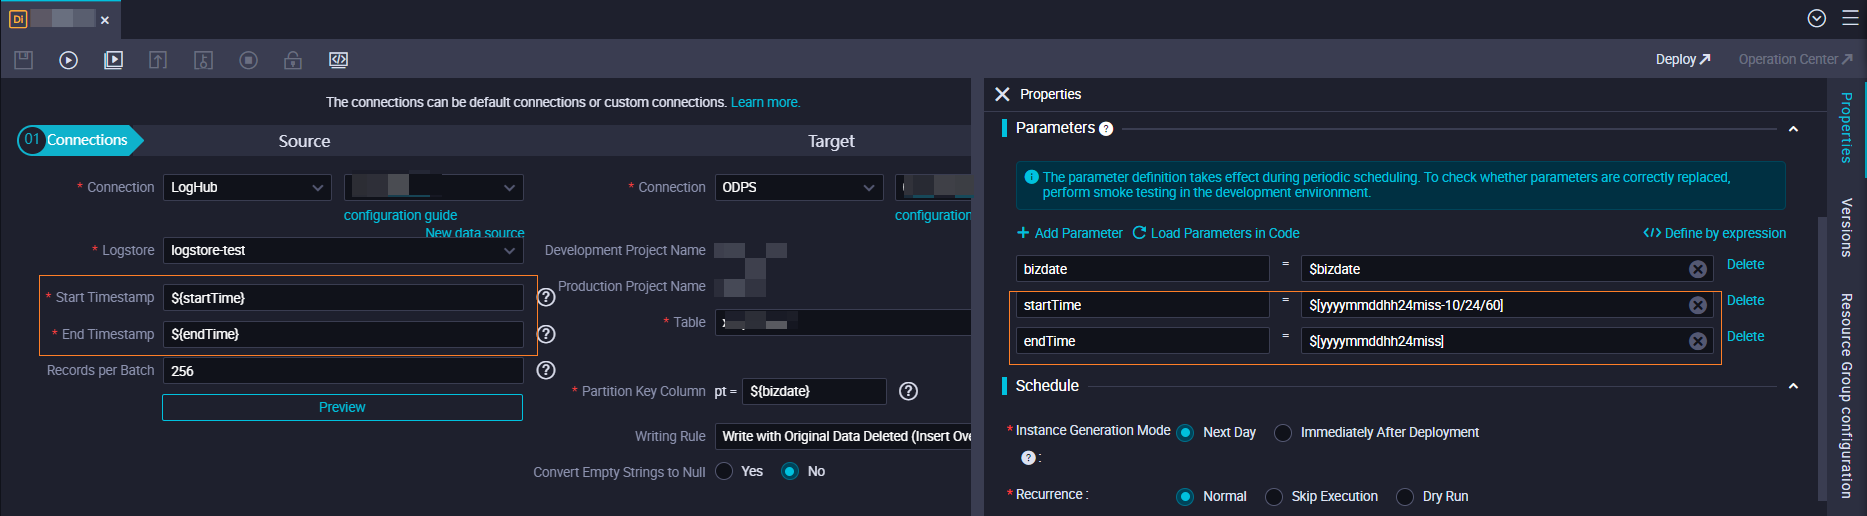
Example 1: Synchronize incremental data from LogHub to the T-1 partition of a MaxCompute table at an interval of 10 minutes.
The system generates a scheduling instance for the data synchronization node every 10 minutes based on the scheduling time of the node. The partition in the MaxCompute table to which the data is written is specified by a scheduling parameter. $bizdate specifies the data timestamp of the data synchronization node. When the data synchronization node is run, the partition filter expressions that are configured for the node are replaced with actual values based on the data timestamp specified by scheduling parameters. For more information about how to use scheduling parameters, see Configure and use scheduling parameters.
NoteThe time range is a left-closed, right-open interval.
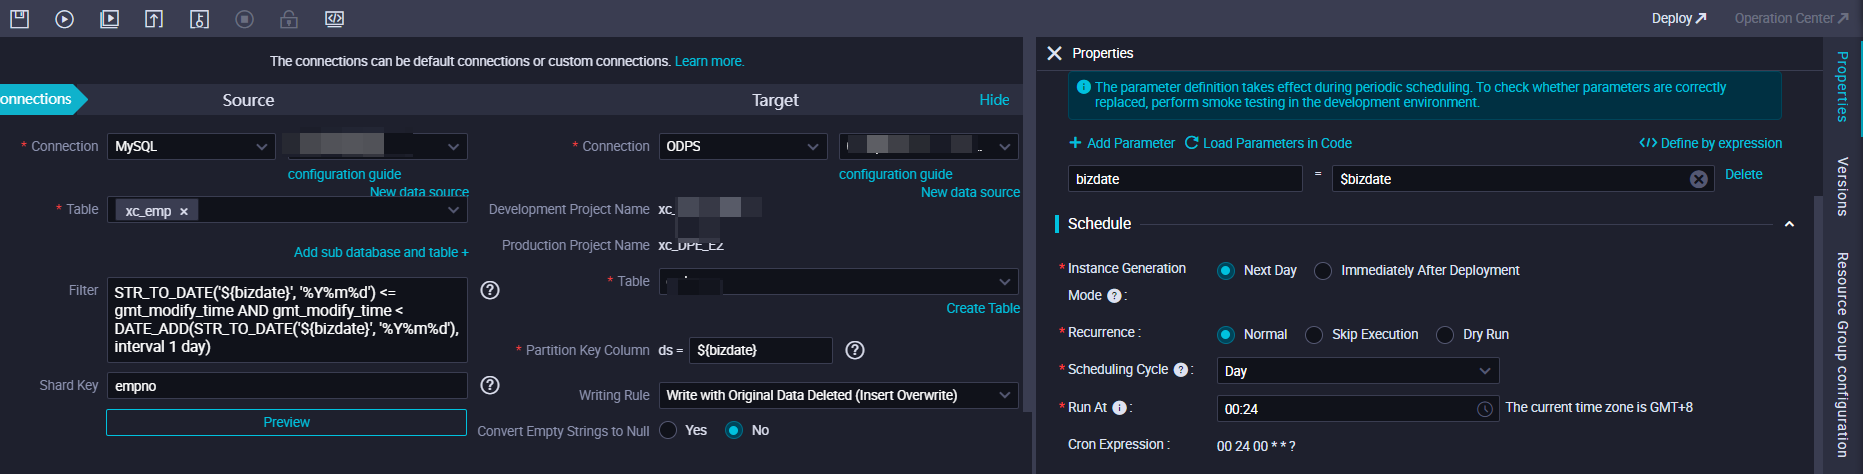
Example 2: Synchronize data that is generated on the previous day from LogHub to the T-1 partition of a MaxCompute table at 00:00 every day.
NoteThe time range is a left-closed, right-open interval.
Scenario 2: Synchronize data from a table or file with dynamic table names or file names
You can assign scheduling parameters to the variables that are defined in the configuration of a data synchronization node as values.
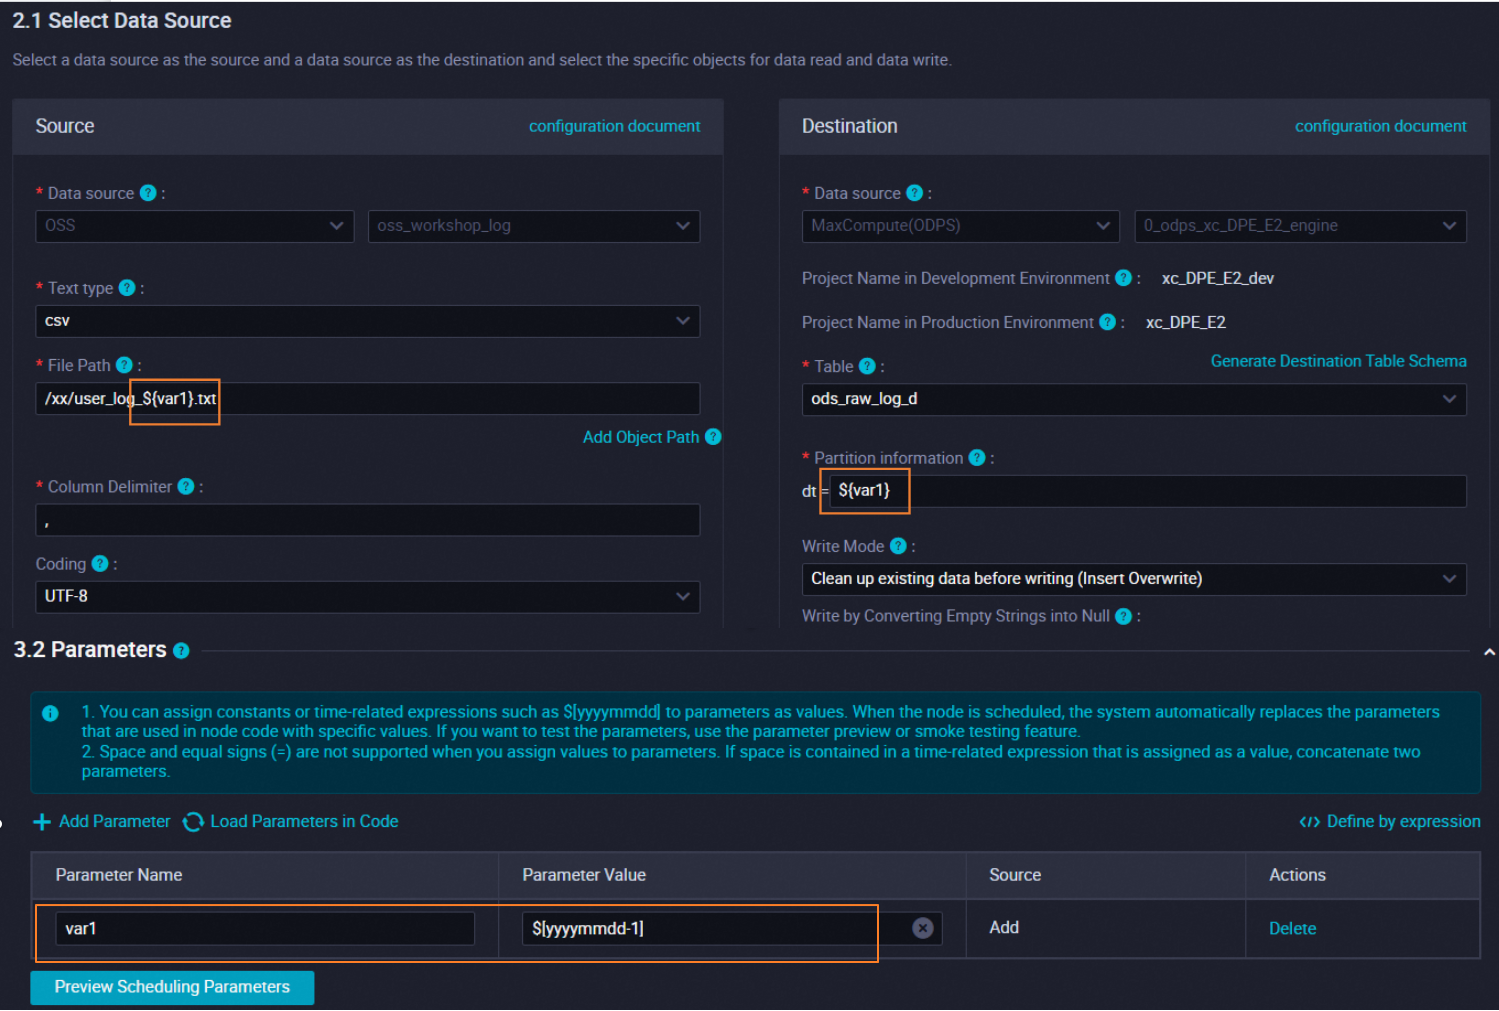
Example 1: Synchronize data from a file with dynamic file names.
When you configure a data synchronization node to synchronize data from OSS to MaxCompute, you can use scheduling parameters to specify the names of source objects whose names end with a date. This way, data can be synchronized from the related objects to the related partitions in the MaxCompute tables every day.
NoteIf you want to use a data synchronization node to synchronize data from a table or file with dynamic table names or file names, you may need to configure the node by using the code editor. If you use variables in the configuration of the data synchronization node, data preview is not supported.
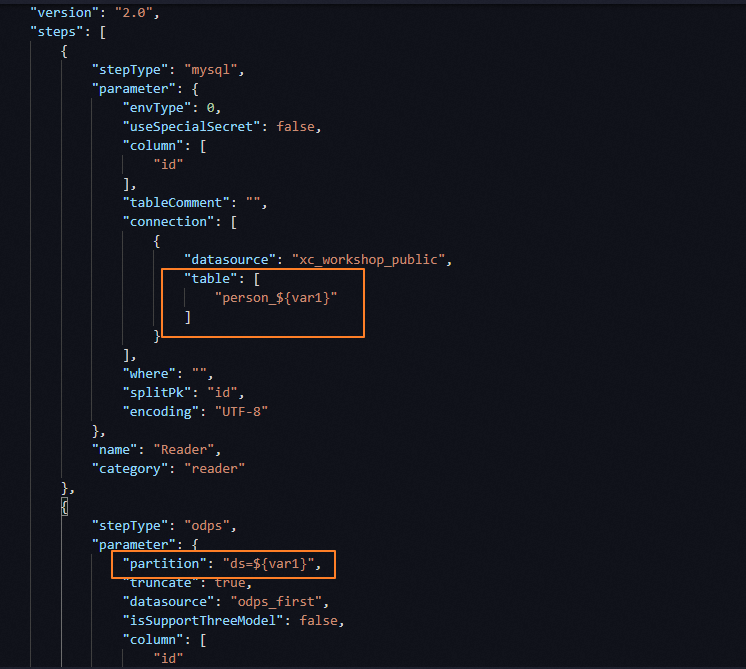
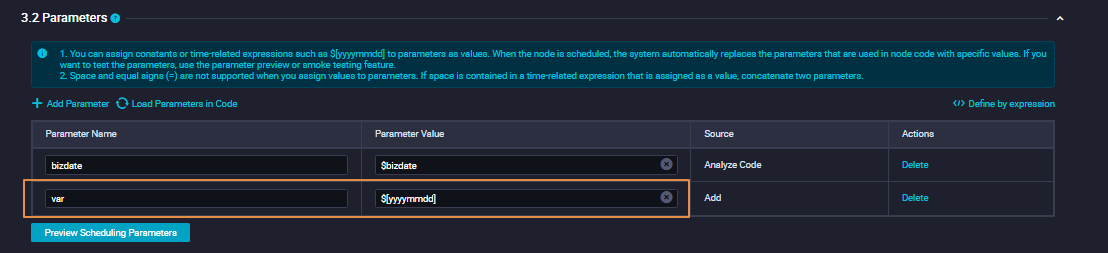
Example 2: Synchronize data from a table with dynamic table names.
When you configure a data synchronization node to synchronize data from MySQL to MaxCompute, you can use scheduling parameters to specify the source tables that are named by time. This way, data can be synchronized from the related tables to the related partitions in the MaxCompute tables every day. The following figures show the configuration in the code editor and codeless UI.
Scenario 3: Define destination fields
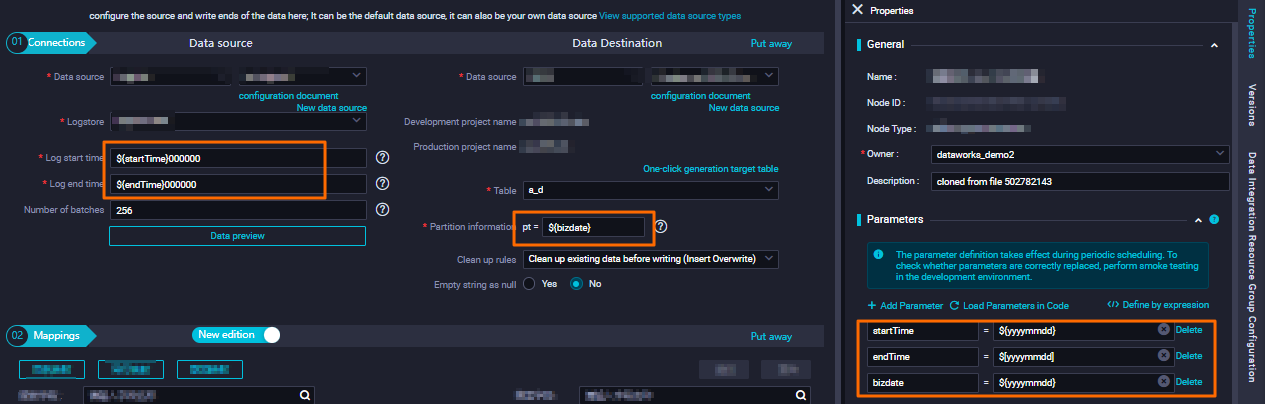
When you configure a data synchronization node, you can assign a constant that is obtained based on the data timestamp of the node to a field in a destination table. For example, in the following figure, the system dynamically assigns values to the field every day based on the values of the scheduling parameter. 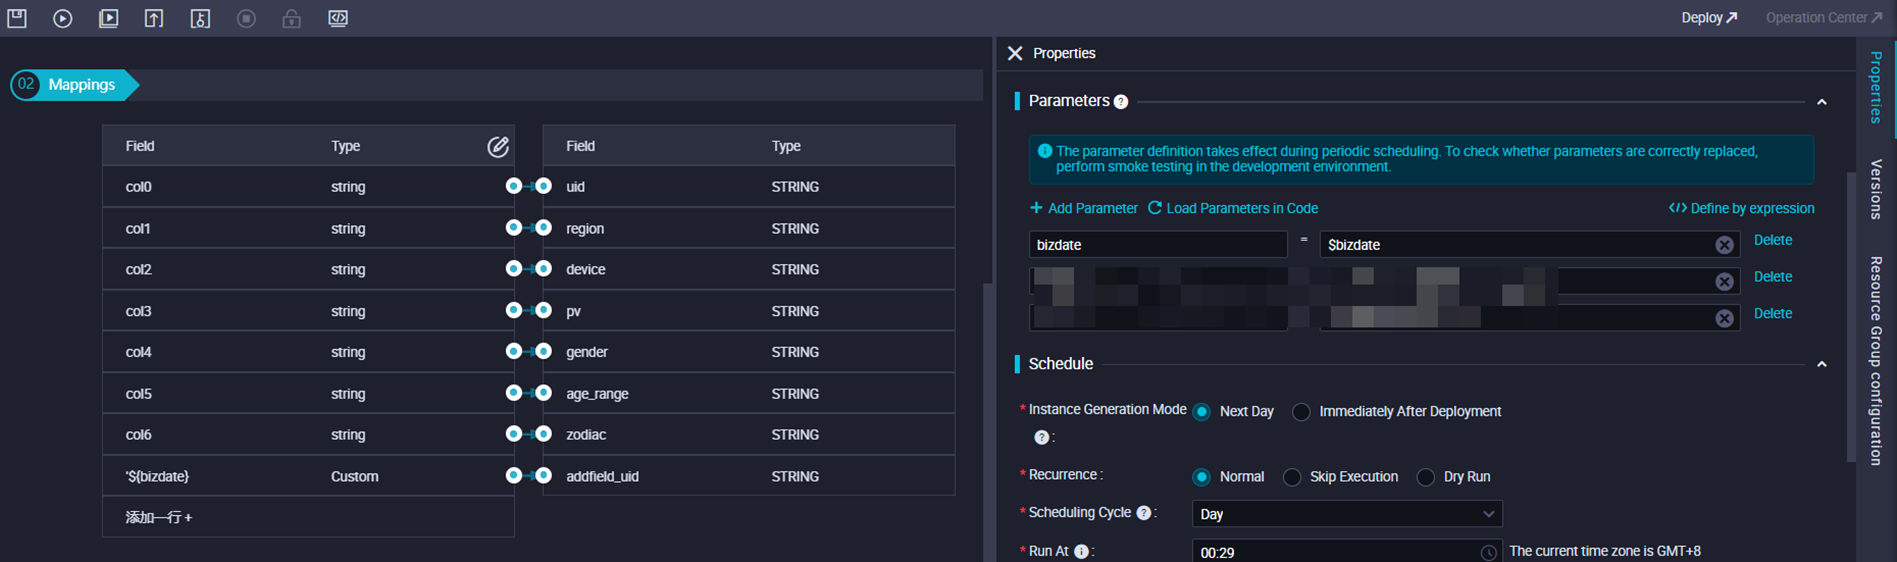
Scenario 4: Synchronize historical data
Scheduling parameters are automatically replaced with specific values based on the data timestamps of nodes and value formats of scheduling parameters. This enables dynamic parameter configuration for node scheduling. If you want to backfill data on the day on which you create a node, you can use the data backfill feature to generate historical data for a specified time range. In this case, scheduling parameters are automatically replaced with specific values based on the data timestamps of the data backfill operation. For more information about data backfill, see Data backfill instance O&M.
For example: The following figure shows how to write incremental data from a MySQL data source to a specified time partition in MaxCompute.