This topic describes how to add HttpFile and MySQL data sources to access the basic user information and website access logs that are provided in the tutorial in this topic. This topic also describes how to configure data synchronization tasks to synchronize data to a private Object Storage Service (OSS) data source, and use E-MapReduce (EMR) Hive nodes to create tables and query the synchronized data.
Prerequisites
An environment is prepared. For more information, see Prepare environments.
A security group rule is added in the Elastic Compute Service (ECS) console to ensure network connectivity. You can use Port
10000of the ECS instance to connect to DataWorks and set Authorization Object to the CIDR block of the vSwitch with which the resource group is associated. For more information, see Add a security group rule.
Step 1: Add data sources
You need to add an HttpFile data source, a MySQL data source, and an OSS data source to a DataWorks workspace to perform subsequent operations.
The HttpFile data source is used to access the website access logs of users.
The MySQL data source is used to access the basic user information.
The OSS data source is used to store the test data obtained from the HttpFile and MySQL data sources.
Add an HttpFile data source
Go to the Data Sources page.
Log on to the DataWorks console. In the top navigation bar, select the desired region. In the left-side navigation pane, choose . On the page that appears, select the desired workspace from the drop-down list and click Go to Management Center.
In the left-side navigation pane of the SettingCenter page, click Data Sources.
In the upper-left corner of the Data Sources page, click Add Data Source. In the Add Data Source dialog box, click HttpFile.
On the Add HttpFile Data Source page, configure the parameters. In this tutorial, the sample values are used in the development and production environments.
Parameter
Description
Data Source Name
The name of the data source. In this example, user_behavior_analysis_httpfile is used.
Data Source Description
The description of the data source. The data source is exclusively provided for the use cases of DataWorks and is used as the source of a batch synchronization task to access the provided test data. The data source is only for data reading in data synchronization scenarios.
URL
Enter
https://dataworks-workshop-2024.oss-cn-shanghai.aliyuncs.comin the URL field for the development and production environments.Find a desired resource group and separately click Test Network Connectivity in the Connection Status (Development Environment) and Connection Status (Production Environment) columns. If the network connectivity test is successful, Connected appears in the corresponding column.
ImportantMake sure that at least one resource group is connectable. Otherwise, you cannot use the codeless user interface (UI) to configure a data synchronization task for the data source.
Click Complete Creation.
Add a MySQL data source
In the left-side navigation pane of the SettingCenter page, click Data Sources. In the upper-left corner of the Data Sources page, click Add Data Source.
In the Add Data Source dialog box, select MySQL.
On the Add MySQL Data Source page, configure the parameters. The following table describes the parameters. In this example, the sample values are used in the development and production environments.
Parameter
Description
Data Source Name
The name of the data source. In this example, user_behavior_analysis_mysql is used.
Data Source Description
The description of the data source. The data source is exclusively provided for the use cases of DataWorks and is used as the source of a batch synchronization task to access the provided test data. The data source is only for data reading in data synchronization scenarios.
Configuration Mode
Select Connection String Mode.
Connection Address
Host IP Address: Enter
rm-bp1z69dodhh85z9qa.mysql.rds.aliyuncs.com.Port Number: Enter
3306.
Database Name
The name of the database. In this example,
workshopis used.Username
The username. In this example, workshop is used.
Password
The password. In this example, workshop#2017 is used.
Authentication Method
Select No Authentication.
Find a desired resource group and separately click Test Network Connectivity in the Connection Status (Development Environment) and Connection Status (Production Environment) columns. If the network connectivity test is successful, Connected appears in the corresponding column.
Click Complete Creation.
Add an OSS data source
In this example, the basic user information of the MySQL data source and the website access logs of the HttpFile data source are synchronized to a private OSS data source.
In the left-side navigation pane of the SettingCenter page, click Data Sources. In the upper-left corner of the Data Sources page, click Add Data Source.
In the Add Data Source dialog box, select OSS.
On the Add OSS Data Source page, configure the parameters. In this example, the sample values are used in the development and production environments.
Parameter
Description
Data Source Name
The name of the data source. In this example, test_g is used.
Data Source Description
The description of the data source.
Access Mode
Select AccessKey Mode.
AccessKey ID
The AccessKey ID of the account that is used to log on to DataWorks. You can go to the AccessKey page to copy the AccessKey ID.
AccessKey Secret
The AccessKey secret of the account that is used to log on to DataWorks.
ImportantThe AccessKey secret is displayed only during creation. You cannot view the AccessKey secret after you create it. Keep it confidential. If the AccessKey pair is leaked or lost, delete the AccessKey pair and create a new AccessKey pair.
Endpoint
The endpoint of OSS. In this example,
http://oss-cn-shanghai-internal.aliyuncs.comis used.Bucket
The name of the OSS bucket that you created when you prepared the environment. In this example, the bucket name is dw-emr-demo.
Find a desired resource group and separately click Test Network Connectivity in the Connection Status (Development Environment) and Connection Status (Production Environment) columns. If the network connectivity test is successful, Connected appears in the corresponding column.
NoteMake sure that at least one resource group is connectable. Otherwise, you cannot use the codeless UI to configure a data synchronization task for the data source.
Click Complete Creation.
Step 2: Configure data synchronization tasks
On the Data Sources page, click the
 icon in the upper-left corner and choose .
 In the Scheduled Workflow pane, right-click Business Flow and select Create Workflow.
In the Create Workflow dialog box, set the Workflow Name parameter to workshop_emr and click Create.
Double-click the new workflow to go to the workflow configuration tab to create a zero load node and two batch synchronization tasks.
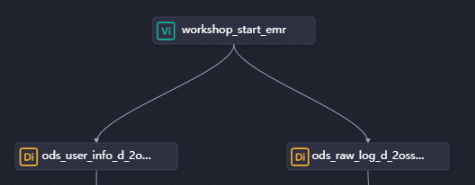
Click Create Node and drag Zero-Load Node in the General section to the canvas on the right. In the Create Node dialog box, set the Name parameter to workshop_start_emr and click Confirm.
Click Create Node and drag Offline synchronization in the Data Integration section to the canvas on the right. Create two batch synchronization nodes named ods_raw_log_d_2oss_emr and ods_user_info_d_2oss_emr in the same manner. The two nodes are used to synchronize the basic user information of MySQL and the website access logs of OSS. Then, click Confirm.
On the workflow configuration tab, drag directed lines to configure the workshop_start_emr node as the ancestor node of the two batch synchronization nodes.
Step 3: Configure data synchronization nodes
Configure the initial node of the workflow
In the Scheduled Workflow pane, double-click the zero load node in the workflow. In the right-side navigation pane of the node configuration tab, click Properties.
Configure the scheduling properties.
Section
Screenshot
Description
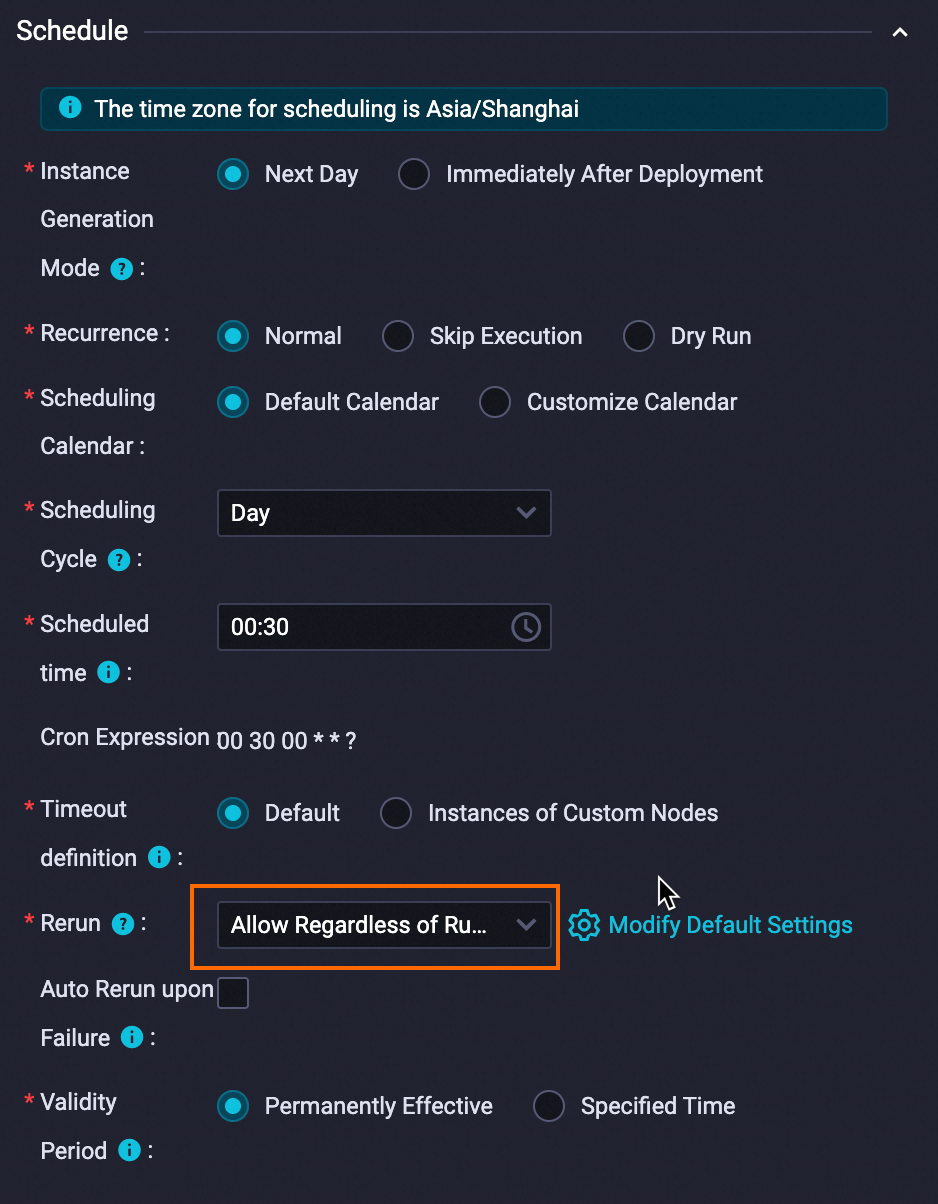
Schedule
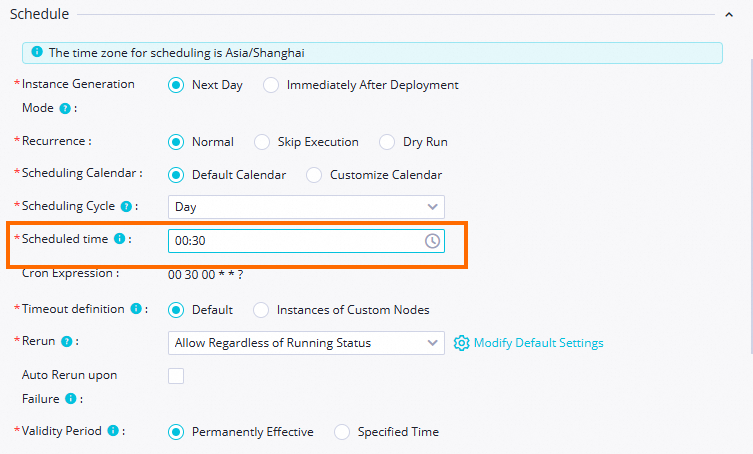
The scheduling time of the zero load node is set to 00:30. The zero load node triggers the current workflow to run at 00:30 every day.
Set the Rerun parameter to Allow Regardless of Running Status.
Scheduling dependencies
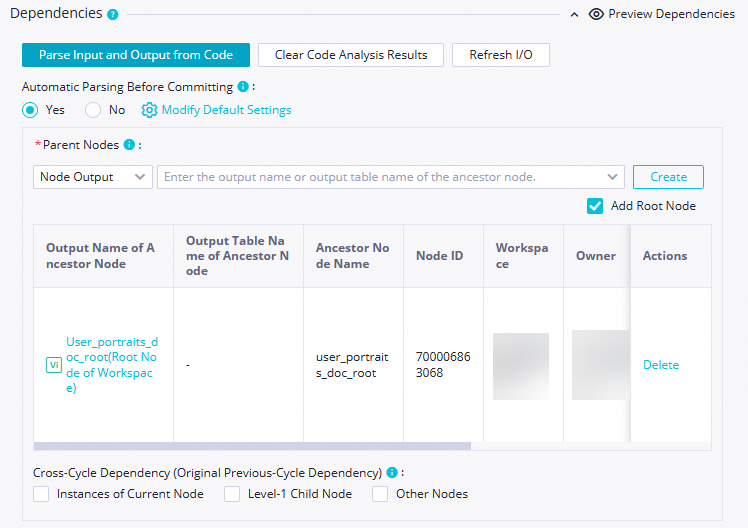
The zero load node
workshop_start_emrdoes not have any ancestor nodes. In this case, you can configure the zero load node as a descendant node of the root node of the workspace. The root node can be used to trigger the zero load nodeworkshop_start_emrto run.The root node of a workspace is named in the
Workspace name_rootformat.After the configuration is complete, click the
 icon in the upper-left corner.
Configure the batch synchronization nodes
Synchronize the basic user information of the MySQL data source to the created OSS bucket.
On the DataStudio page, double-click the ods_user_info_d_2oss_emr node to go to the node configuration page.
Establish network connections between the resource group that you want to use and the data sources.
After you complete the configuration of network connections and resources, click Next and complete the connectivity test as prompted.
Parameter
Description
Source
Source: Set the value to MySQL.
Data Source Name: Set the value to user_behavior_analysis_mysql.
Resource Group
Select the serverless resource group that you purchased.
Destination
Destination: Set the value to OSS.
Data Source Name: Set it to test_g, which specifies the name of the private OSS data source that you added.
Configure the data synchronization node.
Parameter
Description
Source
Table: Select the ods_user_info_d table in the data source.
Split key: The split key for the data to be read. We recommend that you use the primary key or an indexed column as the split key. Only fields of the INTEGER type are supported. In this example, uid is used.
Destination
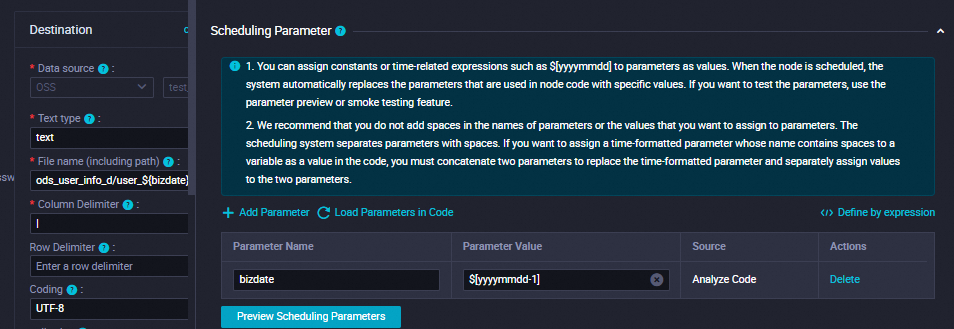
Text type: Set the value to text.
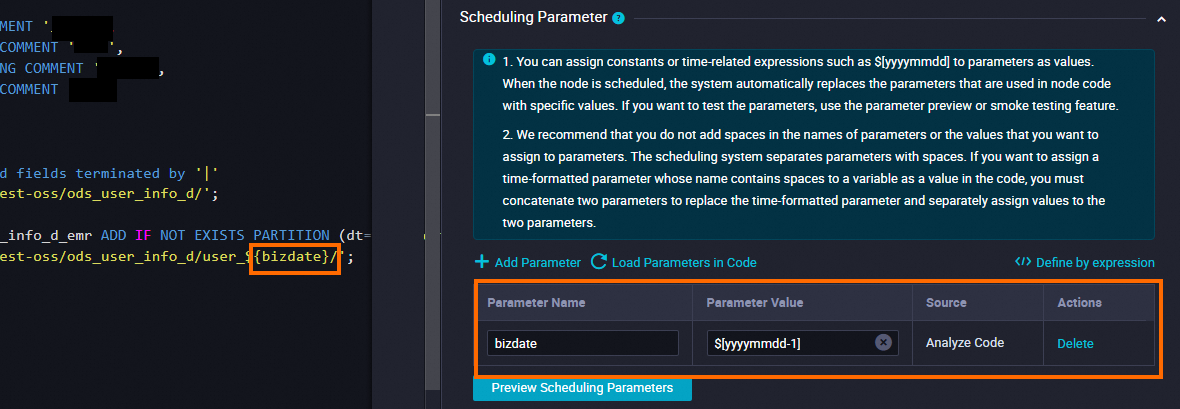
Object Name (Path Included): The path of the OSS object. Configure this parameter based on the folder that you created in the OSS bucket. In this example, ods_user_info_d/user_${bizdate}/user_${bizdate}.txt is entered. ods_user_info_d is the name of the folder that you created in the OSS bucket. $bizdate indicates the date of the previous day.
Column Delimiter: Enter |.
Configure scheduling properties.
In the right-side navigation pane of the node configuration tab, click Properties. On the Properties tab, you can configure scheduling properties and basic information about the node. The following table describes the scheduling parameters.
Section
Description
Screenshot
Scheduling Parameter
Click Add Parameter in the Scheduling Parameter section. In the row that appears in the table, you can specify a scheduling parameter and the value of the scheduling parameter.
Set Parameter Name to bizdate.
Set Parameter Value to $[yyyymmdd-1].
Schedule
Set the Rerun parameter to Allow Regardless of Running Status.
Dependencies
Make sure that the generated table is used as the output table of the current node.
The output table is named in the
Workspace name.Node nameformat.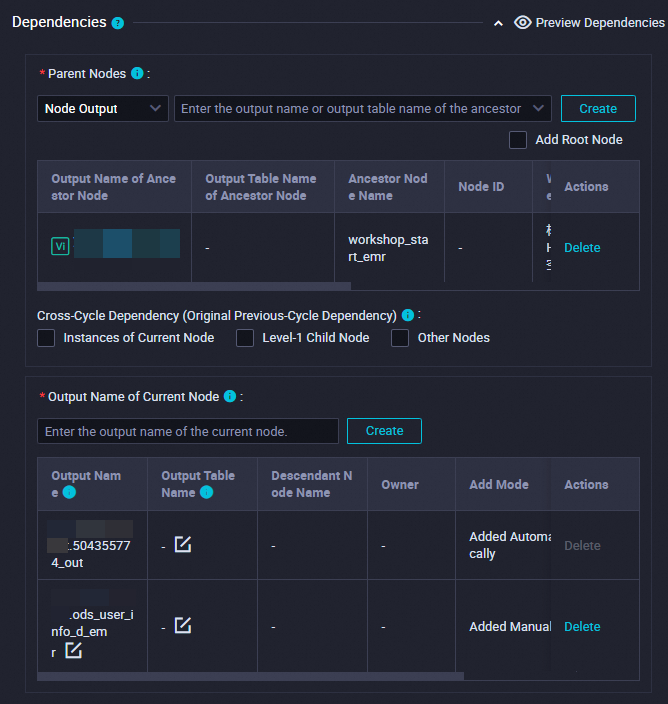
After the configuration is complete, click the
icon in the toolbar.
Synchronize the website access logs of the HttpFile data source to the created OSS bucket.
On the DataStudio page, double-click the ods_raw_log_d_2oss_emr node to go to the node configuration page.
Establish network connections between the resource group that you want to use and the data sources.
After you complete the configuration of network connections and resources, click Next and complete the connectivity test as prompted.
Parameter
Description
Source
Source: Set the value to HttpFile.
Data Source Name: Set the value to user_behavior_analysis_httpfile.
Resource Group
Select the serverless resource group that you purchased.
Destination
Destination: Set the value to OSS.
Data Source Name: Set the value to test_g, which specifies the name of the private OSS data source that you added.
Configure the data synchronization node.
Parameter
Description
Source
File Path: Set the value to /user_log.txt.
Text type: Set the value to text.
Column Delimiter: Enter |.
Compression format: The compression format of the OSS object. Valid values: None, Gzip, Bzip2, and Zip. Select None.
Skip Header: Set the value to No.
Destination
Text type: Set the value to text.
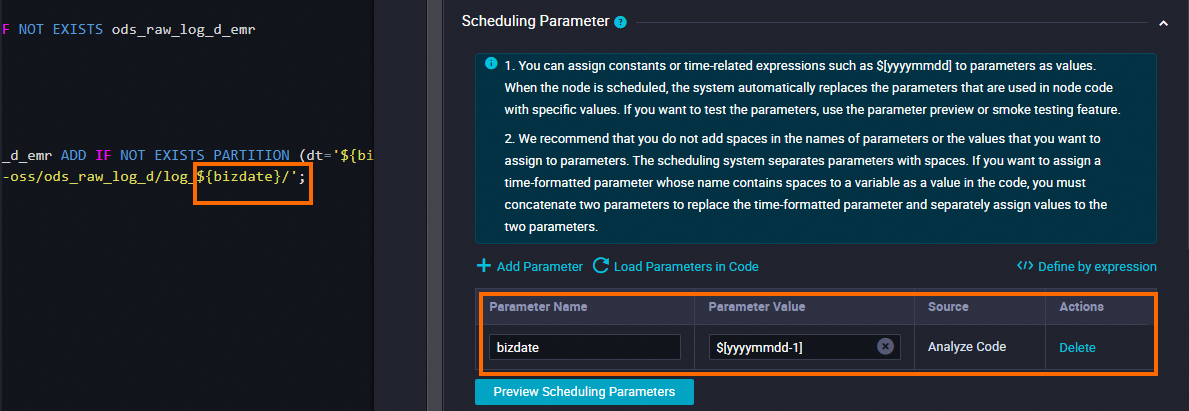
Object Name (Path Included): The path of the OSS object. Configure this parameter based on the folder that you created in the OSS bucket. In this example, ods_raw_log_d/log_${bizdate}/log_${bizdate}.txt is entered. ods_raw_log_d is the name of the folder that you created in the OSS bucket. $bizdate indicates the date of the previous day.
Column Delimiter: Enter |.
Configure the scheduling properties.
In the right-side navigation pane of the node configuration tab, click Properties. On the Properties tab, you can configure scheduling properties and basic information about the node. The following table describes the scheduling parameters.
Section
Description
Screenshot
Scheduling Parameter
Click Add Parameter in the Scheduling Parameter section. In the row that appears in the table, you can specify a scheduling parameter and the value of the scheduling parameter.
Set Parameter Name to bizdate.
Set Parameter Value to $[yyyymmdd-1].

Schedule
Set the Rerun parameter to Allow Regardless of Running Status.
Dependencies
Make sure that the generated table is used as the output table of the current node.
The output table is named in the
Workspace name.Node nameformat.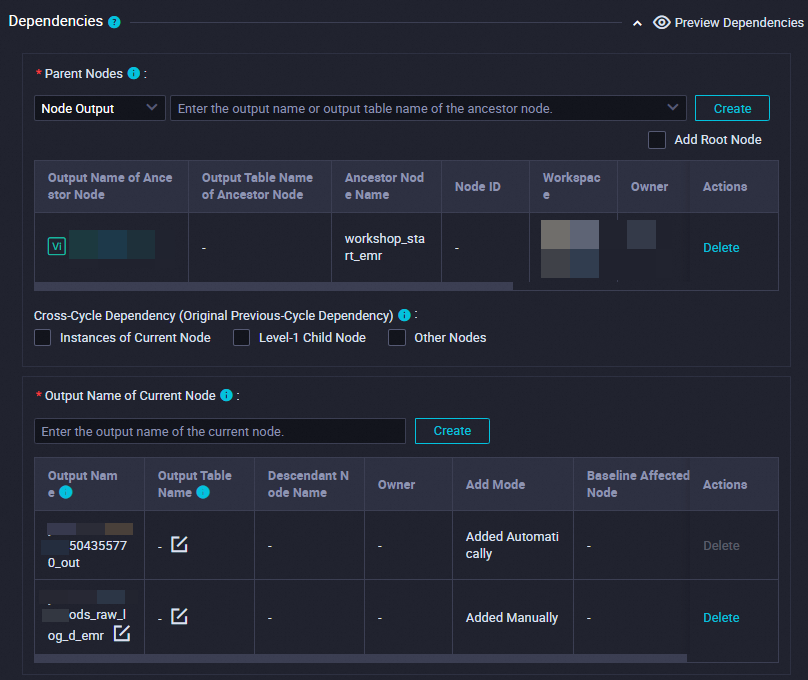
After the configuration is complete, click the
icon in the toolbar.
Create EMR tables to synchronize data
You need to create two EMR tables: ods_user_info_d_emr and ods_raw_log_d_emr. Then, you can use the tables to query the synchronized basic user information of ApsaraDB RDS for MySQL and the website access logs of OSS.
In the Scheduled Workflow pane, click the new workflow, right-click EMR, and then choose .
In the Create Node dialog box, configure the Name parameter and click Confirm.
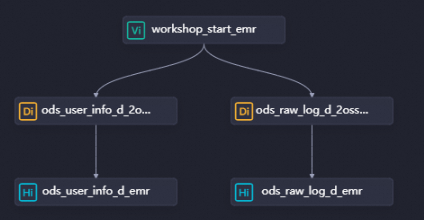
You need to create two EMR Hive nodes: ods_user_info_d_emr and ods_raw_log_d_emr, which are used to create the related tables. Then, you need to configure the dependencies between nodes by drawing lines on the workflow configuration tab. The following figure provides an example.
On the configuration tab of each EMR Hive node, enter a CREATE TABLE statement and select a serverless resource group for the Resource Group parameter in the Resource Group section of the Properties tab. Then, click Save and execute the CREATE TABLE statement for each node.
Create the ods_user_info_d_emr table.
Double-click the ods_user_info_d_emr node. On the node configuration tab that appears, configure the ods_user_info_d_emr node.
Edit the SQL code.
CREATE EXTERNAL TABLE IF NOT EXISTS ods_user_info_d_emr ( `uid` STRING COMMENT 'The user ID', `gender` STRING COMMENT 'The gender', `age_range` STRING COMMENT 'The age range', `zodiac` STRING COMMENT 'The zodiac sign' ) PARTITIONED BY ( dt STRING ) ROW FORMAT delimited fields terminated by '|' LOCATION 'oss://dw-emr-demo/ods_user_info_d/'; ALTER TABLE ods_user_info_d_emr ADD IF NOT EXISTS PARTITION (dt='${bizdate}') LOCATION 'oss://dw-emr-demo/ods_user_info_d/user_${bizdate}/';NoteIn the preceding code, a sample path is used for LOCATION. The path is based on the value of the Object Name (Path Included) parameter when you configure the related batch synchronization node. You must set the LOCATION parameter to the path of the created folder. dw-emr-demo is the domain name of the OSS bucket that you created when you prepared the environment.
Configure scheduling properties for the node.
Section
Description
Screenshot
Scheduling Parameter
Click Add Parameter in the Scheduling Parameter section. In the row that appears in the table, you can specify a scheduling parameter and the value of the scheduling parameter.
Set Parameter Name to bizdate.
Set Parameter Value to $[yyyymmdd-1].
Schedule
Set the Rerun parameter to Allow Regardless of Running Status.
Dependencies
Make sure that the generated table is used as the output table of the current node.
The output table is named in the
Workspace name.Node nameformat.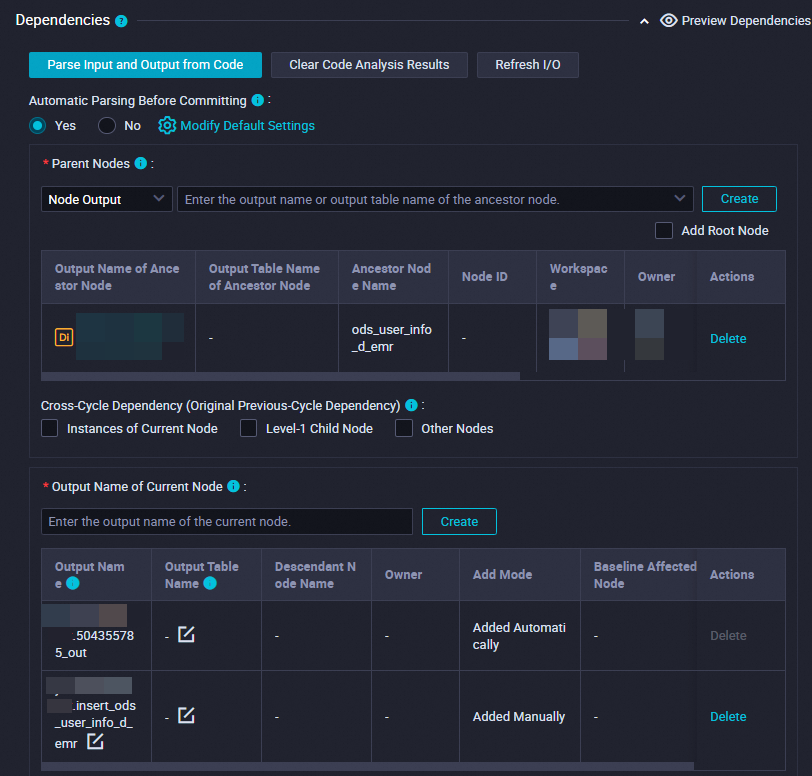
After the configuration is complete, click the
 icon.
icon.
Create the ods_raw_log_d_emr table.
Double-click the ods_raw_log_d_emr node. On the node configuration tab that appears, configure the ods_raw_log_d_emr node.
Edit the SQL code.
-- Create the table used to store website access logs. CREATE EXTERNAL TABLE IF NOT EXISTS ods_raw_log_d_emr ( `col` STRING ) PARTITIONED BY ( dt STRING ); ALTER TABLE ods_raw_log_d_emr ADD IF NOT EXISTS PARTITION (dt='${bizdate}') LOCATION 'oss://dw-emr-demo/ods_raw_log_d/log_${bizdate}/';NoteIn the preceding code, a sample path is used for LOCATION. The path is based on the value of the Object Name (Path Included) parameter when you configure the related batch synchronization node. You must set the LOCATION parameter to the path of the created folder. dw-emr-demo is the name of the OSS bucket that you created when you prepared the environment.
Configure scheduling properties for the node.
Section
Description
Screenshot
Scheduling Parameter
Click Add Parameter in the Scheduling Parameter section. In the row that appears in the table, you can configure a scheduling parameter and specify the value of the scheduling parameter.
Set Parameter Name to bizdate.
Set Parameter Value to $[yyyymmdd-1].
Schedule
Set the Rerun parameter to Allow Regardless of Running Status.
Dependencies
Make sure that the generated table is used as the output table of the current node.
The output table is named in the
Workspace name.Node nameformat.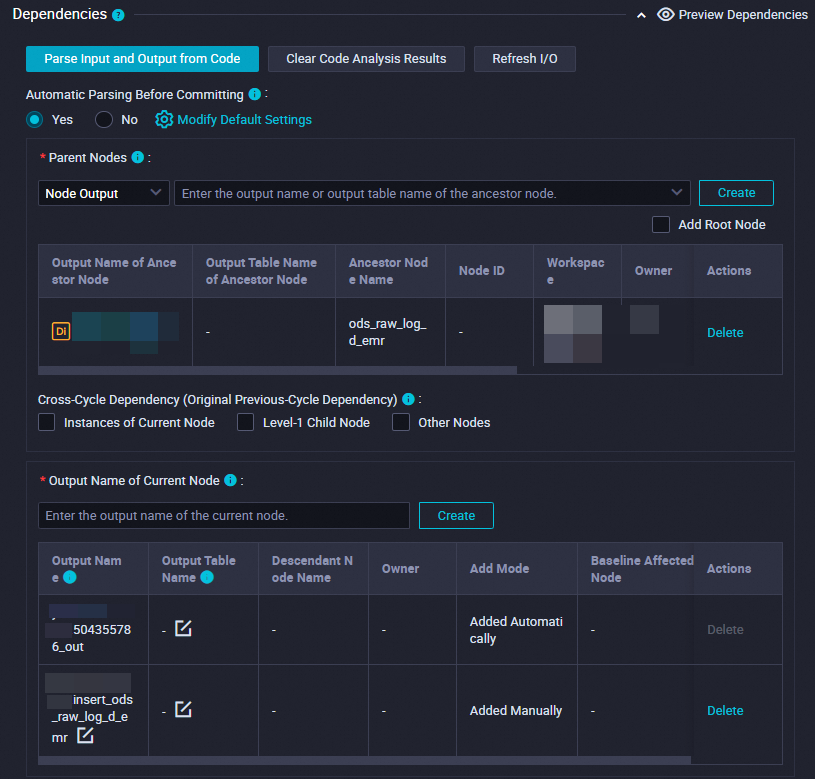
After the configuration is complete, click the
icon.
Step 4: Run the nodes in the workflow and view the results
Run the workflow
On the DataStudio page, double-click the workshop_emr workflow under Business Flow. On the configuration tab of the workflow, click the
 icon in the top toolbar to run the nodes in the workflow based on the scheduling dependencies between the nodes.
 Confirm the status.
View the status of the node.
If nodes are in the
 state, the synchronization process is normal.
 If nodes are in the
 state and the error message
 "java.net.ConnectException: Connection timed out (Connection timed out)"appears, you must add a security group rule in the ECS console, use Port10000of the ECS instance to connect to DataWorks and set Authorization Object to the CIDR block of the vSwitch with which the resource group is associated. You can perform the following steps to obtain the vSwitch CIDR block: Go to the Resource Groups page, find the desired resource group, and click Network Settings in the Actions column. On the VPC Binding tab of the page that appears, obtain the vSwitch CIDR block. For more information about how to add security group rules, see Add a security group rule.
View the node running logs: Right-click the ods_user_info_d_emr or ods_raw_log_d_emr node and select View Logs. If the information shown in the following figure appears in the logs, the node is run and data is synchronized.

Query synchronization results
Create an ad hoc query.
In the left-side navigation pane of the DataStudio page, click the
 icon. In the Ad Hoc Query pane, right-click Ad Hoc Query and choose Create Node > EMR Hive.
 Query synchronization result tables.
Execute the following SQL statements to confirm the data write results. View the number of records that are imported into the ods_raw_log_d_emr and ods_user_info_d_emr tables.
-- In the query statements, change the partition key value to the data timestamp of the node. For example, if the node is run on November 7, 2019, the data timestamp is 20191106, which is one day before the node is run.
SELECT * from ods_user_info_d_emr where dt=Data timestamp;
SELECT * from ods_raw_log_d_emr where dt=Data timestamp;
What to do next
After you understand how to synchronize data based on this tutorial, you can proceed to the next tutorial. In the next tutorial, you will learn how to compute and analyze the synchronized data. For more information, see Process data.