The SAP HANA output component writes data to an SAP HANA data source. When you synchronize data from other sources to SAP HANA, you must configure the target data source settings for the SAP HANA output component.
Prerequisites
An SAP HANA data source is created. For more information, see Create an SAP HANA Data Source.
The account used to configure the SAP HANA output component must have write-through permission for the data source. If you do not have the required permissions, request them. For more information, see Apply for, Renew, and Return Data Source Permissions.
Procedure
Select Development > Data Integration from the top menu bar on the Dataphin home page.
On the integration page's top menu bar, select Project (Dev-Prod mode requires selecting an environment).
In the navigation pane on the left, click on the Batch Pipeline. From the Batch Pipeline list, select the offline pipeline you want to develop to access its configuration page.
To open the Component Library panel, click on Component Library located in the upper right corner of the page.
In the Component Library panel's left-side navigation pane, select Output. Find the SAP HANA component in the list on the right and drag it to the canvas.
Connect the target input component to the SAP HANA output component by clicking and dragging the
 icon.
icon.On the SAP HANA output component, click the
 icon to open the SAP HANA Output Configuration dialog box.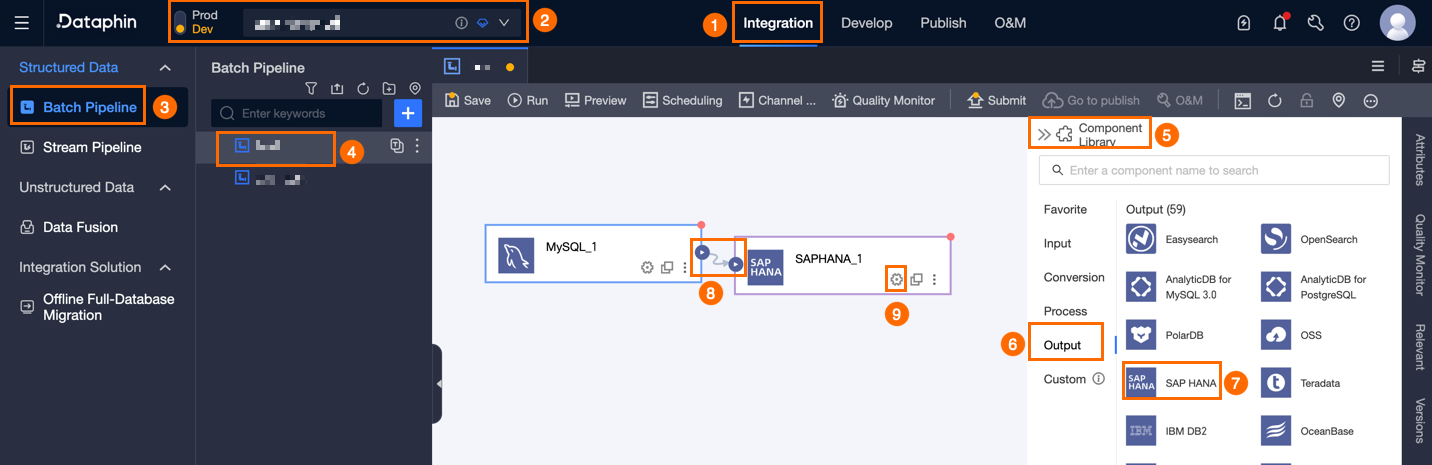
In the SAP HANA Output Configuration dialog box, set the required parameters.
Parameter
Description
Basic Settings
Step Name
The name of the SAP HANA output component. Dataphin automatically generates the step name. You can modify it based on your business scenario. The naming conventions are as follows:
It can only contain Chinese characters, letters, underscores (_), and numbers.
The name can be up to 64 characters in length.
Datasource
The drop-down list displays all SAP HANA data sources, including those with and without write-through permission. Click the
 icon to copy the data source name.
For data sources without write-through permission, click Request next to the data source to request permission. For more information, see Apply for, Renew, and Return Data Source Permissions.
If no SAP HANA data source exists, click the
 icon to create one. For more information, see Create an SAP HANA Data Source.
Schema (optional)
Optional. Select a schema. If you do not select one, the schema with the same name as the user is used by default.
Table
Select the target table for the output data. You can enter a table name keyword to search or enter the exact table name and click Precise Search. After selecting the table, the system will automatically perform a table status check. Click the
 icon to copy the name of the currently selected table.
Loading Policy
Select a loading policy. The following policies are supported:
Append Data: If a primary key or constraint violation occurs, the system reports a dirty data error.
Overwrite Data: If a primary key or constraint violation occurs, the system deletes the original data first and then inserts the new data row.
Batch Write Data Volume (optional)
The data volume written per batch. The system writes data when either this limit or the Batch Write Count is reached first. Default value: 32M.
Batch Write Count (optional)
The maximum number of records written per batch. Default value: 2048 entries. The system uses a batch writing strategy based on both Batch Write Count and Batch Write Data Volume.
When the accumulated data reaches either the batch write data volume or the batch write count limit, the system immediately writes that batch to the destination.
We recommend that you set the batch write data volume to 32 MB. Adjust the batch write count based on the actual size of a single record. A larger value is recommended to maximize batch writing efficiency. For example, if each record is approximately 1 KB, you can set the batch write data volume to 16 MB and the batch write count to a value greater than 16384 (16 MB / 1 KB), such as 20000 entries. With this configuration, a batch write is triggered whenever the accumulated data reaches 16 MB.
Preparation Statement (optional)
An SQL script to run on the database before data import.
For example, to ensure continuous service availability: before the current step writes data, create the target table Target_A and write data to it. After the write completes, rename the active service table Service_B to Temp_C, rename Target_A to Service_B, and then delete Temp_C.
End Statement (optional)
An SQL script to run on the database after data import.
Field Mapping
Input Field
The input fields from the upstream component output.
Output Field
The output fields. You can perform the following operations:
Field Management: Click Field Management to select output fields.
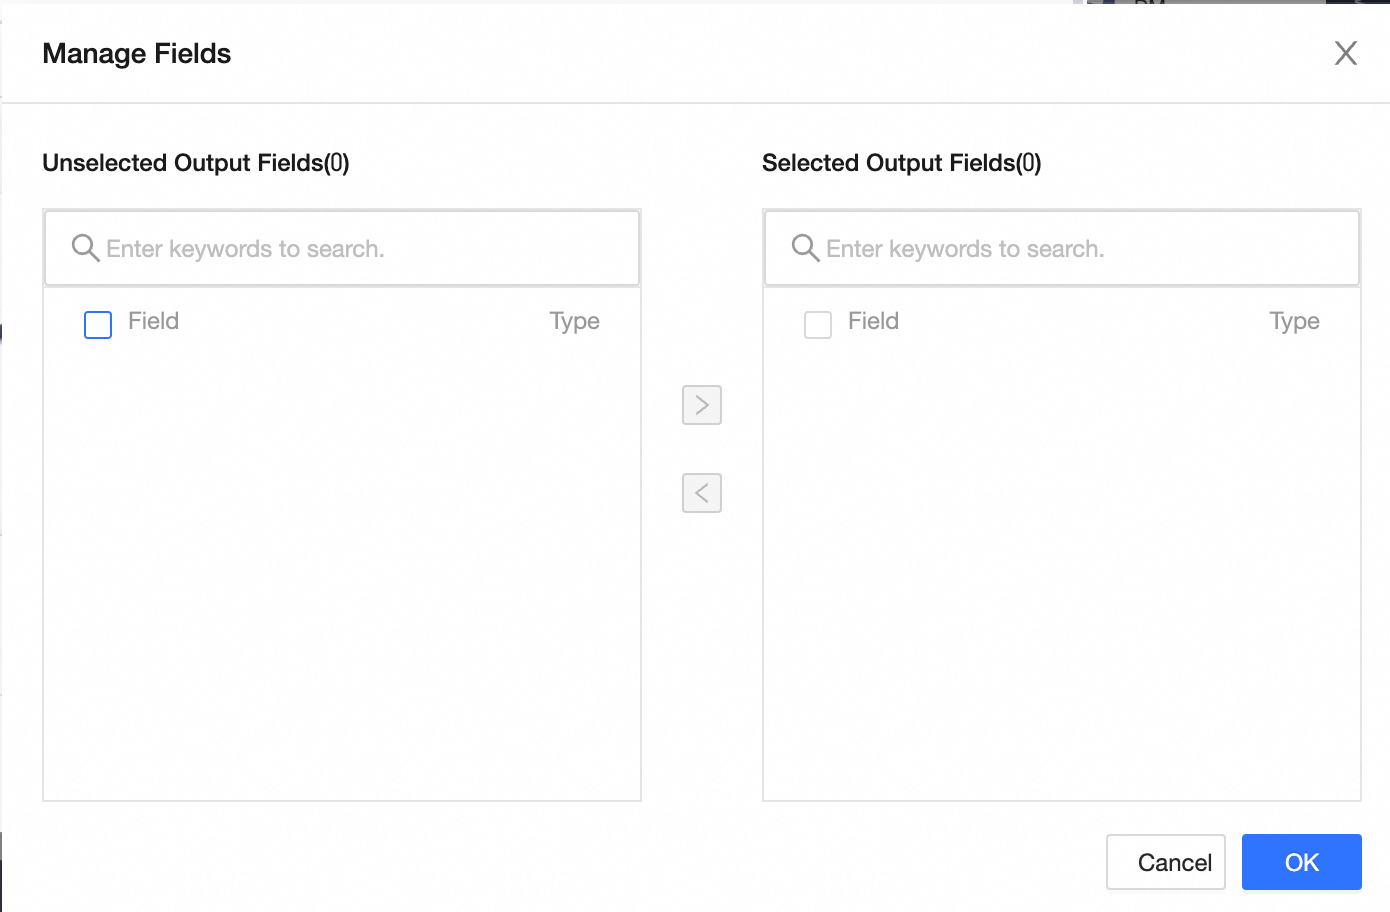
Click the
 icon to move the Selected Input Fields to the Unselected Input Fields.
Click the
 icon to move the Unselected Input Fields to the Selected Input Fields.
Batch Add: Click Batch Add to configure fields in JSON, TEXT, or DDL format.
Batch configuration in JSON format, for example:
// Example: [{ "name": "user_id", "type": "String" }, { "name": "user_name", "type": "String" }]Notename specifies the field name, and type specifies the data type after import. For example,
"name":"user_id","type":"String"imports the user_id field with the String data type.Batch configuration in TEXT format, for example:
// Example:
user_id,String
user_name,String
The row delimiter is used to separate the information of each field. The default is a line feed (\n), and it supports line feed (\n), semicolon (;), or period (.).
The column delimiter is used to separate the field name and field type. The default is a comma (,).
Batch configuration in DDL format, for example:
CREATE TABLE tablename (
    id INT PRIMARY KEY,
    name VARCHAR(50),
    age INT
);
Create Output Field: Click +create Output Field, fill in the Column and select the Type according to the page prompts. After completing the configuration of the current row, click the
 icon to save.
Quick Mapping
You can manually map fields between the upstream input and the target table. Quick Mapping supports Row Mapping and Name Mapping.
Name Mapping: Maps fields that have the same name in the source and target tables.
Row Mapping: Maps fields by row position when the field names in the source and target tables are different. Only the fields of the same row are mapped.
Click Confirm to save the SAP HANA Output Component configuration.