X-Analysis integrates with large AI model platforms, such as Alibaba Cloud Model Studio and DeepSeek. You can use natural language to ask questions, find required data assets, obtain ideas for SQL analysis, and view SQL examples. This topic describes how to use the X-Analysis assistant.
Prerequisites
You must purchase the X-Analysis and Asset Operation features to use X-Analysis.
The X-Analysis assistant is configured and enabled. For more information, see AI applications.
An analysis album is created and enabled. For more information, see Create and manage analysis albums.
Limits
You can use X-Analysis with Dataphin tables that use the following compute engines: MaxCompute, E-MapReduce 3.X, E-MapReduce 5.X, CDH 5.X, CDH 6.X, AsiaInfo DP 5.3, Cloudera Data Platform 7.x, FusionInsight 8.X, Transwarp TDH, Transwarp ArgoDB, AnalyticDB for PostgreSQL, and StarRocks. You can also use it with data source tables that support data preview.
Permissions
Super administrators, system administrators, operation administrators, and custom global roles with the X-Analysis-View permission can use the X-Analysis console.
Users with usage permissions can view the data assets, business knowledge, prompts, and conversation history of an album. Users with the Analysis Album-Manage permission can modify album configurations.
Procedure
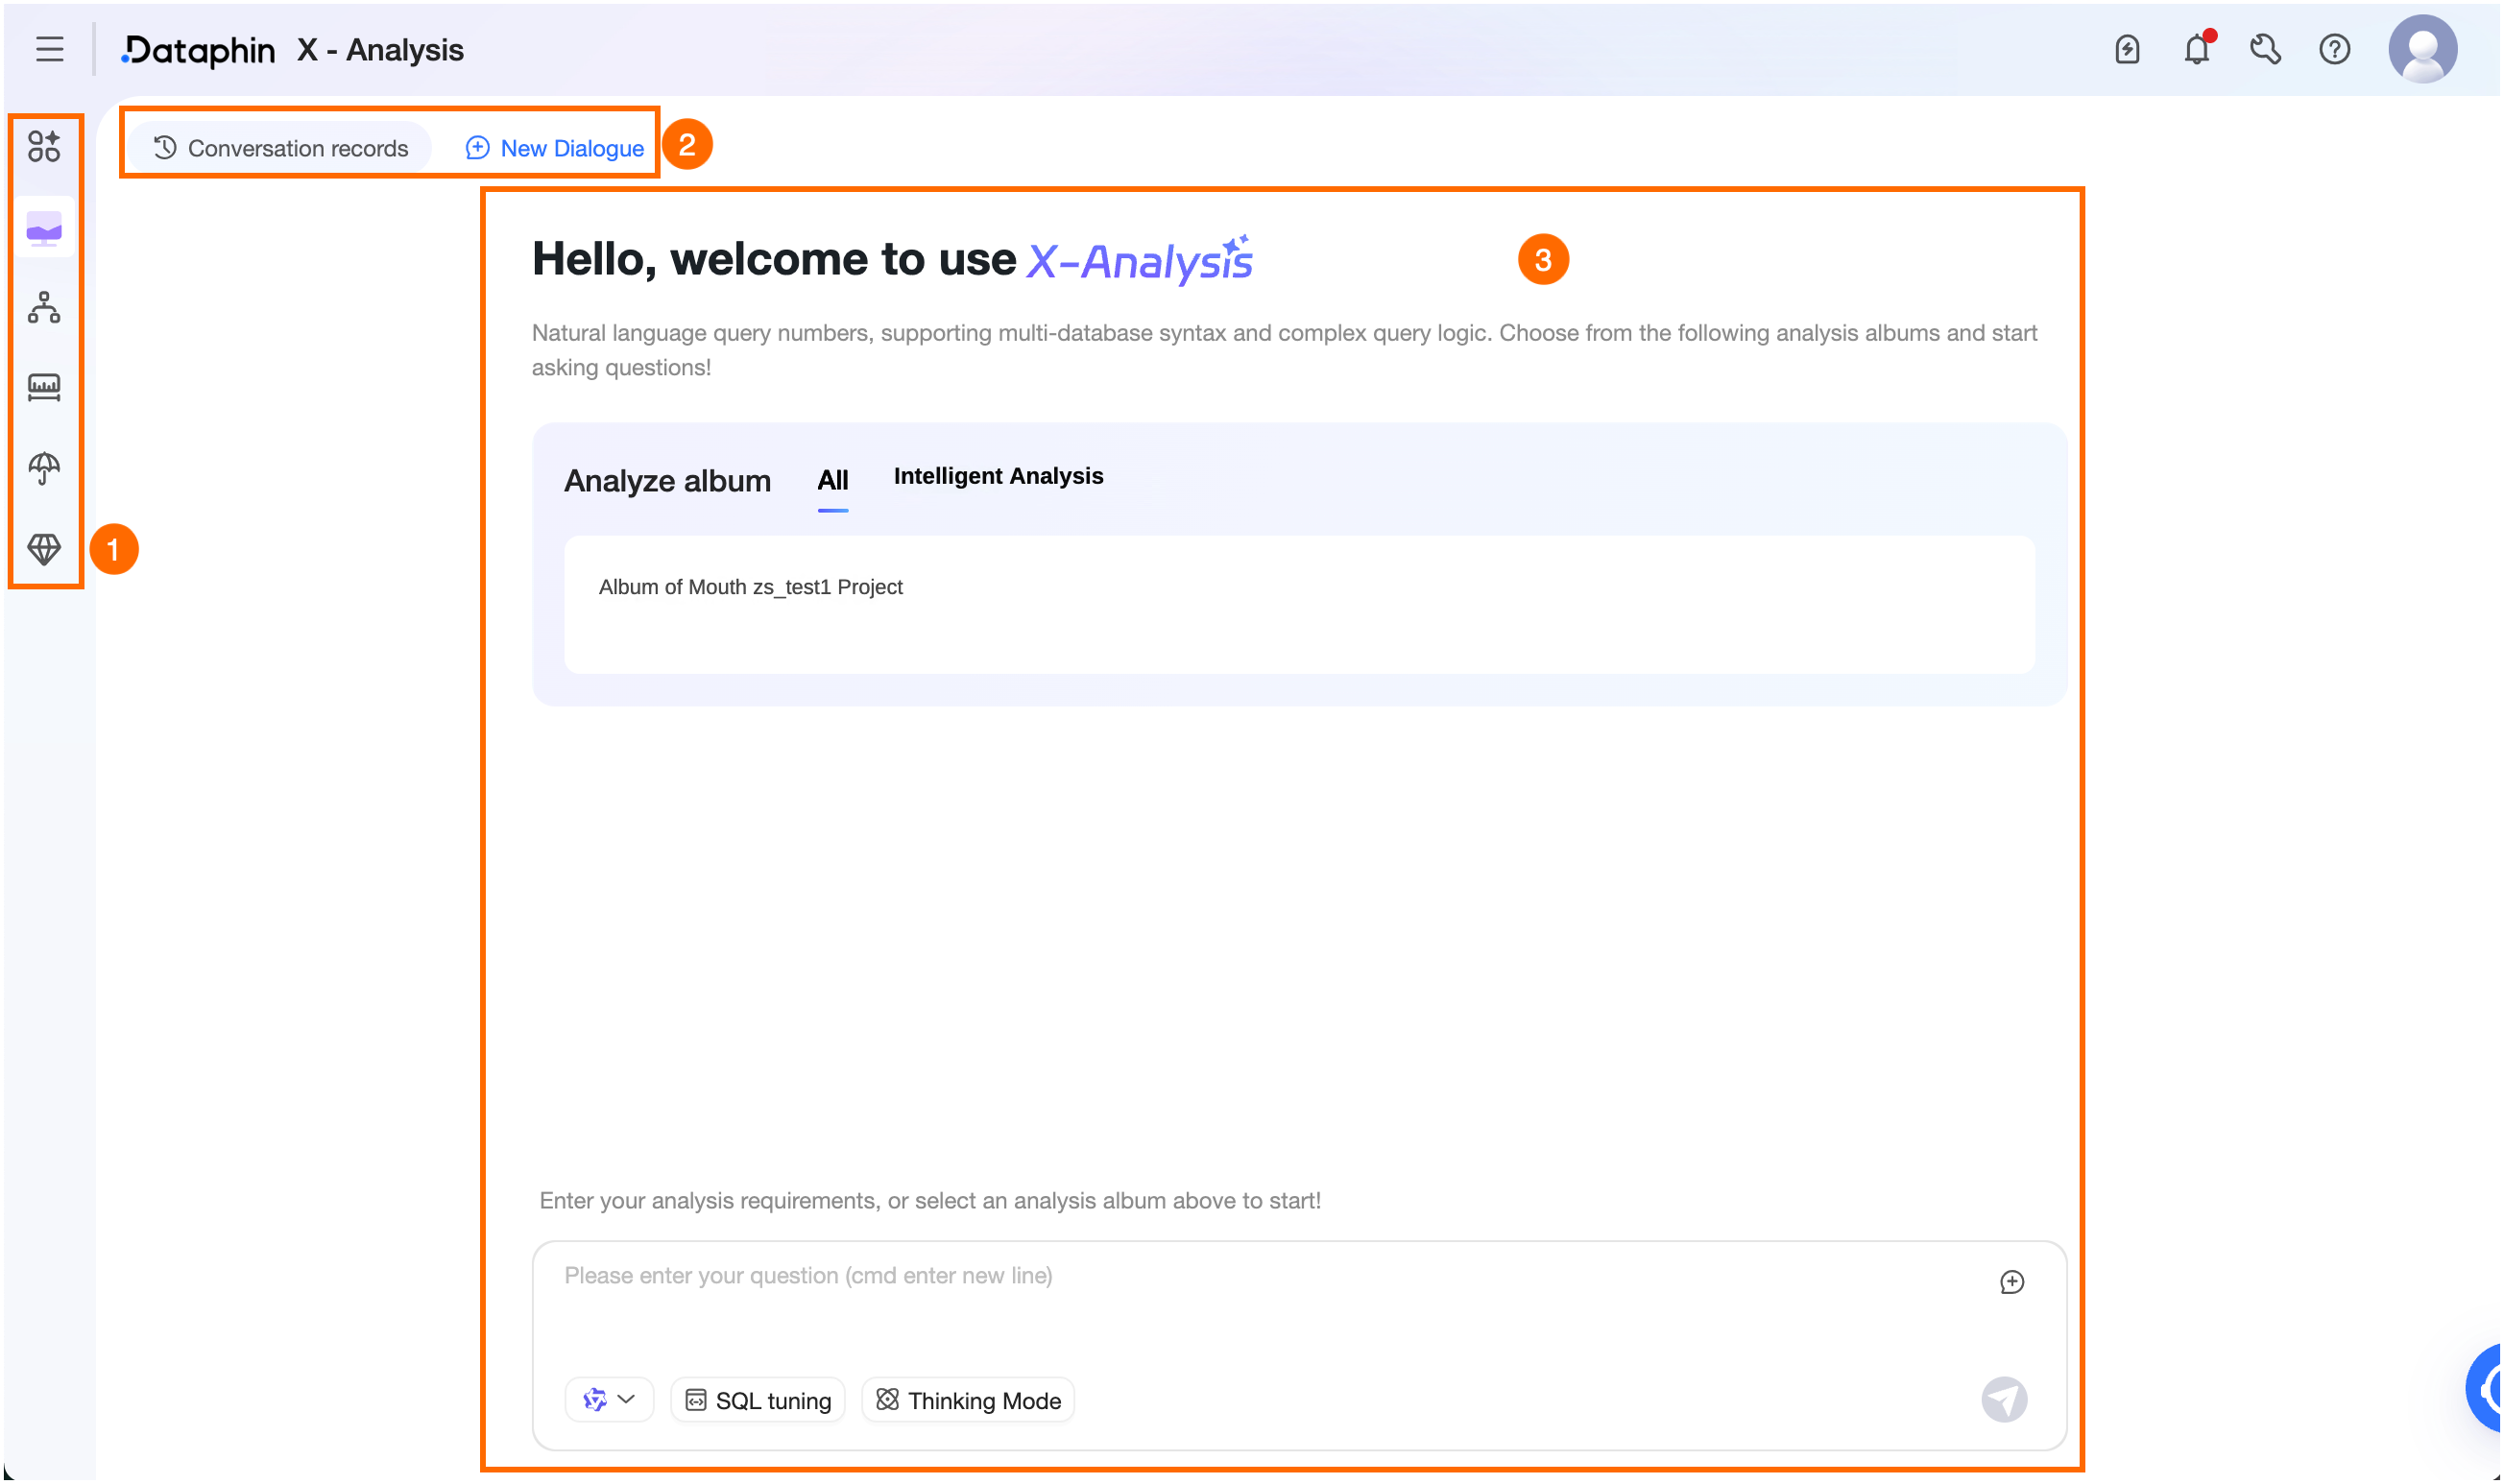
In the top menu bar of the Dataphin home page, choose Super X > X-Analysis to open the X-Analysis page.
On the X-Analysis page, select an album to start an AI chat.
Area
Description
①AI Assistant
Switch between enabled assistants that you have permission to use.
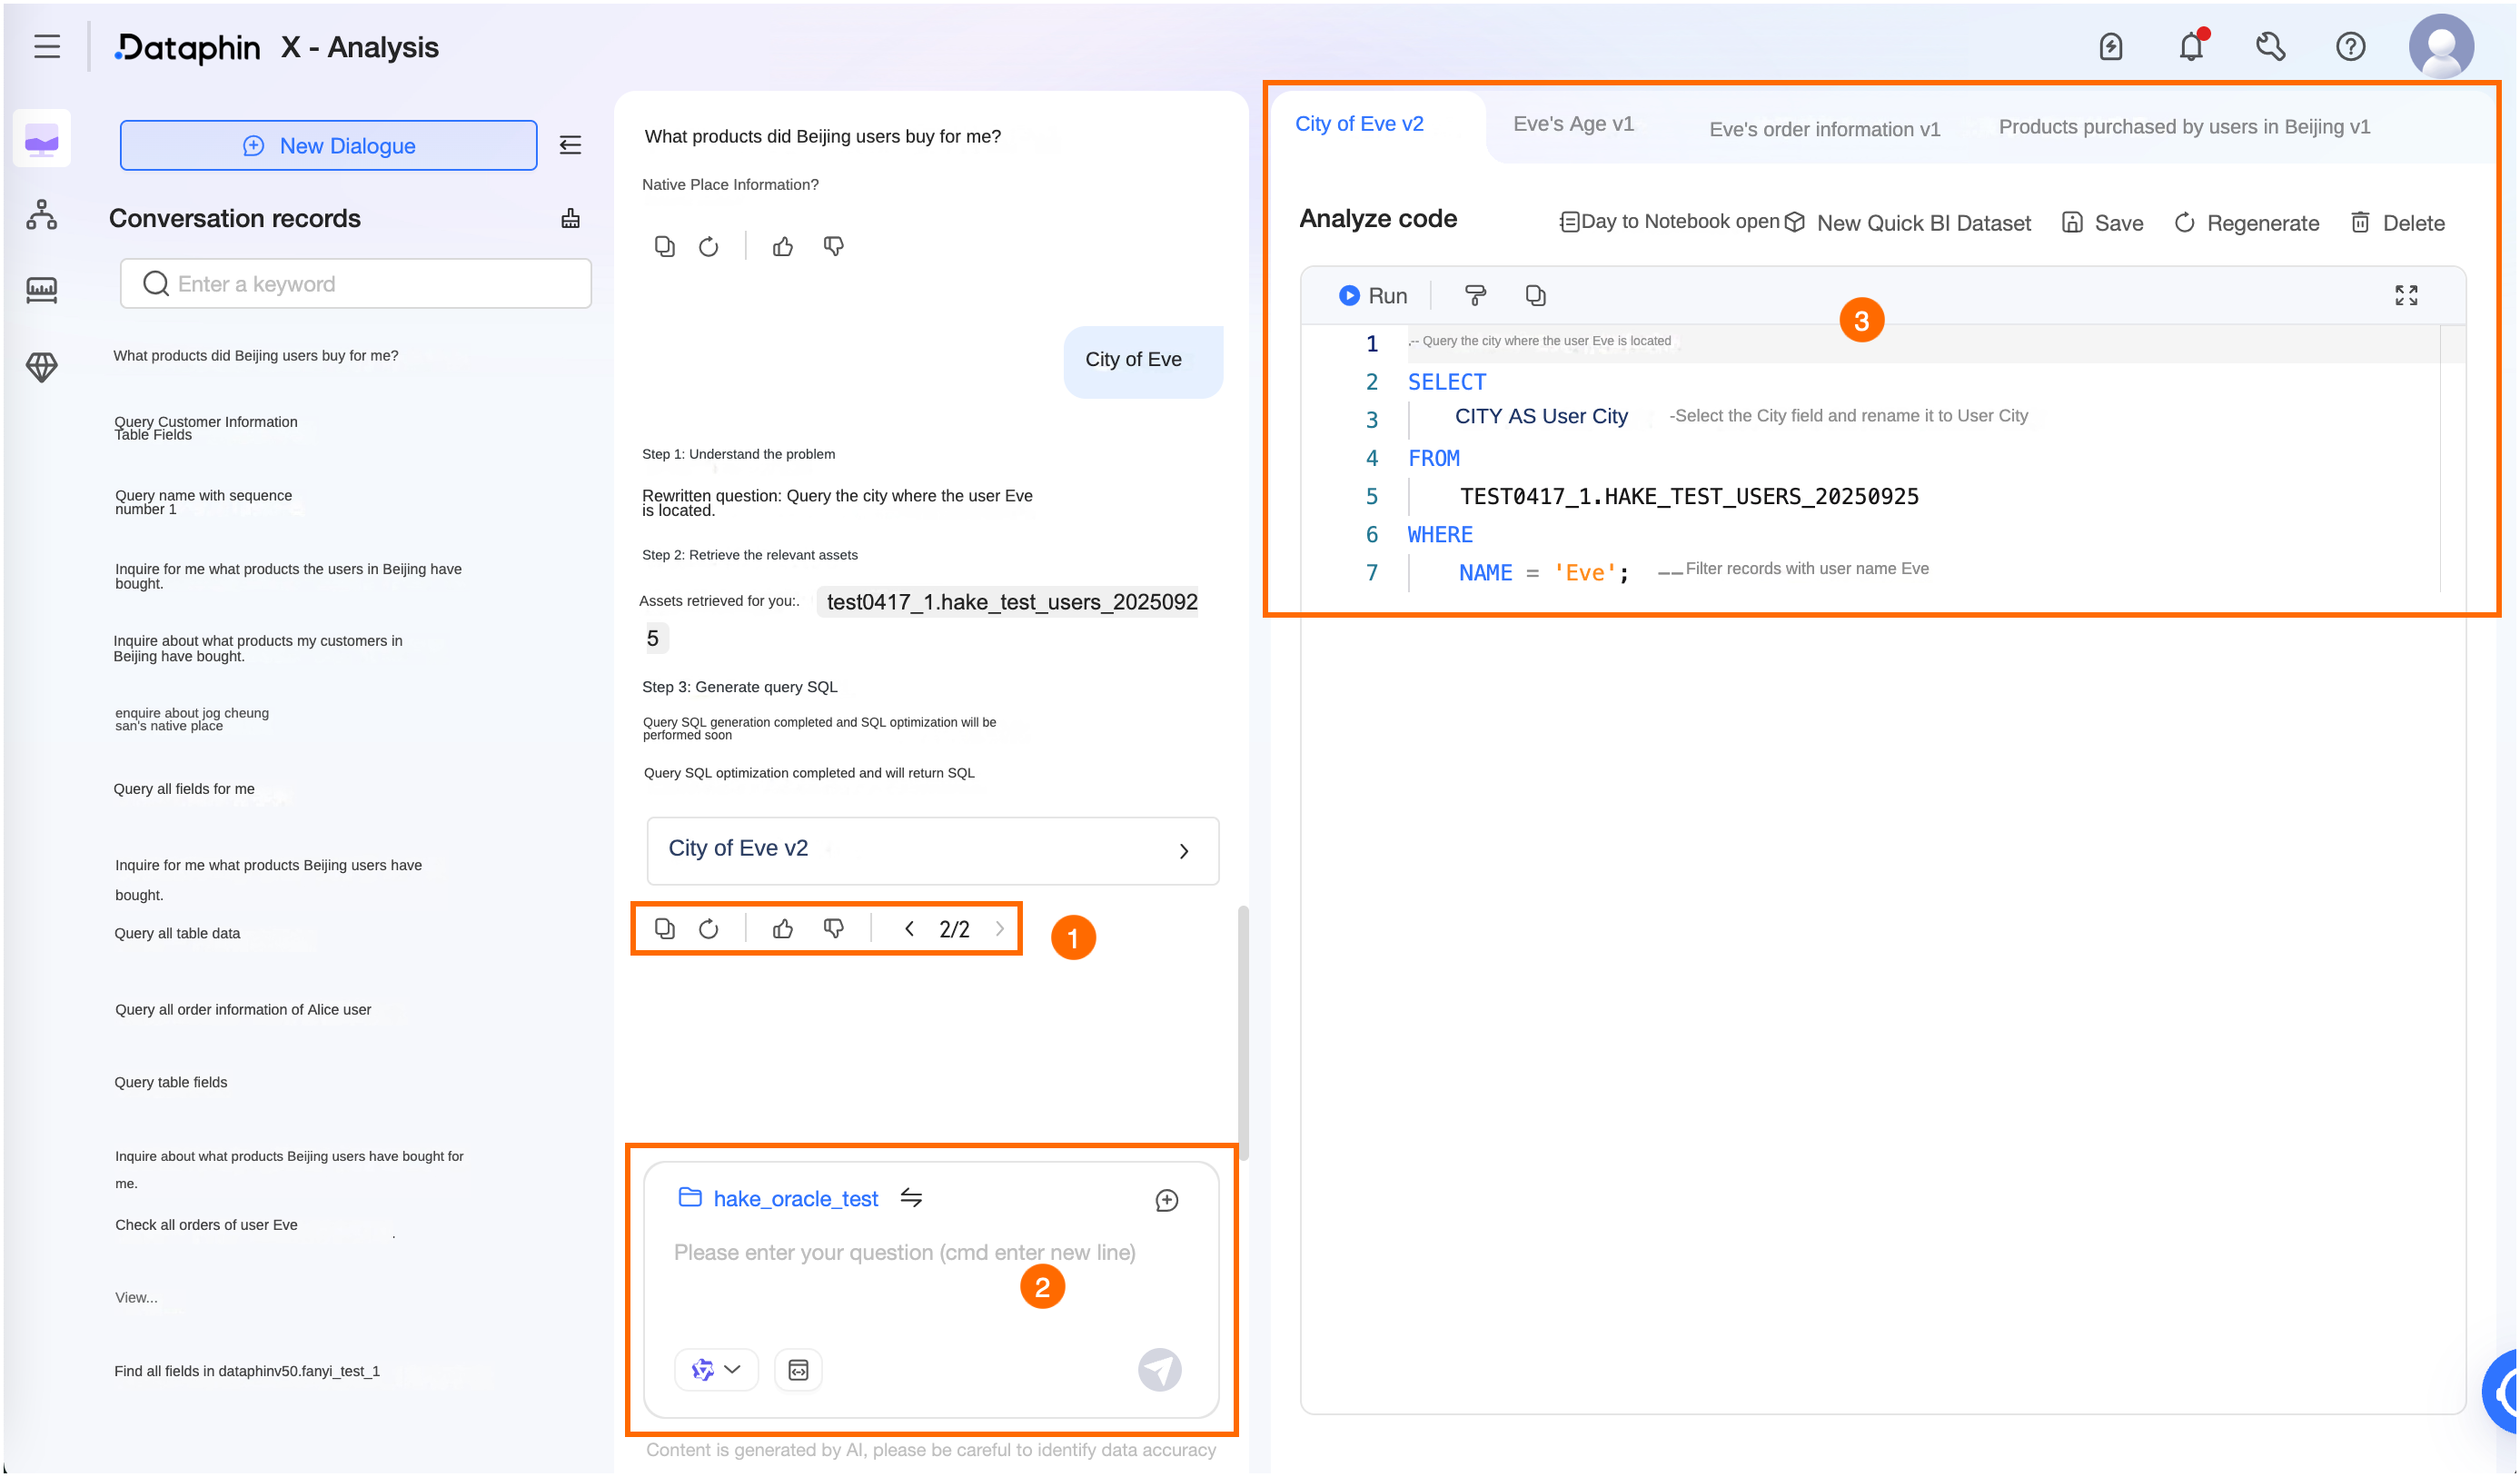
②Conversation History/New Conversation
Conversation History: Click Conversation History in the upper-left corner. In the Conversation History dialog box, view the 20 most recent conversations for an album and do the following:
Search: Search for conversation records by title keyword.
Rename: Click the Rename icon next to a conversation record name to rename it. The name can be up to 256 characters long.
Delete: Click the Purge icon next to the search box to delete all conversation records. You can also click the Delete icon next to a conversation record name or Delete at position ③ to delete a single conversation record.
New Conversation: Click New Conversation in the upper-left corner to start a new conversation.
③AI Chat
Select an analysis album. You can select any enabled album that you have permission to use. Hover over an album and click Details to view its information. If the album has sample questions, click one to ask it. You can also type a question in the dialog box.
Enter a question in the dialog box. The AI provides an answer based on the selected album. If no album is selected, the first album in the current group is used. The following operations are available.
Q&A page overview: Click a result set from the AI's answer. The results appear on the right. You can execute the SQL, copy the SQL, or perform other operations on the result. On the left, you can continue the AI chat. If you click a conversation in the Conversation History, the right pane automatically shows the Q&A and results for that conversation.
Position ①
Copy: Copies the content of the conversation.
Regenerate: Click the Regenerate icon, or click Regenerate at position ③. The model rethinks the current question based on the context and the selected album, and then returns a new result.
Like/Dislike: Click to like or dislike, or to remove your feedback. After you click Dislike, the We Value Your Feedback dialog box appears. You can enter custom feedback up to 512 characters long, or select from built-in feedback options.
You can view feedback records in Super X > AI Application Management > Feedback History to track follow-up actions.
Pagination: After a result is regenerated, click the arrows to page through multiple regenerated results. The system automatically switches to the corresponding thought process and result.
Position ②
Switch Album: Click the Switch icon next to the album name to select a different album for the AI chat. You can switch to any enabled album for which you have permissions.
View Album Details: Click the album name, or on the X-Analysis home page, hover over an analysis album and click Details. You can view the album's data assets, business knowledge, prompts, resources, permissions, and conversation history. You can also modify the album information. For more information, see Create and manage analysis albums.
Data Assets: Filter data tables by data source. Select a data table from the list on the left. The right side shows the field names and associated entities for the current table. This information is shown only if the field has an associated entity. The system identifies fields that are dimensions, metrics, or statistical dates. You can also do the following with the data table.
Data Preview: Hover over a data table name, click More, and select Data Preview. Or, click the Data Preview button to preview the result data. You must have data query permission for the table to use the data preview feature. The preview shows only the results for fields for which you have SELECT permission. You can preview the first 50 data records.
Data Profile: Hover over a data table name, click More, and select Data Profile. Or, click the Data Profile button to go to the Data Profiling tab for the table on the Asset Details page in Asset Catalog. There, you can view the data profiling results and report.
Remove From Album: This operation is available to users with the analysis album management permission. Hover over a data table name, click More, and select Remove From Album to remove the table from the current album.
Natural Language: Only text input is supported. The maximum length is 2,000 characters.
Switch Model: Switch between the models configured for the current AI assistant to conduct the AI chat.
SQL Tuning: Disabled by default. When enabled, it optimizes the generated results or generates multiple candidate SQL statements.
Optimize Generated Results: When enabled, the system tunes the generated SQL to improve code accuracy. This may take some time to return a result. Please wait.
Generate Multiple Candidate SQL Statements: When enabled, the system generates a configured number of candidate SQL statements, compares them, and returns the best result. You can configure it to generate 2 to 5 candidate SQL statements. Generating multiple candidates helps improve SQL accuracy, but it may take some time to return a result. Please wait.
Thinking Mode: Support for this mode depends on the selected model. Click to enable or disable Thinking Mode. When enabled, you can see the model's thought process in the conversation. For a list of supported built-in models, see Supported built-in models for AI applications.
Hover over an asset retrieved during the model's thought process to view a summary of the data table. This information is the same as the field information displayed on the Data Assets tab of the album.
Send: Press Enter or click the Send icon to trigger a response.
Stop: Click to stop the answer generation process.
Position ③
Switch Result: Switch to view the results for different questions.
Open in Notebook: Users with the Analysis Platform-View permission can click this to go to the Analysis > Notebook page. There, you can create a new Notebook node to execute and analyze SQL. For more information, see Create a Notebook.
Create As Quick BI Dataset: Quickly create a Quick BI SQL dataset from the generated SQL. This lets you directly perform operations in Quick BI, such as AI-powered data exploration and report building. Click Create As Quick BI Dataset, configure the parameters in the dialog box, and click OK. The system then validates the configuration. If the configuration is valid, the dataset creation process starts, which includes creating a new data source and a new dataset. After the process is complete, you are automatically redirected to the dataset editing page on the Quick BI platform to perform more operations. For more information, see Dataset Management.
Application System: Defaults to the first Quick BI application system enabled for asset consumption on the Application System page under Management Center > Data Source Management.
Workspace: You can select a workspace in the associated application system if you have management permissions for it. To create a workspace, see Create and Manage Workspaces.
Dataset Name: Enter a name for the dataset. You can use this name to find the dataset in the Quick BI platform. The name can contain numbers, letters, Chinese characters, hyphens (-), forward slashes (/), underscores (_), periods (.), and commas (,). It can be up to 100 characters long and cannot contain spaces.
NoteTo create a Quick BI dataset, the following conditions must be met:
The asset consumption feature is enabled for the current tenant, and a Quick BI application system with an enabled consumption channel exists.
If the data source is Dataphin, the supported compute engines are MaxCompute, E-MapReduce 3.X, E-MapReduce 5.X, CDH 5.X, CDH 6.X, AsiaInfo DP 5.3, Cloudera Data Platform 7.x, FusionInsight 8.X, and AnalyticDB for PostgreSQL.
If the data source is a generic data source, see Operations supported by different types of data sources for a list of supported data sources.
Save: Saves the latest version of the modified code.
Execution: You can perform this operation only when data retrieval for execution is enabled for the current collection. Click Run SQL to preview the execution results below and download sample data from successful executions.
If the code uses parameter variables, you can assign values to them in the Parameter Checking dialog box. When the node is scheduled, the parameter variables are automatically replaced with their corresponding values. For configuration instructions, see Configure runtime parameters for offline tasks.
SQL Content: Hover over a field name to view its basic information. Hover over a table name to view its DDL structure. Click to view details and go to the Object Details page in Asset Checklist to see more field information for the table.
Hover over an SQL error. Click Quick Fix to use the editor's built-in repair feature. Click AI Fix to use the large model's repair capabilities, as described in the AI Fix section below.
Format: Formats the SQL structure with a single click.
Copy: Quickly copies the SQL statement for easy modification.
Full Screen: Views the SQL statement in full screen.
If SQL execution fails, you can view logs, use AI Fix, or retry the execution.
View Log: Click the View Log button to view the log information for the failed SQL execution.
AI Fix: Click the AI Fix button. The system uses its large model capabilities to analyze the error message and regenerate the SQL. The new SQL is fixed according to the syntax of the data source configured for the current album.
Retry: Click the Retry button to run the SQL again.