The FTP Output Widget writes data to an FTP data source. When synchronizing data from other sources to FTP, you must configure the target data source for the FTP Output Widget after setting up the source data source.
Prerequisites
An FTP data source is created. For more information, see Create FTP Data Source.
The account used to configure FTP output widget properties must have read-through permission for the data source. If you do not have permission, request access. For more information, see Apply for, Renew, and Return Data Source Permissions.
Procedure
On the Dataphin home page, navigate to the top menu bar and select Development > Data Integration.
On the integration page, use the top menu bar to select Project (Dev-Prod mode requires selecting Environment).
In the navigation pane on the left, click on the Batch Pipeline. From the Batch Pipeline list, select the offline pipeline you want to develop to access its configuration page.
To open the Component Library panel, click Component Library at the top right corner of the page.
In the Component Library panel's left-side navigation pane, select Output. Then, in the right-hand list, find the FTP widget and drag it onto the canvas.
Connect the FTP output widget to the target input, transform, or flow widget by clicking and dragging the
 icon.
icon.On the FTP output widget card, click the
 icon to open the FTP Output Configuration dialog box.
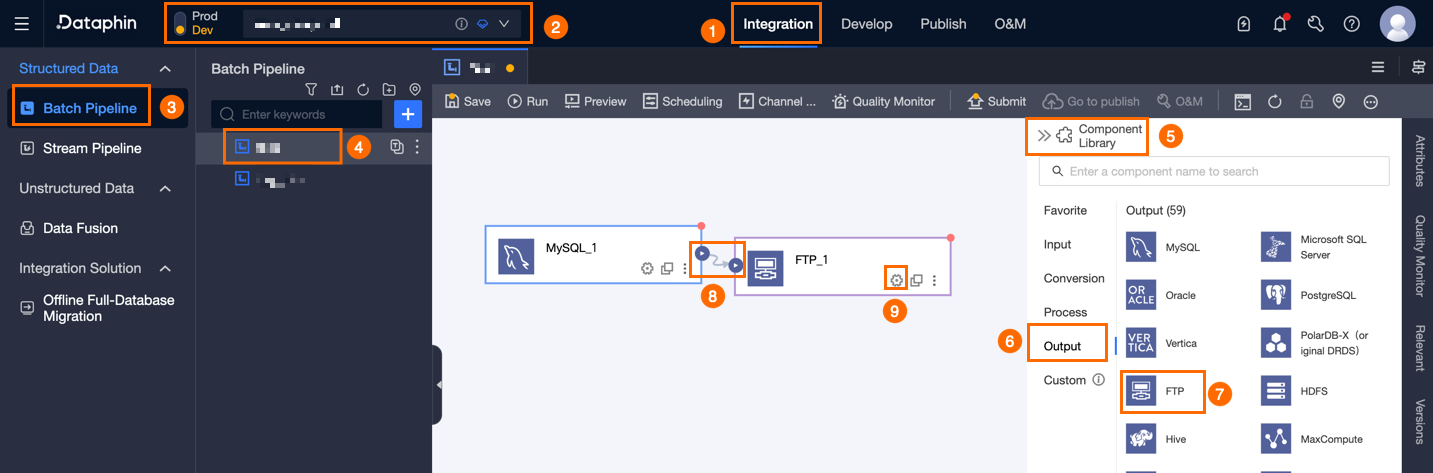
In the FTP Output Configuration dialog box, set the necessary parameters.
Parameter
Description
Basic Settings
Step Name
The name of the FTP output widget. Dataphin generates a default step name, which you can modify as needed. The naming convention is as follows:
Can only contain Chinese characters, letters, underscores (_), and numbers.
Cannot exceed 64 characters.
Datasource
The drop-down list displays all FTP-type data sources, including those with and without write-through permission.
For data sources without write-through permission, click Request next to the data source to request permission. For more information, see Apply for, Renew, and Return Data Source Permissions.
If no FTP-type data source exists, click Create to create one. For more information, see Create FTP Data Source.
File Path
Enter the file storage path. You can obtain this path from the FTP client or FTP server.
File Type
Select the file format for storing the output data. Supported types: Text and CSV.
File Encoding
Select the encoding for the output file. Supported encodings: UTF-8 and GBK.
Loading Policy
The policy for writing data to the FTP data source. Available policies: Overwrite Data, Append Data, and File Name Conflict Error:
Append Data: Adds new data files to the target directory with a random UUID suffix to avoid file name conflicts.
Overwrite Data: Deletes files with conflicting names in the directory before writing new data files.
File Name Conflict Error: Reports an error at runtime if files with conflicting names exist in the directory.
Number Of Files To Write
Write to a single file or multiple files.
Single File: Writes all data into a single file on the target FTP.
Multiple Files: Writes data to multiple files. The number of files equals the task concurrency. A sequence suffix such as
_1,_2,_3, or a random UUID suffix is appended to each filename. If task concurrency is set to 1, selecting multiple files still adds a_1suffix or a random UUID suffix.
Suffix Format
When multiple files are generated, select the suffix format: Sequence Suffix or UUID Random Suffix.
ImportantWhen the loading policy is set to append data, only UUID random suffixes can be generated.
Advanced Settings
Row Delimiter (optional)
Enter the delimiter between rows. Multi-character delimiters are supported. If left empty, the system defaults to the line feed character (\n).
Field Delimiter (optional)
Enter the delimiter between fields. Multi-character delimiters are supported. If left empty, the system defaults to a comma (,).
Export Compressed File
Select a compression format: zip, gzip, or Do Not Compress, Directly Export In The Selected File Type. When a compression format is selected, the output file is compressed and written to FTP in that format.
Export Column Header
Select whether to export the column header:
If selected, the field name is output in the first row of each file.
If not selected, the first row of the file is data.
Compress File Path (optional)
When Number of Files to Write is Single File and Export Compressed File is set to
zip, you can choose whether to include the file path in the compressed package. In other scenarios, only the file itself is compressed without the path.Mark Completion File
Specify whether to generate a completion marker file. Marker file levels include Task Level and File Level:
Task level: Generates a single marker file after the task completes. For example,
/ftpuser/test/SUCCESS.File level: Uses the asterisk (
*) as a placeholder for the data file name. For example,/ftpuser/test/*.flgcreates a marker file with the same name as each data file.
When Required is selected, you must also configure Mark Completion File Content. The available file information parameters are:
File name:
$filename.File name with path:
$filenamewithpath.File size:
$filesize.Row count:
$rowcount.Pipeline-level parameters are also supported. You can choose the required parameters and delimiters. In a task-level marker file, the information of each file is written line by line.
Null Value Conversion (optional)
The string that represents null.
Field Mapping
Input Field
The field read from the upstream input widget.
Output Field
Configure the output fields. Dataphin supports the following methods:
Batch Add: Click Batch Add to support batch configuration in JSON or TEXT format.
Batch configuration in JSON format, for example:
// Example: [{"name": "user_id","type": "String"}, {"name": "user_name","type": "String"}]Note`name` is the name of the imported field. `type` is the data type of the imported field. For example,
"name":"user_id","type":"String"imports the field named `user_id` and sets its data type to `String`.Batch configuration in TEXT format, for example:
// Example:
user_id,String
user_name,String
The row delimiter is used to separate the information of each field. The default is a line feed (\n). Supports line feed (\n), semicolon (;), and period (.).
The column delimiter is used to separate the field name and field type. The default is a comma (,).
Create New Output Field.
Click +create New Output Field and fill in Column and select Type according to the page prompts.
Copy Upstream Field.
Click Copy Upstream Field. The system automatically generates output fields based on the upstream field names.
Manage Output Field.
You can perform the following operations on added fields:
Click the Actions column
 icon to edit the existing fields.
Click the Actions column
 icon to delete the existing field.
Mapping
Maps input fields from the source table to output fields of the target table for data synchronization. Available mapping modes:
Same-name Mapping: Maps fields that share the same field name.
Same-row Mapping: Maps fields by row position when field names differ between the source and target tables.
Click Confirm to finalize the FTP Output Widget configuration.